C++ Journey: Core Principles to Modern Features
By Sagar Kumar Madala
A comprehensive guide from basics to advanced concepts
Data Types, Variables, and Input/Output in C++
Table of Contents
- Introduction
- Variables - Your Data Containers
- Data Types in C++
- Input and Output
- Choosing the Right Data Type
- Common Mistakes and Best Practices
Introduction
Think of C++ programming like cooking. Before you start cooking, you need containers (variables) to store your ingredients (data), and you need to know what type of container to use - you wouldn’t store soup in a sieve! Similarly, in C++, we need to understand what kind of data we’re working with and choose the appropriate “container” for it.
Variables - Your Data Containers
What is a Variable?
A variable is a named storage location in your computer’s memory that holds a value. Think of it as a labeled box where you can store information and retrieve it later.
Variable Declaration Syntax
dataType variableName = value;
Example:
int age = 25;           // 'int' is the type, 'age' is the name, '25' is the value
double price = 19.99;   // Storing a decimal number
char grade = 'A';       // Storing a single character
Variable Naming Rules
Allowed:
- Start with a letter (a-z, A-Z) or underscore (_)
- Contain letters, digits, and underscores
- Examples:
age,student_name,price2,_count
Not Allowed:
- Start with a digit:
2names - Contain spaces:
student name - Use C++ keywords:
int,return,class - Special characters:
price$,name@
Best Naming Practices
// Good - descriptive names
int studentAge = 18;
double accountBalance = 1500.50;
char firstInitial = 'J';

// Bad - unclear names
int x = 18;      // What does x represent?
double a = 1500.50;  // What is 'a'?
char c = 'J';    // What does 'c' mean?
Data Types in C++
C++ has several built-in data types. Let’s explore each category:
1. Integer Types (Whole Numbers)
These store whole numbers without decimal points.
Important Note: The size of integer types can vary depending on your platform (32-bit vs 64-bit system, compiler, operating system). The table below shows typical sizes, but always verify on your system using sizeof().
| Type | Typical Size | Typical Range | When to Use |
|---|---|---|---|
short | 2 bytes | -32,768 to 32,767 | Small numbers, save memory |
int | 4 bytes (most common) | -2,147,483,648 to 2,147,483,647 | General purpose counting, IDs, ages |
long | 4 or 8 bytes* | Platform dependent | Large calculations, timestamps |
long long | 8 bytes (guaranteed) | Very large numbers | Scientific calculations, guaranteed 64-bit |
*Note: long is 4 bytes on Windows (32/64-bit) and most 32-bit systems, but 8 bytes on 64-bit Linux/Mac.
Examples:
int studentCount = 30;           // Number of students in class
short temperature = -15;         // Temperature in Celsius
long worldPopulation = 8000000000L;  // World population
long long distanceToSun = 149600000000LL;  // Distance in meters
Unsigned Integers (Only Positive Numbers)
If you know your number will never be negative, use unsigned to double the positive range:
unsigned int age = 25;           // Age is never negative
unsigned short score = 100;      // Score is always positive
unsigned long fileSize = 5000000;  // File sizes are positive
2. Floating-Point Types (Decimal Numbers)
These store numbers with decimal points.
| Type | Typical Size | Precision | When to Use |
|---|---|---|---|
float | 4 bytes | ~7 decimal digits | Basic decimals, graphics |
double | 8 bytes | ~15 decimal digits | Scientific calculations (MOST COMMON) |
long double | 8-16 bytes* | ~19 decimal digits | Extreme precision needed |
*Note: long double size varies: 8 bytes (some systems), 12 bytes (Linux x86), 16 bytes (some 64-bit systems).
Examples:
float pi = 3.14159f;              // 'f' suffix for float
double accountBalance = 1234.56;  // Most commonly used
double scientificValue = 3.14159265358979;
long double preciseValue = 3.141592653589793238L;
💡 Key Point: Use double by default for decimal numbers. Only use float if memory is critical (like in games with thousands of objects).
3. Character Type
Stores a single character enclosed in single quotes ' '.
char grade = 'A';
char symbol = '$';
char digit = '5';        // This is a character, not a number!
char newline = '\n';     // Special character for new line
Special (Escape) Characters:
'\n'  // New line
'\t'  // Tab
'\\'  // Backslash
'\''  // Single quote
'\"'  // Double quote
4. Boolean Type
Stores only two values: true or false.
bool isStudent = true;
bool hasLicense = false;
bool isPassing = (grade >= 60);  // Result of comparison
💡 Use Case: Perfect for yes/no situations, flags, conditions.
5. String Type (Text)
Stores sequences of characters (words, sentences). Note: You need to include <string> header.
#include <string>

string name = "John Doe";
string message = "Hello, World!";
string empty = "";           // Empty string
String vs Char:
char singleLetter = 'A';      // Single character - single quotes
string word = "A";            // String - double quotes
string fullName = "Alice";    // Multiple characters
Checking Data Type Sizes
Since data type sizes can vary by platform, C++ provides the sizeof() operator to check the actual size on your system.
The sizeof() Operator
#include <iostream>
#include <string>
using namespace std;

int main() {
    cout << "=== Data Type Sizes on This System ===" << endl;
    cout << "Note: Size is shown in bytes (1 byte = 8 bits)\n" << endl;

    // Integer types
    cout << "INTEGER TYPES:" << endl;
    cout << "short          : " << sizeof(short) << " bytes" << endl;
    cout << "int            : " << sizeof(int) << " bytes" << endl;
    cout << "long           : " << sizeof(long) << " bytes" << endl;
    cout << "long long      : " << sizeof(long long) << " bytes" << endl;
    cout << "unsigned int   : " << sizeof(unsigned int) << " bytes" << endl;

    // Floating-point types
    cout << "\nFLOATING-POINT TYPES:" << endl;
    cout << "float          : " << sizeof(float) << " bytes" << endl;
    cout << "double         : " << sizeof(double) << " bytes" << endl;
    cout << "long double    : " << sizeof(long double) << " bytes" << endl;

    // Character and boolean
    cout << "\nCHARACTER & BOOLEAN:" << endl;
    cout << "char           : " << sizeof(char) << " bytes" << endl;
    cout << "bool           : " << sizeof(bool) << " bytes" << endl;

    // String (note: string size varies based on content)
    cout << "\nSTRING:" << endl;
    string emptyStr = "";
    string shortStr = "Hi";
    string longStr = "This is a longer string";
    cout << "string (empty) : " << sizeof(emptyStr) << " bytes (object overhead)" << endl;
    cout << "string (short) : " << sizeof(shortStr) << " bytes (same overhead)" << endl;
    cout << "string (long)  : " << sizeof(longStr) << " bytes (same overhead)" << endl;
    cout << "Note: String object has fixed size; actual text stored separately" << endl;

    // You can also check variable sizes
    cout << "\n=== Checking Variable Sizes ===" << endl;
    int myAge = 25;
    double myHeight = 5.9;
    char myGrade = 'A';

    cout << "int myAge      : " << sizeof(myAge) << " bytes" << endl;
    cout << "double myHeight: " << sizeof(myHeight) << " bytes" << endl;
    cout << "char myGrade   : " << sizeof(myGrade) << " bytes" << endl;

    return 0;
}
Sample Output (may vary on your system):
=== Data Type Sizes on This System ===
Note: Size is shown in bytes (1 byte = 8 bits)

INTEGER TYPES:
short          : 2 bytes
int            : 4 bytes
long           : 8 bytes
long long      : 8 bytes
unsigned int   : 4 bytes

FLOATING-POINT TYPES:
float          : 4 bytes
double         : 8 bytes
long double    : 16 bytes

CHARACTER & BOOLEAN:
char           : 1 bytes
bool           : 1 bytes

STRING:
string (empty) : 32 bytes (object overhead)
string (short) : 32 bytes (same overhead)
string (long)  : 32 bytes (same overhead)
Note: String object has fixed size; actual text stored separately

=== Checking Variable Sizes ===
int myAge      : 4 bytes
double myHeight: 8 bytes
char myGrade   : 1 bytes
💡 Key Insights:
sizeof()returns the size in bytes- Use
sizeof(type)orsizeof(variable) - Run this program on your computer to see platform-specific sizes
- String object size doesn’t change with content length (uses dynamic memory)
Input and Output
Output with cout
cout (console output) displays information to the screen.
#include <iostream>
using namespace std;

int main() {
    cout << "Hello, World!";              // Display text
    cout << "Hello" << " " << "World";    // Multiple outputs
    cout << "Line 1" << endl;             // endl = new line
    cout << "Line 2\n";                   // \n = new line

    int age = 25;
    cout << "Age: " << age << endl;       // Mix text and variables

    return 0;
}
Output:
Hello, World!Hello World
Line 1
Line 2
Age: 25
Input with cin
cin (console input) reads data from the keyboard.
#include <iostream>
using namespace std;

int main() {
    int age;
    cout << "Enter your age: ";
    cin >> age;                  // Wait for user input
    cout << "You are " << age << " years old." << endl;

    return 0;
}
Multiple Inputs
int day, month, year;
cout << "Enter date (DD MM YYYY): ";
cin >> day >> month >> year;
cout << "Date: " << day << "/" << month << "/" << year << endl;
Input for Strings
Problem with cin and strings:
string name;
cout << "Enter your name: ";
cin >> name;              // Only reads until first space!
// Input: "John Doe"
// name = "John" (Doe is ignored!)
Solution - Use getline():
string fullName;
cout << "Enter your full name: ";
getline(cin, fullName);    // Reads entire line including spaces
Complete Input/Output Example
#include <iostream>
#include <string>
using namespace std;

int main() {
    // Declare variables
    string name;
    int age;
    double height;
    char grade;

    // Input
    cout << "Enter your name: ";
    getline(cin, name);

    cout << "Enter your age: ";
    cin >> age;

    cout << "Enter your height (in meters): ";
    cin >> height;

    cout << "Enter your grade: ";
    cin >> grade;

    // Output
    cout << "\n--- Your Information ---" << endl;
    cout << "Name: " << name << endl;
    cout << "Age: " << age << " years" << endl;
    cout << "Height: " << height << " meters" << endl;
    cout << "Grade: " << grade << endl;

    return 0;
}
Choosing the Right Data Type
Decision Guide
1. Need to store whole numbers (no decimals)?
- Small numbers (-32,768 to 32,767):
short - Regular numbers:
int(MOST COMMON) - Very large numbers:
longorlong long - Only positive numbers: Add
unsigned
Examples:
int studentID = 12345;        // Student IDs
unsigned int pageViews = 5000; // Website views (never negative)
long long accountNumber = 9876543210123456LL; // Bank accounts
2. Need decimal numbers?
- Use
double(99% of cases) - Use
floatonly if memory is critical - Use
long doublefor extreme precision
Examples:
double price = 29.99;          // Prices, measurements
double temperature = 36.6;     // Body temperature
float gamePosition = 10.5f;    // Game coordinates (memory critical)
3. Need a single character?
- Use
char
Examples:
char menuChoice = 'A';         // Menu selections
char yesNo = 'Y';              // Simple yes/no
4. Need text (words/sentences)?
- Use
string
Examples:
string username = "alice123";
string email = "user@example.com";
string address = "123 Main St, City";
5. Need true/false?
- Use
bool
Examples:
bool isLoggedIn = true;
bool isPremiumUser = false;
bool hasPermission = (userLevel > 5);
Real-World Scenarios
Scenario 1: Student Management System
int studentID = 1001;              // Unique ID
string studentName = "Alice Johnson";
int age = 20;
double gpa = 3.85;
char letterGrade = 'A';
bool isEnrolled = true;
Scenario 2: E-commerce Product
int productID = 5432;
string productName = "Wireless Mouse";
double price = 24.99;
unsigned int stockQuantity = 150;  // Never negative
bool inStock = (stockQuantity > 0);
float rating = 4.5f;
Scenario 3: Banking Application
long long accountNumber = 1234567890123456LL;
string accountHolder = "John Doe";
double balance = 5432.10;
bool isActive = true;
unsigned int transactionCount = 523;
Common Mistakes and Best Practices
Common Mistakes
1. Integer Division:
int a = 5, b = 2;
int result = a / b;        // result = 2 (not 2.5!)
// Integers ignore decimals

// Fix:
double result = 5.0 / 2.0;  // result = 2.5
2. Mixing cin and getline:
int age;
string name;

cin >> age;           // Leaves newline in buffer
getline(cin, name);   // Reads empty line!

// Fix:
cin >> age;
cin.ignore();         // Clear the newline
getline(cin, name);   // Now works correctly
3. Forgetting Variable Initialization:
int count;            // Uninitialized - contains garbage value
cout << count;        // Unpredictable output!

// Better:
int count = 0;        // Always initialize
4. Using Wrong Data Type:
int price = 19.99;    // price = 19 (decimal lost!)
// Should use: double price = 19.99;
Best Practices
1. Always Initialize Variables:
int count = 0;
double total = 0.0;
string name = "";
bool isValid = false;
2. Use Meaningful Names:
// Bad
int d = 7;
double x = 19.99;

// Good
int daysInWeek = 7;
double productPrice = 19.99;
3. Use const for Constants:
const double PI = 3.14159;
const int MAX_STUDENTS = 50;
const string COMPANY_NAME = "TechCorp";
4. Choose Appropriate Data Types:
// Age is always positive and small
unsigned short age = 25;

// Money needs decimals
double salary = 75000.50;

// IDs are whole numbers
int employeeID = 1234;
5. Comment Your Code:
int maxAttempts = 3;  // Maximum login attempts allowed
double taxRate = 0.15;  // 15% tax rate
Quick Reference Card
| Need | Use | Example |
|---|---|---|
| Whole numbers | int | int count = 10; |
| Large whole numbers | long long | long long distance = 1000000000LL; |
| Positive numbers only | unsigned int | unsigned int age = 25; |
| Decimal numbers | double | double price = 19.99; |
| Single character | char | char grade = 'A'; |
| Text | string | string name = "John"; |
| True/False | bool | bool isActive = true; |
Practice Exercise
Try creating a simple program to practice:
#include <iostream>
#include <string>
using namespace std;

int main() {
    // Create a program that asks for:
    // 1. User's full name (string)
    // 2. Age (int)
    // 3. Height in meters (double)
    // 4. Favorite letter (char)
    // 5. Are you a student? (bool - input 1 for true, 0 for false)

    // Then display all information in a formatted way

    return 0;
}
Summary
- Variables are containers that store data
- Data types define what kind of data a variable can hold
- Use
intfor whole numbers,doublefor decimals,stringfor text - Use
coutto display output,cinfor input - Always initialize your variables
- Choose data types based on what you’re storing
- Use meaningful variable names
Control Flow in C++
Table of Contents
- Introduction
- Decision Making - if-else
- Switch Case Statement
- Loops
- Break and Continue
- Best Practices
- Practice Problems
Introduction
Control flow statements allow your program to make decisions and repeat actions. Think of them as traffic signals and road signs that direct the flow of your program’s execution.
Three main categories:
- Decision Making: if-else, switch (choosing a path)
- Loops: for, while, do-while (repeating actions)
- Jump Statements: break, continue (controlling loop behavior)
Decision Making - if-else
Basic if Statement
Executes code only if a condition is true.
Syntax:
if (condition) {
    // code to execute if condition is true
}
Example:
int age = 18;

if (age >= 18) {
    cout << "You are an adult." << endl;
}
if-else Statement
Provides an alternative when the condition is false.
Syntax:
if (condition) {
    // code if condition is true
} else {
    // code if condition is false
}
Example:
int marks = 45;

if (marks >= 50) {
    cout << "You passed!" << endl;
} else {
    cout << "You failed. Try again!" << endl;
}
if-else if-else Ladder
Tests multiple conditions in sequence.
Syntax:
if (condition1) {
    // code if condition1 is true
} else if (condition2) {
    // code if condition2 is true
} else if (condition3) {
    // code if condition3 is true
} else {
    // code if all conditions are false
}
Example: Grade Calculator
#include <iostream>
using namespace std;

int main() {
    int marks;
    cout << "Enter your marks (0-100): ";
    cin >> marks;

    if (marks >= 90) {
        cout << "Grade: A+ (Excellent!)" << endl;
    } else if (marks >= 80) {
        cout << "Grade: A (Very Good)" << endl;
    } else if (marks >= 70) {
        cout << "Grade: B (Good)" << endl;
    } else if (marks >= 60) {
        cout << "Grade: C (Average)" << endl;
    } else if (marks >= 50) {
        cout << "Grade: D (Pass)" << endl;
    } else {
        cout << "Grade: F (Fail)" << endl;
    }

    return 0;
}
Nested if Statements
if statements inside other if statements.
Example: Login System
string username, password;
cout << "Enter username: ";
cin >> username;

if (username == "admin") {
    cout << "Enter password: ";
    cin >> password;

    if (password == "1234") {
        cout << "Login successful! Welcome, Admin." << endl;
    } else {
        cout << "Incorrect password!" << endl;
    }
} else {
    cout << "User not found!" << endl;
}
Ternary Operator (Shorthand if-else)
A compact way to write simple if-else statements.
Syntax:
condition ? value_if_true : value_if_false;
Example:
int age = 20;
string status = (age >= 18) ? "Adult" : "Minor";
cout << status << endl;  // Output: Adult

// Equivalent to:
string status;
if (age >= 18) {
    status = "Adult";
} else {
    status = "Minor";
}
More Examples:
int a = 10, b = 20;
int max = (a > b) ? a : b;  // max = 20

int marks = 75;
cout << "Result: " << (marks >= 50 ? "Pass" : "Fail") << endl;
Logical Operators in Conditions
Combine multiple conditions:
| Operator | Meaning | Example |
|---|---|---|
&& | AND (both must be true) | (age >= 18 && hasLicense) |
|| | OR (at least one must be true) | (day == "Sat" || day == "Sun") |
! | NOT (reverses the condition) | !(isRaining) |
Basic Examples:
int age = 25;
bool hasLicense = true;

// AND operator
if (age >= 18 && hasLicense) {
    cout << "You can drive!" << endl;
}

// OR operator
string day = "Sunday";
if (day == "Saturday" || day == "Sunday") {
    cout << "It's the weekend!" << endl;
}

// NOT operator
bool isRaining = false;
if (!isRaining) {
    cout << "Let's go outside!" << endl;
}

// Complex condition
int marks = 85;
int attendance = 75;
if (marks >= 50 && attendance >= 75) {
    cout << "Eligible for certificate" << endl;
}
Short-Circuit Evaluation (IMPORTANT!)
C++ uses short-circuit evaluation for logical operators. This is a crucial concept for writing efficient and safe code.
How && (AND) Short-Circuits
Rule: If the first condition is FALSE, the remaining conditions are NOT evaluated.
Why? If one condition in AND is false, the entire expression is false. No need to check further.
Example 1: Basic Short-Circuit
int x = 5;
int y = 10;

// Second condition is NOT checked because first is false
if (x > 10 && y > 5) {
    cout << "This won't print" << endl;
}
// x > 10 is false, so y > 5 is never evaluated
Example 2: Demonstrating with Functions
#include <iostream>
using namespace std;

bool checkFirst() {
    cout << "Checking first condition..." << endl;
    return false;
}

bool checkSecond() {
    cout << "Checking second condition..." << endl;
    return true;
}

int main() {
    cout << "Testing AND (&&):" << endl;
    if (checkFirst() && checkSecond()) {
        cout << "Both true" << endl;
    }

    // Output:
    // Testing AND (&&):
    // Checking first condition...
    // (checkSecond() is NEVER called!)

    return 0;
}
Example 3: Preventing Division by Zero
int a = 10;
int b = 0;

// ✅ SAFE: b != 0 is checked first
if (b != 0 && a / b > 2) {
    cout << "Division result is greater than 2" << endl;
}
// If b is 0, the division never happens!

// ❌ DANGEROUS: Would crash if written the other way
// if (a / b > 2 && b != 0) {  // WRONG! Division happens first!
Example 4: Null Pointer Check
int* ptr = nullptr;

// ✅ SAFE: Check pointer before dereferencing
if (ptr != nullptr && *ptr > 10) {
    cout << "Value is greater than 10" << endl;
}
// If ptr is null, *ptr is never accessed

// ❌ DANGEROUS: Would crash
// if (*ptr > 10 && ptr != nullptr) {  // WRONG! Dereferencing null pointer!
How || (OR) Short-Circuits
Rule: If the first condition is TRUE, the remaining conditions are NOT evaluated.
Why? If one condition in OR is true, the entire expression is true. No need to check further.
Example 1: Basic Short-Circuit
int x = 15;
int y = 10;

// Second condition is NOT checked because first is true
if (x > 10 || y > 15) {
    cout << "At least one condition is true" << endl;
}
// x > 10 is true, so y > 15 is never evaluated
Example 2: Demonstrating with Functions
#include <iostream>
using namespace std;

bool checkFirst() {
    cout << "Checking first condition..." << endl;
    return true;
}

bool checkSecond() {
    cout << "Checking second condition..." << endl;
    return false;
}

int main() {
    cout << "Testing OR (||):" << endl;
    if (checkFirst() || checkSecond()) {
        cout << "At least one is true" << endl;
    }

    // Output:
    // Testing OR (||):
    // Checking first condition...
    // At least one is true
    // (checkSecond() is NEVER called!)

    return 0;
}
Example 3: Default Value Check
string username;
cout << "Enter username: ";
cin >> username;

// Check if empty first (fast check)
if (username.empty() || username == "guest") {
    username = "Anonymous";
}
// If username is empty, the comparison never happens
Example 4: Permission Check
bool isAdmin = false;
bool isOwner = true;
bool hasPermission = false;

// ✅ Efficient: Checks in order of likelihood
if (isAdmin || isOwner || hasPermission) {
    cout << "Access granted!" << endl;
}
// If isAdmin is true, other checks are skipped
Short-Circuit Evaluation Comparison
#include <iostream>
using namespace std;

int callCount = 0;

bool expensive_check() {
    callCount++;
    cout << "Expensive check called (count: " << callCount << ")" << endl;
    return true;
}

int main() {
    callCount = 0;

    // Test 1: AND with false first
    cout << "\n=== Test 1: AND with false first ===" << endl;
    if (false && expensive_check()) {
        cout << "This won't execute" << endl;
    }
    cout << "Expensive check was called " << callCount << " times" << endl;
    // Output: 0 times (never called!)

    // Test 2: AND with true first
    callCount = 0;
    cout << "\n=== Test 2: AND with true first ===" << endl;
    if (true && expensive_check()) {
        cout << "This will execute" << endl;
    }
    cout << "Expensive check was called " << callCount << " times" << endl;
    // Output: 1 time

    // Test 3: OR with true first
    callCount = 0;
    cout << "\n=== Test 3: OR with true first ===" << endl;
    if (true || expensive_check()) {
        cout << "This will execute" << endl;
    }
    cout << "Expensive check was called " << callCount << " times" << endl;
    // Output: 0 times (never called!)

    // Test 4: OR with false first
    callCount = 0;
    cout << "\n=== Test 4: OR with false first ===" << endl;
    if (false || expensive_check()) {
        cout << "This will execute" << endl;
    }
    cout << "Expensive check was called " << callCount << " times" << endl;
    // Output: 1 time

    return 0;
}
Best Practices for Logical Operators
1. Order Matters for Safety
Rule: Always put safety checks FIRST in AND operations.
// ✅ CORRECT: Check for null/zero first
if (ptr != nullptr && *ptr > 10) { }
if (denominator != 0 && numerator / denominator > 5) { }
if (!array.empty() && array[0] == 10) { }

// ❌ WRONG: Dangerous operations first
if (*ptr > 10 && ptr != nullptr) { }  // Crash if ptr is null!
if (numerator / denominator > 5 && denominator != 0) { }  // Division by zero!
if (array[0] == 10 && !array.empty()) { }  // Access invalid memory!
Real-World Example:
#include <iostream>
#include <string>
using namespace std;

int main() {
    string* namePtr = nullptr;

    // ✅ SAFE: Check pointer first
    if (namePtr != nullptr && namePtr->length() > 0) {
        cout << "Name: " << *namePtr << endl;
    } else {
        cout << "No name available" << endl;
    }

    // ❌ This would CRASH:
    // if (namePtr->length() > 0 && namePtr != nullptr) { }

    return 0;
}
2. Order Matters for Performance
Rule: Put cheap/fast checks FIRST, expensive checks LAST.
int age = 25;
bool hasComplexPermission() {
    // Imagine this function does expensive database lookup
    // Takes 100ms to execute
    return true;
}

// ✅ EFFICIENT: Fast check first
if (age >= 18 && hasComplexPermission()) {
    cout << "Access granted" << endl;
}
// If age < 18, expensive function is never called

// ❌ INEFFICIENT: Expensive check first
if (hasComplexPermission() && age >= 18) {
    cout << "Access granted" << endl;
}
// Expensive function ALWAYS called, even if age < 18
Another Example:
string username = "john";
bool isDatabaseUserValid(string user) {
    // Expensive: queries database
    cout << "Querying database..." << endl;
    return true;
}

// ✅ EFFICIENT: Check local variable first
if (!username.empty() && username.length() > 3 && isDatabaseUserValid(username)) {
    cout << "Valid user" << endl;
}
// Database only queried if basic checks pass

// ❌ INEFFICIENT: Database check first
if (isDatabaseUserValid(username) && username.length() > 3) {
    cout << "Valid user" << endl;
}
// Database queried every time, even for invalid usernames
3. Order for OR Operations
Rule: Put most likely to be true conditions FIRST.
bool isWeekend(string day) {
    // ✅ EFFICIENT: Most common cases first
    if (day == "Saturday" || day == "Sunday") {
        return true;
    }
    return false;
}

// In a user role check:
bool hasAccess() {
    // Put most common role first
    // ✅ If 80% users are "member", check that first
    if (role == "member" || role == "admin" || role == "moderator") {
        return true;
    }
    return false;
}
4. Readability vs Performance Trade-off
Sometimes clarity is more important than micro-optimization:
// Option 1: Optimized but less clear
if (ptr && *ptr > 10 && calculate(ptr)) { }

// Option 2: Clearer with separate checks
if (ptr != nullptr) {
    if (*ptr > 10) {
        if (calculate(ptr)) {
            // do something
        }
    }
}
Best approach: Balance both:
// ✅ GOOD: Clear AND efficient
bool isValid = (ptr != nullptr);
bool hasValue = isValid && (*ptr > 10);
bool passesCalculation = hasValue && calculate(ptr);

if (passesCalculation) {
    // do something
}
5. Complex Conditions - Use Parentheses
// ❌ Confusing
if (a && b || c && d) { }

// ✅ Clear with parentheses
if ((a && b) || (c && d)) { }

// Even better with meaningful variables
bool firstConditionMet = (a && b);
bool secondConditionMet = (c && d);
if (firstConditionMet || secondConditionMet) { }
6. Avoid Side Effects in Conditions
int count = 0;

// ❌ BAD: Side effect (incrementing) in condition
if (count++ > 5 && someFunction()) {
    // count might not increment if first condition is false!
}

// ✅ GOOD: Separate side effects
count++;
if (count > 5 && someFunction()) {
    // Clear and predictable
}
Practical Scenarios
Scenario 1: Form Validation
#include <iostream>
#include <string>
using namespace std;

int main() {
    string email, password;

    cout << "Enter email: ";
    cin >> email;
    cout << "Enter password: ";
    cin >> password;

    // ✅ GOOD: Check simple conditions first
    if (!email.empty() &&
        email.find('@') != string::npos &&
        password.length() >= 8) {
        cout << "Registration successful!" << endl;
    } else {
        cout << "Invalid email or password too short" << endl;
    }

    return 0;
}
Scenario 2: Safe Array Access
#include <iostream>
using namespace std;

int main() {
    int scores[] = {85, 90, 78, 92, 88};
    int size = 5;
    int index;

    cout << "Enter index to view (0-4): ";
    cin >> index;

    // ✅ SAFE: Check bounds before accessing
    if (index >= 0 && index < size && scores[index] >= 80) {
        cout << "High score: " << scores[index] << endl;
    } else if (index >= 0 && index < size) {
        cout << "Score: " << scores[index] << endl;
    } else {
        cout << "Invalid index!" << endl;
    }

    return 0;
}
Scenario 3: User Permissions
#include <iostream>
#include <string>
using namespace std;

int main() {
    string role = "user";
    int accountAge = 30;  // days
    bool emailVerified = true;

    // ✅ Efficient: Check from least to most restrictive
    // Most users will fail early checks quickly
    if (emailVerified &&
        accountAge >= 7 &&
        (role == "admin" || role == "moderator" || role == "premium")) {
        cout << "Access to premium features granted!" << endl;
    } else {
        cout << "Upgrade to premium for this feature" << endl;
    }

    return 0;
}
Scenario 4: Game Damage Calculation
#include <iostream>
using namespace std;

int main() {
    int playerHealth = 50;
    int armor = 30;
    int incomingDamage = 40;
    bool hasShield = true;

    // ✅ Process shields first (cheaper check)
    if (hasShield && incomingDamage > 0) {
        cout << "Shield absorbed the damage!" << endl;
        hasShield = false;
    } else if (armor > 0 && incomingDamage > armor) {
        incomingDamage -= armor;
        armor = 0;
        playerHealth -= incomingDamage;
        cout << "Armor damaged! Health: " << playerHealth << endl;
    } else if (armor > 0) {
        armor -= incomingDamage;
        cout << "Armor absorbed damage. Remaining: " << armor << endl;
    } else {
        playerHealth -= incomingDamage;
        cout << "Direct hit! Health: " << playerHealth << endl;
    }

    if (playerHealth <= 0) {
        cout << "Game Over!" << endl;
    }

    return 0;
}
Summary: Logical Operators
| Operator | Short-Circuit | When to Use | Order Strategy |
|---|---|---|---|
&& | Stops at first FALSE | All conditions must be true | Safety checks first, then expensive checks |
|| | Stops at first TRUE | At least one must be true | Most likely true conditions first |
! | No short-circuit | Reverse a condition | Use sparingly for clarity |
Key Takeaways:
- Safety first: Always check null/zero/bounds before using
- Performance: Put cheap checks before expensive ones
- Readability: Use parentheses for complex conditions
- Predictability: Avoid side effects in conditions
- Short-circuit is your friend: Use it to write safer, faster code
Switch Case Statement
Executes different code blocks based on the value of a variable. Better than multiple if-else when checking one variable against many values.
Basic Syntax
switch (expression) {
    case value1:
        // code for value1
        break;
    case value2:
        // code for value2
        break;
    case value3:
        // code for value3
        break;
    default:
        // code if no case matches
}
⚠️ Important:
breakis crucial - without it, execution “falls through” to next caseswitchworks withint,char, andenum(NOT withstringorfloat)defaultis optional but recommended
Example 1: Menu System
#include <iostream>
using namespace std;

int main() {
    int choice;
    cout << "=== Menu ===" << endl;
    cout << "1. Coffee" << endl;
    cout << "2. Tea" << endl;
    cout << "3. Juice" << endl;
    cout << "4. Water" << endl;
    cout << "Enter your choice (1-4): ";
    cin >> choice;

    switch (choice) {
        case 1:
            cout << "You ordered Coffee. Price: $3" << endl;
            break;
        case 2:
            cout << "You ordered Tea. Price: $2" << endl;
            break;
        case 3:
            cout << "You ordered Juice. Price: $4" << endl;
            break;
        case 4:
            cout << "You ordered Water. Price: Free!" << endl;
            break;
        default:
            cout << "Invalid choice!" << endl;
    }

    return 0;
}
Example 2: Day of the Week
char day;
cout << "Enter first letter of day (M/T/W/F/S): ";
cin >> day;

switch (day) {
    case 'M':
        cout << "Monday" << endl;
        break;
    case 'T':
        cout << "Tuesday or Thursday" << endl;
        break;
    case 'W':
        cout << "Wednesday" << endl;
        break;
    case 'F':
        cout << "Friday" << endl;
        break;
    case 'S':
        cout << "Saturday or Sunday" << endl;
        break;
    default:
        cout << "Invalid input!" << endl;
}
Fall-Through Cases (Intentional)
Sometimes you want multiple cases to execute the same code:
int month;
cout << "Enter month number (1-12): ";
cin >> month;

switch (month) {
    case 12:
    case 1:
    case 2:
        cout << "Winter" << endl;
        break;
    case 3:
    case 4:
    case 5:
        cout << "Spring" << endl;
        break;
    case 6:
    case 7:
    case 8:
        cout << "Summer" << endl;
        break;
    case 9:
    case 10:
    case 11:
        cout << "Fall" << endl;
        break;
    default:
        cout << "Invalid month!" << endl;
}
Calculator Example
double num1, num2;
char operation;

cout << "Enter first number: ";
cin >> num1;
cout << "Enter operation (+, -, *, /): ";
cin >> operation;
cout << "Enter second number: ";
cin >> num2;

switch (operation) {
    case '+':
        cout << "Result: " << (num1 + num2) << endl;
        break;
    case '-':
        cout << "Result: " << (num1 - num2) << endl;
        break;
    case '*':
        cout << "Result: " << (num1 * num2) << endl;
        break;
    case '/':
        if (num2 != 0) {
            cout << "Result: " << (num1 / num2) << endl;
        } else {
            cout << "Error: Division by zero!" << endl;
        }
        break;
    default:
        cout << "Invalid operation!" << endl;
}
↑ Back to Table of Contents
Loops
Loops allow you to execute code repeatedly. C++ has three types of loops.
1. for Loop
Best when you know how many times to repeat.
Syntax:
for (initialization; condition; update) {
    // code to repeat
}
Execution Flow:
- Initialization: Runs once at the start
- Condition: Checked before each iteration
- Code Block: Executes if condition is true
- Update: Runs after each iteration
- Repeat steps 2-4 until condition is false
Example 1: Print 1 to 10
for (int i = 1; i <= 10; i++) {
    cout << i << " ";
}
// Output: 1 2 3 4 5 6 7 8 9 10
Example 2: Multiplication Table
int num;
cout << "Enter a number: ";
cin >> num;

cout << "Multiplication table of " << num << ":" << endl;
for (int i = 1; i <= 10; i++) {
    cout << num << " x " << i << " = " << (num * i) << endl;
}
Example 3: Sum of Numbers
int n, sum = 0;
cout << "Enter a number: ";
cin >> n;

for (int i = 1; i <= n; i++) {
    sum += i;  // sum = sum + i
}
cout << "Sum of first " << n << " numbers: " << sum << endl;
Example 4: Counting Down
for (int i = 10; i >= 1; i--) {
    cout << i << " ";
}
cout << "Blast off!" << endl;
// Output: 10 9 8 7 6 5 4 3 2 1 Blast off!
Example 5: Nested Loops (Pattern)
// Print a square pattern
for (int row = 1; row <= 5; row++) {
    for (int col = 1; col <= 5; col++) {
        cout << "* ";
    }
    cout << endl;
}
// Output:
// * * * * *
// * * * * *
// * * * * *
// * * * * *
// * * * * *
2. while Loop
Best when you don’t know how many times to repeat (condition-based).
Syntax:
while (condition) {
    // code to repeat
}
Example 1: Basic Counter
int i = 1;
while (i <= 5) {
    cout << i << " ";
    i++;
}
// Output: 1 2 3 4 5
Example 2: User Input Validation
int password;
cout << "Enter password (1234): ";
cin >> password;

while (password != 1234) {
    cout << "Wrong password! Try again: ";
    cin >> password;
}
cout << "Access granted!" << endl;
Example 3: Menu System
int choice = 0;

while (choice != 4) {
    cout << "\n=== Menu ===" << endl;
    cout << "1. Start Game" << endl;
    cout << "2. Load Game" << endl;
    cout << "3. Settings" << endl;
    cout << "4. Exit" << endl;
    cout << "Choice: ";
    cin >> choice;

    switch (choice) {
        case 1:
            cout << "Starting game..." << endl;
            break;
        case 2:
            cout << "Loading game..." << endl;
            break;
        case 3:
            cout << "Opening settings..." << endl;
            break;
        case 4:
            cout << "Goodbye!" << endl;
            break;
        default:
            cout << "Invalid choice!" << endl;
    }
}
Example 4: Sum Until Negative
int num, sum = 0;

cout << "Enter numbers (negative to stop):" << endl;
cin >> num;

while (num >= 0) {
    sum += num;
    cin >> num;
}

cout << "Sum: " << sum << endl;
3. do-while Loop
Similar to while, but always executes at least once (checks condition at the end).
Syntax:
do {
    // code to repeat (runs at least once)
} while (condition);
Example 1: Basic Usage
int i = 1;
do {
    cout << i << " ";
    i++;
} while (i <= 5);
// Output: 1 2 3 4 5
Example 2: Menu (Guaranteed to Show Once)
char choice;

do {
    cout << "\n=== Options ===" << endl;
    cout << "A. Add" << endl;
    cout << "B. Delete" << endl;
    cout << "C. View" << endl;
    cout << "Q. Quit" << endl;
    cout << "Choice: ";
    cin >> choice;

    switch (choice) {
        case 'A':
        case 'a':
            cout << "Adding..." << endl;
            break;
        case 'B':
        case 'b':
            cout << "Deleting..." << endl;
            break;
        case 'C':
        case 'c':
            cout << "Viewing..." << endl;
            break;
        case 'Q':
        case 'q':
            cout << "Exiting..." << endl;
            break;
        default:
            cout << "Invalid choice!" << endl;
    }
} while (choice != 'Q' && choice != 'q');
Example 3: Input Validation
int age;

do {
    cout << "Enter your age (1-120): ";
    cin >> age;

    if (age < 1 || age > 120) {
        cout << "Invalid age! Please try again." << endl;
    }
} while (age < 1 || age > 120);

cout << "Age accepted: " << age << endl;
Loop Comparison
| Loop Type | When to Use | Minimum Executions |
|---|---|---|
for | Know exact iterations | 0 |
while | Unknown iterations, condition first | 0 |
do-while | Unknown iterations, run at least once | 1 |
Choosing the Right Loop:
// for - when you know the count
for (int i = 0; i < 10; i++) { }

// while - checking condition first
while (userInput != "quit") { }

// do-while - must run at least once (like menus)
do {
    showMenu();
} while (choice != 0);
Break and Continue
Special statements that control loop execution.
break Statement
Purpose: Immediately exits the loop completely.
Example 1: Exit on Condition
for (int i = 1; i <= 10; i++) {
    if (i == 6) {
        break;  // Stop loop when i equals 6
    }
    cout << i << " ";
}
// Output: 1 2 3 4 5
Example 2: Search in Loop
int numbers[] = {10, 20, 30, 40, 50};
int target = 30;
bool found = false;

for (int i = 0; i < 5; i++) {
    if (numbers[i] == target) {
        cout << "Found " << target << " at index " << i << endl;
        found = true;
        break;  // No need to continue searching
    }
}

if (!found) {
    cout << target << " not found!" << endl;
}
Example 3: Exit on User Command
while (true) {  // Infinite loop
    string command;
    cout << "Enter command (type 'exit' to quit): ";
    cin >> command;

    if (command == "exit") {
        cout << "Goodbye!" << endl;
        break;  // Exit the infinite loop
    }

    cout << "You entered: " << command << endl;
}
Example 4: break in switch (already seen)
switch (choice) {
    case 1:
        cout << "Option 1" << endl;
        break;  // Prevents fall-through
    case 2:
        cout << "Option 2" << endl;
        break;
}
continue Statement
Purpose: Skips the rest of current iteration and moves to the next iteration.
Example 1: Skip Specific Values
for (int i = 1; i <= 10; i++) {
    if (i == 5) {
        continue;  // Skip when i is 5
    }
    cout << i << " ";
}
// Output: 1 2 3 4 6 7 8 9 10 (5 is skipped)
Example 2: Print Only Odd Numbers
for (int i = 1; i <= 10; i++) {
    if (i % 2 == 0) {
        continue;  // Skip even numbers
    }
    cout << i << " ";
}
// Output: 1 3 5 7 9
Example 3: Skip Negative Numbers
int numbers[] = {5, -2, 8, -1, 10, -3, 7};

cout << "Positive numbers: ";
for (int i = 0; i < 7; i++) {
    if (numbers[i] < 0) {
        continue;  // Skip negative numbers
    }
    cout << numbers[i] << " ";
}
// Output: Positive numbers: 5 8 10 7
Example 4: Input Validation
int sum = 0;
for (int i = 0; i < 5; i++) {
    int num;
    cout << "Enter number " << (i+1) << ": ";
    cin >> num;

    if (num < 0) {
        cout << "Negative numbers not allowed. Skipping..." << endl;
        continue;  // Skip this iteration
    }

    sum += num;
}
cout << "Sum of valid numbers: " << sum << endl;
break vs continue Comparison
// Example demonstrating both

cout << "Using break:" << endl;
for (int i = 1; i <= 10; i++) {
    if (i == 6) {
        break;  // Exit loop completely
    }
    cout << i << " ";
}
// Output: 1 2 3 4 5

cout << "\n\nUsing continue:" << endl;
for (int i = 1; i <= 10; i++) {
    if (i == 6) {
        continue;  // Skip only 6
    }
    cout << i << " ";
}
// Output: 1 2 3 4 5 7 8 9 10
Visual Difference:
| Statement | Effect | Use When |
|---|---|---|
break | Exits loop entirely | Found what you need, or need to stop |
continue | Skips to next iteration | Need to skip certain values but keep looping |
Nested Loop Control
// break only exits the innermost loop
for (int i = 1; i <= 3; i++) {
    for (int j = 1; j <= 3; j++) {
        if (j == 2) {
            break;  // Only exits inner loop
        }
        cout << i << "," << j << " ";
    }
    cout << endl;
}
// Output:
// 1,1
// 2,1
// 3,1

// continue only affects current loop
for (int i = 1; i <= 3; i++) {
    for (int j = 1; j <= 3; j++) {
        if (j == 2) {
            continue;  // Skip j=2 in inner loop
        }
        cout << i << "," << j << " ";
    }
    cout << endl;
}
// Output:
// 1,1 1,3
// 2,1 2,3
// 3,1 3,3
Best Practices
1. Choosing the Right Control Structure
// ✅ Use switch for multiple discrete values
switch (menuChoice) {
    case 1: /* ... */ break;
    case 2: /* ... */ break;
}

// ✅ Use if-else for ranges or complex conditions
if (score >= 90) {
    // ...
} else if (score >= 80) {
    // ...
}

// ✅ Use for loop when iteration count is known
for (int i = 0; i < 10; i++) { }

// ✅ Use while when condition-based
while (userInput != "quit") { }

// ✅ Use do-while for at-least-once execution
do {
    showMenu();
} while (choice != 0);
2. Always Use Braces
// ❌ Dangerous (easy to make mistakes)
if (condition)
    doSomething();

// ✅ Safe and clear
if (condition) {
    doSomething();
}
3. Avoid Deep Nesting
// ❌ Hard to read
if (condition1) {
    if (condition2) {
        if (condition3) {
            // deeply nested code
        }
    }
}

// ✅ Better - early returns
if (!condition1) return;
if (!condition2) return;
if (!condition3) return;
// main code here
4. Initialize Loop Variables
// ✅ Always initialize
for (int i = 0; i < 10; i++) { }

// ❌ Uninitialized variable
int i;
for (i; i < 10; i++) { }  // i has garbage value initially
5. Avoid Infinite Loops (Unless Intentional)
// ❌ Accidental infinite loop
for (int i = 0; i < 10; i--) {  // i decreases!
    // never ends
}

// ✅ Intentional infinite loop with break
while (true) {
    if (exitCondition) {
        break;
    }
}
6. Use Meaningful Variable Names
// ❌ Unclear
for (int i = 0; i < n; i++) { }

// ✅ Clear
for (int studentIndex = 0; studentIndex < totalStudents; studentIndex++) { }

// ✅ Or use range-based for loop
for (auto student : students) { }
7. Avoid Magic Numbers
// ❌ What does 7 mean?
for (int i = 0; i < 7; i++) { }

// ✅ Use constants
const int DAYS_IN_WEEK = 7;
for (int day = 0; day < DAYS_IN_WEEK; day++) { }
8. break and continue Guidelines
// ✅ Use break to exit when found
for (int i = 0; i < size; i++) {
    if (array[i] == target) {
        found = true;
        break;  // No need to continue searching
    }
}

// ✅ Use continue to skip invalid data
for (int i = 0; i < size; i++) {
    if (data[i] < 0) {
        continue;  // Skip negative values
    }
    processData(data[i]);
}
Practice Problems
Test your understanding with these exercises:
Problem 1: Even or Odd Checker
Write a program that asks for a number and tells if it’s even or odd.
Problem 2: Simple Calculator
Create a calculator using switch-case that performs +, -, *, / operations.
Problem 3: Factorial Calculator
Calculate factorial of a number using a loop. (5! = 5 × 4 × 3 × 2 × 1 = 120)
Problem 4: Prime Number Checker
Check if a number is prime (only divisible by 1 and itself).
Problem 5: Pattern Printing
Print the following pattern:
*
**
***
****
*****
Problem 6: Number Guessing Game
Create a game where the computer picks a random number (1-100) and the user guesses. Use loops and break/continue appropriately.
Summary
Decision Making:
- Use
if-elsefor conditions and ranges - Use
switch-casefor multiple discrete values - Use ternary operator
? :for simple conditions
Loops:
for: When you know iteration countwhile: Condition checked firstdo-while: Runs at least once
Control Statements:
break: Exit loop completelycontinue: Skip current iteration
Key Takeaways:
- Always use braces
{}for clarity - Initialize variables before loops
- Avoid infinite loops (unless intentional)
- Use meaningful variable names
- Comment complex logic
- Choose the right control structure for the task
With these fundamentals, you can now control the flow of any C++ program! 🚀
Understanding Memory Layout and Storage Classes in C++
C++ programs are organized in memory into several sections or segments. Understanding these helps us know where variables are stored, how they persist, and their lifetimes.
Sections of a C++ Program in Memory
A typical C++ program’s memory layout looks like this:
+---------------------------+
|        Stack              |
|   (local variables)       |
+---------------------------+
|        Heap               |
| (dynamic allocations)     |
+---------------------------+
|   Uninitialized Data (.bss)|
| (global/static = 0)       |
+---------------------------+
|   Initialized Data (.data) |
| (global/static ≠ 0)       |
+---------------------------+
|         Code (.text)       |
| (compiled instructions)    |
+---------------------------+
1. Code Section (.text)
- Contains the compiled instructions of your program.
- Read-only to prevent accidental modification of executable code.
- Example: function bodies.
void greet() {
    std::cout << "Hello, World!";
}
2. Initialized Data Section (.data)
- Stores global and static variables initialized with a non-zero value.
- Exists throughout the program lifetime.
int global_var = 10; // Stored in .data
3. Uninitialized Data Section (.bss)
- Stores global and static variables initialized to zero or not initialized.
- Allocated at runtime, initialized to zero automatically.
static int counter; // Stored in .bss (default 0)
4. Heap Section
- Used for dynamic memory allocation via
new,malloc, etc. - Managed manually by the programmer.
- Grows upward.
int* ptr = new int(5); // Stored in heap
5. Stack Section
- Used for function calls and local variables.
- Memory is automatically managed (pushed and popped).
- Grows downward.
void foo() {
    int local = 42; // Stored in stack
}
Storage Classes in C++
Storage classes define the scope, lifetime, and visibility of variables.
| Storage Class | Keyword | Default Value | Scope | Lifetime | Memory Section |
|---|---|---|---|---|---|
| Automatic | auto (default) | Garbage | Local | Until function returns | Stack |
| Register | register | Garbage | Local | Until function returns | CPU Register / Stack |
| Static (local) | static | Zero | Local | Entire program | .data or .bss |
| Static (global) | static | Zero | Global | Entire program | .data or .bss |
| Extern | extern | Depends | Global | Entire program | .data or .bss |
| Mutable | mutable | Depends | Class member | Until object destroyed | Heap/Stack depending on object |
Mapping Storage Classes to Memory Sections
| Example | Storage Class | Memory Section |
|---|---|---|
int x = 5; (inside main) | auto | Stack |
static int count; | static | .bss |
int global = 10; | extern/global | .data |
int* p = new int(3); | auto + heap allocation | Heap |
register int r = 5; | register | Register / Stack |
Example Program
#include <iostream>
using namespace std;

int global_var = 10;        // .data
static int static_global;   // .bss

void demo() {
    int local = 5;          // stack
    static int static_local = 7; // .data
    int* heap_ptr = new int(42); // heap
    cout << "Local: " << local << ", Heap: " << *heap_ptr << endl;
    delete heap_ptr;
}

int main() {
    demo();
    return 0;
}
Diagram: Complete Memory Layout
        +----------------------------------+
        |           Stack                  |
        |   - Function call frames         |
        |   - Local variables              |
        +----------------------------------+
        |           Heap                   |
        |   - Dynamic memory               |
        +----------------------------------+
        |   Uninitialized (.bss)           |
        |   - static int x;                |
        |   - int global_uninit;           |
        +----------------------------------+
        |   Initialized (.data)            |
        |   - int global_init = 5;         |
        |   - static int local_init = 7;   |
        +----------------------------------+
        |           Code (.text)           |
        |   - main(), demo(), etc.         |
        +----------------------------------+
Summary
- Stack: Local and temporary data.
- Heap: Dynamic runtime allocations.
- .data: Initialized globals/statics.
- .bss: Zero-initialized globals/statics.
- .text: Program instructions.
Understanding Static Variables in Depth
What Makes static Special?
- A static variable inside a function is initialized only once, not every time the function is called.
- It retains its value between function calls.
- It has local scope (not visible outside the function) but global lifetime.
Key Points:
- Initialized only once at program startup (if not explicitly initialized, it defaults to zero).
- Memory is allocated in the .data (if initialized) or .bss (if uninitialized) section.
- Value persists across multiple calls to the same function.
Example:
#include <iostream>
using namespace std;

void counterFunction() {
    static int count = 0; // initialized once
    count++;
    cout << "Count = " << count << endl;
}

int main() {
    counterFunction();  // Output: Count = 1
    counterFunction();  // Output: Count = 2
    counterFunction();  // Output: Count = 3
    return 0;
}
How It Works Internally:
- The first time
counterFunction()is called,countis initialized to0. - On subsequent calls,
countretains its last value instead of reinitializing. - This behavior makes static variables ideal for maintaining state between function calls.
Visual Representation:
+---------------------------------------------+
| Function Call Stack                         |
|   local variables -> destroyed after return  |
+---------------------------------------------+
| .data section                               |
|   static int count = 0;  ← persists forever |
+---------------------------------------------+
This shows that even though count is declared inside a function, its
memory does not live on the stack.
Instead, it resides in the data segment, making it available
throughout the program’s execution.
Summary Table for static
| Property | Local Static | Global Static |
|---|---|---|
| Scope | Within function | Within translation unit (.cpp file) |
| Lifetime | Entire program | Entire program |
| Initialization | Once only | Once only |
| Memory Section | .data / .bss | .data / .bss |
| Typical Use | Retain value between function calls | Hide variable/function from other files |
Static variables are often misunderstood in C++, but mastering them helps in writing efficient and predictable code that maintains internal state without global exposure.
Note on register Variables in C++
- Declaring a variable with the
registerkeyword:
register int counter = 0;
-
Does NOT guarantee that the variable will reside in a CPU register.
-
It is only a compiler optimization hint.
-
Modern compilers often ignore this keyword and manage registers automatically.
-
Reasons it might not be placed in a register:
- Limited number of CPU registers.
- Compiler optimization strategies determine better storage location.
-
Therefore,
registermainly serves as historical or readability guidance rather than a strict directive.
C++ Pointers & Dynamic Memory Allocation
Table of Contents
- Introduction to Pointers
- How Dereferencing Works
- Dynamic Memory Allocation
- Void Pointers
- Pointer Size
- Arrays and Pointers
- Const Pointers Variations
- Breaking Constantness
- Placement New Operator
- Best Practices
- Common Bugs
1. Introduction to Pointers
C++ Pointer Basics
A pointer is a variable that stores the memory address of another variable.
int value = 42;
int* ptr = &value;  // ptr stores the address of value

std::cout << "Value: " << value << std::endl;           // Output: 42
std::cout << "Address of value: " << &value << std::endl;  // Output: 0x7ffc12345678
std::cout << "Pointer ptr: " << ptr << std::endl;       // Output: 0x7ffc12345678
std::cout << "Dereferenced ptr: " << *ptr << std::endl; // Output: 42
Key Operators:
&(address-of operator): Gets the memory address of a variable*(dereference operator): Accesses the value at the address stored in the pointer
Real-Life Analogy: Home Addresses
Think of computer memory like a street with houses. Each house has:
- An address (like “123 Main Street”) - this is the memory address
- Contents inside (furniture, people, etc.) - this is the actual data
- A mailbox with the address written on it - this is the pointer
Real Life:                          Computer Memory:
┌─────────────────────────┐        ┌─────────────────────────┐
│  123 Main Street        │        │  Memory Address: 0x1000 │
│  ┌─────────────────┐    │        │  ┌─────────────────┐    │
│  │  John's House   │    │        │  │  Value: 42      │    │
│  │  (The actual    │    │        │  │  (The actual    │    │
│  │   person/data)  │    │        │  │   data)         │    │
│  └─────────────────┘    │        │  └─────────────────┘    │
└─────────────────────────┘        └─────────────────────────┘

Your Friend's Note:                 Your Pointer Variable:
┌─────────────────────────┐        ┌─────────────────────────┐
│ "John lives at          │        │  int* ptr = 0x1000;     │
│  123 Main Street"       │        │                         │
│  (The address, not      │        │  (The address, not      │
│   the person!)          │        │   the value!)           │
└─────────────────────────┘        └─────────────────────────┘
Key Insights from the Analogy:
-
Address vs Contents:
- When someone gives you an address “123 Main Street”, they’re not giving you the house or John - just the location
- When a pointer stores
0x1000, it’s not storing the value42- just the location
-
Using the Address (Dereferencing):
- If you want to visit John, you go to “123 Main Street” and knock on the door
- If you want the value, you dereference
*ptr(go to address0x1000and get the data)
-
Multiple References:
- You can have many notes with the same address “123 Main Street”
- You can have many pointers to the same memory address
-
Changing the Address:
- You can update your note to point to a different house:
123 Main Street→ 456 Oak Avenue - You can change what a pointer points to:
ptr = &another_variable;
- You can update your note to point to a different house:
-
nullptr is like “No Address”:
- A blank note with no address written on it
- You can’t visit a house if you don’t have an address!
Extending the Analogy:
// Real Life                          // Code
int john_age = 25;                    // John (age 25) lives at 123 Main St
int* address_note = &john_age;        // Write down John's address on a note

std::cout << address_note;            // Read the note: "123 Main Street"
std::cout << *address_note;           // Go to that address, find John: age 25

*address_note = 26;                   // Go to 123 Main St, update John's age to 26
// john_age is now 26!                // John's actual age changed!

int mary_age = 30;                    // Mary (age 30) lives at 456 Oak Ave
address_note = &mary_age;             // Update the note to Mary's address
// Now the note points to Mary's house instead of John's house
What Happens Without Pointers?
// Without pointer (making a copy)    // Real Life Analogy
int john_age = 25;                    // John is 25 years old
int copy_of_age = john_age;          // You write "25" on a paper (copy)

copy_of_age = 26;                     // You change the paper to "26"
// john_age is STILL 25!              // But John is STILL 25 years old!
                                      // You only changed your copy

// With pointer (reference)           // Real Life Analogy
int john_age = 25;                    // John is 25 years old
int* ptr = &john_age;                // You write down John's address

*ptr = 26;                            // Go to John's house and change his age
// john_age is NOW 26!                // John himself is now 26!
Why Pointers Are Useful:
-
Efficiency (Sending Just the Address):
Real Life: Instead of copying an entire book to send to someone, you send them the library address and shelf number Code: Instead of copying 1GB of data, you pass a pointer (8 bytes) -
Shared Access:
Real Life: Multiple people can have the same address and visit the same house Code: Multiple pointers can reference the same data -
Dynamic Allocation:
Real Life: Building a new house when you need it (new construction)
           and tearing it down when done (demolition)

Code: Allocating memory with 'new' when needed
      and freeing it with 'delete' when done
2. How Dereferencing Works
Dereferencing is the process of accessing the value stored at the memory address held by a pointer.
Step-by-Step Process:
Memory Layout:
┌─────────────┬──────────┬─────────────┐
│  Address    │   Data   │  Variable   │
├─────────────┼──────────┼─────────────┤
│ 0x1000      │    42    │   value     │
│ 0x1004      │  0x1000  │   ptr       │
└─────────────┴──────────┴─────────────┘
When you dereference *ptr:
- Step 1: CPU reads the pointer variable
ptr→ Gets address0x1000 - Step 2: CPU goes to memory location
0x1000 - Step 3: Uses the data type (
int) to determine how many bytes to read (4 bytes for int) - Step 4: Reads 4 bytes starting from
0x1000→ Gets value42 - Step 5: Returns the value
42
Visual Representation:
int value = 42;        // Located at address 0x1000
int* ptr = &value;     // ptr contains 0x1000

Memory View:
┌──────────────────────────────────────┐
│  Address: 0x1000                     │
│  ┌────┬────┬────┬────┐               │
│  │ 42 │ 00 │ 00 │ 00 │  (4 bytes)    │ ← value
│  └────┴────┴────┴────┘               │
└──────────────────────────────────────┘
        ↑
        │
    ┌───┴────┐
    │  ptr   │ (stores 0x1000)
    └────────┘

*ptr operation:
1. Read ptr       → 0x1000
2. Go to 0x1000   → Find memory location
3. Type is int    → Read 4 bytes
4. Fetch data     → 42
Example with Different Data Types:
// Different types require different byte reads
char c = 'A';        // 1 byte
short s = 1000;      // 2 bytes
int i = 50000;       // 4 bytes
long long ll = 1e15; // 8 bytes
double d = 3.14;     // 8 bytes

char* ptr_c = &c;         // When dereferencing, read 1 byte
short* ptr_s = &s;        // When dereferencing, read 2 bytes
int* ptr_i = &i;          // When dereferencing, read 4 bytes
long long* ptr_ll = ≪  // When dereferencing, read 8 bytes
double* ptr_d = &d;       // When dereferencing, read 8 bytes
3. Dynamic Memory Allocation
Dynamic memory is allocated on the heap at runtime using new and must be manually freed using delete.
Using new and delete
// Single object allocation
int* ptr = new int;        // Allocate memory for one int
*ptr = 100;                // Assign value
std::cout << *ptr << std::endl;
delete ptr;                // Free memory
ptr = nullptr;             // Good practice: nullify after delete

// Allocate with initialization
int* ptr2 = new int(42);   // Allocate and initialize to 42
delete ptr2;

// Array allocation
int* arr = new int[5];     // Allocate array of 5 ints
arr[0] = 10;
arr[1] = 20;
delete[] arr;              // Must use delete[] for arrays
arr = nullptr;
Memory Layout: Stack vs Heap
Stack (automatic storage):          Heap (dynamic storage):
┌─────────────────────┐            ┌─────────────────────┐
│  int x = 10;        │            │  new int(42)        │
│  [cleaned up auto]  │            │  [manual cleanup]   │
│                     │            │                     │
│  Limited size       │            │  Large size         │
│  Fast access        │            │  Slower access      │
│  LIFO structure     │            │  Fragmented         │
└─────────────────────┘            └─────────────────────┘
Key Differences:
| Aspect | Stack | Heap |
|---|---|---|
| Allocation | Automatic | Manual (new) |
| Deallocation | Automatic | Manual (delete) |
| Size | Limited (~1-8MB) | Large (GB) |
| Speed | Faster | Slower |
| Lifetime | Scope-based | Until delete |
4. Void Pointers
A void* is a generic pointer that can point to any data type but cannot be dereferenced directly.
void* void_ptr;
int x = 42;
double y = 3.14;
char c = 'A';

// void* can point to any type
void_ptr = &x;
void_ptr = &y;
void_ptr = &c;

// ERROR: Cannot dereference void*
// std::cout << *void_ptr << std::endl;  // Compiler error!

// Must cast to specific type before dereferencing
void_ptr = &x;
int value = *(static_cast<int*>(void_ptr));  // OK: Cast then dereference
std::cout << value << std::endl;  // Output: 42
Common Use Cases:
// 1. Generic memory allocation functions
void* malloc(size_t size);  // C-style allocation returns void*

// 2. Generic callback functions
void process_data(void* data, void (*callback)(void*)) {
    callback(data);
}

// 3. Type-erased storage
void* user_data = new UserData();
// Later cast back: auto* ud = static_cast<UserData*>(user_data);
Important Notes:
- Cannot perform pointer arithmetic on
void* - Cannot dereference without casting
- Type safety is programmer’s responsibility
- Modern C++ prefers templates over void pointers
5. Pointer Size
The size of a pointer depends on the system architecture, not the data type it points to.
// On 64-bit systems: all pointers are 8 bytes
// On 32-bit systems: all pointers are 4 bytes

char* ptr_char;
int* ptr_int;
double* ptr_double;
long long* ptr_ll;
void* ptr_void;

std::cout << "Size of char*:      " << sizeof(ptr_char) << std::endl;    // 8 on 64-bit
std::cout << "Size of int*:       " << sizeof(ptr_int) << std::endl;     // 8 on 64-bit
std::cout << "Size of double*:    " << sizeof(ptr_double) << std::endl;  // 8 on 64-bit
std::cout << "Size of long long*: " << sizeof(ptr_ll) << std::endl;      // 8 on 64-bit
std::cout << "Size of void*:      " << sizeof(ptr_void) << std::endl;    // 8 on 64-bit

// All output: 8 bytes on 64-bit system
Why All Pointers Are The Same Size:
A pointer is just a memory address:

32-bit system:
  Address space: 0x00000000 to 0xFFFFFFFF
  Pointer size: 4 bytes (32 bits)

64-bit system:
  Address space: 0x0000000000000000 to 0xFFFFFFFFFFFFFFFF
  Pointer size: 8 bytes (64 bits)

The data type tells the compiler:
  - How many bytes to read when dereferencing
  - How much to increment/decrement in pointer arithmetic

But the address itself is always the same size!
Pointer Arithmetic Depends on Type:
int arr[5] = {10, 20, 30, 40, 50};
int* ptr = arr;

std::cout << ptr << std::endl;      // e.g., 0x1000
std::cout << ptr + 1 << std::endl;  // 0x1004 (increments by sizeof(int) = 4)

char* c_ptr = reinterpret_cast<char*>(arr);
std::cout << c_ptr << std::endl;      // 0x1000
std::cout << c_ptr + 1 << std::endl;  // 0x1001 (increments by sizeof(char) = 1)
6. Arrays and Pointers
Real-Life Analogy: Apartment Building
Think of an array as an apartment building where:
- The building address is like the array name (constant, never changes)
- Each apartment is an array element
- Apartment numbers (1, 2, 3…) are like array indices
Apartment Building:                  Array in Memory:
┌────────────────────────────┐      ┌────────────────────────────┐
│ "Sunset Towers"            │      │ int arr[5]                 │
│ Located at 100 Main St     │      │ Located at 0x1000          │
│ (Building address is FIXED)│      │ (Array name is FIXED)      │
│                            │      │                            │
│ Apt #1: John (age 25)      │      │ arr[0]: 10                 │
│ Apt #2: Mary (age 30)      │      │ arr[1]: 20                 │
│ Apt #3: Bob  (age 35)      │      │ arr[2]: 30                 │
│ Apt #4: Sue  (age 40)      │      │ arr[3]: 40                 │
│ Apt #5: Tom  (age 45)      │      │ arr[4]: 50                 │
└────────────────────────────┘      └────────────────────────────┘

Building Address: 100 Main St       Array Name: arr
  - CANNOT change to different        - CANNOT change to point to
    street address                      different memory location
  - It's a PERMANENT landmark         - It's a CONSTANT POINTER

Apartment #1 is at:                 First element at:
  100 Main St, Apt #1                 arr + 0 = 0x1000

Apartment #3 is at:                 Third element at:
  100 Main St, Apt #3                 arr + 2 = 0x1008
Why Array Names Are Constant:
// Real Life                           // Code
int arr[5] = {10, 20, 30, 40, 50};    // Build "Sunset Towers" at 100 Main St

// You CAN: Change what's inside apartments
arr[0] = 100;                         // Renovate Apt #1

// You CAN: Get a notecard with building address
int* ptr = arr;                       // Write "100 Main St" on a note
ptr++;                                // Update note to "100 Main St, Apt #2"

// You CANNOT: Move the entire building!
// arr = arr + 1;  ❌ ERROR!            // Can't relocate Sunset Towers!
// arr++;          ❌ ERROR!            // Buildings don't move!

int other[3] = {1, 2, 3};             // Different building: "Oak Plaza"
// arr = other;    ❌ ERROR!            // Can't make Sunset Towers become Oak Plaza!
Pointer vs Array Name:
Scenario: You have two notecards

NOTECARD 1 (Array Name - "arr"):
┌─────────────────────────────────┐
│ "Sunset Towers is permanently   │
│  located at 100 Main Street"    │
│                                 │
│ ❌ You CANNOT erase this and     │
│    write a different address    │
│ ✓ You CAN visit any apartment   │
└─────────────────────────────────┘

NOTECARD 2 (Pointer - "ptr"):
┌─────────────────────────────────┐
│ "Current location: 100 Main St" │
│                                 │
│ ✓ You CAN erase and write:      │
│   "Current location: 456 Oak"   │
│ ✓ You CAN visit any apartment   │
└─────────────────────────────────┘
Arrays and Pointers
Array Name as a Constant Pointer
When you declare an array, the array name acts like a constant pointer to the first element.
int arr[5] = {10, 20, 30, 40, 50};

// arr is equivalent to &arr[0]
std::cout << "Array name (arr):        " << arr << std::endl;         // e.g., 0x1000
std::cout << "Address of first elem:   " << &arr[0] << std::endl;    // e.g., 0x1000
std::cout << "First element (*arr):    " << *arr << std::endl;        // 10
std::cout << "First element (arr[0]):  " << arr[0] << std::endl;      // 10
Memory Layout of Arrays:
Array: int arr[5] = {10, 20, 30, 40, 50};

Memory View:
┌─────────┬─────────┬─────────┬─────────┬─────────┐
│   10    │   20    │   30    │   40    │   50    │
└─────────┴─────────┴─────────┴─────────┴─────────┘
↑         ↑         ↑         ↑         ↑
0x1000    0x1004    0x1008    0x100C    0x1010
│
arr (points here, FIXED location)

arr[0] ≡ *(arr + 0) ≡ *arr
arr[1] ≡ *(arr + 1)
arr[2] ≡ *(arr + 2)
arr[3] ≡ *(arr + 3)
arr[4] ≡ *(arr + 4)
Array vs Pointer: Key Difference
int arr[5] = {10, 20, 30, 40, 50};
int* ptr = arr;  // ptr points to first element

// Similarities:
std::cout << arr[2] << std::endl;    // 30
std::cout << ptr[2] << std::endl;    // 30
std::cout << *(arr + 2) << std::endl; // 30
std::cout << *(ptr + 2) << std::endl; // 30

// KEY DIFFERENCE: arr is a CONSTANT POINTER
ptr = ptr + 1;     // OK: ptr can be reassigned
// arr = arr + 1;  // ERROR: arr is a constant pointer!

int another[3] = {1, 2, 3};
ptr = another;     // OK: ptr can point to different array
// arr = another;  // ERROR: Cannot reassign arr!
Why Array Name is a Constant Pointer:
int arr[5] = {10, 20, 30, 40, 50};

// Think of arr as:
// int* const arr = <address of first element>;

// This is why you CAN:
*arr = 100;        // Modify the value at arr[0]
*(arr + 1) = 200;  // Modify the value at arr[1]

// But you CANNOT:
// arr = arr + 1;     // Change where arr points
// arr++;             // Increment arr
// int other[3];
// arr = other;       // Point arr to different array

// However, a pointer TO the array can be changed:
int* ptr = arr;
ptr++;             // OK: ptr now points to arr[1]
ptr = arr;         // OK: Reset ptr to point to arr[0]
Visualization:
Stack Memory:
┌─────────────────────────────────────┐
│  int arr[5] = {10, 20, 30, ...};    │
│  ┌────┬────┬────┬────┬────┐         │
│  │ 10 │ 20 │ 30 │ 40 │ 50 │         │
│  └────┴────┴────┴────┴────┘         │
│   ↑                                 │
│   │ arr (CONSTANT - can't change)   │
│   │                                 │
│  ┌┴──────┐                          │
│  │  ptr  │ (VARIABLE - can change)  │
│  └───────┘                          │
│   ↓                                 │
│  Can be reassigned to point         │
│  anywhere                           │
└─────────────────────────────────────┘
Dynamic Array Allocation
Unlike static arrays, dynamically allocated arrays use pointers that CAN be reassigned.
Allocating Dynamic Arrays:
// Allocate array of 5 integers
int* arr = new int[5];

// Initialize values
arr[0] = 10;
arr[1] = 20;
arr[2] = 30;
arr[3] = 40;
arr[4] = 50;

// Access like normal array
for (int i = 0; i < 5; i++) {
    std::cout << arr[i] << " ";
}
std::cout << std::endl;

// IMPORTANT: Must use delete[] for arrays
delete[] arr;
arr = nullptr;
Allocate with Initialization:
// C++11 and later: Initialize with values
int* arr = new int[5]{10, 20, 30, 40, 50};

// Zero-initialize
int* zeros = new int[5]();  // All elements set to 0

// Default-initialize (garbage values for primitives)
int* uninitialized = new int[5];

// Cleanup
delete[] arr;
delete[] zeros;
delete[] uninitialized;
Dynamic Array Memory Layout:
Stack:                          Heap:
┌─────────────┐                ┌────┬────┬────┬────┬────┐
│  int* arr   │ ───────────────>│ 10 │ 20 │ 30 │ 40 │ 50 │
│  (8 bytes)  │                └────┴────┴────┴────┴────┘
└─────────────┘                (20 bytes allocated)
     │
     │ Can be reassigned!
     ▼
┌────────────────┐
│ arr = new ...  │  OK: This is a regular pointer
└────────────────┘
Deallocating Arrays: delete vs delete[]
CRITICAL: Always use delete[] for arrays allocated with new[].
// Single object
int* ptr = new int(42);
delete ptr;  // Correct: Use delete for single object

// Array
int* arr = new int[10];
delete[] arr;  // Correct: Use delete[] for arrays

// WRONG - Undefined Behavior:
int* arr2 = new int[10];
delete arr2;  // BUG: Should be delete[]
              // May corrupt heap, leak memory, or crash

int* ptr2 = new int(42);
delete[] ptr2;  // BUG: Should be delete
                // Undefined behavior
Why delete[] is Necessary:
When you use new[]:
┌────────────────────────────────────┐
│ [hidden size info] [10] [20] [30]  │
└────────────────────────────────────┘
         ↑              ↑
         │              └─ Your pointer points here
         └─ Compiler stores array size here

delete[] knows to:
1. Call destructor for each element (for objects)
2. Read the hidden size information
3. Deallocate the entire block

delete (wrong) will:
1. Call destructor only once
2. Deallocate wrong amount of memory
3. Cause undefined behavior
Example with Objects:
class MyClass {
public:
    MyClass() { std::cout << "Constructor" << std::endl; }
    ~MyClass() { std::cout << "Destructor" << std::endl; }
};

// Allocate array of objects
MyClass* arr = new MyClass[3];
// Output:
// Constructor
// Constructor
// Constructor

delete[] arr;  // Calls destructor for ALL 3 objects
// Output:
// Destructor
// Destructor
// Destructor

// If you mistakenly use delete instead of delete[]:
MyClass* arr2 = new MyClass[3];
delete arr2;  // BUG: Only calls destructor ONCE!
              // Other 2 objects not properly destroyed
Passing Arrays to Functions
When you pass an array to a function, it decays to a pointer. The size information is lost!
Array Decay:
void print_array(int arr[], int size) {  // arr[] decays to int*
    std::cout << "Inside function, sizeof(arr): " << sizeof(arr) << std::endl;
    // Output: 8 (size of pointer, not array!)

    for (int i = 0; i < size; i++) {
        std::cout << arr[i] << " ";
    }
    std::cout << std::endl;
}

int main() {
    int arr[5] = {10, 20, 30, 40, 50};

    std::cout << "In main, sizeof(arr): " << sizeof(arr) << std::endl;
    // Output: 20 (5 elements × 4 bytes each)

    print_array(arr, 5);  // Must pass size separately!

    return 0;
}
Why You Need to Pass Size:
In main():
┌─────────────────────────────────────┐
│  int arr[5] = {10, 20, 30, 40, 50}; │
│                                     │
│  sizeof(arr) = 20 bytes             │
│  Compiler KNOWS it's 5 elements     │
└─────────────────────────────────────┘

When passed to function:
┌─────────────────────────────────────┐
│  void func(int arr[])               │
│                                     │
│  arr is now just int*               │
│  sizeof(arr) = 8 (pointer size)     │
│  No size information!               │
│  Could point to 1, 5, 100 elements  │
└─────────────────────────────────────┘

Solution: Pass size explicitly!
func(arr, 5);
Different Ways to Pass Arrays:
// Method 1: Array notation (still decays to pointer)
void func1(int arr[], int size) {
    // arr is int*
}

// Method 2: Pointer notation (equivalent to method 1)
void func2(int* arr, int size) {
    // More honest about what it is
}

// Method 3: Reference to array (preserves size!)
void func3(int (&arr)[5]) {
    // Size is part of type - no decay!
    // But only works for arrays of exactly 5 elements
    std::cout << sizeof(arr) << std::endl;  // 20 (actual array size)
}

// Method 4: Template (best for generic code)
template<size_t N>
void func4(int (&arr)[N]) {
    // Works for any size array
    std::cout << "Array size: " << N << std::endl;
}

// Method 5: Modern C++ - use std::array or std::vector
void func5(const std::vector<int>& vec) {
    // vec.size() always available!
    for (size_t i = 0; i < vec.size(); i++) {
        std::cout << vec[i] << " ";
    }
}

int main() {
    int arr[5] = {10, 20, 30, 40, 50};

    func1(arr, 5);           // OK
    func2(arr, 5);           // OK
    func3(arr);              // OK: size deduced from type
    func4(arr);              // OK: N = 5 automatically

    std::vector<int> vec = {10, 20, 30, 40, 50};
    func5(vec);              // Best: size is always known

    return 0;
}
Why Array Size is Not Passed Automatically:
void mystery_function(int* arr) {
    // From the pointer alone, we cannot tell:
    // - Is this an array or single element?
    // - If array, how many elements?
    // - Where does it end?

    // This is dangerous:
    for (int i = 0; i < 100; i++) {  // What if array has < 100 elements?
        arr[i] = 0;  // Could write past array bounds!
    }
}

// Solution: Always pass size
void safe_function(int* arr, int size) {
    for (int i = 0; i < size; i++) {
        arr[i] = 0;  // Safe: we know the bounds
    }
}
Multi-dimensional Arrays
Static Multi-dimensional Arrays:
int matrix[3][4] = {
    {1, 2, 3, 4},
    {5, 6, 7, 8},
    {9, 10, 11, 12}
};

// Memory layout is contiguous:
// [1][2][3][4][5][6][7][8][9][10][11][12]

std::cout << matrix[1][2] << std::endl;  // Output: 7
std::cout << *(*(matrix + 1) + 2) << std::endl;  // Also: 7
Dynamic 2D Arrays (Method 1: Array of Pointers):
// Allocate array of pointers
int** matrix = new int*[3];  // 3 rows

// Allocate each row
for (int i = 0; i < 3; i++) {
    matrix[i] = new int[4];  // 4 columns
}

// Use it
matrix[1][2] = 42;

// Deallocate (must free in reverse order)
for (int i = 0; i < 3; i++) {
    delete[] matrix[i];  // Free each row
}
delete[] matrix;  // Free array of pointers
Memory Layout:
Stack:        Heap:
┌────────┐    ┌─────┐    ┌────┬────┬────┬────┐
│ matrix │───>│ ptr │───>│ 1  │ 2  │ 3  │ 4  │  Row 0
└────────┘    ├─────┤    └────┴────┴────┴────┘
              │ ptr │───>┌────┬────┬────┬────┐
              ├─────┤    │ 5  │ 6  │ 7  │ 8  │  Row 1
              │ ptr │─┐  └────┴────┴────┴────┘
              └─────┘ │  ┌────┬────┬────┬────┐
                      └─>│ 9  │ 10 │ 11 │ 12 │  Row 2
                         └────┴────┴────┴────┘
Not contiguous in memory!
Dynamic 2D Arrays (Method 2: Contiguous Memory):
// Allocate as single block (better for cache performance)
int* matrix = new int[3 * 4];  // Total elements

// Access using index calculation: matrix[row * cols + col]
int rows = 3, cols = 4;
matrix[1 * cols + 2] = 42;  // matrix[1][2] = 42

// Helper function for cleaner access
auto at = [&](int r, int c) -> int& {
    return matrix[r * cols + c];
};

at(1, 2) = 42;

// Cleanup is simple
delete[] matrix;
Memory Layout:
Contiguous block in heap:
┌────┬────┬────┬────┬────┬────┬────┬────┬────┬────┬────┬────┐
│ 1  │ 2  │ 3  │ 4  │ 5  │ 6  │ 7  │ 8  │ 9  │ 10 │ 11 │ 12 │
└────┴────┴────┴────┴────┴────┴────┴────┴────┴────┴────┴────┘
 └─── Row 0 ───┘ └─── Row 1 ───┘ └─── Row 2 ───┘

Access: matrix[row * num_cols + col]
Summary Table: Arrays vs Pointers
| Feature | Static Array | Dynamic Array | Pointer |
|---|---|---|---|
| Declaration | int arr[5] | int* arr = new int[5] | int* ptr |
| Size known at compile-time | ✓ Yes | ✗ No | ✗ No |
| Can be reassigned | ✗ No (constant pointer) | ✓ Yes | ✓ Yes |
| Stored on | Stack | Heap | Stack (pointer itself) |
| Automatic cleanup | ✓ Yes | ✗ No (need delete[]) | ✗ No |
| Sizeof gives | Array size | Pointer size | Pointer size |
| Passed to function | Decays to pointer | Already pointer | Pointer |
Best Practices for Arrays:
// ❌ Avoid: C-style arrays for new code
int arr[100];

// ✅ Prefer: std::array (fixed size)
#include <array>
std::array<int, 100> arr;  // Size is part of type
arr.size();  // Always available

// ✅ Prefer: std::vector (dynamic size)
#include <vector>
std::vector<int> vec(100);  // Dynamic, resizable
vec.size();  // Always available
vec.push_back(42);  // Can grow

// ✅ For passing arrays to functions
void process(const std::vector<int>& data) {
    // Size is always available via data.size()
}

// ✅ For 2D data
std::vector<std::vector<int>> matrix(rows, std::vector<int>(cols));
// Or for better performance:
std::vector<int> matrix(rows * cols);
7. Const Pointers Variations
There are three types of const pointer declarations, each with different meanings.
1. Pointer to Constant (const T* or T const*)
int value = 42;
const int* ptr = &value;  // Pointer to constant int

// *ptr = 100;  // ERROR: Cannot modify the value through ptr
value = 100;    // OK: Can modify value directly

int another = 50;
ptr = &another; // OK: Can change where ptr points
Memory View:
┌──────────────┐
│  value = 42  │ ← Can't modify via ptr
└──────────────┘
      ↑
      │ (can change this pointer)
   ┌──┴──┐
   │ ptr │
   └─────┘
2. Constant Pointer (T* const)
int value = 42;
int* const ptr = &value;  // Constant pointer to int

*ptr = 100;     // OK: Can modify the value
// ptr = &another; // ERROR: Cannot change where ptr points
Memory View:
┌──────────────┐
│ value = 100  │ ← Can modify via ptr
└──────────────┘
      ↑
      │ (FIXED - cannot change)
   ┌──┴──┐
   │ ptr │
   └─────┘
3. Constant Pointer to Constant (const T* const)
int value = 42;
const int* const ptr = &value;  // Constant pointer to constant int

// *ptr = 100;     // ERROR: Cannot modify the value
// ptr = &another; // ERROR: Cannot change where ptr points
Memory View:
┌──────────────┐
│  value = 42  │ ← Can't modify via ptr
└──────────────┘
      ↑
      │ (FIXED - cannot change)
   ┌──┴──┐
   │ ptr │
   └─────┘
Summary Table:
| Declaration | Can Modify Value? | Can Change Pointer? | Read as |
|---|---|---|---|
int* ptr | ✓ Yes | ✓ Yes | Pointer to int |
const int* ptr | ✗ No | ✓ Yes | Pointer to const int |
int* const ptr | ✓ Yes | ✗ No | Const pointer to int |
const int* const ptr | ✗ No | ✗ No | Const pointer to const int |
Mnemonic: Read Right to Left
const int* ptr;        // ptr is a pointer to const int
int* const ptr;        // ptr is a const pointer to int
const int* const ptr;  // ptr is a const pointer to const int
8. Breaking Constantness (The Hack)
While const is meant to protect data, C++ provides ways to remove const-ness. Use with extreme caution!
Using const_cast
const int value = 42;
const int* const_ptr = &value;

// Remove const using const_cast
int* mutable_ptr = const_cast<int*>(const_ptr);
*mutable_ptr = 100;  // Undefined Behavior if value was truly const!

std::cout << value << std::endl;  // May still print 42 due to optimization
std::cout << *mutable_ptr << std::endl;  // May print 100
Why This Is Dangerous:
// Case 1: Originally non-const (OK)
int x = 42;
const int* ptr = &x;
int* mutable_ptr = const_cast<int*>(ptr);
*mutable_ptr = 100;  // OK: x was not const originally

// Case 2: Originally const (UNDEFINED BEHAVIOR)
const int y = 42;
const int* ptr2 = &y;
int* mutable_ptr2 = const_cast<int*>(ptr2);
*mutable_ptr2 = 100;  // UNDEFINED BEHAVIOR! Compiler may have optimized assuming y never changes
Compiler Optimizations Can Break Your Code:
const int value = 42;

// Compiler might replace all uses of 'value' with literal 42
if (value == 42) {
    std::cout << "Always true!" << std::endl;
}

// Even if you modify via const_cast, the if statement
// might still use the literal 42 due to optimization!
Legitimate Use Case:
// Working with legacy C APIs that don't use const correctly
void legacy_function(char* str);  // Doesn't modify str, but signature is wrong

void modern_code() {
    const char* message = "Hello";
    // We know legacy_function won't modify str
    legacy_function(const_cast<char*>(message));  // Acceptable if you're sure
}
Other Ways to Break Const (All bad):
const int value = 42;
// Method 1: C-style cast (discouraged)
int* ptr1 = (int*)&value;
// Method 2: reinterpret_cast (very dangerous)
int* ptr2 = reinterpret_cast<int*>(const_cast<void*>(static_cast<const void*>(&value)));
// Method 3: memcpy (also undefined behavior)
int copy;
memcpy(©, &value, sizeof(int));
copy = 100;
memcpy(const_cast<int*>(&value), ©, sizeof(int));
Bottom Line: If you’re using const_cast, you’re probably doing something wrong. Reconsider your design.
9. Placement New Operator
Placement new constructs an object at a pre-allocated memory address without allocating new memory.
Basic Syntax:
#include <new>  // Required for placement new

// Allocate raw memory buffer
char buffer[sizeof(int)];

// Construct an int at the buffer location
int* ptr = new (buffer) int(42);  // Placement new

std::cout << *ptr << std::endl;  // Output: 42

// Must manually call destructor (no delete needed for placement new)
ptr->~int();  // Destructor call (trivial for int, but important for classes)
Complex Example with Classes:
class MyClass {
public:
    int x;
    double y;

    MyClass(int x_val, double y_val) : x(x_val), y(y_val) {
        std::cout << "Constructor called" << std::endl;
    }

    ~MyClass() {
        std::cout << "Destructor called" << std::endl;
    }
};

// Pre-allocate memory
alignas(MyClass) char buffer[sizeof(MyClass)];

// Construct object in buffer
MyClass* obj = new (buffer) MyClass(10, 3.14);

std::cout << "x: " << obj->x << ", y: " << obj->y << std::endl;

// Must manually call destructor
obj->~MyClass();

// No delete needed - we didn't allocate memory with new
Memory Diagram:
Regular new:
┌────────────────────────────────────┐
│ new MyClass(10, 3.14)              │
├────────────────────────────────────┤
│ 1. Allocate memory (heap)          │
│ 2. Construct object in that memory │
│ 3. Return pointer                  │
└────────────────────────────────────┘

Placement new:
┌────────────────────────────────────┐
│ char buffer[sizeof(MyClass)];      │ ← Memory already exists
│ new (buffer) MyClass(10, 3.14);    │
├────────────────────────────────────┤
│ 1. Use provided address (buffer)   │
│ 2. Construct object there          │
│ 3. Return pointer                  │
└────────────────────────────────────┘
Use Cases:
1. Memory Pools
// Pre-allocate a pool of memory
const size_t POOL_SIZE = 1024;
char memory_pool[POOL_SIZE];
size_t offset = 0;

// Allocate objects from the pool
MyClass* obj1 = new (memory_pool + offset) MyClass(1, 1.1);
offset += sizeof(MyClass);

MyClass* obj2 = new (memory_pool + offset) MyClass(2, 2.2);
offset += sizeof(MyClass);

// Cleanup
obj1->~MyClass();
obj2->~MyClass();
2. Reconstructing Objects In-Place
MyClass* obj = new MyClass(10, 3.14);

// Destroy and reconstruct with new values
obj->~MyClass();
new (obj) MyClass(20, 6.28);  // Reuse same memory

delete obj;  // Now delete is OK because original memory was from new
3. Custom Allocators (std::vector, etc.)
template<typename T>
class CustomAllocator {
public:
    void construct(T* ptr, const T& value) {
        new (ptr) T(value);  // Placement new
    }

    void destroy(T* ptr) {
        ptr->~T();  // Manual destructor call
    }
};
Important Rules:
- Never delete placement new memory unless the original memory was allocated with regular new
- Always call destructor manually for non-trivial types
- Ensure proper alignment using
alignas - Be careful with memory lifetime - the buffer must outlive the object
10. Best Practices
1. Always Initialize Pointers
// Bad
int* ptr;  // Uninitialized - contains garbage

// Good
int* ptr = nullptr;  // Explicitly null
int* ptr2 = new int(42);  // Immediately initialized
2. Check for nullptr Before Dereferencing
int* ptr = get_some_pointer();

if (ptr != nullptr) {
    *ptr = 100;  // Safe
}

// Or use modern syntax
if (ptr) {
    *ptr = 100;
}
3. Always Set to nullptr After delete
int* ptr = new int(42);
delete ptr;
ptr = nullptr;  // Prevents dangling pointer

// Now safe to delete again (no-op)
delete ptr;  // OK: deleting nullptr is safe
4. Use Smart Pointers (Modern C++ : Will cover in detail later)
#include <memory>

// Use unique_ptr for exclusive ownership
std::unique_ptr<int> ptr1 = std::make_unique<int>(42);

// Use shared_ptr for shared ownership
std::shared_ptr<int> ptr2 = std::make_shared<int>(100);

// No need to delete - automatic cleanup!
5. Match new/delete and new[]/delete[]
// Single object
int* ptr = new int;
delete ptr;  // Correct

// Array
int* arr = new int[10];
delete[] arr;  // Correct - must use delete[]

// WRONG combinations:
// int* ptr = new int;
// delete[] ptr;  // WRONG!

// int* arr = new int[10];
// delete arr;  // WRONG!
6. Avoid Raw Pointers for Ownership
// Bad: Who owns this? Who deletes it?
int* create_resource() {
    return new int(42);
}

// Good: Clear ownership
std::unique_ptr<int> create_resource() {
    return std::make_unique<int>(42);
}
7. Use References When You Don’t Need nullptr
// If something must exist, use reference
void process(int& value) {  // Cannot be null
    value = 42;
}

// Use pointer only if nullptr is meaningful
void process(int* value) {  // Can be null
    if (value) {
        *value = 42;
    }
}
8. Const Correctness
// Promise not to modify through pointer
void read_only(const int* ptr) {
    std::cout << *ptr << std::endl;
}

// Clear intent to modify
void modify(int* ptr) {
    *ptr = 100;
}
10. Common Bugs
1. Dangling Pointer
int* create_dangling() {
    int x = 42;
    return &x;  // BUG: x is destroyed when function returns
}

int* ptr = create_dangling();
*ptr = 100;  // Undefined behavior! Memory is invalid
Fix:
int* create_safe() {
    int* ptr = new int(42);
    return ptr;  // OK: Memory persists
}

// Or better: use smart pointer
std::unique_ptr<int> create_safer() {
    return std::make_unique<int>(42);
}
2. Double Delete
int* ptr = new int(42);
delete ptr;
delete ptr;  // BUG: Double delete - undefined behavior!
Fix:
int* ptr = new int(42);
delete ptr;
ptr = nullptr;  // Set to null after delete
delete ptr;  // OK: Deleting nullptr is safe (no-op)
3. Memory Leak
void leak_memory() {
    int* ptr = new int(42);
    // Forgot to delete!
}  // BUG: Memory is leaked

void leak_on_exception() {
    int* ptr = new int(42);
    some_function_that_throws();  // If this throws...
    delete ptr;  // ...this never executes - LEAK!
}
Fix:
void no_leak() {
    std::unique_ptr<int> ptr = std::make_unique<int>(42);
}  // Automatically cleaned up

void no_leak_on_exception() {
    std::unique_ptr<int> ptr = std::make_unique<int>(42);
    some_function_that_throws();  // Even if this throws, ptr is cleaned up
}
4. Array Delete Mismatch
int* arr = new int[10];
delete arr;  // BUG: Should be delete[]

int* ptr = new int;
delete[] ptr;  // BUG: Should be delete
Fix:
int* arr = new int[10];
delete[] arr;  // Correct

// Or better: use std::vector
std::vector<int> arr(10);  // No manual delete needed
5. Using After Delete
int* ptr = new int(42);
delete ptr;
*ptr = 100;  // BUG: Use after free - undefined behavior!
Fix:
int* ptr = new int(42);
delete ptr;
ptr = nullptr;  // Set to null

if (ptr) {
    *ptr = 100;  // Won't execute - safe
}
6. Lost Pointer
int* ptr = new int(42);
ptr = new int(100);  // BUG: Lost reference to first allocation - LEAK!
Fix:
int* ptr = new int(42);
delete ptr;  // Clean up first
ptr = new int(100);

// Or use smart pointer
std::unique_ptr<int> ptr = std::make_unique<int>(42);
ptr = std::make_unique<int>(100);  // Old memory automatically deleted
7. Null Pointer Dereference
int* ptr = nullptr;
*ptr = 42;  // BUG: Dereferencing null pointer - crash!
Fix:
int* ptr = nullptr;
if (ptr) {
    *ptr = 42;  // Safe
}

// Or use assert for debugging
#include <cassert>
assert(ptr != nullptr);
*ptr = 42;
8. Uninitialized Pointer
int* ptr;  // Uninitialized - contains garbage
*ptr = 42;  // BUG: Writing to random memory!
Fix:
int* ptr = nullptr;  // Always initialize
if (ptr) {
    *ptr = 42;
}

// Or initialize immediately
int* ptr = new int;
*ptr = 42;
9. Pointer Arithmetic Out of Bounds
int arr[5] = {1, 2, 3, 4, 5};
int* ptr = arr;
ptr += 10;  // BUG: Points outside array
*ptr = 100;  // Undefined behavior!
Fix:
int arr[5] = {1, 2, 3, 4, 5};
int* ptr = arr;
// Check bounds
if (ptr + 10 < arr + 5) {
ptr += 10;
*ptr = 100;
}
// Or use std::vector with at()
std::vector<int> vec = {1, 2, 3, 4, 5};
try {
vec.at(10) = 100; // Throws exception if out of bounds
} catch (const std::out_of_range& e) {
std::cerr << "Out of bounds!" << std::endl;
}
10. Mixing malloc/free with new/delete
int* ptr = (int*)malloc(sizeof(int));
delete ptr; // BUG: Must use free()
int* ptr2 = new int;
free(ptr2); // BUG: Must use delete
Fix:
// C-style
int* ptr = (int*)malloc(sizeof(int));
free(ptr);
// C++-style (preferred)
int* ptr2 = new int;
delete ptr2;
Summary
Key Takeaways:
- Pointers store memory addresses, not values
- Dereferencing accesses the value at the stored address
- Dynamic memory requires manual management (new/delete)
- All pointers are the same size regardless of type
- Const pointers have three variations with different restrictions
- Smart pointers are preferred in modern C++ for automatic memory management
- Always initialize pointers and check for nullptr
- Match allocation/deallocation methods (new/delete, new[]/delete[], malloc/free)
Modern C++ Recommendations:
- ✅ Use
std::unique_ptrandstd::shared_ptr - ✅ Use
std::vectorinstead of arrays - ✅ Use references when ownership isn’t involved
- ✅ Use RAII (Resource Acquisition Is Initialization) principles(Will cover later)
- ❌ Avoid raw pointers for ownership
- ❌ Avoid manual memory management when possible
- ❌ Avoid
const_castunless absolutely necessary
Remember: With great pointer power comes great responsibility. 🎯
Classes and Objects in C++
Table of Contents
- What is a Class?
- What is an Object?
- Class Members: Attributes and Member Functions
- Access Specifiers
- Creating Objects of a Class
- Summary
1. What is a Class?
A class is a user-defined blueprint or template for creating objects. It defines a data structure that bundles data (attributes) and functions (methods) that operate on that data together.
Real-World Example: Car
Think of a class as a blueprint for a car. The blueprint defines:
- Properties: color, brand, model, speed, fuel level
- Behaviors: start engine, accelerate, brake, turn
Just like a car blueprint isn’t an actual car, a class itself isn’t an object—it’s just the design specification.
class Car {
// Attributes (data members)
string brand;
string model;
int year;
double speed;
// Member functions (methods)
void startEngine() {
cout << "Engine started!" << endl;
}
void accelerate() {
speed += 10;
cout << "Speed: " << speed << " km/h" << endl;
}
};
2. What is an Object?
An object is an instance of a class. It’s a concrete entity created from the class blueprint that occupies memory and has actual values.
Relating to Real-World Example
Using our car analogy:
- Class (Car): The blueprint/design document
- Objects: Actual cars manufactured from that blueprint
- Object 1: A red Toyota Camry 2023
- Object 2: A blue Honda Accord 2024
- Object 3: A black Ford Mustang 2022
Each object has its own set of attribute values but shares the same structure and behaviors defined by the class.
Car myCar; // Object 1
Car yourCar; // Object 2
Car rentalCar; // Object 3
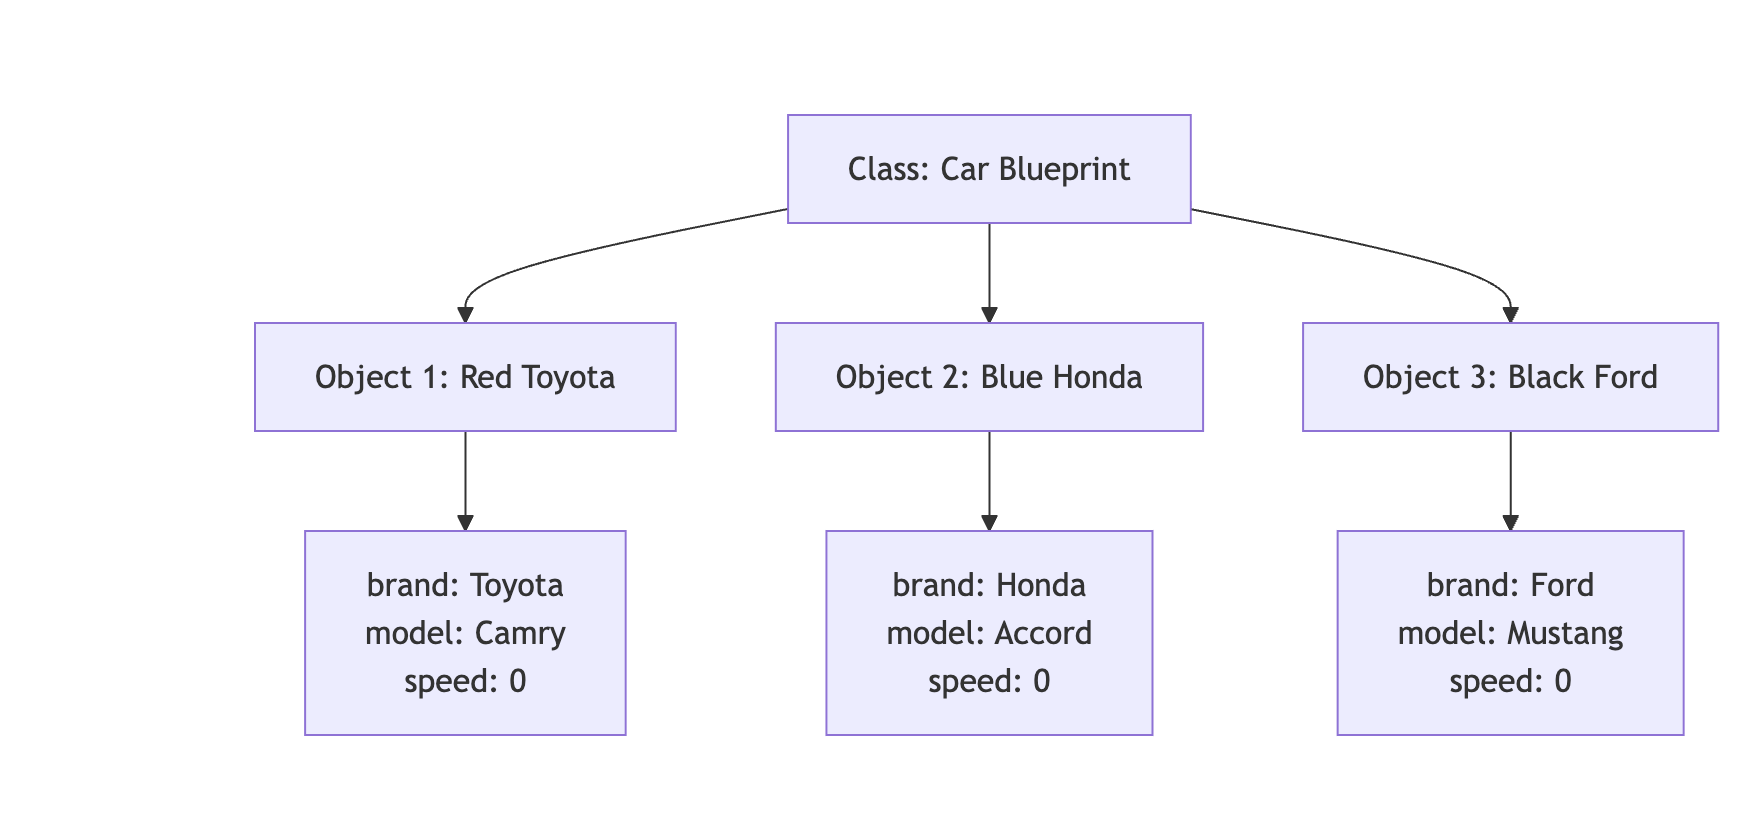
3. Class Members: Attributes and Member Functions
3.1 Attributes (Data Members)
Attributes are variables that hold the state or properties of an object. They represent the characteristics of the object.
Examples:
- For a
Carclass:brand,model,year,speed,fuelLevel - For a
Studentclass:name,rollNumber,grade,age - For a
BankAccountclass:accountNumber,balance,accountHolder
3.2 Member Functions (Methods)
Member functions are functions defined inside a class that operate on the object’s data. They represent the behaviors or actions an object can perform.
Types of Member Functions:
-
Functions that modify object state
void accelerate() { speed += 10; } -
Functions that retrieve information
double getSpeed() { return speed; } -
Functions that perform operations
void displayInfo() { cout << brand << " " << model << endl; }
Complete Example
class BankAccount {
// Attributes
string accountHolder;
long accountNumber;
double balance;
// Member Functions
void deposit(double amount) {
balance += amount;
cout << "Deposited: $" << amount << endl;
}
void withdraw(double amount) {
if (balance >= amount) {
balance -= amount;
cout << "Withdrawn: $" << amount << endl;
}
}
double getBalance() {
return balance;
}
};
4. Access Specifiers
Access specifiers control the accessibility of class members from outside the class. C++ provides three access specifiers:
4.1 Public
Members declared as public are accessible from anywhere in the program.
class Car {
public:
string brand; // Can be accessed from anywhere
void startEngine() { // Can be called from anywhere
cout << "Engine started!" << endl;
}
};
Usage:
Car myCar;
myCar.brand = "Toyota"; // ✓ Allowed
myCar.startEngine(); // ✓ Allowed
4.2 Private
Members declared as private are only accessible within the class itself. This is the default access level in C++.
Key Points:
- Private data members cannot be accessed directly from outside the class
- Private data members can be accessed by member functions within the same class
- Member functions can read, modify, and manipulate private data members
class BankAccount {
private:
double balance; // Cannot be accessed directly from outside
void updateLog() { // Cannot be called from outside
// Internal logging function
}
public:
void deposit(double amount) {
balance += amount; // ✓ Member function CAN access private data
updateLog(); // ✓ Member function CAN call private function
}
double getBalance() {
return balance; // ✓ Member function CAN access private data
}
void showDetails() {
cout << "Balance: $" << balance << endl; // ✓ Accessing private member
updateLog(); // ✓ Calling private function
}
};
Usage:
BankAccount account;
account.balance = 1000; // ✗ Error: balance is private, cannot access from outside
account.updateLog(); // ✗ Error: updateLog is private, cannot call from outside
account.deposit(1000); // ✓ Allowed: deposit is public
account.getBalance(); // ✓ Allowed: getBalance is public (internally accesses private balance)
Summary:
- Private members are hidden from outside the class
- Private members are accessible to all member functions inside the class
- This provides data encapsulation and security
4.3 Protected
Members declared as protected are accessible within the class and by derived (child) classes.
class Vehicle {
protected:
int speed; // Accessible in Vehicle and its derived classes
public:
void setSpeed(int s) {
speed = s;
}
};
Note: Protected access specifier is primarily used in inheritance and will be discussed in detail in the Inheritance section.
4.4 Access Specifier Comparison
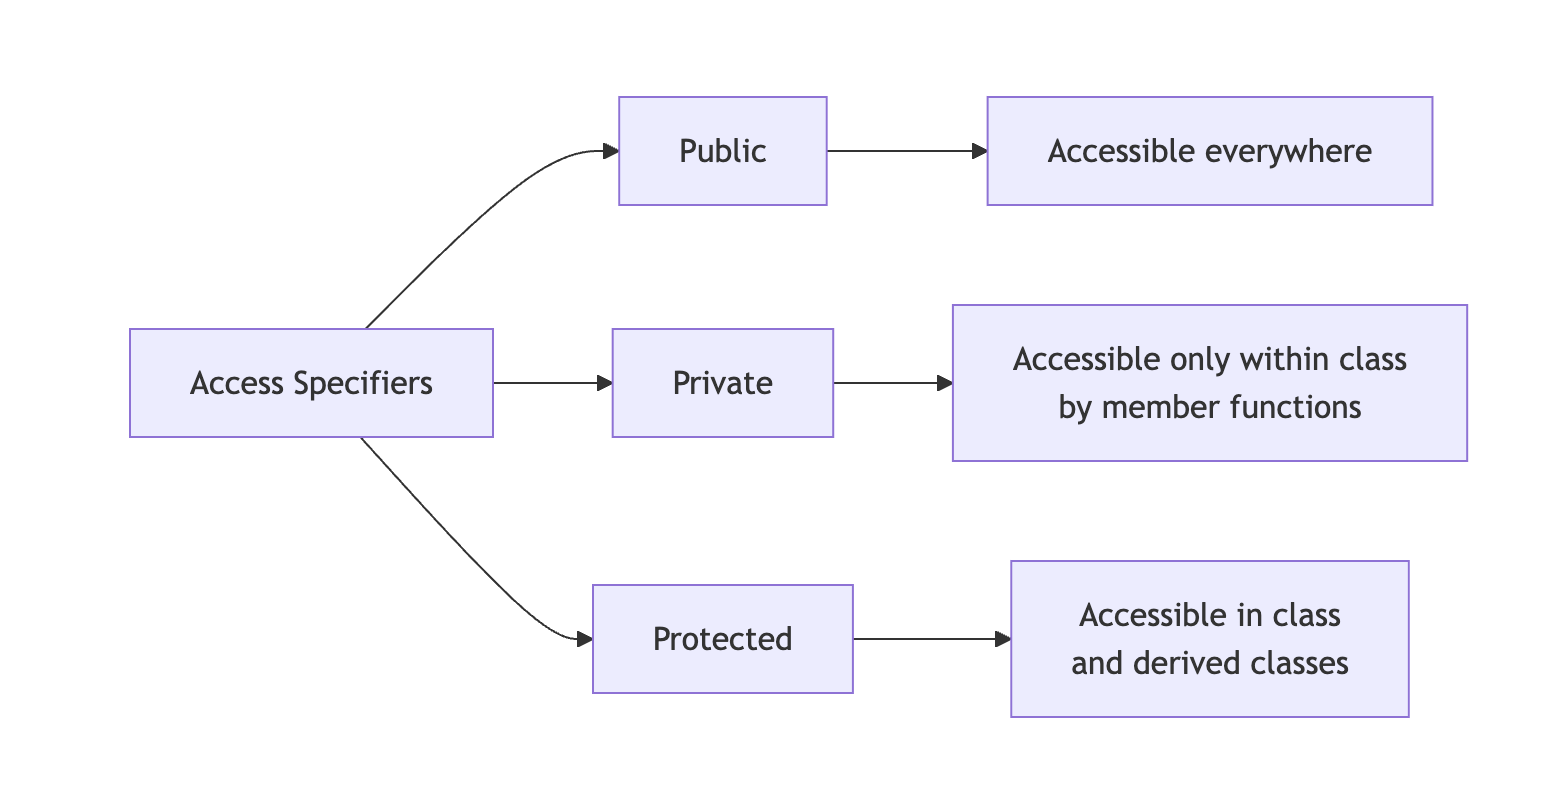
4.5 When to Use Which Access Specifier
| Access Specifier | When to Use | Example Use Cases | Benefits |
|---|---|---|---|
| Public | For interfaces that need to be accessed from anywhere | • Getter/Setter methods • Public utility functions • Methods that define class behavior | • Easy access • Clear interface • User-friendly |
| Private | For internal implementation details that should be hidden | • Data members (variables) • Helper/utility functions • Internal calculations • Sensitive data | • Data protection • Encapsulation • Security • Prevents accidental modification |
| Protected | For members that should be accessible to derived classes | • Attributes shared with child classes • Functions used by inheritance hierarchy | • Supports inheritance • Controlled access in hierarchy • Flexibility for derived classes |
Best Practice Example:
class Student {
private:
// Private: Internal data that should be protected
string name;
int rollNumber;
float marks;
int age;
// Private: Internal helper function
bool validateMarks(float m) {
return (m >= 0 && m <= 100);
}
protected:
// Protected: For use in derived classes (e.g., GraduateStudent)
string department;
public:
// Public: Interface for outside world to interact with the class
void setName(string n) {
name = n;
}
string getName() {
return name;
}
void setMarks(float m) {
if (validateMarks(m)) { // Using private helper function
marks = m;
}
}
float getMarks() {
return marks;
}
void displayInfo() {
cout << "Name: " << name << ", Roll: " << rollNumber
<< ", Marks: " << marks << endl;
}
};
Decision Guide:
- Start with private - Make everything private by default
- Expose what’s needed - Make only necessary methods public
- Use protected for inheritance - When planning class hierarchies
- Never expose data directly - Use getter/setter methods instead
5. Creating Objects of a Class
There are multiple ways to create objects in C++. Here are the various approaches:
5.1 Static Allocation (Stack)
Objects are created on the stack and automatically destroyed when they go out of scope.
// Syntax: ClassName objectName;
Car myCar; // Object created on stack
Student student1; // Another object
BankAccount account; // One more object
Characteristics:
- Memory allocated on the stack
- Automatic destruction when scope ends
- Faster allocation
- Limited by stack size
5.2 Dynamic Allocation (Heap)
Objects are created on the heap using the new keyword and must be manually deleted.
// Syntax: ClassName* objectName = new ClassName;
Car* carPtr = new Car; // Object created on heap
Student* studentPtr = new Student;
// Using the object
carPtr->startEngine();
// Must manually delete to free memory
delete carPtr;
delete studentPtr;
Characteristics:
- Memory allocated on the heap
- Manual memory management required
- Slower allocation than stack
- Can allocate larger objects
- Persists until explicitly deleted
5.3 Array of Objects
You can create multiple objects using arrays.
Static Array:
// Array of objects on stack
Car cars[5]; // Creates 5 Car objects
cars[0].startEngine();
cars[1].accelerate();
Dynamic Array:
// Array of objects on heap
Car* carArray = new Car[10]; // Creates 10 Car objects
carArray[0].startEngine();
// Must delete the array
delete[] carArray;
5.4 Creating Objects with Different Access
class Example {
private:
int privateData;
public:
int publicData;
void display() {
cout << "Example object created!" << endl;
}
};
// Creating and using objects
Example obj1; // Stack allocation
obj1.publicData = 100; // Accessing public member
obj1.display(); // Calling public method
// obj1.privateData = 50; // ✗ Error: Cannot access private member
Example* obj2 = new Example; // Heap allocation
obj2->publicData = 200;
obj2->display();
delete obj2;
5.5 Comparison: Stack vs Heap Allocation

Complete Example: Different Ways to Create Objects
#include <iostream>
using namespace std;
class Rectangle {
private:
double length;
double width;
public:
void setDimensions(double l, double w) {
length = l;
width = w;
}
double getArea() {
return length * width;
}
void display() {
cout << "Rectangle: " << length << " x " << width
<< " = " << getArea() << " sq units" << endl;
}
};
int main() {
// Method 1: Stack allocation
Rectangle rect1;
rect1.setDimensions(5.0, 3.0);
rect1.display();
// Method 2: Heap allocation
Rectangle* rect2 = new Rectangle;
rect2->setDimensions(4.0, 6.0);
rect2->display();
delete rect2; // Don't forget to delete!
// Method 3: Array of objects
Rectangle rooms[3];
rooms[0].setDimensions(10.0, 12.0);
rooms[1].setDimensions(8.0, 10.0);
rooms[2].setDimensions(6.0, 8.0);
for (int i = 0; i < 3; i++) {
cout << "Room " << i + 1 << ": ";
rooms[i].display();
}
return 0;
}
Summary
- Class: A blueprint that defines structure and behavior
- Object: An instance of a class with actual data
- Attributes: Variables that store object properties
- Member Functions: Functions that define object behaviors (can access private members)
- Access Specifiers: Control visibility (public, private, protected)
- Object Creation: Can be done on stack or heap, as single objects or arrays
This foundation prepares you for more advanced topics like constructors, destructors, and inheritance!
Encapsulation in C++
Table of Contents
- What is Encapsulation?
- How to Achieve Encapsulation
- Why is Encapsulation Needed? Benefits
- Real-World Examples
- Best Practices
- Common Mistakes to Avoid
- Summary
1. What is Encapsulation?
Encapsulation is the bundling of data (attributes) and methods (functions) that operate on that data into a single unit (class), while restricting direct access to some of the object’s components. It’s about data hiding and controlling access to the internal state of an object.
Core Principles
Encapsulation involves three key concepts:
- Data Hiding - Keeping internal data private
- Bundling - Grouping related data and methods together
- Controlled Access - Providing specific methods to interact with data
Think of it as putting data in a protective capsule where:
- Internal details are hidden from outside
- Access is controlled through specific methods
- Data integrity is maintained through validation
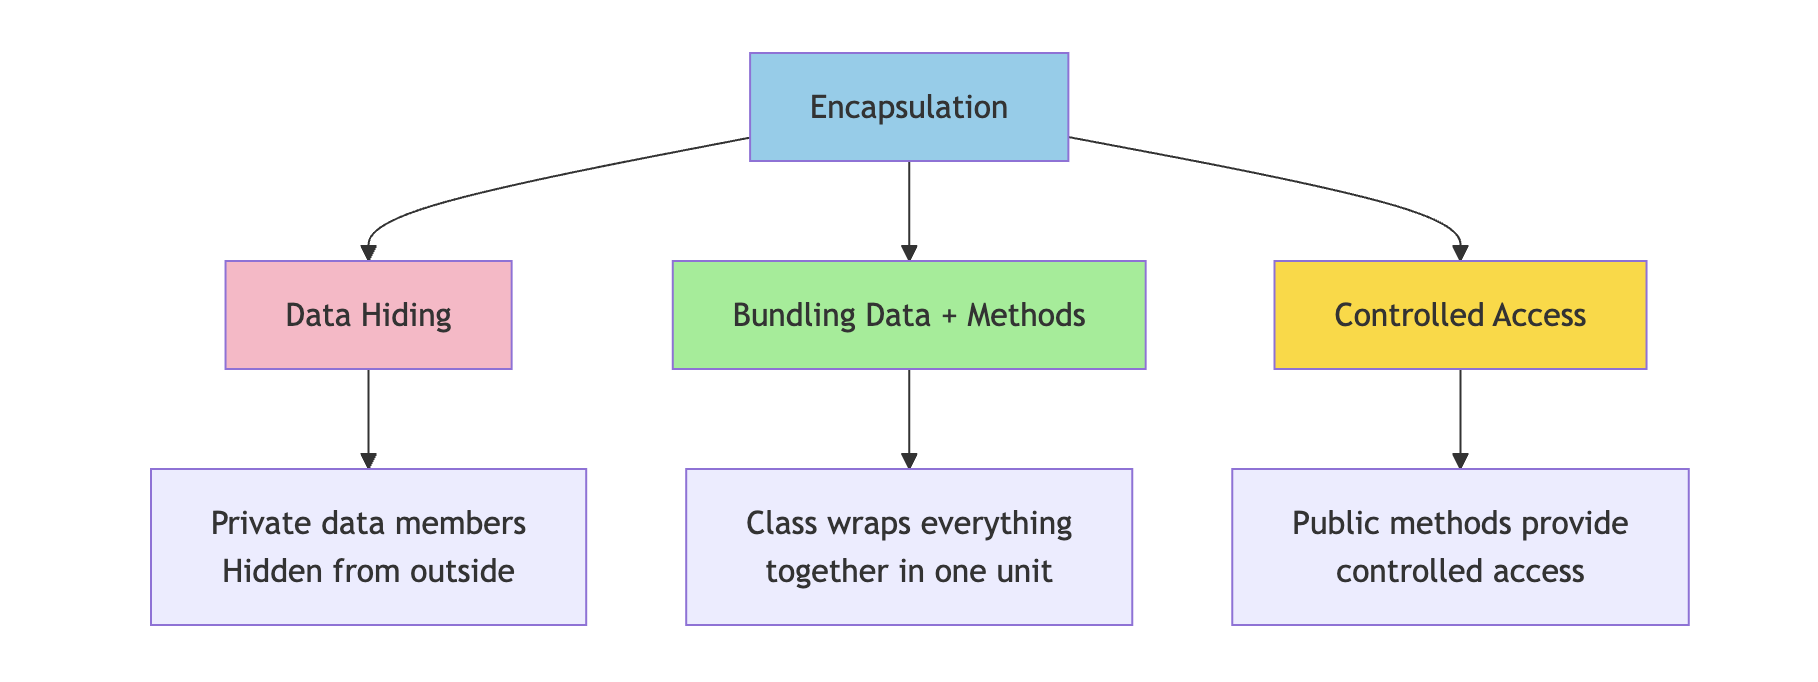
Simple Analogy
Think of a medicine capsule:
- The capsule shell protects the medicine inside
- You cannot directly access the medicine (it’s hidden)
- You take the whole capsule as intended (controlled access)
- The medicine is bundled safely inside the capsule
Similarly, in programming:
- Class is the capsule
- Data members are the medicine (protected content)
- Public methods are the intended way to use it
2. How to Achieve Encapsulation
Encapsulation is achieved using access specifiers in C++. The typical pattern is:
- Make data members private
- Provide public methods (getters and setters) to access and modify data
- Add validation logic in methods to ensure data integrity
2.1 Making Data Members Private
By making data members private, we prevent direct access from outside the class.
class BankAccount {
private:
// Private data members - hidden from outside
string accountHolder;
long accountNumber;
double balance;
string pin;
public:
// Public methods will be added here
};
Why Private?
BankAccount account;
// This is prevented (good!)
// account.balance = 1000000; // ✗ Error: balance is private
// account.pin = "0000"; // ✗ Error: pin is private
// This ensures data can only be modified through controlled methods
2.2 Providing Public Methods
Public methods (getters and setters) provide controlled access to private data.
class BankAccount {
private:
string accountHolder;
long accountNumber;
double balance;
string pin;
public:
// Getter methods - Read access
string getAccountHolder() {
return accountHolder;
}
long getAccountNumber() {
return accountNumber;
}
double getBalance() {
return balance;
}
// Setter methods - Write access with control
void setAccountHolder(string name) {
if (!name.empty()) {
accountHolder = name;
} else {
cout << "Error: Name cannot be empty!" << endl;
}
}
void setPin(string oldPin, string newPin) {
if (oldPin == pin && newPin.length() == 4) {
pin = newPin;
cout << "PIN changed successfully!" << endl;
} else {
cout << "Error: Invalid PIN change request!" << endl;
}
}
// Note: No direct setter for balance
// Balance can only be modified through deposit/withdraw
};
2.3 Validation and Control
The real power of encapsulation comes from adding validation logic in methods.
class BankAccount {
private:
string accountHolder;
long accountNumber;
double balance;
string pin;
bool isLocked;
public:
// Constructor
BankAccount(string name, long accNum, string p) {
accountHolder = name;
accountNumber = accNum;
balance = 0.0;
pin = p;
isLocked = false;
}
// Deposit with validation
void deposit(double amount) {
if (isLocked) {
cout << "Account is locked!" << endl;
return;
}
if (amount > 0 && amount <= 100000) {
balance += amount;
cout << "Deposited: $" << amount << endl;
cout << "New Balance: $" << balance << endl;
} else {
cout << "Invalid deposit amount!" << endl;
}
}
// Withdraw with multiple validations
void withdraw(string inputPin, double amount) {
if (isLocked) {
cout << "Account is locked!" << endl;
return;
}
if (inputPin != pin) {
cout << "Incorrect PIN!" << endl;
return;
}
if (amount <= 0) {
cout << "Invalid amount!" << endl;
return;
}
if (amount > balance) {
cout << "Insufficient funds!" << endl;
cout << "Available balance: $" << balance << endl;
return;
}
balance -= amount;
cout << "Withdrawn: $" << amount << endl;
cout << "Remaining Balance: $" << balance << endl;
}
// Transfer with validation
void transfer(string inputPin, BankAccount& recipient, double amount) {
if (inputPin != pin) {
cout << "Incorrect PIN!" << endl;
return;
}
if (amount > balance) {
cout << "Insufficient funds for transfer!" << endl;
return;
}
balance -= amount;
recipient.balance += amount;
cout << "Transferred $" << amount << " to " << recipient.accountHolder << endl;
}
// View balance (requires authentication)
void viewBalance(string inputPin) {
if (inputPin == pin) {
cout << "Account Balance: $" << balance << endl;
} else {
cout << "Incorrect PIN!" << endl;
}
}
// Lock/Unlock account
void lockAccount(string inputPin) {
if (inputPin == pin) {
isLocked = true;
cout << "Account locked successfully!" << endl;
}
}
void unlockAccount(string inputPin) {
if (inputPin == pin) {
isLocked = false;
cout << "Account unlocked successfully!" << endl;
}
}
};
Usage Example:
int main() {
BankAccount account1("John Doe", 123456789, "1234");
BankAccount account2("Jane Smith", 987654321, "5678");
// Controlled access through public methods
account1.deposit(5000);
account1.withdraw("1234", 2000);
account1.viewBalance("1234");
// Transfer between accounts
account1.transfer("1234", account2, 1000);
// Cannot directly access or modify balance
// account1.balance = 999999; // ✗ Error: balance is private
return 0;
}
3. Why is Encapsulation Needed? Benefits
Benefits Table
| Benefit | Description | Example |
|---|---|---|
| Data Protection | Prevents unauthorized or accidental modification of data | Bank balance cannot be directly set to negative values |
| Data Validation | Ensures only valid data is stored | Age cannot be set to -5 or 500; email must contain @ symbol |
| Flexibility | Internal implementation can change without affecting external code | Can change how balance is calculated internally without breaking client code |
| Maintainability | Easier to modify and maintain code | Changes to internal logic don’t break code that uses the class |
| Security | Sensitive data remains hidden and protected | PIN, password, credit card details cannot be accessed directly |
| Control | Complete control over how data is accessed and modified | Can add logging, authentication, or business rules in methods |
| Debugging | Easier to track where data is modified | Only specific methods modify data, making bugs easier to find |
| Consistency | Ensures data remains in valid state | Account balance always consistent with transactions |
Detailed Examples of Benefits
1. Data Protection
class Student {
private:
float marks; // Protected from invalid values
public:
void setMarks(float m) {
if (m >= 0 && m <= 100) {
marks = m;
} else {
cout << "Error: Marks must be between 0 and 100!" << endl;
}
}
};
// Without encapsulation (dangerous):
// student.marks = -50; // Would allow invalid data
// student.marks = 150; // Would allow invalid data
// With encapsulation (safe):
Student student;
student.setMarks(85); // ✓ Valid
student.setMarks(-50); // ✗ Rejected
student.setMarks(150); // ✗ Rejected
2. Flexibility and Maintainability
class Employee {
private:
double baseSalary;
double bonus;
// Internal implementation can change without affecting external code
double calculateTotalSalary() {
// Version 1: Simple addition
return baseSalary + bonus;
// Later, can change to:
// Version 2: Include tax calculation
// double tax = baseSalary * 0.2;
// return baseSalary + bonus - tax;
// External code using getSalary() doesn't need to change!
}
public:
double getSalary() {
return calculateTotalSalary();
}
};
3. Security
class User {
private:
string username;
string passwordHash; // Never store plain password
string email;
string hashPassword(string password) {
// Complex hashing algorithm
return "hashed_" + password; // Simplified for example
}
public:
void setPassword(string oldPassword, string newPassword) {
if (hashPassword(oldPassword) == passwordHash) {
passwordHash = hashPassword(newPassword);
cout << "Password changed successfully!" << endl;
} else {
cout << "Incorrect old password!" << endl;
}
}
bool login(string inputPassword) {
return (hashPassword(inputPassword) == passwordHash);
}
// No getter for password - security!
// Cannot retrieve actual password
};
4. Control and Business Logic
class ShoppingCart {
private:
vector<string> items;
double totalPrice;
int itemCount;
void updateTotal(double price) {
totalPrice += price;
itemCount++;
// Can add business logic here
if (totalPrice > 1000) {
cout << "Free shipping applied!" << endl;
}
}
void logActivity(string action) {
cout << "[LOG] " << action << " at " << /* current time */ endl;
}
public:
void addItem(string item, double price) {
if (price < 0) {
cout << "Invalid price!" << endl;
return;
}
items.push_back(item);
updateTotal(price);
logActivity("Item added: " + item);
cout << "Item added to cart. Total: $" << totalPrice << endl;
}
void removeItem(string item, double price) {
// Find and remove item
totalPrice -= price;
itemCount--;
logActivity("Item removed: " + item);
}
double getTotal() {
return totalPrice;
}
};
4. Real-World Examples
4.1 ATM Machine Example
An ATM machine is a perfect example of encapsulation in real life.
class ATM {
private:
// Hidden internal components (Encapsulation)
double cashAvailable;
map<string, double> accountBalances;
map<string, string> accountPins;
vector<string> transactionLog;
// Private helper methods (Hidden implementation)
bool authenticateUser(string cardNumber, string pin) {
if (accountPins.find(cardNumber) != accountPins.end()) {
return accountPins[cardNumber] == pin;
}
return false;
}
bool checkCashAvailability(double amount) {
return (cashAvailable >= amount);
}
void dispenseCash(double amount) {
// Complex mechanical operations hidden
cout << "Dispensing cash..." << endl;
cout << "Please collect $" << amount << endl;
cashAvailable -= amount;
}
void logTransaction(string cardNumber, string type, double amount) {
string log = cardNumber + " - " + type + " - $" + to_string(amount);
transactionLog.push_back(log);
}
void printReceipt(string cardNumber, string type, double amount, double balance) {
cout << "\n========== RECEIPT ==========" << endl;
cout << "Account: ****" << cardNumber.substr(cardNumber.length() - 4) << endl;
cout << "Transaction: " << type << endl;
cout << "Amount: $" << amount << endl;
cout << "Balance: $" << balance << endl;
cout << "============================\n" << endl;
}
public:
// Constructor
ATM(double initialCash) : cashAvailable(initialCash) {}
// Public interface (Simple methods for users)
void addAccount(string cardNumber, string pin, double initialBalance) {
accountPins[cardNumber] = pin;
accountBalances[cardNumber] = initialBalance;
}
void withdrawMoney(string cardNumber, string pin, double amount) {
cout << "\nProcessing withdrawal..." << endl;
if (!authenticateUser(cardNumber, pin)) {
cout << "Authentication failed! Incorrect PIN." << endl;
return;
}
if (accountBalances[cardNumber] < amount) {
cout << "Insufficient funds!" << endl;
cout << "Available balance: $" << accountBalances[cardNumber] << endl;
return;
}
if (!checkCashAvailability(amount)) {
cout << "ATM has insufficient cash. Please try a smaller amount." << endl;
return;
}
// All checks passed, process withdrawal
accountBalances[cardNumber] -= amount;
dispenseCash(amount);
logTransaction(cardNumber, "Withdrawal", amount);
printReceipt(cardNumber, "Withdrawal", amount, accountBalances[cardNumber]);
}
void depositMoney(string cardNumber, string pin, double amount) {
cout << "\nProcessing deposit..." << endl;
if (!authenticateUser(cardNumber, pin)) {
cout << "Authentication failed! Incorrect PIN." << endl;
return;
}
if (amount <= 0) {
cout << "Invalid deposit amount!" << endl;
return;
}
accountBalances[cardNumber] += amount;
cashAvailable += amount;
logTransaction(cardNumber, "Deposit", amount);
cout << "Deposit successful!" << endl;
printReceipt(cardNumber, "Deposit", amount, accountBalances[cardNumber]);
}
void checkBalance(string cardNumber, string pin) {
cout << "\nChecking balance..." << endl;
if (!authenticateUser(cardNumber, pin)) {
cout << "Authentication failed! Incorrect PIN." << endl;
return;
}
cout << "Current Balance: $" << accountBalances[cardNumber] << endl;
}
void changePin(string cardNumber, string oldPin, string newPin) {
cout << "\nChanging PIN..." << endl;
if (!authenticateUser(cardNumber, oldPin)) {
cout << "Authentication failed! Incorrect current PIN." << endl;
return;
}
if (newPin.length() != 4) {
cout << "PIN must be 4 digits!" << endl;
return;
}
accountPins[cardNumber] = newPin;
cout << "PIN changed successfully!" << endl;
}
};
// Usage
int main() {
ATM atm(50000); // ATM with $50,000 cash
// Add accounts
atm.addAccount("1234567890123456", "1234", 5000);
atm.addAccount("9876543210987654", "5678", 3000);
// User interactions - simple and clean
atm.checkBalance("1234567890123456", "1234");
atm.withdrawMoney("1234567890123456", "1234", 500);
atm.depositMoney("1234567890123456", "1234", 1000);
atm.changePin("1234567890123456", "1234", "9999");
// Cannot access internal data (encapsulated)
// atm.cashAvailable = 0; // ✗ Error: private member
// atm.accountBalances["1234567890123456"] = 999999; // ✗ Error: private
return 0;
}
Key Points of ATM Encapsulation:
- Users interact through simple buttons/methods
- Internal mechanisms (cash counting, authentication algorithms) are hidden
- Cannot directly access cash or account balances
- All operations go through validation
- Complex security and logging happen behind the scenes
4.2 Smart Thermostat Example
class SmartThermostat {
private:
double currentTemperature;
double targetTemperature;
bool isHeatingOn;
bool isCoolingOn;
string mode; // "auto", "heat", "cool", "off"
int fanSpeed;
// Private methods - hidden complexity
void adjustHeating() {
if (currentTemperature < targetTemperature - 1) {
isHeatingOn = true;
isCoolingOn = false;
} else {
isHeatingOn = false;
}
}
void adjustCooling() {
if (currentTemperature > targetTemperature + 1) {
isCoolingOn = true;
isHeatingOn = false;
} else {
isCoolingOn = false;
}
}
void autoRegulate() {
if (currentTemperature < targetTemperature - 1) {
adjustHeating();
} else if (currentTemperature > targetTemperature + 1) {
adjustCooling();
} else {
isHeatingOn = false;
isCoolingOn = false;
}
}
public:
SmartThermostat() {
currentTemperature = 20.0;
targetTemperature = 22.0;
isHeatingOn = false;
isCoolingOn = false;
mode = "auto";
fanSpeed = 2;
}
// Simple public interface
void setTargetTemperature(double temp) {
if (temp >= 15.0 && temp <= 30.0) {
targetTemperature = temp;
cout << "Target temperature set to " << temp << "°C" << endl;
autoRegulate();
} else {
cout << "Temperature must be between 15°C and 30°C" << endl;
}
}
double getTargetTemperature() {
return targetTemperature;
}
double getCurrentTemperature() {
return currentTemperature;
}
void setMode(string m) {
if (m == "auto" || m == "heat" || m == "cool" || m == "off") {
mode = m;
cout << "Mode set to: " << mode << endl;
} else {
cout << "Invalid mode!" << endl;
}
}
string getMode() {
return mode;
}
void displayStatus() {
cout << "\n===== Thermostat Status =====" << endl;
cout << "Current: " << currentTemperature << "°C" << endl;
cout << "Target: " << targetTemperature << "°C" << endl;
cout << "Mode: " << mode << endl;
cout << "Heating: " << (isHeatingOn ? "ON" : "OFF") << endl;
cout << "Cooling: " << (isCoolingOn ? "ON" : "OFF") << endl;
cout << "============================\n" << endl;
}
// Simulate temperature change (for testing)
void simulateTemperatureChange(double change) {
currentTemperature += change;
cout << "Temperature changed to " << currentTemperature << "°C" << endl;
autoRegulate();
}
};
4.3 Email Account Example
class EmailAccount {
private:
string emailAddress;
string password;
vector<string> inbox;
vector<string> sent;
vector<string> spam;
int storageUsed; // in MB
int storageLimit;
bool isValidEmail(string email) {
return email.find('@') != string::npos;
}
bool isSpam(string message) {
// Simplified spam detection
return message.find("FREE MONEY") != string::npos ||
message.find("CLICK HERE NOW") != string::npos;
}
void updateStorage(int size) {
storageUsed += size;
}
public:
EmailAccount(string email, string pass) {
if (isValidEmail(email)) {
emailAddress = email;
password = pass;
storageUsed = 0;
storageLimit = 1000; // 1000 MB
}
}
void receiveEmail(string from, string message) {
if (storageUsed >= storageLimit) {
cout << "Storage full! Cannot receive email." << endl;
return;
}
string email = "From: " + from + " - " + message;
if (isSpam(message)) {
spam.push_back(email);
cout << "Email moved to spam folder" << endl;
} else {
inbox.push_back(email);
cout << "New email received from " << from << endl;
}
updateStorage(1); // Each email = 1 MB
}
void sendEmail(string to, string message) {
if (!isValidEmail(to)) {
cout << "Invalid recipient email!" << endl;
return;
}
string email = "To: " + to + " - " + message;
sent.push_back(email);
updateStorage(1);
cout << "Email sent to " << to << endl;
}
void viewInbox() {
cout << "\n===== INBOX =====" << endl;
if (inbox.empty()) {
cout << "No messages" << endl;
} else {
for (size_t i = 0; i < inbox.size(); i++) {
cout << i + 1 << ". " << inbox[i] << endl;
}
}
cout << "================\n" << endl;
}
void getStorageInfo() {
cout << "Storage: " << storageUsed << " MB / " << storageLimit << " MB" << endl;
cout << "Available: " << (storageLimit - storageUsed) << " MB" << endl;
}
void changePassword(string oldPass, string newPass) {
if (oldPass == password) {
if (newPass.length() >= 8) {
password = newPass;
cout << "Password changed successfully!" << endl;
} else {
cout << "Password must be at least 8 characters!" << endl;
}
} else {
cout << "Incorrect password!" << endl;
}
}
};
5. Best Practices
1. Always Make Data Members Private
// ✓ Good
class Person {
private:
string name;
int age;
public:
void setAge(int a) {
if (a >= 0 && a <= 150) age = a;
}
};
// ✗ Bad
class Person {
public:
string name;
int age; // Anyone can set age to -5 or 9999
};
2. Provide Getters and Setters with Validation
class Product {
private:
string name;
double price;
int quantity;
public:
// Getter - simple read access
double getPrice() {
return price;
}
// Setter with validation
void setPrice(double p) {
if (p > 0) {
price = p;
} else {
cout << "Price must be positive!" << endl;
}
}
// Controlled modification
void updateQuantity(int change) {
if (quantity + change >= 0) {
quantity += change;
} else {
cout << "Insufficient quantity!" << endl;
}
}
};
3. Don’t Provide Setters for Everything
class Order {
private:
string orderID;
double totalAmount;
string status;
public:
// Read-only access (no setter)
string getOrderID() {
return orderID;
}
double getTotalAmount() {
return totalAmount;
}
// Controlled state changes only
void processPayment() {
if (status == "pending") {
status = "paid";
// Process payment logic
}
}
void shipOrder() {
if (status == "paid") {
status = "shipped";
}
}
// No direct setStatus() method - status changes through business logic only
};
4. Use Const for Getters
class Rectangle {
private:
double length;
double width;
public:
// Const getter - promises not to modify object
double getLength() const {
return length;
}
double getWidth() const {
return width;
}
double getArea() const {
return length * width;
}
};
5. Encapsulate Related Data Together
// ✓ Good - Related data encapsulated together
class Address {
private:
string street;
string city;
string state;
string zipCode;
public:
string getFullAddress() const {
return street + ", " + city + ", " + state + " " + zipCode;
}
};
class Person {
private:
string name;
Address homeAddress;
Address workAddress;
};
6. Common Mistakes to Avoid
Mistake 1: Making Everything Public
// ✗ Bad - No encapsulation
class Student {
public:
string name;
int age;
float marks;
};
// Anyone can do:
Student s;
s.marks = -50; // Invalid data!
s.age = 999; // Invalid data!
Mistake 2: Getters/Setters for Everything Without Validation
// ✗ Bad - Useless encapsulation
class Person {
private:
int age;
public:
void setAge(int a) { age = a; } // No validation!
int getAge() { return age; }
};
// Not much better than:
class Person {
public:
int age;
};
Mistake 3: Returning References to Private Data
// ✗ Bad - Breaks encapsulation
class Database {
private:
vector<string> records;
public:
vector<string>& getRecords() {
return records; // Returns reference - caller can modify!
}
};
// Better:
vector<string> getRecords() const {
return records; // Returns copy - safe
}
Mistake 4: Not Validating in Constructors
// ✗ Bad
class BankAccount {
private:
double balance;
public:
BankAccount(double b) {
balance = b; // Could be negative!
}
};
// ✓ Good
class BankAccount {
private:
double balance;
public:
BankAccount(double b) {
if (b >= 0) {
balance = b;
} else {
balance = 0;
cout << "Invalid initial balance. Set to 0." << endl;
}
}
};
Summary
Encapsulation is one of the fundamental pillars of object-oriented programming. It provides:
- Data Protection - Private members prevent unauthorized access
- Controlled Access - Public methods with validation ensure data integrity
- Flexibility - Internal implementation can change without affecting external code
- Security - Sensitive data remains hidden
- Maintainability - Easier to debug and modify
Key Takeaways
- Make data members private by default
- Provide public methods (getters/setters) with validation
- Bundle related data and methods together in a class
- Hide implementation details from outside world
- Control how data is accessed and modified
Quick Reference
class EncapsulationExample {
private:
// 1. Hide data
int privateData;
// 2. Hide complex implementation
void complexInternalMethod() {
// Hidden complexity
}
public:
// 3. Provide controlled access
void setData(int value) {
if (value >= 0) { // 4. Add validation
privateData = value;
}
}
int getData() const { // 5. Use const for read-only
return privateData;
}
};
Encapsulation creates robust, secure, and maintainable code by protecting your data and providing controlled access through well-defined interfaces!
C++ Inheritance
What is Inheritance?
Imagine you work at a company. All employees share common properties like name, employee ID, and salary. But different roles have additional specific properties:
- Developers have programming languages they know
- Managers have a team size they manage
- HR Staff have recruitment targets
Instead of rewriting common properties for each role, inheritance lets you define them once in a base “Employee” class and extend it for specific roles. This is exactly how inheritance works in C++.
In simple terms: Inheritance is when a class (child/derived class) inherits properties and behaviors from another class (parent/base class), allowing you to reuse code and create a hierarchical relationship.
Basic Syntax of Inheritance
class BaseClassName {
// Base class members
};
class DerivedClassName : access_specifier BaseClassName {
// Derived class members
// + Inherited members from BaseClassName
};
Components:
BaseClassName: The class being inherited from (also called parent class or superclass)DerivedClassName: The class that inherits (also called child class or subclass)access_specifier: How inheritance is done (public,protected, orprivate):(colon): Indicates inheritance relationship
Simple Example
// Base class
class Animal {
public:
void eat() {
cout << "Eating..." << endl;
}
};
// Derived class inherits from Animal
class Dog : public Animal {
public:
void bark() {
cout << "Woof!" << endl;
}
};
// Usage
Dog myDog;
myDog.eat(); // Inherited from Animal
myDog.bark(); // Dog's own method
Understanding Base Class and Derived Class
Base Class (Parent Class / Superclass)
The base class is the class that provides the common properties and behaviors to be inherited. It’s the “general” class.
Characteristics:
- Contains common/shared functionality
- Defined first, independently
- Can exist and be used on its own
- Doesn’t know about its derived classes
class Employee { // BASE CLASS
public:
string name;
int employeeID;
void displayInfo() {
cout << "Employee: " << name << endl;
}
};
Derived Class (Child Class / Subclass)
The derived class is the class that inherits from the base class and adds its own specific properties and behaviors. It’s the “specialized” class.
Characteristics:
- Inherits all accessible members from base class
- Adds its own specific functionality
- Cannot exist without the base class definition
- Can override base class behaviors
class Developer : public Employee { // DERIVED CLASS
public:
string programmingLanguage; // Additional property
void code() { // Additional method
cout << name << " is coding" << endl; // Can use inherited 'name'
}
};
Visual Relationship
┌─────────────────┐
│ Employee │ ◄── BASE CLASS (Parent)
│ (Base Class) │
└────────┬────────┘
│ inherits from
│
┌────────▼────────┐
│ Developer │ ◄── DERIVED CLASS (Child)
│ (Derived Class) │
└─────────────────┘
What Gets Inherited?
class Base {
public:
int publicVar; // ✓ Inherited and accessible
protected:
int protectedVar; // ✓ Inherited and accessible (in derived class only)
private:
int privateVar; // ✓ Inherited but NOT accessible
public:
void publicMethod() { } // ✓ Inherited and accessible
protected:
void protectedMethod() { } // ✓ Inherited and accessible (in derived class only)
private:
void privateMethod() { } // ✓ Inherited but NOT accessible
};
class Derived : public Base {
// Has: publicVar, protectedVar, publicMethod(), protectedMethod()
// Doesn't have access to: privateVar, privateMethod()
// (but they exist in memory!)
};
Key Point: Private members ARE inherited (they exist in the derived object’s memory), but the derived class cannot directly access them.
Real-World Example: Company Employee System
// Base class - Common properties for ALL employees
class Employee {
public:
string name;
int employeeID;
double salary;
void displayBasicInfo() {
cout << "Name: " << name << endl;
cout << "ID: " << employeeID << endl;
cout << "Salary: $" << salary << endl;
}
};
// Derived class - Specific to developers
class Developer : public Employee {
public:
string programmingLanguage;
void code() {
cout << name << " is coding in " << programmingLanguage << endl;
}
};
// Derived class - Specific to managers
class Manager : public Employee {
public:
int teamSize;
void conductMeeting() {
cout << name << " is conducting a meeting with " << teamSize << " team members" << endl;
}
};
Usage:
Developer dev;
dev.name = "Alice"; // Inherited from Employee
dev.employeeID = 101; // Inherited from Employee
dev.salary = 80000; // Inherited from Employee
dev.programmingLanguage = "C++"; // Specific to Developer
dev.displayBasicInfo(); // Inherited method
dev.code(); // Developer's own method
Why Use Inheritance?
Benefits of Inheritance
-
Code Reusability: Write common code once, use it everywhere
- No need to repeat
name,employeeID,salaryin every employee type
- No need to repeat
-
Easy Maintenance: Fix bugs in one place
- If you fix a bug in the
displayBasicInfo()method, it’s fixed for all employee types
- If you fix a bug in the
-
Logical Organization: Models real-world relationships
- Clearly shows that Developer “is-a” Employee
-
Extensibility: Easy to add new employee types
- Adding a
SalesRepclass? Just inherit fromEmployee
- Adding a
-
Polymorphism Support: Treat different types uniformly (covered in later chapters)
- Store all employees in one array, regardless of their specific type
Protected Access Specifier
C++ has three access specifiers: private, protected, and public. The protected keyword is particularly important in inheritance.
Access Specifier Comparison
| Access Specifier | Accessible in Same Class | Accessible in Derived Class | Accessible Outside Class |
|---|---|---|---|
private | ✓ Yes | ✗ No | ✗ No |
protected | ✓ Yes | ✓ Yes | ✗ No |
public | ✓ Yes | ✓ Yes | ✓ Yes |
When to Use Protected
Use protected when you want derived classes to access members, but not outside code.
class Employee {
protected:
double baseSalary; // Derived classes can access
private:
string bankAccount; // Only Employee class can access
public:
string name; // Everyone can access
void setSalary(double salary) {
baseSalary = salary;
}
};
class Developer : public Employee {
public:
void calculateBonus() {
// Can access baseSalary (protected)
double bonus = baseSalary * 0.15;
cout << "Bonus: $" << bonus << endl;
// Cannot access bankAccount (private)
// bankAccount = "123456"; // ERROR!
}
};
Best Practice: Use protected for data that derived classes need to access but should remain hidden from external code.
Types of Inheritance: Private, Protected, and Public
The inheritance type controls how base class members are inherited.
Syntax
class Derived : access_specifier Base {
// access_specifier can be private, protected, or public
};
How Inheritance Types Affect Access
| Base Class Member | Public Inheritance | Protected Inheritance | Private Inheritance |
|---|---|---|---|
public | public | protected | private |
protected | protected | protected | private |
private | Not accessible | Not accessible | Not accessible |
1. Public Inheritance (Most Common)
“IS-A” relationship - Developer IS-A Employee
class Employee {
public:
string name;
protected:
double salary;
private:
string ssn;
};
class Developer : public Employee {
// name remains public
// salary remains protected
// ssn is not accessible
};
Developer dev;
dev.name = "Bob"; // OK - name is public
2. Protected Inheritance
“Implemented-in-terms-of” relationship - Less common
class Employee {
public:
string name;
protected:
double salary;
};
class Developer : protected Employee {
// name becomes protected (was public)
// salary remains protected
};
Developer dev;
dev.name = "Bob"; // ERROR! name is now protected
3. Private Inheritance
“Implemented-in-terms-of” relationship - Hides the base class completely
class Employee {
public:
string name;
protected:
double salary;
};
class Developer : private Employee {
// name becomes private (was public)
// salary becomes private (was protected)
};
Developer dev;
dev.name = "Bob"; // ERROR! name is now private
Most Common: Use public inheritance 99% of the time. Use protected/private inheritance only when you want to hide the base class interface.
Object Size in Inheritance Hierarchy
When a class inherits from another, the derived class object contains all members from both classes.
Memory Layout Diagram
class Employee {
string name; // 32 bytes (typical string size)
int employeeID; // 4 bytes
double salary; // 8 bytes
}; // Total: ~44 bytes
class Developer : public Employee {
string programmingLanguage; // 32 bytes
int yearsOfExperience; // 4 bytes
}; // Total: ~80 bytes (44 + 36)
Visual Representation:
Employee Object:
┌─────────────────────────────┐
│ name (32 bytes) │
├─────────────────────────────┤
│ employeeID (4 bytes) │
├─────────────────────────────┤
│ salary (8 bytes) │
└─────────────────────────────┘
Total: ~44 bytes
Developer Object:
┌─────────────────────────────┐
│ Employee Part: │
│ - name (32 bytes) │
│ - employeeID (4 bytes) │
│ - salary (8 bytes) │
├─────────────────────────────┤
│ Developer Part: │
│ - programmingLanguage │
│ (32 bytes) │
│ - yearsOfExperience │
│ (4 bytes) │
└─────────────────────────────┘
Total: ~80 bytes
Key Points About Object Size
- Derived objects are always larger than base objects (or equal if no new members)
- Base class portion comes first in memory
- You can check sizes using
sizeof():
cout << "Employee size: " << sizeof(Employee) << " bytes" << endl;
cout << "Developer size: " << sizeof(Developer) << " bytes" << endl;
Casting Objects: Upcasting and Downcasting
Upcasting (Safe) ✓
Upcasting = Converting derived class pointer/reference to base class pointer/reference
Developer dev;
dev.name = "Charlie";
dev.programmingLanguage = "Python";
// Upcasting - ALWAYS SAFE
Employee* empPtr = &dev; // Developer* → Employee*
empPtr->displayBasicInfo(); // Works fine
// But loses access to derived class members
// empPtr->code(); // ERROR! Employee doesn't have code()
Why it’s safe: Every Developer IS-AN Employee, so treating it as Employee is always valid.
Downcasting (Risky) ⚠️
Downcasting = Converting base class pointer/reference to derived class pointer/reference
Employee* empPtr = new Employee();
// Downcasting - DANGEROUS without checking!
Developer* devPtr = (Developer*)empPtr; // C-style cast - risky!
devPtr->code(); // RUNTIME ERROR! empPtr wasn't actually pointing to a Developer
Safe Downcasting with dynamic_cast
Employee* empPtr = new Developer(); // Actually points to Developer
// Safe downcasting using dynamic_cast
Developer* devPtr = dynamic_cast<Developer*>(empPtr);
if (devPtr != nullptr) {
// Successfully casted - empPtr was really a Developer
devPtr->code();
} else {
// Cast failed - empPtr wasn't a Developer
cout << "Not a Developer!" << endl;
}
Requirements for dynamic_cast:
- Base class must have at least one virtual function
- Only works with pointers and references
- Returns
nullptrfor pointers or throwsbad_castexception for references if cast fails
Best Practices for Casting
- Prefer Upcasting: It’s safe and natural
- Avoid Downcasting when possible: Design your code to minimize need for downcasting
- Use
dynamic_castfor Downcasting: Never use C-style casts for downcasting - Always check
dynamic_castresults: Handle the case where it returnsnullptr - Consider virtual functions instead: Often better than downcasting
Common Casting Failures at Runtime
// Failure Case 1: Casting to wrong derived class
Employee* emp = new Manager();
Developer* dev = dynamic_cast<Developer*>(emp); // Returns nullptr - emp is Manager, not Developer
// Failure Case 2: Slicing problem
Developer dev;
Employee emp = dev; // Copies only Employee part, loses Developer data (object slicing)
// Failure Case 3: Casting without virtual functions
class Base { int x; }; // No virtual functions
class Derived : public Base { int y; };
Base* b = new Derived();
Derived* d = dynamic_cast<Derived*>(b); // Compile error! Need virtual functions
Coming Up Next: Advanced Inheritance Concepts
In the following chapters, we’ll explore concepts that are deeply related to and build upon inheritance:
1. Constructors and Destructors in Inheritance
- How derived class constructors call base class constructors
- Order of construction and destruction
- Passing arguments to base class constructors
2. Virtual Functions and Polymorphism
- Runtime polymorphism through virtual functions
- Virtual function tables (vtables)
- Pure virtual functions and abstract classes
3. Function Overriding
- How derived classes override base class methods
- The
overridekeyword - Difference between overriding and overloading
4. Multiple Inheritance
- Inheriting from multiple base classes
- The diamond problem
- Virtual inheritance
5. Virtual Destructors
- Why destructors should be virtual in base classes
- Memory leak prevention
- Proper cleanup in inheritance hierarchies
6. Access Control in Inheritance
- Using
usingdeclarations to change access - Friend functions and inheritance
- Protected inheritance use cases
7. Object Slicing
- What happens when you assign derived to base
- How to avoid slicing problems
- Using pointers and references
8. Composition vs Inheritance
- “Has-A” vs “IS-A” relationships
- When to use composition instead
- Design guidelines
9. Abstract Classes and Interfaces
- Creating interfaces using pure virtual functions
- Designing flexible, extensible systems
- Interface segregation principles
Each of these topics expands on the foundation of inheritance and helps you build robust, maintainable object-oriented systems in C++!
C++ Constructors and Destructors
Table of Contents
- Constructors
- Destructors
- The
explicitKeyword - Constructor Initializer Lists
- The
thisPointer and Const Member Functions - The
mutableKeyword - Copy constructor
1. Constructors
Constructors are special member functions that share the same name as their class.
Common Misconception
Many people believe constructors create objects, but this isn’t accurate.
What Constructors Actually Do
Constructors are special functions designed to initialize an object immediately after it has been created. When an object is instantiated, memory is first allocated for it, and then the constructor is automatically invoked to set up the object’s initial state—assigning values to member variables, allocating resources, or performing any other setup operations needed before the object is ready to use.
Key Points:
- Object creation (memory allocation) happens first
- Constructor invocation (initialization) happens immediately after
- Constructors ensure objects start in a valid, well-defined state
- They are called automatically—you don’t invoke them manually
Object Lifetime Flow
1. Memory Allocation
2. Constructor Execution ← Initialization
3. Object Usage
4. Destructor Execution ← Cleanup
5. Memory Deallocation
Basic Code Example
#include <iostream>
class Foo {
private:
int member;
public:
/* Default Constructor */
Foo() {
std::cout << "Foo() invoked\n";
}
/* Parameterized constructor */
Foo(int a) {
this->member = a;
std::cout << "Foo(int a) invoked\n";
}
/* Destructor */
~Foo() {
std::cout << "~Foo() invoked\n";
}
void print_obj() {
std::cout << "Object Add: " << this << ": member : " << this->member << std::endl;
}
};
int main(int argc, char* argv[]) {
Foo obj1; // Default constructor invoke
obj1.print_obj();
Foo obj2(2); // Explicitly Parameterized constructor invoked
// Explicit conversion
obj2.print_obj();
Foo obj3 = 10; // Parameterized constructor will be invoked
// Implicit type conversion from int to Foo Type
obj3.print_obj();
return 0;
// Destructors are called here automatically in reverse order: obj3, obj2, obj1
}
Output
➜ practice g++ -O0 -fno-elide-constructors constructor_example.cpp
➜ practice ./a.out
Foo() invoked
Object Add: 0x16f64704c: member : 1
Foo(int a) invoked
Object Add: 0x16f647038: member : 2
Foo(int a) invoked
Object Add: 0x16f647034: member : 10
~Foo() invoked
~Foo() invoked
~Foo() invoked
Explanation
This example demonstrates three ways to create objects:
Foo obj1;- Calls the default constructor (no parameters)Foo obj2(2);- Calls the parameterized constructor with explicit syntaxFoo obj3 = 10;- Calls the parameterized constructor through implicit conversion frominttoFoo
All three objects are destroyed at the end of main() when they go out of scope, invoking their destructors in reverse order of creation (obj3 → obj2 → obj1). This ensures that dependencies between objects are properly handled during cleanup.
2. Destructors
Destructors are special member functions that have the same name as the class, but prefixed with a tilde (~).
What Destructors Actually Do
Destructors are special functions designed to clean up an object just before it is destroyed. When an object goes out of scope or is explicitly deleted, the destructor is automatically invoked to perform cleanup operations—releasing dynamically allocated memory, closing file handles, releasing locks, or performing any other necessary cleanup before the object’s memory is deallocated.
Key Points:
- Destructor invocation (cleanup) happens first
- Object destruction (memory deallocation) happens immediately after
- Destructors ensure proper resource cleanup and prevent memory leaks
- They are called automatically when an object goes out of scope or is deleted
- A class can have only one destructor (no overloading, no parameters)
- Destructors are called in reverse order of object creation
Example
See the code example in the Constructors section above, which demonstrates both constructors and destructors working together.
3. The explicit Keyword
Why Implicit Conversions Are Problematic
Implicit conversions can lead to several issues:
- Unintended Behavior - The compiler silently converts types, which may not be what you intended
- Harder to Debug - When something goes wrong, it’s difficult to trace back to an implicit conversion
- Reduces Code Clarity - Other developers reading your code may not realize a conversion is happening
- Potential Performance Issues - Unnecessary temporary objects may be created
- Type Safety Loss - You lose the strict type checking that helps catch errors at compile time
Example of the Problem
class Foo {
int member;
public:
Foo(int a) { member = a; }
};
void process(Foo obj) {
// Does something with Foo object
}
int main() {
process(42); // Compiles! But is this really what you meant?
// 42 is implicitly converted to Foo object
}
In the above code, you probably meant to pass a Foo object, but accidentally passed an int. The compiler doesn’t complain—it just silently converts 42 to a Foo object. This can hide bugs!
Solution: The explicit Keyword
The explicit keyword prevents implicit conversions by forcing the programmer to explicitly construct objects.
When you mark a constructor as explicit, the compiler will only allow explicit construction and will reject implicit conversions.
Code Example with explicit
#include <iostream>
class Foo {
private:
int member;
public:
/* Default Constructor */
explicit Foo() {
std::cout << "Foo() invoked\n";
}
/* Parameterized constructor marked as explicit */
explicit Foo(int a) {
this->member = a;
std::cout << "Foo(int a) invoked\n";
}
~Foo() {
std::cout << "~Foo() invoked\n";
}
void print_obj() {
std::cout << "Object Add: " << this << ": member : " << this->member << std::endl;
}
};
int main(int argc, char* argv[]) {
Foo obj1; // ✓ OK: Default constructor invoked explicitly
obj1.print_obj();
Foo obj2(2); // ✓ OK: Parameterized constructor invoked explicitly
obj2.print_obj();
// ✗ COMPILATION ERROR: Implicit conversion not allowed!
// Foo obj3 = 10;
// ✓ OK: If you really want to convert, you must do it explicitly:
// Foo obj3 = Foo(10); // This would work
// or
// Foo obj3{10}; // This would also work
return 0;
}
Benefits of Using explicit
1. Prevents Accidental Bugs
explicit Foo(int a);
void doSomething(Foo obj) { }
doSomething(42); // ✗ Compilation error - catches the mistake!
doSomething(Foo(42)); // ✓ OK - you clearly meant to create a Foo
2. Makes Code More Readable
When someone reads Foo obj(10), it’s crystal clear that a Foo object is being created. With Foo obj = 10, it’s less obvious what’s happening.
3. Enforces Type Safety
You maintain C++’s strong typing system. If you want a Foo object, you must explicitly create one—no shortcuts.
4. Reduces Unexpected Behavior
No surprise conversions means no surprise bugs. What you write is what you get.
Best Practice Rules
✓ DO: Mark single-parameter constructors as explicit by default
class String {
public:
explicit String(int size); // Good!
};
✗ DON’T: Allow implicit conversions unless you have a very good reason
class String {
public:
String(int size); // Dangerous! int could be silently converted to String
};
Comparison: With vs Without explicit
Without explicit | With explicit |
|---|---|
Foo obj = 10; ✓ compiles | Foo obj = 10; ✗ error |
Foo obj(10); ✓ compiles | Foo obj(10); ✓ compiles |
| Implicit conversions allowed | Only explicit conversions allowed |
| Can hide bugs | Catches bugs at compile time |
| Less clear intent | Crystal clear intent |
4. Constructor Initializer Lists
The Problem with Const Member Variables
Consider this problematic code:
#include <iostream>
class Foo {
private:
/* We have a member whose storage is const */
const int member;
public:
/* Default Constructor */
explicit Foo() {
std::cout << "Foo() invoked\n";
}
/* Parameterized constructor - THIS WILL NOT COMPILE! */
explicit Foo(int a){
this->member = a; // ❌ ERROR: Cannot assign to const member!
std::cout << "Foo(int a) invoked\n";
}
~Foo() {
std::cout << "~Foo() invoked\n";
}
void print_obj() {
std::cout << "Object Add: " << this << ": member : " << this->member << std::endl;
}
};
Why This Fails
The above code will not compile! The compiler will give an error like:
error: assignment of read-only member 'Foo::member'
The Problem: You cannot assign a value to a const member variable. Once a const variable is created, it cannot be changed.
When you write this->member = a; inside the constructor body, you’re trying to assign to member after it has already been created. But member is const, so assignment is forbidden!
Understanding Object Creation Flow
To understand the solution, we need to understand what happens when an object is created:
Step-by-Step Object Creation:
1. Memory Allocation
└─> Space for the object is allocated on stack/heap
2. Member Variable Construction (BEFORE constructor body)
└─> All member variables are constructed/created
└─> This happens BEFORE the constructor body executes
└─> For const members, they MUST be initialized here!
3. Constructor Body Execution
└─> The code inside { } of the constructor runs
└─> At this point, all members already exist
└─> You can only ASSIGN values here, not INITIALIZE
4. Object is Ready to Use
Key Insight: By the time the constructor body { } executes, all member variables have already been constructed. For const members, it’s too late to initialize them—you can only initialize them during step 2, not during step 3.
The Solution: Member Initializer List
The member initializer list allows you to initialize member variables before the constructor body executes—exactly when they are being constructed.
Syntax
ClassName(parameters) : member1(value1), member2(value2) {
// Constructor body
}
The part after : and before { is the initializer list.
Corrected Code Example
#include <iostream>
class Foo {
private:
const int member; // const member variable
public:
/* Default Constructor with initializer list */
explicit Foo() : member(0) { // Initialize member to 0
std::cout << "Foo() invoked\n";
}
/* Parameterized constructor with initializer list */
explicit Foo(int a) : member(a) { // Initialize member with 'a'
std::cout << "Foo(int a) invoked\n";
}
~Foo() {
std::cout << "~Foo() invoked\n";
}
void print_obj() {
std::cout << "Object Add: " << this << ": member : " << this->member << std::endl;
}
};
int main(int argc, char* argv[]) {
Foo obj1; // Default constructor - member initialized to 0
obj1.print_obj();
Foo obj2(42); // Parameterized constructor - member initialized to 42
obj2.print_obj();
return 0;
}
Output
Foo() invoked
Object Add: 0x16fdff04c: member : 0
Foo(int a) invoked
Object Add: 0x16fdff048: member : 42
~Foo() invoked
~Foo() invoked
How Initializer Lists Fix the Problem
What Happens with Initializer List:
Foo(int a) : member(a) { // Initializer list
// Constructor body
}
Step-by-Step Flow:
- Memory Allocation - Space for
Fooobject allocated - Member Initialization -
memberis initialized (not assigned) with valuea- This happens via the initializer list
: member(a) - The
const int memberis created and given its value in one step - Since it’s initialization (not assignment), it works with
const!
- This happens via the initializer list
- Constructor Body - The code inside
{ }executes - Object Ready - Object is fully constructed and ready to use
What Happens WITHOUT Initializer List:
Foo(int a) {
this->member = a; // ❌ Trying to assign
}
Step-by-Step Flow:
- Memory Allocation - Space for
Fooobject allocated - Member Default Construction -
memberis created but uninitialized (or default-initialized)- For
constmembers, this is where they need their value! - But we didn’t provide one via initializer list
- For
- Constructor Body - Try to execute
this->member = a;- ❌ ERROR! This is assignment, not initialization
- Can’t assign to a
constvariable!
Key Differences: Initialization vs Assignment
| Initialization | Assignment |
|---|---|
| Happens when variable is created | Happens after variable exists |
Uses initializer list : member(value) | Uses = operator in constructor body |
Works with const members | ❌ Does NOT work with const members |
| Works with reference members | ❌ Does NOT work with reference members |
| More efficient (direct construction) | Less efficient (construct then modify) |
When You MUST Use Initializer Lists
You must use initializer lists for:
-
Const member variables
class Foo { const int x; public: Foo(int val) : x(val) { } // Required! }; -
Reference member variables
class Foo { int& ref; public: Foo(int& r) : ref(r) { } // Required! }; -
Member objects without default constructors
class Bar { public: Bar(int x) { } // No default constructor }; class Foo { Bar b; public: Foo() : b(10) { } // Required! Bar needs a value }; -
Base class initialization (inheritance)
class Base { public: Base(int x) { } }; class Derived : public Base { public: Derived(int x) : Base(x) { } // Required! };
Best Practices
✓ DO: Use initializer lists for all member variables
class Person {
std::string name;
int age;
public:
Person(std::string n, int a) : name(n), age(a) { }
};
✓ DO: Initialize members in the same order they are declared in the class
class Foo {
int x; // Declared first
int y; // Declared second
public:
Foo(int a, int b) : x(a), y(b) { } // Initialize in same order
};
✗ DON’T: Mix initialization and assignment unnecessarily
// Bad - Inefficient
Foo(int a) {
member = a; // Default construct, then assign
}
// Good - Efficient
Foo(int a) : member(a) { } // Direct initialization
5. The this Pointer and Const Member Functions
Understanding the this Pointer
The this pointer is a hidden pointer that exists in every non-static member function. It points to the object that called the function.
How Member Functions Actually Work
When you write:
obj.print_obj();
The compiler secretly transforms this into something like:
print_obj(&obj); // Pass the address of obj as a hidden argument
Inside the function, you access members through this hidden pointer called this.
The this Pointer Explained
thisis a pointer to the object that called the member function- It’s automatically passed to every non-static member function
- Type:
ClassName* const(constant pointer to the class type) - You can use it explicitly (
this->member) or implicitly (member)
Why is this a Constant Pointer?
The type Foo* const means:
Foo*- Pointer to aFooobjectconst(after the*) - The pointer itself is constant
This means:
- ✓ You CAN modify the object that
thispoints to (change member variables) - ✗ You CANNOT reassign
thisto point to a different object
void someFunction() {
// this has type: Foo* const
this->member = 10; // ✓ OK: Can modify the object
member = 20; // ✓ OK: Same thing (implicit this)
Foo other;
this = &other; // ❌ ERROR: Cannot reassign 'this'!
// 'this' is a constant pointer
}
Why this design? The this pointer must always point to the same object throughout the entire function execution. It would be dangerous and nonsensical to allow this to be reassigned to point to a different object mid-function!
The Problem with Const Objects
Consider this example:
#include <iostream>
class Foo {
private:
const int member;
public:
explicit Foo() : member(0) {
std::cout << "Foo() invoked\n";
}
explicit Foo(int a) : member(a) {
std::cout << "Foo(int a) invoked\n";
}
~Foo() {
std::cout << "~Foo() invoked\n";
}
// Non-const member function
void print_obj() {
std::cout << "Object Add: " << this << ": member : " << this->member << std::endl;
}
};
int main() {
Foo obj1;
obj1.print_obj(); // ✓ Works fine
Foo obj2(2);
obj2.print_obj(); // ✓ Works fine
const Foo obj3(20); // const object
obj3.print_obj(); // ❌ COMPILATION ERROR!
return 0;
}
Compilation Error
error: passing 'const Foo' as 'this' argument discards qualifiers
Why Does This Fail?
Let’s understand what’s happening behind the scenes:
-
When you call
obj3.print_obj()on aconstobject:- The compiler tries to pass
&obj3toprint_obj() - Type of
&obj3isconst Foo*(pointer to const Foo)
- The compiler tries to pass
-
What
print_obj()expects:- Type:
Foo* const(constant pointer to non-const Foo) - The function signature is really:
void print_obj(Foo* const this) - This means
thiscannot be reassigned, but the object can be modified
- Type:
-
Type Mismatch:
- You’re trying to pass:
const Foo* - Function expects:
Foo* const - This is not allowed because it would discard the
constqualifier!
- You’re trying to pass:
Visualizing the Type Mismatch
void print_obj() {
// Behind the scenes, this function signature is:
// void print_obj(Foo* const this)
// ^^^^ ^^^^^
// | |
// | 'this' pointer itself is constant (can't be reassigned)
// The object pointed to is non-const (can be modified)
}
const Foo obj3(20);
obj3.print_obj();
// Trying to pass: const Foo*
// Function expects: Foo* const
// ❌ ERROR: Cannot convert const Foo* to Foo* const
// The issue is the first 'const' - it protects the object from modification
Why is this dangerous? If allowed, you could modify a const object through the non-const this pointer, violating const-correctness!
The Solution: Const Member Functions
Mark the member function as const to tell the compiler: “This function will not modify the object.”
Corrected Code
#include <iostream>
class Foo {
private:
const int member;
public:
explicit Foo() : member(0) {
std::cout << "Foo() invoked\n";
}
explicit Foo(int a) : member(a) {
std::cout << "Foo(int a) invoked\n";
}
~Foo() {
std::cout << "~Foo() invoked\n";
}
// Const member function - note the 'const' after parameter list
void print_obj() const {
std::cout << "Object Add: " << this << ": member : " << this->member << std::endl;
}
};
int main() {
Foo obj1;
obj1.print_obj(); // ✓ Works
Foo obj2(2);
obj2.print_obj(); // ✓ Works
const Foo obj3(20); // const object
obj3.print_obj(); // ✓ Now works!
return 0;
}
Output
Foo() invoked
Object Add: 0x16fdff04c: member : 0
Foo(int a) invoked
Object Add: 0x16fdff048: member : 2
Foo(int a) invoked
Object Add: 0x16fdff044: member : 20
~Foo() invoked
~Foo() invoked
~Foo() invoked
How const Fixes the Issue
Behind the Scenes: Function Signature
When you add const to a member function:
void print_obj() const {
// Behind the scenes:
// void print_obj(const Foo* const this)
// ^^^^^ ^^^ ^^^^^
// | | |
// | | 'this' pointer is constant (can't be reassigned)
// | pointer
// Object is const (cannot be modified)
}
The const keyword changes the type of the this pointer from Foo* const to const Foo* const.
Now:
- The object pointed to by
thisis const (firstconst) - The pointer
thisitself is const (secondconst)
GDB Evidence
Using GDB with demangling turned off reveals the true function signature:
(gdb) set print demangle off
(gdb) info functions Foo::print_obj
All functions matching regular expression "Foo::print_obj":
File const.cpp:
22: void _ZNK3Foo9print_objEv(const Foo * const);
^^ ^^^^^
|| |||||
|| const Foo* const
||
'K' indicates const member function
Breakdown of the mangled name _ZNK3Foo9print_objEv:
_Z= Start of mangled nameN= Nested nameK= const member function (this is the key!)3Foo= Class name “Foo” (3 characters)9print_obj= Function name “print_obj” (9 characters)Ev= Return type void, no parameters (except hiddenthis)
The signature shows: void _ZNK3Foo9print_objEv(const Foo * const);
This means the function receives: const Foo* const
- First
const: The object pointed to cannot be modified *: Pointer- Second
const: The pointer itself cannot be reassigned
This matches what we expect for a const member function!
Type Matching with Const Member Functions
Without const keyword:
void print_obj() {
// Real signature: void print_obj(Foo* const this)
// ^^^^ ^^^^^
// Can modify object, pointer is constant
}
const Foo obj3(20);
obj3.print_obj();
// Passing: const Foo* const
// Expects: Foo* const
// ❌ Type mismatch! The object being passed is const, but function could modify it
With const keyword:
void print_obj() const {
// Real signature: void print_obj(const Foo* const this)
// ^^^^^ ^^^ ^^^^^
// Cannot modify object, pointer is constant
}
const Foo obj3(20);
obj3.print_obj();
// Passing: const Foo* const
// Expects: const Foo* const
// ✓ Types match perfectly!
What Const Member Functions Promise
When you declare a member function as const:
void print_obj() const {
// Inside this function:
// - 'this' has type: const Foo* const
// - You CANNOT modify any member variables (object is const)
// - You CANNOT reassign 'this' pointer (pointer is const)
// - You CAN read member variables
// - You CAN only call other const member functions
}
What You Can and Cannot Do
class Foo {
int x;
int y;
public:
void readOnly() const {
std::cout << x; // ✓ OK: Reading is allowed
std::cout << y; // ✓ OK: Reading is allowed
// x = 10; // ❌ ERROR: Cannot modify members
// y = 20; // ❌ ERROR: Cannot modify members
}
void modify() {
x = 10; // ✓ OK: Non-const function can modify
}
void anotherConst() const {
readOnly(); // ✓ OK: Can call const functions
// modify(); // ❌ ERROR: Cannot call non-const functions
}
};
Rules for Const Objects and Functions
| Scenario | Allowed? | Explanation |
|---|---|---|
| Non-const object calling non-const function | ✓ Yes | Normal case |
| Non-const object calling const function | ✓ Yes | Safe: const function won’t modify |
| Const object calling const function | ✓ Yes | Perfect match: both are const |
| Const object calling non-const function | ❌ No | Unsafe: function might modify const object |
Best Practices
✓ DO: Mark member functions as const if they don’t modify the object
class Person {
std::string name;
int age;
public:
// Getters should be const - they only read data
std::string getName() const { return name; }
int getAge() const { return age; }
// Setters should NOT be const - they modify data
void setName(const std::string& n) { name = n; }
void setAge(int a) { age = a; }
// Display functions should be const - they only read
void display() const {
std::cout << name << " is " << age << " years old\n";
}
};
✓ DO: Use const-correctness throughout your code
void processUser(const Person& p) {
p.display(); // ✓ OK: display() is const
// p.setAge(30); // ❌ ERROR: setAge() is not const
}
✗ DON’T: Forget to mark read-only functions as const
class Bad {
int x;
public:
int getValue() { return x; } // ❌ Bad: Should be const!
};
void useIt(const Bad& b) {
// int val = b.getValue(); // ❌ Won't compile!
}
6. The mutable Keyword
The Problem: Wanting to Modify Some Members of Const Objects
Sometimes you have a const object where most members should be read-only, but a few specific members need to be modifiable. This is common in scenarios like:
- Caching: Storing computed results to avoid recalculation
- Debugging counters: Tracking how many times a function is called
- Lazy initialization: Initializing data only when first accessed
- Mutex locks: Managing thread synchronization in const member functions
Example Problem
#include <iostream>
class Foo {
private:
int member;
int readonly_member;
public:
explicit Foo(int a, int b) : member(a), readonly_member(b) {
std::cout << "Foo(int a, int b) invoked\n";
}
void print_obj() const {
std::cout << "Object: " << this
<< ", member: " << member
<< ", readonly: " << readonly_member << std::endl;
}
void can_modify(int data) const {
this->member = data; // ❌ ERROR: Cannot modify in const function!
// this->readonly_member = data; // ❌ ERROR: Cannot modify in const function!
}
};
int main() {
const Foo obj1(20, 30);
obj1.print_obj();
// I want to modify 'member' but keep the object const
obj1.can_modify(100); // ❌ Won't compile!
return 0;
}
Compilation Error
error: assignment of member 'Foo::member' in read-only object
The Problem: Even though can_modify() is a const member function, it cannot modify ANY member variables because this has type const Foo* const.
The Solution: The mutable Keyword
The mutable keyword allows you to mark specific member variables as always modifiable, even in const member functions and const objects.
Syntax
class ClassName {
mutable Type memberName; // This member can be modified even in const contexts
};
Corrected Example
#include <iostream>
class Foo {
private:
mutable int member; // mutable: can be modified even in const functions
int readonly_member; // regular: cannot be modified in const functions
public:
explicit Foo() : member(0), readonly_member(0) {
std::cout << "Foo() invoked\n";
}
explicit Foo(int a, int b) : member(a), readonly_member(b) {
std::cout << "Foo(int a, int b) invoked\n";
}
~Foo() {
std::cout << "~Foo() invoked\n";
}
void print_obj() const {
std::cout << "Object: " << this
<< ", member: " << member
<< ", readonly: " << readonly_member << std::endl;
}
void can_modify(int data) const {
this->member = data; // ✓ OK: member is mutable
// this->readonly_member = data; // ❌ ERROR: readonly_member is not mutable
}
};
int main() {
// Creating a constant object
const Foo obj1(20, 30);
std::cout << "Initial state:\n";
obj1.print_obj();
// Modifying the mutable member through a const function
std::cout << "\nModifying mutable member to 100:\n";
obj1.can_modify(100);
obj1.print_obj();
return 0;
}
Output
Foo(int a, int b) invoked
Initial state:
Object: 0x16fdff048, member: 20, readonly: 30
Modifying mutable member to 100:
Object: 0x16fdff048, member: 100, readonly: 30
~Foo() invoked
How mutable Works
When you mark a member as mutable:
class Foo {
mutable int counter; // Can be modified even in const functions
int value; // Cannot be modified in const functions
public:
void someConstFunction() const {
// this has type: const Foo* const
counter++; // ✓ OK: counter is mutable
// value++; // ❌ ERROR: value is not mutable
}
};
Key Point: The mutable keyword essentially tells the compiler: “Don’t apply const restrictions to this particular member, even when the object is const.”
Real-World Use Cases
1. Caching Expensive Computations
class DataProcessor {
std::vector<int> data;
mutable bool cached;
mutable double cachedResult;
public:
DataProcessor(const std::vector<int>& d)
: data(d), cached(false), cachedResult(0.0) {}
// This function doesn't logically modify the object,
// but it caches the result for performance
double getAverage() const {
if (!cached) {
double sum = 0;
for (int val : data) sum += val;
cachedResult = sum / data.size(); // ✓ OK: mutable
cached = true; // ✓ OK: mutable
}
return cachedResult;
}
};
2. Debug Counters
class Service {
mutable int callCount; // Track how many times methods are called
std::string data;
public:
Service(const std::string& d) : callCount(0), data(d) {}
std::string getData() const {
callCount++; // ✓ OK: Track calls even in const function
return data;
}
int getCallCount() const {
return callCount;
}
};
3. Lazy Initialization
class ExpensiveResource {
mutable std::unique_ptr<Resource> resource; // Initialized on first use
public:
const Resource& getResource() const {
if (!resource) {
resource = std::make_unique<Resource>(); // ✓ OK: Lazy init
}
return *resource;
}
};
4. Thread Synchronization
class ThreadSafeCounter {
mutable std::mutex mtx; // Mutex must be lockable in const functions
int count;
public:
int getCount() const {
std::lock_guard<std::mutex> lock(mtx); // ✓ OK: Can lock mutable mutex
return count;
}
void increment() {
std::lock_guard<std::mutex> lock(mtx);
count++;
}
};
Important Characteristics of mutable
What mutable Does:
- ✓ Allows modification of the member in
constmember functions - ✓ Allows modification of the member in
constobjects - ✓ Exempts the member from const-correctness rules
What mutable Does NOT Do:
- ✗ Does not make the member constant
- ✗ Does not affect the member in non-const contexts
- ✗ Does not change thread-safety characteristics
Comparison: Regular vs Mutable Members
class Example {
int regular;
mutable int mutableMember;
public:
// Non-const member function
void modify() {
regular = 1; // ✓ OK
mutableMember = 2; // ✓ OK
}
// Const member function
void constModify() const {
// regular = 1; // ❌ ERROR
mutableMember = 2; // ✓ OK
}
};
int main() {
// Non-const object
Example obj1;
obj1.regular = 10; // ✓ OK
obj1.mutableMember = 20; // ✓ OK
// Const object
const Example obj2;
// obj2.regular = 10; // ❌ ERROR
// obj2.mutableMember = 20; // ❌ ERROR: Direct access still not allowed
// But mutable members CAN be modified through const member functions
obj2.constModify(); // ✓ OK: Modifies mutableMember internally
}
When to Use mutable
✓ DO use mutable for:
- Internal caching mechanisms
- Debug/logging counters
- Lazy initialization
- Synchronization primitives (mutexes)
- Implementation details that don’t affect logical const-ness
✗ DON’T use mutable for:
- Core data that defines the object’s state
- When it breaks the logical const-ness of the object
- As a workaround for poor design
- When a better design would avoid the need for it
Best Practices
Good Use: Caching
class MathProcessor {
std::vector<int> numbers;
mutable bool sumCached;
mutable int cachedSum;
public:
int getSum() const {
if (!sumCached) {
cachedSum = 0;
for (int n : numbers) cachedSum += n;
sumCached = true;
}
return cachedSum;
}
};
✓ Why it’s good: The cache is an implementation detail. Logically, getSum() doesn’t modify the object—it just returns a value.
Bad Use: Breaking Logical Const-ness
class Counter {
mutable int count; // ❌ Bad: count is the object's main state!
public:
void increment() const { // ❌ Bad: This should NOT be const!
count++;
}
};
✗ Why it’s bad: The count is the object’s primary state. If you’re modifying it, the object IS changing, so the function shouldn’t be const.
Understanding Copy Constructors in C++
Let’s explore what a copy constructor is, when it’s invoked, and understand deep vs shallow copies and temporary objects through examples.
What is a Copy Constructor?
A copy constructor in C++ is a special constructor used to create a new object as a copy of an existing object.
Syntax
ClassName(const ClassName& other);
Purpose
- Defines how an object should be copied.
- Required when your class manages resources (like memory, files, sockets).
- Prevents issues like double deletion and dangling pointers.
When is it Invoked?
The compiler automatically calls the copy constructor in these cases:
-
Object initialization using another object
Foo obj2 = obj1; // or Foo obj2(obj1); -
Passing an object by value to a function
void func(Foo obj); // Copy constructor called when passed by value -
Returning an object by value from a function
Foo get_obj() { Foo temp(10); return temp; // Copy constructor may be invoked (before RVO) } -
Explicit copying using copy initialization
Foo obj3 = Foo(obj1); // Explicit copy
If you do not define a copy constructor, the compiler provides a default shallow copy constructor, which may not be safe for classes managing dynamic memory.
Step 1: Basic Class Without Copy Constructor
#include <iostream>
class Foo {
private:
int* ptr;
public:
Foo(int value) {
ptr = new int(value);
std::cout << "Foo(int) invoked, *ptr = " << *ptr << "\n";
}
~Foo() {
std::cout << "~Foo() invoked, deleting ptr\n";
delete ptr;
}
};
int main() {
Foo obj1(10);
Foo obj2 = obj1; // ❌ Problem here
return 0;
}
Problem: Shallow Copy
The compiler automatically generates a default copy constructor that performs a member-wise (shallow) copy.
That means both obj1 and obj2 will have their ptr pointing to the same memory location.
When both destructors run:
obj1deletesptrobj2also tries to delete the same memory
./a.out
Foo(int) invoked, *ptr = 10
~Foo() invoked, deleting ptr
~Foo() invoked, deleting ptr
a.out(53252,0x1f91d60c0) malloc: *** error for object 0x6000013a4020: pointer being freed was not allocated
a.out(53252,0x1f91d60c0) malloc: *** set a breakpoint in malloc_error_break to debug
[1] 53252 abort ./a.out
Result: Double free or corruption runtime error.
Step 2: What Valgrind(linux)/leaks(mac) Shows
If you run this under Valgrind, you’ll see:
==1234== Invalid free() / delete / delete[]
==1234== at 0x4C2B5D5: operator delete(void*) (vg_replace_malloc.c:642)
==1234== by 0x1091C2: Foo::~Foo() (example.cpp:12)
==1234== Address 0x5a52040 is 0 bytes inside a block of size 4 free'd
==1234== by 0x1091C2: Foo::~Foo() (example.cpp:12)
leaks --atExit -- ./a.out
a.out(56120) MallocStackLogging: could not tag MSL-related memory as no_footprint, so those pages will be included in process footprint - (null)
a.out(56120) MallocStackLogging: recording malloc (and VM allocation) stacks using lite mode
Foo(int) invoked, *ptr = 10
~Foo() invoked, deleting ptr
~Foo() invoked, deleting ptr
a.out(56120,0x1f91d60c0) malloc: *** error for object 0x133804080: pointer being freed was not allocated
a.out(56120,0x1f91d60c0) malloc: *** set a breakpoint in malloc_error_break to debug
This happens because two destructors delete the same pointer.
Step 3: Add a Custom Copy Constructor (Deep Copy)
We fix this by allocating new memory for each object, and copying the value instead of the pointer.
#include <iostream>
class Foo {
private:
int* ptr;
public:
Foo(int value) {
ptr = new int(value);
std::cout << "Foo(int) invoked, *ptr = " << *ptr << "\n";
}
// 🟢 Copy Constructor (Deep Copy)
Foo(Foo& obj) {
ptr = new int(*obj.ptr);
std::cout << "Foo(Foo&) invoked (deep copy), *ptr = " << *ptr << "\n";
}
~Foo() {
std::cout << "~Foo() invoked, deleting ptr\n";
delete ptr;
}
};
int main() {
Foo obj1(10);
Foo obj2 = obj1; // Deep copy now, no double delete
return 0;
}
Now each object has its own ptr, and deletion is safe.
Step 4: Problem with Temporaries (rvalues or prvalues in c++11)
Let’s add a function that returns a temporary object:
Foo get_obj() {
return Foo(20); // creates a temporary (prvalue)
}
int main() {
Foo obj5 = get_obj(); // ❌ Error with Foo(Foo&)
return 0;
}
❌ Error:
error: no matching constructor for initialization of 'Foo'
note: candidate constructor not viable: expects an lvalue for 1st argument
Why?
return Foo(20)creates a temporary object (a prvalue).- The parameter type
Foo&cannot bind to a temporary object. - In C++, non-const lvalue references cannot bind to temporaries.
Step 5: Fix by Adding const to Copy Constructor
#include <iostream>
class Foo {
private:
int* ptr;
public:
Foo(int value) {
ptr = new int(value);
std::cout << "Foo(int) invoked, *ptr = " << *ptr << "\n";
}
// ✅ Const Copy Constructor
Foo(const Foo& obj) {
ptr = new int(*obj.ptr);
std::cout << "Foo(const Foo&) invoked (deep copy), *ptr = " << *ptr << "\n";
}
~Foo() {
std::cout << "~Foo() invoked, deleting ptr\n";
delete ptr;
}
};
Foo get_obj() {
return Foo(30);
}
int main() {
Foo obj1(10);
Foo obj2 = obj1; // ✅ lvalue copy
Foo obj3 = get_obj(); // ✅ prvalue copy
return 0;
}
Now it works for both:
- lvalues (
obj1) - temporaries (prvalues) returned from functions
Step 6: Understanding Temporary Objects
What is a Temporary (prvalue)?
- Created by expressions like
Foo(20)orreturn Foo(). - Exists only until the end of the full expression.
- Cannot be modified (non-const binding forbidden).
That’s why the copy constructor should accept:
Foo(const Foo& obj);
so that temporaries can be used to create new objects safely.
Step 7: Unoptimized Invocations
Before compiler optimizations (like Return Value Optimization, RVO),
the following may happen when you call get_obj():
Foo(30)temporary created (constructor invoked)- Temporary copied into
obj3(copy constructor invoked) - Temporary destroyed (destructor invoked)
obj3destroyed (destructor invoked)
Output (unoptimized):
Foo(int) invoked, *ptr = 30
Foo(const Foo&) invoked (deep copy), *ptr = 30
~Foo() invoked, deleting ptr
~Foo() invoked, deleting ptr
In optimized builds, modern compilers often elide these copies (RVO),
so you might see fewer constructor calls.
Summary
| Concept | Description |
|---|---|
| Copy Constructor | Special constructor used to create an object as a copy of another object |
| Shallow Copy | Copies pointer value → both objects share same memory → leads to double free |
| Deep Copy | Allocates new memory and copies data → each object owns its own copy |
Why const? | Allows binding to temporaries (prvalues) |
Without const | Fails when copying from a temporary |
| Temporary (prvalue) | A short-lived unnamed object like Foo(10) or return Foo() |
Next step Move Constructor
(to optimize performance and avoid unnecessary deep copies for temporaries).
↑ Back to Table of Contents
Summary
Constructors initialize objects after memory allocation, while destructors clean up resources before memory deallocation. Using the explicit keyword on constructors is a best practice that prevents implicit type conversions, making your code safer, clearer, and more maintainable.
Member initializer lists allow you to initialize member variables at the moment of their construction, which is essential for const and reference members, and more efficient for all member variables.
The this pointer is a hidden pointer passed to every member function that points to the calling object. When working with const objects, member functions must be marked as const to accept a const Foo* const instead of Foo* const, ensuring const-correctness and type safety.
The mutable keyword allows specific member variables to be modified even in const member functions and const objects. Use it for implementation details like caching, debug counters, and lazy initialization—but not for core object state.
Bottom Line: Use mutable judiciously for implementation details that don’t affect the logical const-ness of your objects. It’s a powerful tool for optimization and internal bookkeeping, but shouldn’t be used to bypass const-correctness for core object state!
Constructor Execution in Inheritance - C++
Table of Contents
- Understanding Constructor Execution Order
- Default Constructor Behavior
- Execution Sequence Analysis
- Calling Parameterized Base Constructors
- Complete Example with Explanation
- Inheriting constructors - C++11
- Limitation of inherited construtors - C++11
- Understanding Destructor Execution Order
1. Understanding Constructor Execution Order
When creating an object of a derived class, constructors are called in a specific order:
Order of Construction:
- Base class constructor (top of hierarchy) - First
- Intermediate class constructors (if any)
- Derived class constructor (bottom of hierarchy) - Last
Order of Destruction: (Reverse order)
- Derived class destructor - First
- Intermediate class destructors
- Base class destructor - Last
Why This Order?
The derived class depends on the base class being fully constructed first. You can’t build a house’s roof before building its foundation!
Construction: Base → Intermediate → Derived (Bottom-up)
Destruction: Derived → Intermediate → Base (Top-down)
2. Default Constructor Behavior
Original Example
#include <iostream>
class A {
public:
A() : a(1) {
std::cout << "A(): a = " << a << std::endl;
}
A(int a) : a(a) {
std::cout << "A(int): a = " << a << std::endl;
}
private:
int a;
};
class B : public A {
public:
B() : b(2) {
std::cout << "B(): b = " << b << std::endl;
}
B(int b) : b(b) {
std::cout << "B(int): b = " << b << std::endl;
}
private:
int b;
};
class C : public B {
public:
C() : c(3) {
std::cout << "C(): c = " << c << std::endl;
}
C(int c) : c(c) {
std::cout << "C(int): c = " << c << std::endl;
}
private:
int c;
};
int main(int argc, char* argv[]) {
std::cout << "Without parameter:" << std::endl;
C c_obj{};
std::cout << "\nWith parameter:" << std::endl;
C c_obj_param{30};
return 0;
}
Output
Without parameter:
A(): a = 1
B(): b = 2
C(): c = 3
With parameter:
A(): a = 1
B(): b = 2
C(int): c = 30
Key Observation
Notice that even when we call C(int) with a parameter, the base classes A and B still use their default constructors!
3. Execution Sequence Analysis
Case 1: C c_obj{}; (Default Constructor)
What the Compiler Sees:
C() : c(3) {
std::cout << "C(): c = " << c << std::endl;
}
What the Compiler Does (Implicit):
C() : B(), // ← Implicitly calls B's default constructor
c(3) {
std::cout << "C(): c = " << c << std::endl;
}
And B() does the same:
B() : A(), // ← Implicitly calls A's default constructor
b(2) {
std::cout << "B(): b = " << b << std::endl;
}
Execution Flow:
Step 1: C() constructor called
│
├──> Step 2: Compiler sees no explicit base constructor call
│ Automatically calls B() (default)
│ │
│ ├──> Step 3: B() constructor starts
│ │ Compiler sees no explicit base constructor call
│ │ Automatically calls A() (default)
│ │ │
│ │ ├──> Step 4: A() constructor starts
│ │ │ Initializes: a = 1
│ │ │ Prints: "A(): a = 1"
│ │ └──> A() constructor completes
│ │
│ ├──> Step 5: B() constructor continues
│ │ Initializes: b = 2
│ │ Prints: "B(): b = 2"
│ └──> B() constructor completes
│
├──> Step 6: C() constructor continues
│ Initializes: c = 3
│ Prints: "C(): c = 3"
└──> C() constructor completes
Visual Timeline:
Time →
[A() starts] → [a=1] → [Print "A()"] → [A() done]
↓
[B() starts] → [b=2] → [Print "B()"] → [B() done]
↓
[C() starts] → [c=3] → [Print "C()"] → [C() done]
Case 2: C c_obj_param{30}; (Parameterized Constructor)
What the Compiler Sees:
C(int c) : c(c) {
std::cout << "C(int): c = " << c << std::endl;
}
What the Compiler Does (Implicit):
C(int c) : B(), // ← Still implicitly calls B's DEFAULT constructor!
c(c) {
std::cout << "C(int): c = " << c << std::endl;
}
Execution Flow:
Step 1: C(int) constructor called with c = 30
│
├──> Step 2: Compiler sees no explicit base constructor call
│ Automatically calls B() (default, not B(int)!)
│ │
│ ├──> Step 3: B() constructor starts
│ │ Automatically calls A() (default)
│ │ │
│ │ ├──> Step 4: A() constructor
│ │ │ Initializes: a = 1
│ │ │ Prints: "A(): a = 1"
│ │ └──> A() completes
│ │
│ ├──> Step 5: B() constructor continues
│ │ Initializes: b = 2
│ │ Prints: "B(): b = 2"
│ └──> B() completes
│
├──> Step 6: C(int) constructor continues
│ Initializes: c = 30 (uses the parameter!)
│ Prints: "C(int): c = 30"
└──> C(int) completes
Important Rule
If a derived class constructor doesn’t EXPLICITLY call a base class constructor in its initializer list, the compiler AUTOMATICALLY calls the base class’s DEFAULT constructor.
This means:
- You wrote:
C(int c) : c(c) { } - Compiler executes:
C(int c) : B(), c(c) { } B()then executes:B() : A(), b(2) { }
4. Calling Parameterized Base Constructors
To use parameterized constructors of base classes, you must explicitly call them in the initializer list.
Modified Code
#include <iostream>
class A {
public:
A() : a(1) {
std::cout << "A(): a = " << a << std::endl;
}
A(int a) : a(a) {
std::cout << "A(int): a = " << a << std::endl;
}
private:
int a;
};
class B : public A {
public:
B() : A(), b(2) { // Explicitly call A() (though it's implicit)
std::cout << "B(): b = " << b << std::endl;
}
B(int b) : A(), b(b) { // Explicitly call A()
std::cout << "B(int): b = " << b << std::endl;
}
// New: Constructor that takes parameters for both B and A
B(int a_val, int b_val) : A(a_val), b(b_val) {
std::cout << "B(int, int): b = " << b << std::endl;
}
private:
int b;
};
class C : public B {
public:
C() : B(), c(3) { // Explicitly call B()
std::cout << "C(): c = " << c << std::endl;
}
C(int c) : B(), c(c) { // Explicitly call B()
std::cout << "C(int): c = " << c << std::endl;
}
// New: Constructor that takes parameters for C and B
C(int b_val, int c_val) : B(b_val), c(c_val) {
std::cout << "C(int, int): c = " << c << std::endl;
}
// New: Constructor that takes parameters for all classes
C(int a_val, int b_val, int c_val) : B(a_val, b_val), c(c_val) {
std::cout << "C(int, int, int): c = " << c << std::endl;
}
private:
int c;
};
int main(int argc, char* argv[]) {
std::cout << "=== Case 1: Default constructors ===" << std::endl;
C obj1{};
std::cout << "\n=== Case 2: Only C parameter ===" << std::endl;
C obj2{30};
std::cout << "\n=== Case 3: B and C parameters ===" << std::endl;
C obj3{20, 30};
std::cout << "\n=== Case 4: A, B, and C parameters ===" << std::endl;
C obj4{10, 20, 30};
return 0;
}
Output
=== Case 1: Default constructors ===
A(): a = 1
B(): b = 2
C(): c = 3
=== Case 2: Only C parameter ===
A(): a = 1
B(): b = 2
C(int): c = 30
=== Case 3: B and C parameters ===
A(): a = 1
B(int): b = 20
C(int, int): c = 30
=== Case 4: A, B, and C parameters ===
A(int): a = 10
B(int, int): b = 20
C(int, int, int): c = 30
5. Complete Example with Explanation
Detailed Analysis of Each Case
Case 1: C obj1{}; (All Default Constructors)
C() : B(), c(3) {
std::cout << "C(): c = " << c << std::endl;
}
Execution:
A() called → a = 1
B() called → b = 2
C() called → c = 3
Explanation:
C()callsB()(explicit in modified code, implicit in original)B()callsA()(explicit in modified code, implicit in original)- Each constructor uses default values
Case 2: C obj2{30}; (Only C Gets Parameter)
C(int c) : B(), c(c) {
std::cout << "C(int): c = " << c << std::endl;
}
Execution:
A() called → a = 1
B() called → b = 2
C(int) called → c = 30
Explanation:
C(int)explicitly callsB()(default constructor)B()implicitly callsA()(default constructor)- Only
cgets the parameter value aandbstill use defaults
Key Point: Passing a parameter to C doesn’t automatically pass it to B or A!
Case 3: C obj3{20, 30}; (B and C Get Parameters)
C(int b_val, int c_val) : B(b_val), c(c_val) {
std::cout << "C(int, int): c = " << c << std::endl;
}
Which calls:
B(int b) : A(), b(b) {
std::cout << "B(int): b = " << b << std::endl;
}
Execution:
A() called → a = 1
B(int) called → b = 20
C(int, int) called → c = 30
Explanation:
C(int, int)explicitly callsB(int)withb_val = 20B(int)implicitly callsA()(default constructor)astill uses default, butbandcget parameters
Case 4: C obj4{10, 20, 30}; (All Get Parameters)
C(int a_val, int b_val, int c_val) : B(a_val, b_val), c(c_val) {
std::cout << "C(int, int, int): c = " << c << std::endl;
}
Which calls:
B(int a_val, int b_val) : A(a_val), b(b_val) {
std::cout << "B(int, int): b = " << b << std::endl;
}
Which calls:
A(int a) : a(a) {
std::cout << "A(int): a = " << a << std::endl;
}
Execution:
A(int) called → a = 10
B(int, int) called → b = 20
C(int, int, int) called → c = 30
Explanation:
C(int, int, int)explicitly callsB(int, int)witha_val = 10, b_val = 20B(int, int)explicitly callsA(int)witha_val = 10- All classes get their respective parameter values
This is the proper way to initialize the entire hierarchy with custom values!
Visual Representation of Constructor Calls
Case 1: C obj1{}
C()
└─> B()
└─> A()
└─> a=1
└─> b=2
└─> c=3
Case 2: C obj2{30}
C(int) [param: 30]
└─> B()
└─> A()
└─> a=1
└─> b=2
└─> c=30 ← Uses parameter
Case 3: C obj3{20, 30}
C(int, int) [params: 20, 30]
└─> B(int) [param: 20]
└─> A()
└─> a=1
└─> b=20 ← Uses parameter
└─> c=30 ← Uses parameter
Case 4: C obj4{10, 20, 30}
C(int, int, int) [params: 10, 20, 30]
└─> B(int, int) [params: 10, 20]
└─> A(int) [param: 10]
└─> a=10 ← Uses parameter
└─> b=20 ← Uses parameter
└─> c=30 ← Uses parameter
Key Takeaways
1. Automatic Default Constructor Call
- If you don’t explicitly call a base class constructor, the compiler calls the default constructor automatically
- This happens even if you call a parameterized constructor of the derived class
2. Explicit Base Constructor Call
- To use a parameterized base constructor, you MUST explicitly call it in the initializer list:
DerivedClass(params) : BaseClass(params), members(values) { // constructor body }
3. Constructor Execution Order
- Always executes from base to derived (top-down in hierarchy)
- Base class is fully constructed before derived class constructor body runs
4. Passing Parameters Up the Hierarchy
- Parameters don’t automatically propagate to base classes
- You must explicitly pass them through constructor calls:
C(int a, int b, int c) : B(a, b), c(c) { }
5. Initializer List Order
- Base class constructors are called before member initialization
- Even if you write members first in the list:
C() : c(3), B() { } // B() still called before c initialization
Best Practice
✓ DO:
- Explicitly call base constructors when you need specific initialization
- Pass parameters through the hierarchy when needed
- Use initializer lists for all initialization
✗ DON’T:
- Rely on implicit default constructor calls when you need specific values
- Try to initialize base class members in derived class constructor body
- Forget that base constructors run first
Summary
Constructor execution in inheritance follows a strict order:
- Base class constructor (outermost first)
- Member variable initialization
- Constructor body execution
If not explicitly called, the compiler automatically invokes the default constructor of the base class. To use parameterized base constructors, you must explicitly call them in the initializer list.
This ensures that the base class is fully constructed before the derived class tries to use it, maintaining the integrity of the inheritance hierarchy.
C++11 introduced constructor inheritance using the using keyword, which allows derived classes to inherit base class constructors, reducing boilerplate code. However, there are important limitations when constructors with the same signature exist in both base and derived classes.
6. Inheriting Constructors (C++11)
The Problem Before C++11
Before C++11, if you wanted to use base class constructors in a derived class, you had to write forwarding constructors manually:
class Base {
public:
Base(int x) { }
Base(int x, int y) { }
Base(int x, int y, int z) { }
};
class Derived : public Base {
public:
// Manually forward each constructor - tedious!
Derived(int x) : Base(x) { }
Derived(int x, int y) : Base(x, y) { }
Derived(int x, int y, int z) : Base(x, y, z) { }
};
Problems:
- Lots of boilerplate code
- Error-prone (easy to forget a constructor)
- Hard to maintain (every base constructor needs forwarding)
- Repetitive and tedious
The Solution: using to Inherit Constructors (C++11)
C++11 introduced the using declaration to inherit base class constructors:
class Base {
public:
Base(int x) { std::cout << "Base(int): " << x << "\n"; }
Base(int x, int y) { std::cout << "Base(int, int): " << x << ", " << y << "\n"; }
Base(int x, int y, int z) { std::cout << "Base(int, int, int)\n"; }
};
class Derived : public Base {
public:
using Base::Base; // ✓ Inherit ALL base constructors!
};
int main() {
Derived d1(10); // Calls Base(int)
Derived d2(10, 20); // Calls Base(int, int)
Derived d3(10, 20, 30); // Calls Base(int, int, int)
}
Output
Base(int): 10
Base(int, int): 10, 20
Base(int, int, int)
How It Eases Development
Before C++11 (Manual Forwarding)
class Base {
public:
Base() { }
Base(int x) { }
Base(int x, double y) { }
Base(std::string s) { }
};
class Derived : public Base {
int member;
public:
// Must manually write ALL of these!
Derived() : Base(), member(0) { }
Derived(int x) : Base(x), member(0) { }
Derived(int x, double y) : Base(x, y), member(0) { }
Derived(std::string s) : Base(s), member(0) { }
};
After C++11 (Inheriting Constructors)
class Base {
public:
Base() { }
Base(int x) { }
Base(int x, double y) { }
Base(std::string s) { }
};
class Derived : public Base {
int member = 0; // Default member initialization
public:
using Base::Base; // ✓ One line instead of four constructors!
};
Benefits:
- ✓ Less code - One line vs multiple constructors
- ✓ Less maintenance - Add base constructor, automatically available
- ✓ Fewer errors - No chance of forgetting to forward a constructor
- ✓ Cleaner code - Intent is clear and concise
Complete Example
#include <iostream>
#include <string>
class Person {
protected:
std::string name;
int age;
public:
Person(std::string n) : name(n), age(0) {
std::cout << "Person(string): " << name << "\n";
}
Person(std::string n, int a) : name(n), age(a) {
std::cout << "Person(string, int): " << name << ", " << age << "\n";
}
void display() const {
std::cout << "Name: " << name << ", Age: " << age << "\n";
}
};
class Employee : public Person {
int employeeId = 0; // Default member initialization
public:
// Inherit all Person constructors
using Person::Person;
// Can still add derived-specific constructors
Employee(std::string n, int a, int id) : Person(n, a), employeeId(id) {
std::cout << "Employee(string, int, int): " << name << ", " << age << ", " << id << "\n";
}
void display() const {
Person::display();
std::cout << "Employee ID: " << employeeId << "\n";
}
};
int main() {
std::cout << "=== Using inherited constructor ===" << std::endl;
Employee emp1("Alice", 30);
emp1.display();
std::cout << "\n=== Using derived-specific constructor ===" << std::endl;
Employee emp2("Bob", 25, 1001);
emp2.display();
return 0;
}
Output
=== Using inherited constructor ===
Person(string, int): Alice, 30
Name: Alice, Age: 30
Employee ID: 0
=== Using derived-specific constructor ===
Person(string, int): Bob, 25
Employee(string, int, int): Bob, 25, 1001
Name: Bob, Age: 25
Employee ID: 1001
7. Limitations of Inherited Constructors
Limitation 1: Constructor Hiding (Same Signature Conflict)
Important Rule: If a derived class defines a constructor with the same signature as an inherited base constructor, the derived class constructor hides (overrides) the inherited one.
Example: Constructor Hiding
#include <iostream>
class Base {
public:
Base(int x) {
std::cout << "Base(int): " << x << "\n";
}
Base(int x, int y) {
std::cout << "Base(int, int): " << x << ", " << y << "\n";
}
};
class Derived : public Base {
public:
using Base::Base; // Inherit all Base constructors
// This HIDES the inherited Base(int) constructor!
Derived(int x) {
std::cout << "Derived(int): " << x << "\n";
}
};
int main() {
Derived d1(10); // Calls Derived(int), NOT Base(int)
Derived d2(10, 20); // Calls inherited Base(int, int)
return 0;
}
Output
Derived(int): 10
Base(int, int): 10, 20
Analysis
using Base::Base; // Brings in:
// - Base(int) ← HIDDEN by Derived(int)
// - Base(int, int) ← Still available
Derived(int x) { } // This HIDES Base(int)
What Happens:
Derived d1(10)- CallsDerived(int), not the inheritedBase(int)Derived d2(10, 20)- Calls inheritedBase(int, int)(no conflict)
Key Point: The derived class constructor with matching signature takes precedence and completely hides the inherited base constructor.
Detailed Example with Multiple Scenarios
#include <iostream>
class Base {
public:
Base() {
std::cout << "Base()\n";
}
Base(int x) {
std::cout << "Base(int): " << x << "\n";
}
Base(int x, int y) {
std::cout << "Base(int, int): " << x << ", " << y << "\n";
}
Base(double d) {
std::cout << "Base(double): " << d << "\n";
}
};
class Derived : public Base {
int member;
public:
using Base::Base; // Inherit ALL Base constructors
// Scenario 1: Same signature - HIDES Base(int)
Derived(int x) : Base(x * 2), member(x) {
std::cout << "Derived(int): " << x << ", member = " << member << "\n";
}
// Scenario 2: Different signature - coexists with inherited constructors
Derived(int x, int y, int z) : Base(x, y), member(z) {
std::cout << "Derived(int, int, int): member = " << z << "\n";
}
};
int main() {
std::cout << "=== Test 1: Derived(int) - Hidden ===" << std::endl;
Derived d1(5); // Calls Derived(int), Base(int) is hidden
std::cout << "\n=== Test 2: Base(int, int) - Inherited ===" << std::endl;
Derived d2(10, 20); // Calls inherited Base(int, int)
std::cout << "\n=== Test 3: Base(double) - Inherited ===" << std::endl;
Derived d3(3.14); // Calls inherited Base(double)
std::cout << "\n=== Test 4: Derived(int, int, int) - Derived-specific ===" << std::endl;
Derived d4(1, 2, 3); // Calls Derived(int, int, int)
std::cout << "\n=== Test 5: Base() - Inherited ===" << std::endl;
Derived d5; // Calls inherited Base()
return 0;
}
Output
=== Test 1: Derived(int) - Hidden ===
Base(int): 10
Derived(int): 5, member = 5
=== Test 2: Base(int, int) - Inherited ===
Base(int, int): 10, 20
=== Test 3: Base(double) - Inherited ===
Base(double): 3.14
=== Test 4: Derived(int, int, int) - Derived-specific ===
Base(int, int): 1, 2
Derived(int, int, int): member = 3
=== Test 5: Base() - Inherited ===
Base()
Analysis of Each Test Case
| Test | Constructor Called | Explanation |
|---|---|---|
Derived d1(5) | Derived(int) | Derived class has Derived(int) which hides inherited Base(int) |
Derived d2(10, 20) | Inherited Base(int, int) | No conflict, uses inherited constructor |
Derived d3(3.14) | Inherited Base(double) | No conflict, uses inherited constructor |
Derived d4(1, 2, 3) | Derived(int, int, int) | Derived-specific constructor (not inherited) |
Derived d5 | Inherited Base() | No conflict, uses inherited constructor |
Limitation 2: Cannot Inherit from Multiple Bases with Same Signature
If multiple base classes have constructors with the same signature, you cannot inherit them:
class Base1 {
public:
Base1(int x) { }
};
class Base2 {
public:
Base2(int x) { }
};
class Derived : public Base1, public Base2 {
public:
using Base1::Base1; // Brings Base1(int)
using Base2::Base2; // ERROR: Ambiguous - both have (int)
};
Solution: Define your own constructor to resolve ambiguity:
class Derived : public Base1, public Base2 {
public:
Derived(int x) : Base1(x), Base2(x) { }
};
Limitation 3: Private and Protected Constructors
Inherited constructors maintain their access level:
class Base {
protected:
Base(int x) { } // Protected constructor
};
class Derived : public Base {
public:
using Base::Base; // Base(int) is still PROTECTED in Derived
};
int main() {
// Derived d(10); // ERROR: Base(int) is protected
}
Limitation 4: Default Member Initialization
When using inherited constructors, derived class members must use default member initialization:
class Base {
public:
Base(int x) { }
};
class Derived : public Base {
int member; // Uninitialized when using inherited constructors!
public:
using Base::Base;
};
// Better:
class Derived : public Base {
int member = 0; // ✓ Default member initialization
public:
using Base::Base;
};
When NOT to Use Inherited Constructors
Don’t use inherited constructors when:
- Derived class needs to initialize its own members in specific ways
- You need different behavior than just forwarding to base
- Multiple bases have constructors with same signature
- You need to perform additional initialization logic
✓ DO use inherited constructors when:
- Derived class doesn’t add new data members (or they have defaults)
- You simply want to forward all base constructors
- No special initialization logic is needed
- You want to reduce boilerplate code
Best Practices Summary
class Base {
public:
Base(int x) { }
Base(int x, int y) { }
};
// ✓ GOOD: Simple forwarding, members have defaults
class Derived1 : public Base {
int member = 0;
public:
using Base::Base; // Clean and simple
};
// ✓ GOOD: Mix inherited and custom constructors
class Derived2 : public Base {
int member = 0;
public:
using Base::Base; // Inherit most constructors
// Add custom constructor when needed
Derived2(int x, int y, int z) : Base(x, y), member(z) { }
};
// ✓ GOOD: Override when you need different behavior
class Derived3 : public Base {
int member;
public:
using Base::Base; // Inherit Base(int, int)
// Override Base(int) with custom behavior
Derived3(int x) : Base(x * 2), member(x) { }
};
// BAD: Inherited constructors can't initialize this properly
class Derived4 : public Base {
int member; // No default, will be uninitialized!
public:
using Base::Base; // member not initialized
};
7.Understanding Destructor Execution Order
When an object of a derived class is destroyed, destructors are called in the reverse order of construction.
Order of Destruction:
- Derived class destructor — called first
- Base class destructor — called last
This ensures that the derived class cleans up its resources before the base class is destroyed.
Example
#include <iostream>
class Parent {
public:
Parent() { std::cout << "Inside base class constructor\n"; }
~Parent() { std::cout << "Inside base class destructor\n"; }
};
class Child : public Parent {
public:
Child() { std::cout << "Inside derived class constructor\n"; }
~Child() { std::cout << "Inside derived class destructor\n"; }
};
int main() {
Child obj;
return 0;
}
Expected Output
Inside base class constructor
Inside derived class constructor
Inside derived class destructor
Inside base class destructor
Why Destructors Are Called in Reverse Order
- During construction, the base class is created first, forming a foundation for the derived class.
- During destruction, the derived destructor runs first to clean up resources that might depend on the base class still being valid.
- After that, the base class destructor runs to finalize the cleanup.
This reverse order:
- Prevents undefined behavior caused by destroying the base while derived resources still exist.
- Maintains symmetry and safety — the base’s lifetime always outlasts the derived part.
- Applies similarly to data members, which are also destroyed in the reverse order of their construction.
Complete Summary
Constructor Execution Rules
- Execution Order: Base → Derived (construction), Derived → Base (destruction)
- Default Constructor: Automatically called if not explicitly specified
- Explicit Calls: Use initializer list to call specific base constructors
- C++11 Inheritance: Use
using Base::Base;to inherit all base constructors
Inheriting Constructors (C++11)
Advantages:
- ✓ Reduces boilerplate code
- ✓ Automatic forwarding of base constructors
- ✓ Easier maintenance
- ✓ Less error-prone
Limitations:
- Same signature in derived class hides inherited constructor
- Cannot inherit from multiple bases with same signature
- Access levels are preserved
- Derived members need default initialization
Golden Rule: Inherited constructors are a convenience feature for simple cases. When you need custom initialization logic, write explicit constructors.
Destructor execution order
The reverse order of destructor calls ensures:
- Consistent and safe cleanup
- Proper handling of dependencies
- No premature destruction of essential components
In short, destruction happens bottom-up, mirroring the top-down order of construction.
C++11 Advanced Constructor Features
A comprehensive guide to modern constructor features introduced in C++11.
Table of Contents
- Delegating Constructors
- Defaulted Constructors
- Deleted Constructors
- Non-static Data Member Initializers
- Inheriting Constructors
Delegating Constructors
Why Needed?
Before C++11, multiple constructors with different parameters often duplicated initialization logic, leading to code repetition and maintenance issues.
How It’s Beneficial
Delegating constructors allow one constructor to call another constructor in the same class, reducing code duplication and centralizing initialization logic.
Example
class Rectangle {
private:
int width;
int height;
public:
// Main constructor with initialization logic
Rectangle(int w, int h) : width(w), height(h) {
std::cout << "Creating rectangle: " << width << "x" << height << "\n";
}
// Delegating constructor - calls the main constructor
Rectangle() : Rectangle(10, 10) {
// Delegates to Rectangle(int, int)
}
// Another delegating constructor
Rectangle(int size) : Rectangle(size, size) {
// Creates a square by delegating
}
};
// Usage
Rectangle r1; // Calls Rectangle() -> Rectangle(10, 10)
Rectangle r2(5); // Calls Rectangle(int) -> Rectangle(5, 5)
Rectangle r3(8, 12); // Calls Rectangle(int, int) directly
Before C++11 (Code Duplication):
class Rectangle {
int width, height;
public:
Rectangle(int w, int h) : width(w), height(h) {
std::cout << "Creating rectangle\n"; // Duplicated
}
Rectangle() : width(10), height(10) {
std::cout << "Creating rectangle\n"; // Duplicated
}
Rectangle(int size) : width(size), height(size) {
std::cout << "Creating rectangle\n"; // Duplicated
}
};
Defaulted Constructors
Why Needed?
Sometimes you want the compiler-generated default constructor even when you’ve defined other constructors. Before C++11, you had to write an empty constructor body if you have declared a parameterized constructor, which is unnecessary work.
How It’s Beneficial
Using = default explicitly requests the compiler to generate the default implementation, making code clearer and potentially more efficient.
Example
class Point {
private:
int x, y;
public:
// Explicitly request compiler-generated default constructor
Point() = default;
// Custom constructor
Point(int xVal, int yVal) : x(xVal), y(yVal) {}
// Explicitly defaulted copy constructor
Point(const Point&) = default;
// Explicitly defaulted copy assignment
Point& operator=(const Point&) = default;
};
// Usage
Point p1; // Default constructor (x and y uninitialized)
Point p2(5, 10); // Custom constructor
Point p3 = p2; // Copy constructor
Why it matters:
class Data {
int value;
public:
Data(int v) : value(v) {}
// Without = default, no default constructor exists
// Data d; // ERROR: no default constructor
};
class BetterData {
int value;
public:
BetterData() = default; // Now we have both!
BetterData(int v) : value(v) {}
};
BetterData d1; // OK: uses defaulted constructor
BetterData d2(42); // OK: uses custom constructor
Deleted Constructors
Why Needed?
Sometimes you want to prevent certain operations (like copying) or specific implicit conversions. Before C++11, you had to declare constructors as private without implementation.
What = delete Means
Using = delete means the particular constructor is not available and is deleted. The compiler will generate an error if anyone attempts to use it.
How It’s Beneficial
Using = delete explicitly states intent, provides better error messages, and prevents unwanted operations at compile time.
Example
class UniqueResource {
private:
int* data;
public:
UniqueResource(int value) : data(new int(value)) {}
// Delete copy constructor - prevent copying
UniqueResource(const UniqueResource&) = delete;
// Delete copy assignment - prevent assignment
UniqueResource& operator=(const UniqueResource&) = delete;
// Move operations are still allowed
UniqueResource(UniqueResource&& other) noexcept : data(other.data) {
other.data = nullptr;
}
~UniqueResource() { delete data; }
};
// Usage
UniqueResource r1(42);
// UniqueResource r2 = r1; // ERROR: copy constructor deleted
// UniqueResource r3(r1); // ERROR: copy constructor deleted
UniqueResource r4 = std::move(r1); // OK: move constructor
Preventing Implicit Conversions:
class SafeInt {
int value;
public:
SafeInt(int v) : value(v) {}
// Prevent construction from double
SafeInt(double) = delete;
};
SafeInt s1(42); // OK
// SafeInt s2(3.14); // ERROR: constructor deleted
// SafeInt s3 = 2.5; // ERROR: constructor deleted
Non-static Data Member Initializers
Why Needed?
Before C++11, you had to initialize member variables in the constructor initializer list or constructor body, leading to duplication across multiple constructors.
How It’s Beneficial
You can provide default values directly in the class definition, reducing code duplication and ensuring members always have a valid initial value.
Example
class Configuration {
private:
// Direct member initialization
int maxConnections = 100;
double timeout = 30.0;
bool useSSL = true;
std::string serverName = "localhost";
public:
// Default constructor uses the member initializers
Configuration() = default;
// This constructor overrides only specific values
Configuration(int connections) : maxConnections(connections) {
// timeout, useSSL, serverName use their default values
}
// This overrides multiple values
Configuration(int connections, double time)
: maxConnections(connections), timeout(time) {
// useSSL and serverName use their default values
}
void display() const {
std::cout << "Max Connections: " << maxConnections << "\n"
<< "Timeout: " << timeout << "\n"
<< "Use SSL: " << useSSL << "\n"
<< "Server: " << serverName << "\n";
}
};
// Usage
Configuration c1; // All defaults: 100, 30.0, true, "localhost"
Configuration c2(200); // 200, 30.0, true, "localhost"
Configuration c3(150, 60.0); // 150, 60.0, true, "localhost"
Before C++11 (Code Duplication):
class OldConfiguration {
int maxConnections;
double timeout;
bool useSSL;
std::string serverName;
public:
OldConfiguration()
: maxConnections(100), timeout(30.0),
useSSL(true), serverName("localhost") {}
OldConfiguration(int connections)
: maxConnections(connections), timeout(30.0), // Duplicated!
useSSL(true), serverName("localhost") {} // Duplicated!
OldConfiguration(int connections, double time)
: maxConnections(connections), timeout(time),
useSSL(true), serverName("localhost") {} // Duplicated!
};
Combined with Delegating Constructors:
class SmartConfig {
int value = 42; // Default value
std::string name = "default";
public:
SmartConfig() = default; // Uses member initializers
SmartConfig(int v) : SmartConfig() {
value = v; // Override just one value
}
};
Inheriting Constructors
Note: This topic has been covered in detail in previous chapters on inheritance and derived classes.
Brief Overview
C++11 allows derived classes to inherit base class constructors using the using declaration:
class Base {
public:
Base(int x) { }
Base(int x, double y) { }
};
class Derived : public Base {
public:
// Inherit all Base constructors
using Base::Base;
// Can still add new constructors
Derived(std::string s) : Base(0) { }
};
// Usage
Derived d1(42); // Uses inherited Base(int)
Derived d2(10, 3.14); // Uses inherited Base(int, double)
Derived d3("hello"); // Uses Derived(std::string)
For comprehensive coverage of inheriting constructors, refer to the inheritance chapters.
Summary
C++11 constructor features provide powerful tools for writing cleaner, safer, and more maintainable code:
- Delegating Constructors: Reduce code duplication by reusing constructor logic
- Defaulted Constructors: Explicitly request compiler-generated implementations
- Deleted Constructors: Prevent unwanted operations and conversions
- Explicit Constructors: Avoid implicit conversions and potential bugs
- Member Initializers: Provide default values directly in class definitions
- Inheriting Constructors: Simplify derived class constructor declarations
These features work together to make C++ code more expressive and less error-prone.
C++ Static Members
Table of Contents
- Static Data Members in a Class
- Static Functions in a Class
- Why Static Functions Cannot Access Non-Static Members (The
thisPointer Problem) - When to Use Static Data Members: Real-World Examples
- Singleton Design Pattern: Using Static Members
- Static vs Non-Static: Key Differences
1. Static Data Members in a Class
What are Static Data Members?
A static data member is a class member that is shared by all objects of that class. Instead of each object having its own copy, there’s only one copy that belongs to the class itself.
Basic Syntax
class MyClass {
public:
static int count; // Declaration inside class
int regularVar; // Non-static (each object has its own copy)
};
// Definition outside class (REQUIRED!)
int MyClass::count = 0;
Important: Static data members must be defined outside the class (except for const static integral types).
Simple Example
class Student {
public:
string name;
static int totalStudents; // Shared by ALL students
Student(string n) {
name = n;
totalStudents++; // Increment shared counter
}
};
// Must define static member outside class
int Student::totalStudents = 0;
int main() {
cout << "Total students: " << Student::totalStudents << endl; // 0
Student s1("Alice");
cout << "Total students: " << Student::totalStudents << endl; // 1
Student s2("Bob");
cout << "Total students: " << Student::totalStudents << endl; // 2
Student s3("Charlie");
cout << "Total students: " << Student::totalStudents << endl; // 3
return 0;
}
Memory Layout Diagram
Regular (Non-Static) Members:
Each object has its own copy
s1 object: s2 object: s3 object:
┌─────────────────┐ ┌─────────────────┐ ┌─────────────────┐
│ name: "Alice" │ │ name: "Bob" │ │ name: "Charlie" │
└─────────────────┘ └─────────────────┘ └─────────────────┘
Static Members:
Only ONE copy shared by all objects
┌─────────────────────────┐
│ totalStudents: 3 │ ◄─── Shared by all!
└─────────────────────────┘
▲
│
┌───────────────┼───────────────┐
│ │ │
s1 uses s2 uses s3 uses
Key Characteristics of Static Data Members
- Shared Across All Objects: Only one copy exists, regardless of how many objects are created
- Belongs to Class, Not Objects: Can be accessed even without creating any object
- Must Be Defined Outside Class: Declaration inside, definition outside (with initialization)
- Lifetime: Exists for the entire program duration
- Access: Can be accessed using class name (
ClassName::staticVar) or object (obj.staticVar)
Accessing Static Data Members
class Counter {
public:
static int count;
};
int Counter::count = 100;
int main() {
// Method 1: Using class name (Preferred)
cout << Counter::count << endl; // 100
// Method 2: Using object
Counter c1;
cout << c1.count << endl; // 100
Counter c2;
c2.count = 200;
// All ways show the same value (shared!)
cout << Counter::count << endl; // 200
cout << c1.count << endl; // 200
cout << c2.count << endl; // 200
return 0;
}
2. Static Functions in a Class
What are Static Member Functions?
A static member function is a function that belongs to the class itself, not to any specific object. It can be called without creating an object.
Basic Syntax
class MyClass {
public:
static int count;
static void displayCount() { // Static function
cout << "Count: " << count << endl;
}
};
int MyClass::count = 5;
int main() {
// Call without creating object
MyClass::displayCount(); // Count: 5
// Can also call with object (but not recommended)
MyClass obj;
obj.displayCount(); // Count: 5
return 0;
}
Real-World Example: Bank Account
class BankAccount {
private:
string accountHolder;
double balance;
static double interestRate; // Same for all accounts
static int totalAccounts;
public:
BankAccount(string name, double bal) {
accountHolder = name;
balance = bal;
totalAccounts++;
}
// Static function to set interest rate for ALL accounts
static void setInterestRate(double rate) {
interestRate = rate;
}
// Static function to get total accounts
static int getTotalAccounts() {
return totalAccounts;
}
void applyInterest() {
balance += balance * interestRate;
}
void display() {
cout << accountHolder << ": $" << balance << endl;
}
};
// Define static members
double BankAccount::interestRate = 0.05;
int BankAccount::totalAccounts = 0;
int main() {
BankAccount::setInterestRate(0.07); // Set for ALL accounts
BankAccount acc1("Alice", 1000);
BankAccount acc2("Bob", 2000);
cout << "Total accounts: " << BankAccount::getTotalAccounts() << endl; // 2
acc1.applyInterest();
acc2.applyInterest();
acc1.display(); // Alice: $1070
acc2.display(); // Bob: $2140
return 0;
}
Characteristics of Static Functions
- No
thisPointer: Cannot access non-static members directly - Called Using Class Name:
ClassName::functionName() - Can Access Only Static Members: Can use static data members and other static functions
- Cannot Be
constorvirtual: These keywords require athispointer - Cannot Be Overridden: No polymorphism with static functions
What Static Functions CAN and CANNOT Do
class Example {
private:
int nonStaticVar;
static int staticVar;
public:
static void staticFunc() {
// ✓ CAN access static members
staticVar = 100;
// ✗ CANNOT access non-static members
// nonStaticVar = 50; // ERROR!
// ✗ CANNOT call non-static functions
// nonStaticFunc(); // ERROR!
// ✓ CAN call other static functions
anotherStaticFunc();
}
static void anotherStaticFunc() {
cout << "Another static function" << endl;
}
void nonStaticFunc() {
// ✓ Non-static can access everything
nonStaticVar = 10;
staticVar = 20;
staticFunc();
}
};
int Example::staticVar = 0;
3. Why Static Functions Cannot Access Non-Static Members (The this Pointer Problem)
Understanding the this Pointer
Every non-static member function has a hidden parameter called this - a pointer to the object that called the function.
class MyClass {
public:
int x;
void setX(int val) {
x = val; // Actually: this->x = val;
}
};
MyClass obj;
obj.setX(10); // Compiler passes &obj as 'this' pointer
Behind the scenes:
// What you write:
void setX(int val) {
x = val;
}
// What compiler sees:
void setX(MyClass* this, int val) { // Hidden 'this' pointer!
this->x = val;
}
// How it's called:
obj.setX(10); // You write this
setX(&obj, 10); // Compiler generates this
The Problem with Static Functions
Static functions have NO this pointer because they don’t belong to any specific object!
class MyClass {
public:
int x; // Non-static member
static int y; // Static member
// Non-static function: Has 'this' pointer
void nonStaticFunc() {
x = 10; // OK: Uses this->x
y = 20; // OK: Static member
}
// Static function: NO 'this' pointer
static void staticFunc() {
// x = 10; // ERROR! Which object's x?
// No 'this' pointer to refer to!
y = 20; // OK: Static member doesn't need 'this'
}
};
int MyClass::y = 0;
Visual Explanation
Scenario: Three objects exist
obj1: obj2: obj3:
┌──────────┐ ┌──────────┐ ┌──────────┐
│ x = 5 │ │ x = 10 │ │ x = 15 │
└──────────┘ └──────────┘ └──────────┘
When you call: obj1.nonStaticFunc()
▼
┌────────────────────┐
│ nonStaticFunc() │
│ this = &obj1 ◄───┼─── 'this' points to obj1
│ x = this->x ◄───┼─── Accesses obj1's x
└────────────────────┘
When you call: MyClass::staticFunc()
▼
┌────────────────────┐
│ staticFunc() │
│ NO 'this' pointer! │ ◄─── Which object's x?
│ x = ??? │ There's no way to know!
└────────────────────┘
▲
│
Doesn't belong to
any specific object
Why This Design Makes Sense
class Counter {
public:
static int count;
int id;
Counter() {
id = ++count;
}
static void resetCounter() {
count = 0; // ✓ Makes sense: Reset shared counter
// id = 0; // ✗ Doesn't make sense: Which object's id?
// There might be 100 Counter objects!
}
};
int Counter::count = 0;
int main() {
Counter c1, c2, c3; // count = 3, ids are 1, 2, 3
Counter::resetCounter(); // Resets shared counter
// But which id should be reset? c1's? c2's? c3's? All?
// This is why static functions can't access non-static members!
return 0;
}
Workaround: Pass Object as Parameter
If a static function needs to work with non-static members, pass the object as a parameter:
class MyClass {
public:
int x;
static int y;
static void staticFunc(MyClass& obj) {
obj.x = 10; // ✓ Now we know which object!
y = 20; // ✓ Static member
}
};
int MyClass::y = 0;
int main() {
MyClass obj;
MyClass::staticFunc(obj); // Pass the object explicitly
return 0;
}
Summary: this Pointer Table
| Function Type | Has this Pointer? | Can Access Non-Static Members? | Can Access Static Members? |
|---|---|---|---|
| Non-Static Member Function | ✓ Yes | ✓ Yes | ✓ Yes |
| Static Member Function | ✗ No | ✗ No | ✓ Yes |
| Global Function | ✗ No | ✗ N/A | ✗ N/A |
4. When to Use Static Data Members: Real-World Examples
Use Case 1: Counting Objects
Problem: You need to know how many objects of a class exist at any time.
class Employee {
private:
string name;
static int employeeCount; // Shared counter
public:
Employee(string n) : name(n) {
employeeCount++;
cout << "Employee created. Total: " << employeeCount << endl;
}
~Employee() {
employeeCount--;
cout << "Employee destroyed. Total: " << employeeCount << endl;
}
static int getEmployeeCount() {
return employeeCount;
}
};
int Employee::employeeCount = 0;
int main() {
cout << "Employees: " << Employee::getEmployeeCount() << endl; // 0
{
Employee e1("Alice"); // Total: 1
Employee e2("Bob"); // Total: 2
cout << "Current employees: " << Employee::getEmployeeCount() << endl; // 2
} // e1 and e2 destroyed here
cout << "Employees: " << Employee::getEmployeeCount() << endl; // 0
return 0;
}
Why Static? Every employee needs to update the same counter. If it were non-static, each employee would have their own count (useless!).
Use Case 2: Shared Configuration
Problem: All objects need to share the same configuration settings.
class Logger {
private:
string moduleName;
static string logLevel; // Shared by all loggers
static bool timestampEnabled; // Shared by all loggers
public:
Logger(string module) : moduleName(module) {}
static void setLogLevel(string level) {
logLevel = level; // Changes for ALL loggers
}
static void enableTimestamp(bool enable) {
timestampEnabled = enable; // Changes for ALL loggers
}
void log(string message) {
if (timestampEnabled) {
cout << "[" << __TIME__ << "] ";
}
cout << "[" << logLevel << "] ";
cout << "[" << moduleName << "] ";
cout << message << endl;
}
};
string Logger::logLevel = "INFO";
bool Logger::timestampEnabled = true;
int main() {
Logger networkLogger("Network");
Logger databaseLogger("Database");
networkLogger.log("Connection established");
databaseLogger.log("Query executed");
// Change log level for ALL loggers at once
Logger::setLogLevel("DEBUG");
networkLogger.log("Detailed network info");
databaseLogger.log("Detailed database info");
return 0;
}
/* Output:
[TIME] [INFO] [Network] Connection established
[TIME] [INFO] [Database] Query executed
[TIME] [DEBUG] [Network] Detailed network info
[TIME] [DEBUG] [Database] Detailed database info
*/
Why Static? You want one central configuration that affects all loggers. Changing it once updates all instances.
Use Case 3: Shared Resource Pool
Problem: All objects need to access the same limited resource (e.g., database connections).
class DatabaseConnection {
private:
int connectionID;
static int maxConnections; // Limit for ALL connections
static int activeConnections; // Current count
public:
DatabaseConnection() {
if (activeConnections >= maxConnections) {
throw runtime_error("Connection pool exhausted!");
}
connectionID = ++activeConnections;
cout << "Connection #" << connectionID << " established" << endl;
}
~DatabaseConnection() {
cout << "Connection #" << connectionID << " closed" << endl;
activeConnections--;
}
static void setMaxConnections(int max) {
maxConnections = max;
}
static int getActiveConnections() {
return activeConnections;
}
};
int DatabaseConnection::maxConnections = 3; // Pool size: 3
int DatabaseConnection::activeConnections = 0;
int main() {
try {
DatabaseConnection::setMaxConnections(2); // Limit to 2
DatabaseConnection db1; // OK: Connection #1
DatabaseConnection db2; // OK: Connection #2
DatabaseConnection db3; // ERROR: Pool exhausted!
} catch (const exception& e) {
cout << "Error: " << e.what() << endl;
}
return 0;
}
/* Output:
Connection #1 established
Connection #2 established
Error: Connection pool exhausted!
Connection #2 closed
Connection #1 closed
*/
Why Static? The limit and current count must be shared across all connections to enforce the pool size.
Use Case 4: Unique ID Generation
Problem: Each object needs a unique ID, and no two objects should have the same ID.
class Task {
private:
int taskID;
string description;
static int nextID; // Shared ID generator
public:
Task(string desc) : description(desc) {
taskID = nextID++; // Get unique ID and increment for next object
cout << "Task #" << taskID << " created: " << description << endl;
}
static void resetIDCounter() {
nextID = 1;
}
int getID() const {
return taskID;
}
};
int Task::nextID = 1;
int main() {
Task t1("Write code"); // Task #1
Task t2("Test code"); // Task #2
Task t3("Deploy code"); // Task #3
cout << "Task IDs: " << t1.getID() << ", "
<< t2.getID() << ", " << t3.getID() << endl;
return 0;
}
/* Output:
Task #1 created: Write code
Task #2 created: Test code
Task #3 created: Deploy code
Task IDs: 1, 2, 3
*/
Why Static? The nextID must be shared to ensure every task gets a unique, sequential ID.
Visual Summary: When to Use Static Members
Use Static Data Members When:
1. Counting Objects
┌─────────┐ ┌─────────┐ ┌─────────┐
│ Object1 │ │ Object2 │ │ Object3 │
└────┬────┘ └────┬────┘ └────┬────┘
│ │ │
└───────────┼───────────┘
▼
┌───────────────┐
│ count = 3 │ ◄─── Shared counter
└───────────────┘
2. Shared Configuration
All objects read from the same settings
┌───────────────────┐
│ config: "value" │ ◄─── Single source of truth
└───────────────────┘
▲
┌───────────┼───────────┐
│ │ │
┌────┴────┐ ┌───┴─────┐ ┌───┴─────┐
│ Object1 │ │ Object2 │ │ Object3 │
└─────────┘ └─────────┘ └─────────┘
3. Resource Pool
Enforcing global limits across all objects
┌───────────────────────┐
│ maxConnections = 5 │ ◄─── Global limit
│ activeCount = 3 │
└───────────────────────┘
4. Unique ID Generation
Sequential IDs without duplicates
┌───────────────┐
│ nextID = 4 │ ◄─── Increments for each object
└───────────────┘
5. Singleton Design Pattern: Using Static Members
What is the Singleton Design Pattern?
The Singleton Pattern is a design pattern that ensures a class has only one instance throughout the entire program and provides a global point of access to that instance.
Real-World Analogy: Think of a country’s president - there can only be one president at a time, and everyone in the country refers to the same person when they say “the president.”
Why Use Singleton?
Some resources should have only one instance:
- Database Connection Manager - One pool managing all connections
- Logger - Single logging system for the entire application
- Configuration Manager - One central configuration
- Device Drivers - Only one driver managing hardware
- Cache - Single shared cache for the application
The Problem Without Singleton
class Database {
public:
Database() {
cout << "Database connection created" << endl;
}
void query(string sql) {
cout << "Executing: " << sql << endl;
}
};
int main() {
Database db1; // Creates connection 1
Database db2; // Creates connection 2 - Wasteful!
Database db3; // Creates connection 3 - More waste!
// We wanted ONE connection, but got THREE!
return 0;
}
How Static Members Achieve Singleton
The Singleton pattern uses:
- Private constructor - Prevents external instantiation
- Static instance - Holds the single instance
- Static function - Provides global access to the instance
Basic Singleton Implementation
class Singleton {
private:
// Private constructor - cannot create from outside
Singleton() {
cout << "Singleton instance created" << endl;
}
// Static pointer to hold the single instance
static Singleton* instance;
public:
// Static function to get the instance
static Singleton* getInstance() {
if (instance == nullptr) {
instance = new Singleton(); // Create only once
}
return instance;
}
void doSomething() {
cout << "Doing something..." << endl;
}
};
// Define the static member
Singleton* Singleton::instance = nullptr;
int main() {
// Singleton s; // ERROR! Constructor is private
Singleton* s1 = Singleton::getInstance(); // Creates instance
Singleton* s2 = Singleton::getInstance(); // Returns same instance
Singleton* s3 = Singleton::getInstance(); // Returns same instance
cout << "s1 address: " << s1 << endl;
cout << "s2 address: " << s2 << endl;
cout << "s3 address: " << s3 << endl;
// All three have the SAME address!
s1->doSomething();
return 0;
}
/* Output:
Singleton instance created (only once!)
s1 address: 0x1234abcd
s2 address: 0x1234abcd (same address)
s3 address: 0x1234abcd (same address)
Doing something...
*/
Visual Diagram: Singleton Pattern
Without Singleton:
main()
│
├─→ new Object() ──→ Instance 1 ┐
│ │
├─→ new Object() ──→ Instance 2 ├─ Multiple instances (wasteful)
│ │
└─→ new Object() ──→ Instance 3 ┘
With Singleton:
main()
│
├─→ getInstance() ─┐
│ │
├─→ getInstance() ─┼─→ Single Instance ← Static member
│ │
└─→ getInstance() ─┘
All calls return the SAME instance!
Real-World Example: Logger Singleton
class Logger {
private:
static Logger* instance;
string logFile;
// Private constructor
Logger() {
logFile = "application.log";
cout << "Logger initialized with file: " << logFile << endl;
}
public:
// Prevent copying
Logger(const Logger&) = delete;
Logger& operator=(const Logger&) = delete;
static Logger* getInstance() {
if (instance == nullptr) {
instance = new Logger();
}
return instance;
}
void log(string level, string message) {
cout << "[" << level << "] " << message << endl;
// In real code, would write to logFile
}
void setLogFile(string filename) {
logFile = filename;
}
};
Logger* Logger::instance = nullptr;
int main() {
// Multiple parts of the program can access the same logger
Logger::getInstance()->log("INFO", "Application started");
Logger::getInstance()->log("DEBUG", "Processing data...");
Logger::getInstance()->log("ERROR", "Something went wrong!");
// Only ONE Logger instance was created for all these calls
return 0;
}
/* Output:
Logger initialized with file: application.log (only once!)
[INFO] Application started
[DEBUG] Processing data...
[ERROR] Something went wrong!
*/
Thread-Safe Singleton (Modern C++)
The basic singleton above isn’t thread-safe. Here’s a better approach using Meyer’s Singleton (C++11):
class ThreadSafeLogger {
private:
ThreadSafeLogger() {
cout << "ThreadSafeLogger created" << endl;
}
public:
// Prevent copying
ThreadSafeLogger(const ThreadSafeLogger&) = delete;
ThreadSafeLogger& operator=(const ThreadSafeLogger&) = delete;
static ThreadSafeLogger& getInstance() {
static ThreadSafeLogger instance; // Created only once, thread-safe!
return instance;
}
void log(string message) {
cout << "LOG: " << message << endl;
}
};
int main() {
ThreadSafeLogger::getInstance().log("Message 1");
ThreadSafeLogger::getInstance().log("Message 2");
// Same instance, guaranteed thread-safe by C++11 standard
return 0;
}
Why this is better:
- No need for manual pointer management
- Thread-safe by language guarantee (C++11+)
- Automatic cleanup when program ends
- Simpler code
Destroying the Singleton Instance
Unlike regular objects, Singleton instances need careful cleanup management. Here are different approaches:
Approach 1: Manual Cleanup with destroy() Method
class Database {
private:
static Database* instance;
Database() {
cout << "Database connection opened" << endl;
}
~Database() {
cout << "Database connection closed" << endl;
}
public:
Database(const Database&) = delete;
Database& operator=(const Database&) = delete;
static Database* getInstance() {
if (instance == nullptr) {
instance = new Database();
}
return instance;
}
// Method to explicitly destroy the instance
static void destroyInstance() {
if (instance != nullptr) {
delete instance;
instance = nullptr;
cout << "Singleton instance destroyed" << endl;
}
}
void query(string sql) {
cout << "Executing: " << sql << endl;
}
};
Database* Database::instance = nullptr;
int main() {
Database::getInstance()->query("SELECT * FROM users");
Database::getInstance()->query("INSERT INTO logs...");
// Manually destroy when done
Database::destroyInstance();
// Can recreate if needed
Database::getInstance()->query("SELECT * FROM products");
// Clean up again
Database::destroyInstance();
return 0;
}
/* Output:
Database connection opened
Executing: SELECT * FROM users
Executing: INSERT INTO logs...
Database connection closed
Singleton instance destroyed
Database connection opened (recreated!)
Executing: SELECT * FROM products
Database connection closed
Singleton instance destroyed
*/
Approach 2: Automatic Cleanup (Meyer’s Singleton - Recommended)
class Logger {
private:
Logger() {
cout << "Logger created" << endl;
}
~Logger() {
cout << "Logger destroyed (automatic cleanup)" << endl;
}
public:
Logger(const Logger&) = delete;
Logger& operator=(const Logger&) = delete;
static Logger& getInstance() {
static Logger instance; // Automatically destroyed at program end!
return instance;
}
void log(string message) {
cout << "LOG: " << message << endl;
}
};
int main() {
Logger::getInstance().log("Application started");
Logger::getInstance().log("Processing data");
// No need to manually destroy!
// Destructor automatically called when program ends
return 0;
}
/* Output:
Logger created
LOG: Application started
LOG: Processing data
Logger destroyed (automatic cleanup) ← Automatic!
*/
Approach 3: Smart Pointers (Modern C++ Style)
class Cache {
private:
static unique_ptr<Cache> instance;
Cache() {
cout << "Cache initialized" << endl;
}
~Cache() {
cout << "Cache destroyed" << endl;
}
public:
Cache(const Cache&) = delete;
Cache& operator=(const Cache&) = delete;
static Cache* getInstance() {
if (instance == nullptr) {
instance = unique_ptr<Cache>(new Cache());
}
return instance.get();
}
// Optional: Manual reset
static void reset() {
instance.reset(); // Automatically deletes and sets to nullptr
cout << "Cache reset" << endl;
}
void store(string key, string value) {
cout << "Stored: " << key << " = " << value << endl;
}
};
unique_ptr<Cache> Cache::instance = nullptr;
int main() {
Cache::getInstance()->store("user", "Alice");
Cache::getInstance()->store("session", "xyz123");
// Manual cleanup if needed
Cache::reset();
// Can recreate
Cache::getInstance()->store("user", "Bob");
// Automatic cleanup at program end even without reset()
return 0;
}
/* Output:
Cache initialized
Stored: user = Alice
Stored: session = xyz123
Cache destroyed
Cache reset
Cache initialized
Stored: user = Bob
Cache destroyed ← Automatic cleanup at program end
*/
Approach 4: atexit() for Guaranteed Cleanup
class ResourceManager {
private:
static ResourceManager* instance;
ResourceManager() {
cout << "Resources allocated" << endl;
}
~ResourceManager() {
cout << "Resources released" << endl;
}
static void cleanup() {
if (instance != nullptr) {
delete instance;
instance = nullptr;
}
}
public:
ResourceManager(const ResourceManager&) = delete;
ResourceManager& operator=(const ResourceManager&) = delete;
static ResourceManager* getInstance() {
if (instance == nullptr) {
instance = new ResourceManager();
atexit(cleanup); // Register cleanup function
}
return instance;
}
void manage() {
cout << "Managing resources..." << endl;
}
};
ResourceManager* ResourceManager::instance = nullptr;
int main() {
ResourceManager::getInstance()->manage();
ResourceManager::getInstance()->manage();
// No manual cleanup needed!
// atexit() ensures cleanup() is called when program exits
return 0;
}
/* Output:
Resources allocated
Managing resources...
Managing resources...
Resources released ← Called by atexit() automatically
*/
Comparison: Cleanup Approaches
| Approach | Pros | Cons | Best For |
|---|---|---|---|
| Manual destroy() | Full control, can reset/recreate | Must remember to call, easy to forget | When you need explicit control |
| Meyer’s Singleton | Automatic, thread-safe, simple | Can’t reset during program execution | Most use cases (RECOMMENDED) |
| Smart Pointers | Automatic memory management, can reset | Slightly more complex syntax | When you need reset capability |
| atexit() | Guaranteed cleanup, automatic | Less common pattern, global function | Legacy code or special requirements |
Important Notes About Destruction
- Meyer’s Singleton is usually best - Automatic, safe, simple
- Order of destruction matters - If Singleton A depends on Singleton B, destruction order can cause issues
- Don’t access after destruction - If manually destroyed, ensure no further access
- Memory leaks in basic pointer version - If you never call delete, memory is leaked (but OS cleans up at program end)
Destruction Order Example (Potential Issue)
class Logger {
private:
Logger() { cout << "Logger created" << endl; }
~Logger() { cout << "Logger destroyed" << endl; }
public:
static Logger& getInstance() {
static Logger instance;
return instance;
}
void log(string msg) { cout << "LOG: " << msg << endl; }
};
class Database {
private:
Database() {
Logger::getInstance().log("Database created");
}
~Database() {
// DANGER: Logger might be destroyed already!
Logger::getInstance().log("Database destroyed");
}
public:
static Database& getInstance() {
static Database instance;
return instance;
}
};
int main() {
Database::getInstance();
// At program end, destruction order of static objects is undefined!
// If Logger is destroyed before Database, the log() call in ~Database() fails!
return 0;
}
Solution: Avoid dependencies between Singletons’ destructors, or use dependency injection instead of Singleton pattern.
Key Points About Singleton Pattern
| Aspect | Details |
|---|---|
| Purpose | Ensure only one instance of a class exists |
| Private Constructor | Prevents direct instantiation |
| Static Instance | Holds the single instance (shared by all) |
| Static Access Method | Provides global access point |
| Thread Safety | Use Meyer’s Singleton (static local) for thread safety |
| Use Cases | Logger, Config, DB Connection Pool, Cache |
Pros and Cons of Singleton
Pros:
- ✓ Controlled access to single instance
- ✓ Reduced memory footprint
- ✓ Global access point
- ✓ Lazy initialization (created when first needed)
Cons:
- ✗ Can make unit testing difficult
- ✗ Violates Single Responsibility Principle
- ✗ Can introduce global state issues
- ✗ Requires careful handling in multi-threaded environments
When to Use Singleton
✓ Use when:
- Only one instance should exist (e.g., hardware device manager)
- Global access point is needed
- Lazy initialization is beneficial
✗ Don’t use when:
- You might need multiple instances in the future
- It complicates testing
- Dependency injection would be cleaner
6. Static vs Non-Static: Key Differences
Comparison Table: Static vs Non-Static
| Feature | Static Members | Non-Static Members |
|---|---|---|
| Belongs To | Class | Object |
| Memory | One copy per class | One copy per object |
| Access | ClassName::member or object.member | object.member only |
| Lifetime | Entire program | Object’s lifetime |
| this Pointer | Not available | Available |
| Can Access | Only static members | Both static and non-static |
| Use Case | Shared data/utilities | Object-specific data |
Real-World Analogy
Think of a company (class) and employees (objects):
Static Members = Company-wide policies/resources
- Total employee count (shared data)
- Company-wide holiday list (shared configuration)
- HR policies (static functions)
- These affect ALL employees equally
Non-Static Members = Individual employee properties
- Employee name (unique to each)
- Employee salary (unique to each)
- Individual performance review (non-static function)
- These are specific to each employee
class Company {
public:
// Static: Shared by all employees
static string companyName;
static int totalEmployees;
static double companyRevenue;
// Non-static: Unique to each employee
string employeeName;
double employeeSalary;
string department;
// Static function: Company-level operation
static void announceCompanyMeeting() {
cout << companyName << " meeting at 3 PM!" << endl;
}
// Non-static function: Employee-specific operation
void giveRaise(double amount) {
employeeSalary += amount;
}
};
Summary: Static Members Key Concepts
Quick Reference
Static Data Members:
✓ Shared by all objects of the class
✓ One copy per class, not per object
✓ Must be defined outside class
✓ Accessed using ClassName::member or object.member
✓ Lifetime: Entire program duration
Static Member Functions:
✓ Belong to the class, not objects
✓ Called using ClassName::function()
✓ No 'this' pointer
✓ Can only access static members
✓ Cannot be virtual, const, or override
✓ Used for class-level operations
When to Use Static:C++ Polymorphism
Table of Contents
- What is Polymorphism?
- Polymorphism in C++ Programming
- How Can We Achieve Polymorphism in C++?
- Static Polymorphism (Compile-Time Polymorphism)
- Important: Function Overloading Cannot Be Achieved by Just Having Different Return Types
- When Static Polymorphism Is Not Enough
- Dynamic Polymorphism (Runtime Polymorphism)
What is Polymorphism?
Imagine the word “play” — it’s the same word, but its meaning changes depending on the situation:
- When you say, “Kids play in the park,” it means they are having fun or playing games.
- When you say, “Musicians play the guitar,” it means they are performing music.
- When you say, “Actors play a role,” it means they are acting in a movie or play.
Same word (“play”) — different meanings depending on the context.
That’s what polymorphism means (having many forms):
“One thing (name or action) behaving differently based on the situation.”
Polymorphism in C++ Programming
Polymorphism is the ability of a single method or function to behave differently depending on the situation. From a class and object perspective, it means:
The same method can produce different behaviors depending on either the type of object it is called on, or the type of data it is given.
Key Idea: Client code can call a method on different kinds of objects or data, and the resulting behavior will differ — this is the essence of polymorphism.
How Can We Achieve Polymorphism in C++?
In C++, polymorphism can be achieved in two main ways:
- At compile time → Static Polymorphism
- At runtime → Dynamic Polymorphism
Let’s first understand compile-time polymorphism.
Static Polymorphism (Compile-Time Polymorphism)
Static polymorphism is achieved when the behavior of a function is decided at compile time.
- The compiler determines which method to call based on the data type or number of arguments passed.
- This allows the same function name to work in multiple ways, depending on the inputs.
Common ways to achieve this are function overloading, operator overloading, and templates (will cover templates in a separate section).
Function Overloading
Function overloading allows you to define multiple functions with the same name but with different parameter types or numbers of parameters.
The compiler automatically selects the appropriate function based on the arguments you pass.
Example: Static Polymorphism with Function Overloading
#include <iostream>
#include <string>
using namespace std;
class Player {
public:
void play(int minutes) {
cout << "Kids are playing for " << minutes << " minutes.\n";
}
void play(const string& instrument) {
cout << "Musician is playing the " << instrument << ".\n";
}
void play() {
cout << "Actor is playing a role in a movie.\n";
}
};
int main() {
Player p;
p.play(); // Actor
p.play(30); // Kids
p.play("Guitar"); // Musician
}
Output:
Actor is playing a role in a movie.
Kids are playing for 30 minutes.
Musician is playing the Guitar.
Explanation:
- The same function name
play()behaves differently depending on the arguments. - The compiler decides which version to call — this is static (compile-time) polymorphism.
Important: Function Overloading Cannot Be Achieved by Just Having Different Return Types
You cannot overload functions based solely on their return type. The compiler uses the function signature to distinguish between overloaded functions, and the return type is not part of the function signature.
What is a Function Signature?
A function signature consists of:
- The function name
- The number of parameters
- The types of parameters
- The order of parameters
Note: The return type is NOT included in the function signature.
Why Can’t We Overload Based on Return Type Alone?
When you call a function, the compiler needs to determine which version to execute based on how you’re calling it. The compiler looks at:
- The function name
- The arguments you’re passing
The compiler does not look at how you’re using the return value to decide which function to call.
Example: Why This Won’t Work
class Calculator {
public:
int compute(int a, int b) {
return a + b;
}
double compute(int a, int b) { // ❌ ERROR: Cannot overload
return a + b + 0.5;
}
};
int main() {
Calculator calc;
auto result = calc.compute(5, 3); // Which function should be called?
}
Problem: When the compiler sees calc.compute(5, 3), it looks at:
- Function name:
compute✓ - Arguments:
(int, int)✓
Both functions have the exact same signature: compute(int, int)
The compiler has no way to decide which function to call because:
- It doesn’t know if you want an
intordoubleresult - Function selection happens before the return value is considered
- Even if you write
int result = calc.compute(5, 3);, the compiler resolves the function call first, then attempts the assignment
Symbol Perspective
In compiled code, functions are identified by name mangling (a technique where the compiler creates unique symbols for functions). The mangled name includes:
- Function name
- Parameter types
- (Sometimes) namespace/class name
For example, the compiler might create symbols like:
_ZN10Calculator7computeEii→Calculator::compute(int, int)_ZN10Calculator7computeEii→Calculator::compute(int, int)returning double
Both would have the same mangled symbol! This creates a conflict.
Valid Overloading Examples
class Calculator {
public:
// ✓ Different number of parameters
int compute(int a) {
return a * 2;
}
int compute(int a, int b) {
return a + b;
}
// ✓ Different parameter types
double compute(double a, double b) {
return a + b;
}
// ✓ Different order of parameter types
void compute(int a, double b) {
cout << "int, double\n";
}
void compute(double a, int b) {
cout << "double, int\n";
}
};
Each of these has a unique signature, so the compiler can distinguish between them.
Const Overloading (Special Case for Member Functions)
In C++, you can overload member functions by making one const and the other non-const. This is called const overloading. But it works only for member functions, not for free (non-member) functions.
The const qualifier becomes part of the function signature for member functions because it affects the type of the implicit this pointer:
- Non-const member function:
thisis a pointer to non-const object - Const member function:
thisis a pointer to const object
Example: Const Overloading
#include <iostream>
using namespace std;
class Data {
private:
int value;
public:
Data(int v) : value(v) {}
// Non-const version - can modify the object
int& getValue() {
cout << "Non-const getValue() called\n";
return value;
}
// Const version - cannot modify the object
const int& getValue() const {
cout << "Const getValue() called\n";
return value;
}
};
int main() {
Data d1(10);
const Data d2(20);
d1.getValue(); // Calls non-const version
d2.getValue(); // Calls const version
d1.getValue() = 50; // Can modify through non-const version
// d2.getValue() = 60; // ❌ ERROR: Cannot modify through const version
return 0;
}
Output:
Non-const getValue() called
Const getValue() called
Key Points:
- The compiler chooses the appropriate version based on whether the object is
constor non-const - This is useful when you want different behavior or return types for const and non-const objects
- The const version typically returns a const reference to prevent modification
When Static Polymorphism Is Not Enough
Static polymorphism works great when you know the exact types at compile time. But what if you don’t know the exact type until the program is running?
Real-World Scenario: A Drawing Application
Imagine you’re building a drawing application that can draw different shapes: circles, rectangles, triangles, etc.
#include <iostream>
#include <vector>
using namespace std;
class Circle {
public:
void draw() {
cout << "Drawing a Circle\n";
}
};
class Rectangle {
public:
void draw() {
cout << "Drawing a Rectangle\n";
}
};
class Triangle {
public:
void draw() {
cout << "Drawing a Triangle\n";
}
};
int main() {
vector<???> shapes; // ❌ What type should this be?
// User creates shapes at runtime based on input
// How do we store different shape types in one collection?
// How do we call draw() on each without knowing the exact type?
return 0;
}
The Problem:
- You need to store different shape types in a single collection (like a vector)
- You want to call
draw()on each shape without knowing its exact type - The user decides which shapes to create at runtime (not compile time)
- Static polymorphism (function overloading) can’t help here because the compiler needs to know exact types
The Solution: We need Dynamic Polymorphism (Runtime Polymorphism)!
Dynamic Polymorphism (Runtime Polymorphism)
Dynamic polymorphism is achieved when the behavior of a function is decided at runtime based on the actual object type, not the reference/pointer type.
Key characteristics:
- The decision of which function to call happens during program execution
- Allows you to write code that works with base class pointers/references but calls derived class functions
- Achieved through inheritance, function overriding, and virtual functions
Function Overriding
Function overriding occurs when a derived class provides its own implementation of a function that is already defined in the base class.
Requirements for function overriding:
- Must have the same name
- Must have the same parameters (exact match)
- Must have the same return type (or covariant return type)
- The base class function must be declared as
virtual
Example: Function Overriding
#include <iostream>
using namespace std;
class Shape {
public:
void draw() { // Non-virtual function
cout << "Drawing a generic Shape\n";
}
};
class Circle : public Shape {
public:
void draw() { // Overriding the base class function
cout << "Drawing a Circle\n";
}
};
int main() {
Circle circle;
Shape* shapePtr = &circle;
shapePtr->draw(); // What will this print?
return 0;
}
Output:
Drawing a generic Shape
Problem: Even though shapePtr points to a Circle object, it calls the Shape::draw() function! This is because the function is not virtual, so the call is resolved at compile time based on the pointer type (Shape*), not the actual object type (Circle).
This is where virtual functions come to the rescue!
Virtual Functions
A virtual function is a member function in the base class that you expect to be overridden in derived classes. When you call a virtual function through a base class pointer or reference, C++ ensures that the correct derived class version is called based on the actual object type.
Syntax:
class Base {
public:
virtual void functionName() {
// Base implementation
}
};
Example: Virtual Functions in Action
#include <iostream>
using namespace std;
class Shape {
public:
virtual void draw() { // Virtual function
cout << "Drawing a generic Shape\n";
}
virtual ~Shape() {} // Virtual destructor
};
class Circle : public Shape {
public:
void draw() override { // Overriding the virtual function
cout << "Drawing a Circle\n";
}
};
class Rectangle : public Shape {
public:
void draw() override {
cout << "Drawing a Rectangle\n";
}
};
class Triangle : public Shape {
public:
void draw() override {
cout << "Drawing a Triangle\n";
}
};
int main() {
Shape* s1 = new Circle();
Shape* s2 = new Rectangle();
Shape* s3 = new Triangle();
s1->draw(); // Calls Circle::draw()
s2->draw(); // Calls Rectangle::draw()
s3->draw(); // Calls Triangle::draw()
delete s1;
delete s2;
delete s3;
return 0;
}
Output:
Drawing a Circle
Drawing a Rectangle
Drawing a Triangle
Drawing a Circle
Success! Now each object calls its own draw() function, even though we’re using base class pointers. This is dynamic polymorphism!
Key Points:
- The
virtualkeyword enables runtime polymorphism - Always declare a virtual destructor in the base class when using polymorphism
How Virtual Functions Work: The Mechanism
Virtual functions work through a mechanism involving two key components:
- Virtual Pointer (vptr) - A hidden pointer in each object
- Virtual Table (vtable) - A table of function pointers for each class
Understanding vptr and vtable
When a class has at least one virtual function:
-
The compiler creates a vtable (virtual table) for that class
- The vtable is a static array of function pointers
- Each entry points to the most-derived version of a virtual function
- One vtable per class (not per object)
-
Each object gets a vptr (virtual pointer)
- The vptr is a hidden member variable added by the compiler
- It points to the vtable of that object’s class
- Each object has its own vptr
Visual Representation
class Shape {
public:
virtual void draw() { cout << "Shape\n"; }
virtual void area() { cout << "Shape area\n"; }
};
class Circle : public Shape {
public:
void draw() override { cout << "Circle\n"; }
void area() override { cout << "Circle area\n"; }
};
Memory Layout:
Shape Object: Circle Object:
+-----------------+ +-----------------+
| vptr (8 bytes) |--+ | vptr (8 bytes) |--+
+-----------------+ | +-----------------+ |
| |
v v
Shape's vtable: Circle's vtable:
+-----------------+ +-----------------+
| &Shape::draw | | &Circle::draw |
| &Shape::area | | &Circle::area |
+-----------------+ +-----------------+
Key Observations:
- The vptr is typically the first member of the object (8 bytes on 64-bit systems)
- Each class with virtual functions has its own vtable
- All objects of the same class share the same vtable but have their own vptr
Size Impact
class WithoutVirtual {
int x; // 4 bytes
};
class WithVirtual {
int x; // 4 bytes
virtual void func() {}
// + vptr (8 bytes on 64-bit)
};
cout << sizeof(WithoutVirtual); // Output: 4 bytes
cout << sizeof(WithVirtual); // Output: 16 bytes (4 + 8 + padding)
How a Virtual Function Call Gets Resolved
When you call a virtual function through a pointer or reference, here’s what happens:
Step-by-Step Process
Shape* shapePtr = new Circle();
shapePtr->draw(); // How does this get resolved?
Step 1: Dereference the vptr
- The program accesses the object through
shapePtr - It reads the vptr from the object (first 8 bytes)
- The vptr points to Circle’s vtable
Step 2: Look up the function in the vtable
- The compiler knows that
draw()is the first virtual function (index 0) - It accesses
vtable[0]to get the address of the function
Step 3: Call the function
- The program jumps to the function address found in the vtable
- In this case, it calls
Circle::draw()
Pseudo-code Representation
// What you write:
shapePtr->draw();
// What actually happens (conceptually):
(*(shapePtr->vptr[0]))(shapePtr);
// ^ ^ ^ ^
// | | | |
// | | | +-- Pass 'this' pointer
// | | +---------- Index 0 for draw()
// | +----------------- Access vptr
// +----------------------- Dereference function pointer and call
Performance Characteristics
Virtual Function Call:
- 2 memory accesses (vptr lookup + vtable lookup)
- 1 indirect function call
- Slightly slower than direct function calls
- Cannot be inlined by the compiler
Non-Virtual Function Call:
- Direct function call
- Can be inlined by the compiler
- Faster
Benchmark (approximate):
- Virtual function call: ~2-3 nanoseconds overhead
- For most applications, this overhead is negligible
Complete Example with Explanation
#include <iostream>
using namespace std;
class Animal {
public:
virtual void speak() {
cout << "Animal speaks\n";
}
virtual void eat() {
cout << "Animal eats\n";
}
};
class Dog : public Animal {
public:
void speak() override {
cout << "Dog barks\n";
}
void eat() override {
cout << "Dog eats bones\n";
}
};
int main() {
Animal* animalPtr = new Dog();
animalPtr->speak();
// Step 1: Access animalPtr->vptr → Points to Dog's vtable
// Step 2: Look up vtable[0] → &Dog::speak
// Step 3: Call Dog::speak()
// Output: "Dog barks"
animalPtr->eat();
// Step 1: Access animalPtr->vptr → Points to Dog's vtable
// Step 2: Look up vtable[1] → &Dog::eat
// Step 3: Call Dog::eat()
// Output: "Dog eats bones"
delete animalPtr;
return 0;
}
Output:
Dog barks
Dog eats bones
Why This Works:
- Even though
animalPtris of typeAnimal*, the object it points to is aDog - The
Dogobject’s vptr points toDog’s vtable - The vtable contains pointers to
Dog’s overridden functions - At runtime, the correct functions are called based on the actual object type
What If a Derived Class Doesn’t Override All Virtual Functions?
When a derived class doesn’t override a virtual function, the base class version is used in the derived class’s vtable.
#include <iostream>
using namespace std;
class Base {
public:
virtual void func1() {
cout << "Base::func1()\n";
}
virtual void func2() {
cout << "Base::func2()\n";
}
virtual void func3() {
cout << "Base::func3()\n";
}
};
class Derived : public Base {
public:
void func1() override {
cout << "Derived::func1()\n";
}
// func2() is NOT overridden
void func3() override {
cout << "Derived::func3()\n";
}
};
int main() {
Base* basePtr = new Derived();
basePtr->func1(); // Calls Derived::func1()
basePtr->func2(); // Calls Base::func2() (not overridden)
basePtr->func3(); // Calls Derived::func3()
delete basePtr;
return 0;
}
Output:
Derived::func1()
Base::func2()
Derived::func3()
vtable Layout:
Base's vtable: Derived's vtable:
+-------------------+ +-------------------+
| &Base::func1 | | &Derived::func1 | ← Overridden
| &Base::func2 | | &Base::func2 | ← NOT overridden, inherits Base's
| &Base::func3 | | &Derived::func3 | ← Overridden
+-------------------+ +-------------------+
Key Insight:
- When
Deriveddoesn’t overridefunc2(), its vtable entry still points toBase::func2() - The derived class “inherits” the base class function pointer in its vtable
- This is why calling
basePtr->func2()executesBase::func2()even though the object is of typeDerived - The vtable ensures that each function call resolves to the most-derived version available
Why Virtual Destructors Are Critical
When using polymorphism, always make the base class destructor virtual. If you don’t, deleting a derived class object through a base class pointer will only call the base class destructor, causing a memory leak!
#include <iostream>
using namespace std;
class Base {
public:
Base() { cout << "Base Constructor\n"; }
~Base() { cout << "Base Destructor\n"; } // ❌ NOT virtual
};
class Derived : public Base {
int* data;
public:
Derived() {
data = new int[100];
cout << "Derived Constructor\n";
}
~Derived() {
delete[] data;
cout << "Derived Destructor\n";
}
};
int main() {
Base* ptr = new Derived();
delete ptr; // ⚠️ Memory leak! Only Base destructor called
return 0;
}
Output:
Base Constructor
Derived Constructor
Base Destructor
Problem: Derived destructor never called → data array leaked!
Solution: Make Base Destructor Virtual
class Base {
public:
Base() { cout << "Base Constructor\n"; }
virtual ~Base() { cout << "Base Destructor\n"; } // ✓ Virtual
};
// ... rest same ...
int main() {
Base* ptr = new Derived();
delete ptr; // ✓ Both destructors called correctly
return 0;
}
Output:
Base Constructor
Derived Constructor
Derived Destructor
Base Destructor
Rule of Thumb: If a class has any virtual functions, its destructor should be virtual too!
The override Keyword (C++11)
C++11 introduced the override keyword to make your code safer and more explicit when overriding virtual functions. It’s not required, but it’s highly recommended!
What Does override Do?
The override keyword tells the compiler: “I intend to override a virtual function from the base class.”
If you make a mistake (wrong parameter types, misspelled name, forgot const, etc.), the compiler will give you an error instead of silently creating a new function.
Problem Without override
class Base {
public:
virtual void setValue(int val) {
cout << "Base::setValue\n";
}
};
class Derived : public Base {
public:
// Oops! Typo: "vlaue" instead of "value"
// Also wrong parameter type: double instead of int
virtual void setValue(double val) { // ❌ NOT overriding!
cout << "Derived::setValue\n";
}
};
int main() {
Base* ptr = new Derived();
ptr->setValue(10); // Calls Base::setValue (unexpected!)
delete ptr;
return 0;
}
Output:
Base::setValue
Problem: The compiler doesn’t warn you! It thinks you’re creating a new overloaded function, not overriding the base class function.
Solution With override
class Base {
public:
virtual void setValue(int val) {
cout << "Base::setValue\n";
}
};
class Derived : public Base {
public:
void setValue(double val) override { // ✓ Compiler error!
cout << "Derived::setValue\n";
}
};
Compiler Error:
error: 'void Derived::setValue(double)' marked 'override', but does not override
The compiler catches your mistake immediately!
Correct Usage
class Base {
public:
virtual void setValue(int val) {
cout << "Base::setValue\n";
}
};
class Derived : public Base {
public:
void setValue(int val) override { // ✓ Correct override
cout << "Derived::setValue\n";
}
};
int main() {
Base* ptr = new Derived();
ptr->setValue(10); // Calls Derived::setValue (as expected!)
delete ptr;
return 0;
}
Output:
Derived::setValue
Benefits of Using override
- Catches typos - Misspelled function names
- Catches signature mismatches - Wrong parameter types or count
- Catches const mismatches - Forgot
constqualifier - Self-documenting - Makes it clear you’re overriding, not creating a new function
- Refactoring safety - If the base class function signature changes, you’ll get compilation errors
Complete Example
#include <iostream>
using namespace std;
class Animal {
public:
virtual void makeSound() const {
cout << "Animal sound\n";
}
virtual ~Animal() {}
};
class Dog : public Animal {
public:
void makeSound() const override { // ✓ Correct
cout << "Woof!\n";
}
};
class Cat : public Animal {
public:
void makeSound() override { // ❌ Compiler error: missing 'const'
cout << "Meow!\n";
}
};
int main() {
Animal* animal = new Dog();
animal->makeSound();
delete animal;
return 0;
}
Best Practice: Always use override when overriding virtual functions in modern C++ (C++11 and later)!
The final Keyword (C++11)
The final keyword, introduced in C++11, is used to restrict inheritance and method overriding. It can be applied in two ways:
- Final Class - Prevents a class from being inherited
- Final Method - Prevents a virtual method from being overridden in derived classes
Example: Using final
#include <iostream>
using namespace std;
// Base class with a final method
class Base {
public:
virtual void canOverride() {
cout << "Base: This can be overridden" << endl;
}
// This method cannot be overridden
virtual void cannotOverride() final {
cout << "Base: This is final - cannot be overridden" << endl;
}
};
// This class cannot be inherited from
class FinalClass final {
public:
void display() {
cout << "This is a final class" << endl;
}
};
// Derived class from Base
class Derived : public Base {
public:
// Allowed - overriding non-final method
void canOverride() override {
cout << "Derived: Overridden successfully" << endl;
}
// ERROR: Cannot override final method
// void cannotOverride() override {
// cout << "This will cause compilation error" << endl;
// }
};
// ERROR: Cannot inherit from final class
// class AnotherClass : public FinalClass {
// // Compilation error
// };
int main() {
Derived d;
d.canOverride(); // Calls overridden version
d.cannotOverride(); // Calls Base's final version
FinalClass fc;
fc.display();
return 0;
}
Output:
Derived: Overridden successfully
Base: This is final - cannot be overridden
This is a final class
Key Points:
- Use
finalon a class to prevent any inheritance from it - Use
finalon a virtual method to prevent derived classes from overriding it - Attempting to violate
finalrestrictions results in a compile-time error - The
finalkeyword provides clear intent and compiler-enforced restrictions
For in-depth details about the final keyword, refer to the C++11 final Keyword section.
Overloading vs Overriding: Quick Comparison
Here’s a side-by-side comparison to help you understand the key differences:
| Aspect | Function Overloading | Function Overriding |
|---|---|---|
| Type of Polymorphism | Static (Compile-time) | Dynamic (Runtime) |
| When is it resolved? | At compile time | At runtime |
| Where does it occur? | Same class (or across classes) | Base and derived classes (inheritance required) |
| Function signature | Must be different (different parameters) | Must be same (same name, parameters, return type) |
virtual keyword | Not required | Required in base class |
override keyword | Not applicable | Recommended (C++11+) |
| Function name | Same name, different parameters | Same name, same parameters |
| Return type | Can be same or different | Must be same (or covariant) |
| Purpose | Provide multiple ways to call same function name with different arguments | Provide specific implementation in derived class for base class behavior |
| Example | print(int), print(double), print(string) | Base: virtual void draw(), Derived: void draw() override |
| Relationship | Independent functions in same scope | Child class redefines parent class function |
| Pointer/Reference type | Not relevant (direct call) | Important (base pointer/reference to derived object) |
Quick Example Comparison
#include <iostream>
using namespace std;
// OVERLOADING (Static Polymorphism)
class Calculator {
public:
int add(int a, int b) {
return a + b;
}
double add(double a, double b) { // Different parameter types
return a + b;
}
int add(int a, int b, int c) { // Different number of parameters
return a + b + c;
}
};
// OVERRIDING (Dynamic Polymorphism)
class Animal {
public:
virtual void sound() {
cout << "Animal makes a sound\n";
}
};
class Dog : public Animal {
public:
void sound() override { // Same signature, different implementation
cout << "Dog barks\n";
}
};
int main() {
// Overloading - Compiler decides which function to call
Calculator calc;
cout << calc.add(5, 3) << "\n"; // Calls add(int, int)
cout << calc.add(5.5, 3.2) << "\n"; // Calls add(double, double)
cout << calc.add(1, 2, 3) << "\n"; // Calls add(int, int, int)
cout << "---\n";
// Overriding - Runtime decides which function to call
Animal* animalPtr = new Dog();
animalPtr->sound(); // Calls Dog::sound() at runtime
delete animalPtr;
return 0;
}
Output:
8
8.7
6
---
Dog barks
Key Takeaway:
- Overloading = Same name, different signatures → Compile-time decision
- Overriding = Same name, same signature, inheritance → Runtime decision
C++11 final Keyword
Table of Contents
- What is the final Keyword?
- How Programmers Achieved This Before C++11
- How final Keyword Improved the Code
- When to Use final?
- Best Practices and Guidelines
What is the final Keyword?
The final keyword, introduced in C++11, is used to restrict inheritance and method overriding. It can be applied in two contexts:
- Final Classes - Prevents a class from being inherited
- Final Methods - Prevents a virtual method from being overridden in derived classes
Preventing Class Inheritance
When a class is marked as final, no other class can inherit from it.
Syntax:
class ClassName final {
// Class definition
};
Example:
#include <iostream>
using namespace std;
// This class cannot be inherited
class FinalClass final {
public:
void display() {
cout << "This is a final class" << endl;
}
};
// Attempting to inherit from FinalClass
class DerivedClass : public FinalClass { // ERROR: Cannot inherit from final class
public:
void show() {
cout << "Derived class" << endl;
}
};
int main() {
FinalClass obj;
obj.display();
return 0;
}
Compiler Error:
error: cannot derive from 'final' base 'FinalClass' in derived type 'DerivedClass'
Preventing Method Override
When a virtual method is marked as final, derived classes cannot override it.
Syntax:
virtual return_type methodName() final {
// Method implementation
}
Example:
#include <iostream>
using namespace std;
class Base {
public:
virtual void display() {
cout << "Base display" << endl;
}
// This method cannot be overridden
virtual void show() final {
cout << "Base show - cannot be overridden" << endl;
}
};
class Derived : public Base {
public:
// This is allowed
void display() override {
cout << "Derived display" << endl;
}
// This will cause a compilation error
void show() override { // ERROR: Cannot override final method
cout << "Derived show" << endl;
}
};
int main() {
Derived obj;
obj.display();
obj.show();
return 0;
}
Compiler Error:
error: virtual function 'virtual void Derived::show()' overrides final function
How Programmers Achieved This Before C++11
Before C++11, there was no direct language support for preventing inheritance or method overriding. Programmers used various workarounds, all with significant limitations.
Private/Protected Constructor Approach
One common technique was to make constructors private or protected, preventing direct instantiation of derived classes.
#include <iostream>
using namespace std;
class NonInheritableClass {
private:
NonInheritableClass() { // Private constructor
cout << "NonInheritableClass created" << endl;
}
public:
// Factory method for creating instances
static NonInheritableClass* create() {
return new NonInheritableClass();
}
void display() {
cout << "Display method" << endl;
}
};
// Attempting to inherit
class DerivedClass : public NonInheritableClass {
public:
DerivedClass() { // ERROR: Cannot access private constructor
cout << "Derived class" << endl;
}
};
int main() {
// Cannot create object directly
// NonInheritableClass obj; // ERROR
// Must use factory method
NonInheritableClass* obj = NonInheritableClass::create();
obj->display();
delete obj;
return 0;
}
Friend Class Approach
Another technique combined private constructors with friend classes for controlled creation.
#include <iostream>
using namespace std;
class NonInheritableClass;
// Helper class that can create NonInheritableClass
class Creator {
public:
static NonInheritableClass* create();
};
class NonInheritableClass {
private:
NonInheritableClass() {
cout << "Created via friend" << endl;
}
friend class Creator; // Only Creator can access private constructor
public:
void display() {
cout << "Display method" << endl;
}
};
NonInheritableClass* Creator::create() {
return new NonInheritableClass();
}
int main() {
NonInheritableClass* obj = Creator::create();
obj->display();
delete obj;
return 0;
}
Problems with Pre-C++11 Approaches
These workarounds had several significant issues:
1. No Direct Method Override Prevention
class Base {
public:
virtual void criticalMethod() {
// Important logic that shouldn't be changed
}
};
class Derived : public Base {
public:
// No way to prevent this override before C++11
void criticalMethod() override {
// Oops! Accidentally overridden
}
};
2. Complex and Error-Prone Code
// Required complex boilerplate code
class SafeClass {
private:
SafeClass() {}
static SafeClass* instance;
public:
static SafeClass* getInstance() {
if (!instance) {
instance = new SafeClass();
}
return instance;
}
// Lots of additional code needed...
};
SafeClass* SafeClass::instance = nullptr;
3. Unclear Intent
// Why is the constructor private? To prevent inheritance or for Singleton pattern?
class MyClass {
private:
MyClass() {} // Intent is not clear
public:
static MyClass* create() {
return new MyClass();
}
};
4. Memory Management Burden
// Forced to use pointers and factory methods
MyClass* obj = MyClass::create();
obj->doSomething();
delete obj; // Must remember to delete
// Could not simply do:
// MyClass obj; // Direct instantiation not possible
5. Incomplete Prevention
class Base {
private:
Base() {}
public:
static Base create() {
return Base();
}
};
// This still compiles in some cases!
class Derived : public Base {
// Can still inherit even with private constructor
};
How final Keyword Improved the Code
The final keyword provides a clean, explicit, and reliable solution that addresses all the problems of previous approaches.
Clear Intent
The final keyword makes the programmer’s intent immediately obvious.
Before C++11:
class Configuration {
private:
Configuration() {} // Why private? Not immediately clear
public:
static Configuration* getInstance();
void setOption(string key, string value);
};
With final:
class Configuration final {
public:
Configuration() {} // Clear: this class cannot be inherited
void setOption(string key, string value);
};
Compile-Time Enforcement
The compiler enforces the restriction, catching errors early.
class SecurityManager final {
public:
void authenticate(string username, string password) {
// Critical security logic
}
};
// Compiler immediately catches this error
class CustomSecurityManager : public SecurityManager { // COMPILE ERROR
// Cannot compromise security by inheriting
};
Better Error Messages
Clear, understandable compiler errors help developers fix issues quickly.
Example:
class ImmutableString final {
string data;
public:
ImmutableString(string s) : data(s) {}
string get() const { return data; }
};
class MutableString : public ImmutableString { // ERROR
public:
void set(string s) { /* ... */ }
};
Compiler Error:
error: cannot derive from 'final' base 'ImmutableString'
This is much clearer than cryptic errors about private constructors!
Performance Optimizations
The compiler can make optimization decisions knowing that methods won’t be overridden.
class FastMath {
public:
virtual int add(int a, int b) final {
return a + b;
}
virtual int multiply(int a, int b) final {
return a * b;
}
};
// Compiler knows these methods are final and can:
// - Inline them more aggressively
// - Skip virtual table lookups
// - Apply devirtualization optimizations
Comparison Example:
#include <iostream>
#include <chrono>
using namespace std;
class NonFinalClass {
public:
virtual int compute(int x) {
return x * x;
}
};
class FinalClass {
public:
virtual int compute(int x) final {
return x * x;
}
};
int main() {
NonFinalClass nfc;
FinalClass fc;
const int iterations = 100000000;
// Non-final method call
auto start = chrono::high_resolution_clock::now();
int sum1 = 0;
for(int i = 0; i < iterations; i++) {
sum1 += nfc.compute(i);
}
auto end = chrono::high_resolution_clock::now();
auto duration1 = chrono::duration_cast<chrono::milliseconds>(end - start);
// Final method call (potentially optimized)
start = chrono::high_resolution_clock::now();
int sum2 = 0;
for(int i = 0; i < iterations; i++) {
sum2 += fc.compute(i);
}
end = chrono::high_resolution_clock::now();
auto duration2 = chrono::duration_cast<chrono::milliseconds>(end - start);
cout << "Non-final time: " << duration1.count() << "ms" << endl;
cout << "Final time: " << duration2.count() << "ms" << endl;
return 0;
}
Simplified Code Structure
No need for complex workarounds or boilerplate code.
Before C++11 (50+ lines):
class Singleton {
private:
static Singleton* instance;
Singleton() {}
Singleton(const Singleton&) = delete;
Singleton& operator=(const Singleton&) = delete;
public:
static Singleton* getInstance() {
if (!instance) {
instance = new Singleton();
}
return instance;
}
void doWork() {
cout << "Working..." << endl;
}
};
Singleton* Singleton::instance = nullptr;
// Usage requires pointers
Singleton* obj = Singleton::getInstance();
obj->doWork();
With final (10 lines):
class Singleton final {
private:
Singleton() {}
public:
static Singleton& getInstance() {
static Singleton instance;
return instance;
}
void doWork() {
cout << "Working..." << endl;
}
};
// Usage is cleaner
Singleton::getInstance().doWork();
When to Use final?
Use Cases for final Classes
1. Utility Classes with Static Methods
Classes that only contain static helper functions should be final.
class MathUtils final {
public:
static double sqrt(double x) {
// Implementation
return 0.0;
}
static double pow(double base, double exp) {
// Implementation
return 0.0;
}
// No need for inheritance - just utility functions
};
2. Value Objects / Data Transfer Objects (DTOs)
Simple data containers that represent immutable values.
class Point final {
private:
int x, y;
public:
Point(int x, int y) : x(x), y(y) {}
int getX() const { return x; }
int getY() const { return y; }
// No need to extend - it's just a point
};
3. Implementation Classes (Not Interfaces)
Concrete implementations that should not be further specialized.
class HttpClient final {
public:
void sendRequest(string url) {
// Concrete implementation
cout << "Sending HTTP request to " << url << endl;
}
string receiveResponse() {
// Concrete implementation
return "Response data";
}
};
4. Security-Critical Classes
Classes where inheritance could compromise security or correctness.
class PasswordHasher final {
public:
string hash(string password) {
// Critical hashing algorithm
// Must not be altered by inheritance
return "hashed_password";
}
bool verify(string password, string hash) {
// Critical verification logic
return true;
}
};
Use Cases for final Methods
1. Template Method Pattern - Fixed Steps
When certain steps in an algorithm must never change.
class DataProcessor {
public:
// Template method defines the algorithm
void process() {
readData();
validateData(); // This step is fixed
transformData(); // This can be customized
writeData(); // This step is fixed
}
protected:
virtual void readData() {
cout << "Reading data..." << endl;
}
// This validation must always happen exactly this way
virtual void validateData() final {
cout << "Performing mandatory validation..." << endl;
// Critical validation logic that must not be changed
}
virtual void transformData() = 0; // Subclasses must implement
// Writing must follow specific protocol
virtual void writeData() final {
cout << "Writing data with integrity checks..." << endl;
// Must not be altered
}
};
class CSVProcessor : public DataProcessor {
protected:
void transformData() override {
cout << "Converting to CSV format..." << endl;
}
// Cannot override validateData() or writeData() - they are final
};
2. Performance-Critical Methods
Methods that are optimized and should not be overridden.
class GraphicsRenderer {
public:
// Highly optimized rendering code
virtual void render() final {
// Assembly-optimized or GPU-accelerated code
// Must not be overridden to maintain performance
cout << "Optimized rendering..." << endl;
}
virtual void setColor(int r, int g, int b) {
// Can be overridden
}
};
3. Preventing Accidental Override
Methods that work correctly and should not be accidentally broken.
class BankAccount {
protected:
double balance;
public:
BankAccount(double initial) : balance(initial) {}
virtual void deposit(double amount) {
if(amount > 0) {
balance += amount;
}
}
// Critical business logic - must not be changed
virtual bool withdraw(double amount) final {
if(amount > 0 && balance >= amount) {
balance -= amount;
return true;
}
return false;
}
double getBalance() const {
return balance;
}
};
class SavingsAccount : public BankAccount {
public:
SavingsAccount(double initial) : BankAccount(initial) {}
// Can add interest calculation
void addInterest(double rate) {
deposit(balance * rate);
}
// Cannot override withdraw() - protected by final
};
4. Ensuring Contract Compliance
When a method implements a critical contract that must be maintained.
class Observable {
private:
vector<Observer*> observers;
public:
void attach(Observer* obs) {
observers.push_back(obs);
}
// Notification must always work this way
virtual void notify() final {
for(auto obs : observers) {
obs->update(this);
}
}
virtual void setState(int state) {
// Can be overridden
}
};
When NOT to Use final
1. Library/Framework Base Classes
Classes designed to be extended by users.
// DON'T do this
class Widget final { // BAD - users might want to extend
public:
virtual void render();
};
// DO this instead
class Widget {
public:
virtual void render();
virtual ~Widget() {}
};
2. When Extensibility is a Feature
Classes that are meant to be customized.
// DON'T do this
class Plugin final { // BAD - plugins need to be extended
public:
virtual void execute();
};
// DO this instead
class Plugin {
public:
virtual void execute() = 0;
virtual ~Plugin() {}
};
3. Early in Development
Don’t use final prematurely before the design stabilizes.
// During prototyping - keep it flexible
class GameEntity {
public:
virtual void update();
virtual void render();
};
// Later, when design is stable, you might make specific methods final
class GameEntity {
public:
virtual void update();
virtual void render() final; // Now we know this shouldn't change
};
4. When Testing Requires Mocking
Classes that need to be mocked for unit testing.
// DON'T do this if you need to mock
class DatabaseConnection final { // BAD - cannot mock for testing
public:
void query(string sql);
};
// DO this instead
class DatabaseConnection {
public:
virtual void query(string sql);
virtual ~DatabaseConnection() {}
};
// Now you can create a mock for testing
class MockDatabaseConnection : public DatabaseConnection {
public:
void query(string sql) override {
// Mock implementation for testing
}
};
Best Practices and Guidelines
-
Use
finalconservatively - Only use it when you have a clear reason to prevent inheritance or overriding -
Document why - Add comments explaining why a class or method is final
// Final to prevent security vulnerabilities through inheritance class AuthenticationManager final { // ... }; -
Combine with
override- When marking a method final, use both keywords for clarityclass Derived : public Base { public: void method() override final { // Both override and final // ... } }; -
Consider alternatives - Sometimes composition is better than preventing inheritance
// Instead of making everything final class FinalClass final { void doWork(); }; // Consider composition class Worker { Helper helper; // Use composition instead public: void doWork() { helper.assist(); } }; -
Virtual destructors - If a class has virtual methods, ensure it has a virtual destructor
class Base { public: virtual void method() final; virtual ~Base() {} // Virtual destructor }; -
Performance considerations - Use
finalon hot-path methods to enable compiler optimizationsclass FastProcessor { public: virtual int compute(int x) final { return x * x; // Can be inlined aggressively } }; -
API design - For public APIs, think carefully before using
finalas it limits users -
Team communication - Discuss with team before making classes final in shared codebases
C++11 Override Keyword
Table of Contents
- What is the Override Keyword?
- The Problem Without Override
- The Solution: Using Override Keyword
- Benefits of Override Keyword
- Best Practices
What is the Override Keyword?
The override keyword is a C++11 feature that explicitly indicates that a member function in a derived class is intended to override a virtual function from the base class. It provides compile-time checking to ensure the override is valid.
The override keyword is placed after the function signature in a derived class to explicitly declare that the function overrides a virtual function from the base class.
Syntax:
class Base {
public:
virtual void functionName() {
// base implementation
}
};
class Derived : public Base {
public:
void functionName() override { // Explicitly marks as override
// derived implementation
}
};
The Problem Without Override
Without the override keyword, subtle mistakes in function signatures can lead to bugs that are difficult to detect. The compiler won’t warn you if you accidentally create a new function instead of overriding the base class function.
Example 1: Typo in Function Name
#include <iostream>
class Shape {
public:
virtual void draw() {
std::cout << "Drawing a shape" << std::endl;
}
virtual ~Shape() = default;
};
class Circle : public Shape {
public:
void darw() { // Typo: 'darw' instead of 'draw'
std::cout << "Drawing a circle" << std::endl;
}
};
int main() {
Shape* shape = new Circle();
shape->draw(); // Calls Shape::draw(), not Circle::darw()
delete shape;
return 0;
}
Output:
Drawing a shape
Problem: The typo darw() creates a new function instead of overriding draw(). The compiler doesn’t warn you, and the base class function is called instead of the derived class function.
Example 2: Wrong Parameter Types
#include <iostream>
class Animal {
public:
virtual void makeSound(int volume) {
std::cout << "Animal sound at volume " << volume << std::endl;
}
virtual ~Animal() = default;
};
class Dog : public Animal {
public:
void makeSound(double volume) { // Wrong parameter type: double instead of int
std::cout << "Woof at volume " << volume << std::endl;
}
};
int main() {
Animal* animal = new Dog();
animal->makeSound(5); // Calls Animal::makeSound(int), not Dog::makeSound(double)
delete animal;
return 0;
}
Output:
Animal sound at volume 5
Problem: The parameter type doesn’t match (double vs int), so this creates a new function instead of overriding. The base class function is called.
Example 3: Missing const Qualifier
#include <iostream>
class Vehicle {
public:
virtual void getInfo() const {
std::cout << "Vehicle info" << std::endl;
}
virtual ~Vehicle() = default;
};
class Car : public Vehicle {
public:
void getInfo() { // Missing 'const' qualifier
std::cout << "Car info" << std::endl;
}
};
int main() {
Vehicle* vehicle = new Car();
vehicle->getInfo(); // Calls Vehicle::getInfo(), not Car::getInfo()
delete vehicle;
return 0;
}
Output:
Vehicle info
Problem: Missing const qualifier means the signature doesn’t match, creating a new function instead of overriding.
The Solution: Using Override Keyword
Correct Usage
#include <iostream>
class Shape {
public:
virtual void draw() {
std::cout << "Drawing a shape" << std::endl;
}
virtual void area() const {
std::cout << "Calculating shape area" << std::endl;
}
virtual ~Shape() = default;
};
class Circle : public Shape {
public:
void draw() override { // Correctly overrides Shape::draw()
std::cout << "Drawing a circle" << std::endl;
}
void area() const override { // Correctly overrides Shape::area()
std::cout << "Calculating circle area" << std::endl;
}
};
int main() {
Shape* shape = new Circle();
shape->draw(); // Calls Circle::draw()
shape->area(); // Calls Circle::area()
delete shape;
return 0;
}
Output:
Drawing a circle
Calculating circle area
Success: The derived class functions are correctly called because they properly override the base class functions.
Catching Errors at Compile Time
Example 1: Typo Caught by Override
class Shape {
public:
virtual void draw() {
std::cout << "Drawing a shape" << std::endl;
}
};
class Circle : public Shape {
public:
void darw() override { // Compilation Error!
std::cout << "Drawing a circle" << std::endl;
}
};
Compiler Error:
error: 'void Circle::darw()' marked 'override', but does not override
Example 2: Wrong Parameter Type Caught
class Animal {
public:
virtual void makeSound(int volume) {
std::cout << "Animal sound" << std::endl;
}
};
class Dog : public Animal {
public:
void makeSound(double volume) override { // Compilation Error!
std::cout << "Woof" << std::endl;
}
};
Compiler Error:
error: 'void Dog::makeSound(double)' marked 'override', but does not override
Example 3: Missing const Caught
class Vehicle {
public:
virtual void getInfo() const {
std::cout << "Vehicle info" << std::endl;
}
};
class Car : public Vehicle {
public:
void getInfo() override { // Compilation Error!
std::cout << "Car info" << std::endl;
}
};
Compiler Error:
error: 'void Car::getInfo()' marked 'override', but does not override
Benefits of Override Keyword
- Compile-time Error Detection: Catches mistakes early when the function signature doesn’t match the base class
- Self-documenting Code: Makes it clear that a function is intended to override a base class function
- Refactoring Safety: If the base class function signature changes, the compiler will catch all derived classes that need updating
- Prevents Silent Bugs: Eliminates bugs caused by accidentally creating new functions instead of overriding
- Better Code Maintenance: Easier to understand class hierarchies and relationships
- No Runtime Overhead: It’s a compile-time feature with zero runtime cost
Best Practices
- Always use
overridewhen you intend to override a virtual function - Use
virtualonly in base classes for the initial declaration - Don’t use both
virtualandoverridein derived classes (redundant) - Mark base class destructors as
virtualwhen using inheritance - Consider using
finalto prevent further overriding if needed
Example of Best Practices:
class Base {
public:
virtual void foo() { }
virtual void bar() { }
virtual ~Base() = default; // Virtual destructor
};
class Derived : public Base {
public:
void foo() override { } // Good: uses override
void bar() override final { } // Good: override and prevent further overriding
};
class FurtherDerived : public Derived {
public:
void foo() override { } // Good: overrides Derived::foo()
// void bar() override { } // Error: bar is final in Derived
};
Abstract Classes and Pure Virtual Functions
Table of Contents
- What is an Abstract Class?
- Benefits and Use Cases
- OOP Concept: Abstraction
- Special Notes: Non-Pure Virtual Functions in Abstract Classes
- Key Takeaways
What is an Abstract Class?
An abstract class is a class that cannot be instantiated directly and is designed to serve as a base class for other classes. It acts as a blueprint that defines the interface (contract) that derived classes must implement.
A class becomes abstract when it contains at least one pure virtual function.
Pure Virtual Function
A pure virtual function is a virtual function that has no implementation in the base class and must be overridden by derived classes. It is declared by assigning = 0 to the function declaration.
Syntax:
virtual return_type function_name(parameters) = 0;
Example: Basic Abstract Class
#include <iostream>
#include <string>
using namespace std;
// Abstract class - cannot be instantiated
class Shape {
protected:
string color;
public:
Shape(string c) : color(c) {}
// Pure virtual function - makes Shape abstract
virtual double calculateArea() = 0;
// Pure virtual function
virtual void draw() = 0;
// Regular member function
void setColor(string c) {
color = c;
}
string getColor() {
return color;
}
};
// Concrete class - must implement all pure virtual functions
class Circle : public Shape {
private:
double radius;
public:
Circle(string c, double r) : Shape(c), radius(r) {}
// Must override pure virtual function
double calculateArea() override {
return 3.14159 * radius * radius;
}
void draw() override {
cout << "Drawing a " << color << " circle" << endl;
}
};
class Rectangle : public Shape {
private:
double width, height;
public:
Rectangle(string c, double w, double h) : Shape(c), width(w), height(h) {}
double calculateArea() override {
return width * height;
}
void draw() override {
cout << "Drawing a " << color << " rectangle" << endl;
}
};
int main() {
// Shape s("red"); // ERROR! Cannot instantiate abstract class
Circle c("blue", 5.0);
Rectangle r("green", 4.0, 6.0);
cout << "Circle area: " << c.calculateArea() << endl;
c.draw();
cout << "Rectangle area: " << r.calculateArea() << endl;
r.draw();
// Polymorphism with abstract class pointers
Shape* shapes[2];
shapes[0] = &c;
shapes[1] = &r;
cout << "\nUsing polymorphism:" << endl;
for(int i = 0; i < 2; i++) {
cout << "Area: " << shapes[i]->calculateArea() << endl;
shapes[i]->draw();
}
return 0;
}
Output:
Circle area: 78.5397
Drawing a blue circle
Rectangle area: 24
Drawing a green rectangle
Using polymorphism:
Area: 78.5397
Drawing a blue circle
Area: 24
Drawing a green rectangle
Benefits and Use Cases
1. Enforcing a Contract (Interface)
Abstract classes ensure that all derived classes implement specific methods, creating a consistent interface.
class Database {
public:
// All database implementations must provide these operations
virtual void connect(string connectionString) = 0;
virtual void disconnect() = 0;
virtual void executeQuery(string query) = 0;
virtual ~Database() {}
};
class MySQLDatabase : public Database {
public:
void connect(string connectionString) override {
cout << "Connecting to MySQL: " << connectionString << endl;
}
void disconnect() override {
cout << "Disconnecting from MySQL" << endl;
}
void executeQuery(string query) override {
cout << "Executing MySQL query: " << query << endl;
}
};
class PostgreSQLDatabase : public Database {
public:
void connect(string connectionString) override {
cout << "Connecting to PostgreSQL: " << connectionString << endl;
}
void disconnect() override {
cout << "Disconnecting from PostgreSQL" << endl;
}
void executeQuery(string query) override {
cout << "Executing PostgreSQL query: " << query << endl;
}
};
2. Code Reusability with Polymorphism
Abstract classes allow you to write generic code that works with any derived class.
void performDatabaseOperations(Database* db) {
db->connect("server=localhost");
db->executeQuery("SELECT * FROM users");
db->disconnect();
}
int main() {
MySQLDatabase mysql;
PostgreSQLDatabase postgres;
performDatabaseOperations(&mysql); // Works with MySQL
performDatabaseOperations(&postgres); // Works with PostgreSQL
return 0;
}
3. Framework Design
Abstract classes are perfect for creating frameworks where the core structure is defined but implementation details are left to users.
class GameCharacter {
protected:
string name;
int health;
public:
GameCharacter(string n, int h) : name(n), health(h) {}
// Framework defines the game loop
void takeTurn() {
cout << name << "'s turn:" << endl;
performAction(); // Specific to each character type
if(canUseSpecialAbility()) {
useSpecialAbility();
}
}
// Must be implemented by each character type
virtual void performAction() = 0;
virtual void useSpecialAbility() = 0;
virtual bool canUseSpecialAbility() = 0;
virtual ~GameCharacter() {}
};
class Warrior : public GameCharacter {
public:
Warrior(string n) : GameCharacter(n, 150) {}
void performAction() override {
cout << "Warrior attacks with sword!" << endl;
}
void useSpecialAbility() override {
cout << "Warrior uses RAGE mode!" << endl;
}
bool canUseSpecialAbility() override {
return health < 50; // Can rage when low health
}
};
class Mage : public GameCharacter {
private:
int mana = 100;
public:
Mage(string n) : GameCharacter(n, 80) {}
void performAction() override {
cout << "Mage casts fireball!" << endl;
}
void useSpecialAbility() override {
cout << "Mage teleports!" << endl;
mana -= 30;
}
bool canUseSpecialAbility() override {
return mana >= 30;
}
};
OOP Concept: Abstraction
Abstraction is one of the four pillars of Object-Oriented Programming (encapsulation, inheritance, polymorphism, and abstraction).
Real-World Example: Driving a Car
Think about driving a car. When you drive, you interact with simple controls:
- Steering wheel - turn it to change direction
- Accelerator pedal - press it to go faster
- Brake pedal - press it to slow down
- Gear shift - move it to change gears
As a driver, you don’t need to know:
- How the engine combusts fuel
- How the transmission system works
- How the braking system applies friction to the wheels
- How the power steering mechanism functions
The car’s interface (steering wheel, pedals) abstracts away all the complex mechanical and electronic systems underneath. You focus on what you want to do (turn, accelerate, stop) rather than how the car makes it happen.
This is exactly what abstraction does in programming - it hides the complex implementation details and provides a simple interface to interact with.
What is Abstraction?
Abstraction means hiding complex implementation details and showing only the essential features of an object. It allows you to focus on what an object does rather than how it does it.
How Abstract Classes Achieve Abstraction
Abstract classes are the primary mechanism for achieving abstraction in C++:
- Hide Implementation Details: Users of the abstract class don’t need to know how each operation is implemented.
- Define Clear Interfaces: The pure virtual functions define what operations are available.
- Allow Multiple Implementations: Different derived classes can implement the same interface in different ways.
// User only sees this interface - internal details are hidden
class PaymentProcessor {
public:
virtual bool processPayment(double amount) = 0;
virtual string getTransactionId() = 0;
virtual void refund(string transactionId) = 0;
virtual ~PaymentProcessor() {}
};
// Implementation details are hidden in derived classes
class CreditCardProcessor : public PaymentProcessor {
private:
// Complex credit card processing logic hidden from users
string encryptCardData(string cardNumber) {
// Encryption implementation
return "encrypted_data";
}
bool validateCard(string cardNumber) {
// Validation logic
return true;
}
public:
bool processPayment(double amount) override {
// User doesn't need to know about encryption or validation
cout << "Processing credit card payment: $" << amount << endl;
return true;
}
string getTransactionId() override {
return "CC-12345";
}
void refund(string transactionId) override {
cout << "Refunding transaction: " << transactionId << endl;
}
};
class PayPalProcessor : public PaymentProcessor {
private:
// Different implementation with different internal details
void connectToPayPalAPI() {
// API connection logic
}
public:
bool processPayment(double amount) override {
cout << "Processing PayPal payment: $" << amount << endl;
return true;
}
string getTransactionId() override {
return "PP-67890";
}
void refund(string transactionId) override {
cout << "Refunding via PayPal: " << transactionId << endl;
}
};
// Client code uses abstraction - doesn't care about implementation
void checkout(PaymentProcessor* processor, double amount) {
if(processor->processPayment(amount)) {
cout << "Transaction ID: " << processor->getTransactionId() << endl;
}
}
The client code using checkout() doesn’t need to know whether it’s processing a credit card or PayPal payment - it just knows it can process payments. This is abstraction in action.
Special Notes: Non-Pure Virtual Functions in Abstract Classes
An abstract class can have a mix of pure virtual functions and regular (non-pure) virtual or non-virtual functions. This is useful for providing default behavior while still enforcing implementation of critical methods.
Example: Mixed Functions
class Document {
protected:
string title;
string content;
public:
Document(string t) : title(t) {}
// Pure virtual - MUST be implemented
virtual void save() = 0;
// Non-pure virtual - CAN be overridden, has default implementation
virtual void print() {
cout << "Title: " << title << endl;
cout << "Content: " << content << endl;
}
// Regular function - shared by all derived classes
void setContent(string c) {
content = c;
}
virtual ~Document() {}
};
class PDFDocument : public Document {
public:
PDFDocument(string t) : Document(t) {}
// Must implement pure virtual function
void save() override {
cout << "Saving as PDF file: " << title << ".pdf" << endl;
}
// Can optionally override non-pure virtual function
void print() override {
cout << "=== PDF Document ===" << endl;
Document::print(); // Call base class implementation
cout << "===================" << endl;
}
};
class WordDocument : public Document {
public:
WordDocument(string t) : Document(t) {}
void save() override {
cout << "Saving as Word file: " << title << ".docx" << endl;
}
// Uses default print() from Document class
};
How to Invoke Non-Pure Virtual Functions?
Since you cannot instantiate an abstract class, you access non-pure virtual functions through:
1. Derived Class Objects
int main() {
PDFDocument pdf("Report");
pdf.setContent("This is the report content");
pdf.print(); // Calls PDFDocument's overridden version
pdf.save();
WordDocument word("Letter");
word.setContent("This is a letter");
word.print(); // Calls Document's default implementation
word.save();
return 0;
}
2. Calling Base Class Implementation from Derived Class
class AdvancedPDFDocument : public Document {
public:
AdvancedPDFDocument(string t) : Document(t) {}
void save() override {
cout << "Saving with advanced compression..." << endl;
}
void print() override {
// Call the base class non-pure virtual function
Document::print();
cout << "Additional PDF metadata..." << endl;
}
};
3. Through Polymorphic Pointers/References
void processDocument(Document* doc) {
doc->setContent("Sample content"); // Regular function
doc->print(); // Non-pure virtual (uses derived or base)
doc->save(); // Pure virtual (must be derived)
}
int main() {
PDFDocument pdf("Test");
WordDocument word("Test");
processDocument(&pdf);
processDocument(&word);
return 0;
}
Why Use Non-Pure Virtual Functions in Abstract Classes?
1. Provide Default Behavior
Not every derived class needs custom implementation of every method.
class Vehicle {
public:
virtual void start() = 0; // Every vehicle starts differently
virtual void honk() { // Most vehicles honk the same way
cout << "Beep beep!" << endl;
}
};
class Car : public Vehicle {
public:
void start() override {
cout << "Turning key..." << endl;
}
// Uses default honk()
};
class Bicycle : public Vehicle {
public:
void start() override {
cout << "Start pedaling..." << endl;
}
void honk() override {
cout << "Ring ring!" << endl; // Bicycles need different honk
}
};
2. Code Reuse
Common logic can be shared while critical parts are enforced.
class Logger {
protected:
string timestamp() {
return "[2025-11-12 10:30:00]";
}
public:
// Must implement - each logger writes differently
virtual void write(string message) = 0;
// Shared logic - adds timestamp automatically
virtual void log(string message) {
write(timestamp() + " " + message);
}
};
class FileLogger : public Logger {
public:
void write(string message) override {
cout << "Writing to file: " << message << endl;
}
};
class ConsoleLogger : public Logger {
public:
void write(string message) override {
cout << "Console: " << message << endl;
}
// Can override log() if needed for different behavior
};
3. Template Method Pattern
This design pattern will be covered in a separate section.
Key Takeaways
- Abstract classes cannot be instantiated and must have at least one pure virtual function
- Pure virtual functions are declared with
= 0and must be implemented by derived classes - Abstract classes enforce a contract that derived classes must follow
- They are essential for achieving abstraction in OOP
- Abstract classes can have non-pure virtual functions for default behavior
- Non-pure virtual functions are accessed through derived class objects or polymorphic pointers
- Mixing pure and non-pure virtual functions provides flexibility: enforce critical implementations while sharing common code
Abstract classes are powerful tools for designing extensible, maintainable systems where you want to define clear interfaces while allowing flexibility in implementation.
Friend Functions and Friend Classes in C++
Table of Contents
- What is a Friend Function
- What is a Friend Class
- Friend Functions and Encapsulation
- Why Friend Functions Cannot Be Const
- Friend Functions and Inheritance
- Accessing Static Private Members
- Scope of Friend Functions
- Useful Cases for Friend Functions
What is a Friend Function
A friend function is a function that is granted access to the private and protected members of a class, even though it is not a member of that class. It is declared inside the class using the friend keyword but defined outside the class scope.
Global Function as Friend
A global function can be declared as a friend to access private members of a class.
#include <iostream>
using namespace std;
class Box {
private:
int width;
public:
Box(int w) : width(w) {}
// Declare global function as friend
friend void displayWidth(Box b);
};
// Define the friend function
void displayWidth(Box b) {
// Can access private member 'width'
cout << "Width of box: " << b.width << endl;
}
int main() {
Box box(10);
displayWidth(box); // Output: Width of box: 10
return 0;
}
Friend Function Inside Class
You can define a friend function directly inside the class body. The function is still not a member function, but it’s defined inline within the class. It can be called from outside using argument-dependent lookup (ADL).
#include <iostream>
using namespace std;
class Box {
private:
int width;
int height;
public:
Box(int w, int h) : width(w), height(h) {}
// Friend function defined inside the class
friend void displayBox(Box b) {
// Can access private members
cout << "Box dimensions: " << b.width << " x " << b.height << endl;
}
// Another friend function defined inside
friend void compareBoxes(Box b1, Box b2) {
cout << "Box1 area: " << (b1.width * b1.height) << endl;
cout << "Box2 area: " << (b2.width * b2.height) << endl;
if (b1.width * b1.height > b2.width * b2.height)
cout << "Box1 is larger" << endl;
else
cout << "Box2 is larger" << endl;
}
};
int main() {
Box box1(10, 20);
Box box2(15, 15);
// Call friend functions - they are NOT member functions
// so we don't use box1.displayBox()
displayBox(box1); // Output: Box dimensions: 10 x 20
compareBoxes(box1, box2); // Compares both boxes
return 0;
}
Important Notes:
- Even though defined inside the class, these are not member functions
- They are called directly by name, not through an object (e.g.,
displayBox(box1)notbox1.displayBox()) - They don’t have a
thispointer - They are found via argument-dependent lookup (ADL) when called
What is a Friend Class
A friend class is a class whose all member functions have access to the private and protected members of another class. It is declared using the friend keyword.
Entire Class as Friend
When an entire class is declared as a friend, all its member functions can access private members.
Important: Friendship is not mutual. If class A is a friend of class B, it doesn’t mean B is automatically a friend of A.
#include <iostream>
using namespace std;
class Box {
private:
int width;
int height;
public:
Box(int w, int h) : width(w), height(h) {}
// Declare entire class as friend
friend class BoxPrinter;
};
class BoxPrinter {
private:
string printerName;
public:
BoxPrinter(string name) : printerName(name) {}
void printDimensions(Box b) {
// BoxPrinter can access Box's private members
cout << "Width: " << b.width << ", Height: " << b.height << endl;
}
void printArea(Box b) {
cout << "Area: " << (b.width * b.height) << endl;
}
};
// Box CANNOT access BoxPrinter's private members
void testBox(Box b, BoxPrinter printer) {
// cout << printer.printerName << endl; // Error: cannot access private member
}
int main() {
Box box(10, 20);
BoxPrinter printer("HP-Printer");
printer.printDimensions(box); // Output: Width: 10, Height: 20
printer.printArea(box); // Output: Area: 200
return 0;
}
Key Points about Friendship:
- Friendship is one-way: BoxPrinter can access Box’s private members, but Box cannot access BoxPrinter’s private members
- Friendship must be explicitly granted: If you want mutual access, both classes must declare each other as friends
- Friendship is not transitive: If A is a friend of B, and B is a friend of C, it doesn’t mean A is a friend of C
Only One Member Function as Friend
You can declare only specific member functions of a class as friends, rather than the entire class.
#include <iostream>
using namespace std;
class Box; // Forward declaration
class Analyzer {
public:
void analyzeBox(Box b); // Will be friend
void processBox(Box b); // Will NOT be friend
};
class Box {
private:
int width;
public:
Box(int w) : width(w) {}
// Only analyzeBox is friend, not processBox
friend void Analyzer::analyzeBox(Box b);
};
void Analyzer::analyzeBox(Box b) {
cout << "Analyzing box with width: " << b.width << endl; // Works
}
void Analyzer::processBox(Box b) {
// cout << b.width << endl; // Error: cannot access private member
cout << "Processing box..." << endl;
}
int main() {
Box box(15);
Analyzer analyzer;
analyzer.analyzeBox(box); // Output: Analyzing box with width: 15
analyzer.processBox(box); // Output: Processing box...
return 0;
}
Friend Functions and Encapsulation
While friend functions allow access to private and protected data members, which technically breaks encapsulation, they are still useful in certain scenarios:
-
Operator Overloading: When overloading binary operators (like
+,-,<<,>>) where the left operand is not a class object. -
Bridge Between Two Classes: When two tightly coupled classes need to share data efficiently without exposing it publicly.
-
Testing and Debugging: Unit tests may need access to internal state without making everything public.
-
Performance Optimization: Avoiding getter/setter overhead when frequent access is needed between closely related classes.
-
Legacy Code Integration: When integrating with existing code that requires direct access to internal structures.
-
Implementation of Certain Design Patterns: Patterns like Iterator or Visitor may benefit from friend access.
-
Symmetric Operations: When operations need to treat multiple objects equally (like comparing two objects).
Why Friend Functions Cannot Be Const
A friend function cannot be declared as const because:
-
Not a Member Function: The
constkeyword in a member function indicates that the function doesn’t modify the object it’s called on (the implicitthispointer points to a const object). -
No Implicit
thisPointer: Friend functions are not member functions, so they don’t have an implicitthispointer to qualify as const or non-const. -
Parameter-Based Qualification: If a friend function shouldn’t modify an object, you pass that object as a
constreference or pointer parameter.
class Box {
private:
int width;
public:
Box(int w) : width(w) {}
// Correct: Pass const reference if function shouldn't modify
friend void display(const Box& b);
// Incorrect syntax: friend functions can't be const
// friend void display(Box b) const; // Error!
};
void display(const Box& b) {
cout << b.width << endl;
// b.width = 10; // Error: cannot modify const object
}
Friend Functions and Inheritance
Friend functions are not inherited by derived classes. Friendship must be explicitly granted by each class.
#include <iostream>
using namespace std;
class Base {
private:
int baseData;
public:
Base(int d) : baseData(d) {}
friend void showBase(Base b);
};
class Derived : public Base {
private:
int derivedData;
public:
Derived(int b, int d) : Base(b), derivedData(d) {}
// showBase is NOT automatically a friend of Derived
};
void showBase(Base b) {
cout << "Base data: " << b.baseData << endl; // Works
}
void showDerived(Derived d) {
// cout << d.baseData << endl; // Error: cannot access
// cout << d.derivedData << endl; // Error: cannot access
}
int main() {
Base b(10);
Derived d(20, 30);
showBase(b); // Works
showBase(d); // Works (object slicing to Base)
return 0;
}
Key Point: If you want a friend function to access derived class members, you must explicitly declare it as a friend in the derived class as well.
Accessing Static Private Members
Friend functions can access static private data members just like instance members.
#include <iostream>
using namespace std;
class Counter {
private:
static int count;
int instanceId;
public:
Counter() {
instanceId = ++count;
}
friend void displayStatistics();
friend void displayInstance(Counter c);
};
// Initialize static member
int Counter::count = 0;
void displayStatistics() {
// Access static private member
cout << "Total objects created: " << Counter::count << endl;
}
void displayInstance(Counter c) {
// Access both static and instance private members
cout << "Instance ID: " << c.instanceId << endl;
cout << "Total count: " << Counter::count << endl;
}
int main() {
Counter c1, c2, c3;
displayStatistics(); // Output: Total objects created: 3
displayInstance(c2); // Output: Instance ID: 2, Total count: 3
return 0;
}
Scope of Friend Functions
The scope of a friend function depends on where it is defined:
-
Global Scope: If defined outside any class, it has global scope.
-
Namespace Scope: If defined within a namespace, it belongs to that namespace.
-
Not in Class Scope: Even though declared inside a class, friend functions are not members of that class and don’t belong to the class scope.
-
Access Rules: Friend functions can be called like any other function based on their actual scope, not through the class.
#include <iostream>
using namespace std;
namespace MyNamespace {
class Box {
private:
int width;
public:
Box(int w) : width(w) {}
friend void display(Box b); // Declared in class
};
// Defined in namespace scope
void display(Box b) {
cout << "Width: " << b.width << endl;
}
}
int main() {
MyNamespace::Box box(50);
// Call using namespace scope, not class scope
MyNamespace::display(box); // Correct
// box.display(); // Error: not a member function
return 0;
}
Important: Friend functions are called directly by their name (with appropriate namespace qualification if needed), not as member functions through an object.
Useful Cases for Friend Functions
Friend functions are particularly useful in the following scenarios:
1. Operator Overloading
Friend functions are commonly used for operator overloading, especially for binary operators and I/O stream operators where the left operand is not your class object.
Note: Operator overloading will be covered in detail in a separate chapter.
2. Implementing Bridge Between Tightly Coupled Classes
When two classes need to work together closely and share internal state.
class Engine;
class Car {
private:
string model;
public:
Car(string m) : model(m) {}
friend class Engine; // Engine can access Car's internals
};
class Engine {
private:
int horsepower;
public:
Engine(int hp) : horsepower(hp) {}
void diagnose(Car& car) {
cout << "Diagnosing " << car.model << " with "
<< horsepower << "hp engine" << endl;
}
};
3. Factory Functions
Friend functions can act as factory methods that construct objects with access to private constructors.
Note: Factory patterns will be covered in detail in a separate chapter.
4. Unit Testing
Friend functions and classes allow test code to access private members without making them public, enabling thorough testing while maintaining encapsulation in production code.
#include <iostream>
using namespace std;
class BankAccount {
private:
double balance;
string accountNumber;
public:
BankAccount(string accNum, double b) : accountNumber(accNum), balance(b) {}
void deposit(double amount) {
if (amount > 0)
balance += amount;
}
bool withdraw(double amount) {
if (amount > 0 && balance >= amount) {
balance -= amount;
return true;
}
return false;
}
#ifdef UNIT_TEST
friend class AccountTester;
#endif
};
#ifdef UNIT_TEST
class AccountTester {
public:
static void testBalance() {
BankAccount acc("ACC123", 1000.0);
// Direct access to private members for testing
cout << "Initial balance: " << acc.balance << endl;
acc.deposit(500);
cout << "After deposit: " << acc.balance << endl;
acc.withdraw(200);
cout << "After withdrawal: " << acc.balance << endl;
// Verify internal state
if (acc.balance == 1300.0)
cout << "Test PASSED!" << endl;
else
cout << "Test FAILED!" << endl;
}
};
#endif
int main() {
#ifdef UNIT_TEST
AccountTester::testBalance();
#else
BankAccount acc("ACC456", 2000.0);
acc.deposit(500);
acc.withdraw(300);
cout << "Production mode - private members protected" << endl;
#endif
return 0;
}
Benefits:
- Test code can verify internal state without exposing it publicly
- Conditional compilation keeps test access separate from production code
- Maintains encapsulation while enabling comprehensive testing
Summary
Friend functions and friend classes provide controlled access to private members when:
- Encapsulation needs can be met through careful design
- The relationship between classes is well-defined and stable
- Performance or design patterns require direct access
- Operator overloading or symmetric operations are needed
Use them judiciously to maintain good object-oriented design principles while solving practical problems that arise in real-world programming.
Operator Overloading
Table of Contents
- What is Operator Overloading?
- Overloadable vs Non-Overloadable Operators
- Why Use Operator Overloading?
- Ways to Overload Operators
- Binary vs Unary Operators
- More Operator Overloading Examples
- Best Practices
What is Operator Overloading?
Operator overloading is a feature in C++ that allows you to define custom behavior for operators (like +, -, <, <<, etc.) when they are used with your own classes. This tells C++ what it means to use an operator on a class you’ve written yourself.
Basic Syntax
There are two ways to overload an operator:
1. As a Member Function
ReturnType operator@(parameters) const;
2. As a Non-Member Function
ReturnType operator@(ClassName& lhs, ClassName& rhs);
Where @ represents the operator you want to overload (e.g., +, -, <, ==, etc.)
Example Prototype
class MyClass {
public:
// Member function operator overloading
MyClass operator+(const MyClass& other) const;
bool operator<(const MyClass& other) const;
MyClass& operator=(const MyClass& other);
};
// Non-member function operator overloading
MyClass operator*(const MyClass& lhs, const MyClass& rhs);
ostream& operator<<(ostream& out, const MyClass& obj);
Overloadable Operators
C++ allows you to overload most operators:
- Arithmetic:
+,-,*,/,% - Comparison:
<,>,<=,>=,==,!= - Logical:
&&,||,! - Assignment:
=,+=,-=,*=,/= - Stream:
<<,>> - And many more!
Overloadable vs Non-Overloadable Operators
Not all operators in C++ can be overloaded. Here’s a comprehensive table:
Operators That CAN Be Overloaded
| Category | Operators |
|---|---|
| Arithmetic | + - * / % |
| Bitwise | ^ & ` |
| Comparison | < > <= >= == != |
| Logical | ! && ` |
| Assignment | = += -= *= /= %= ^= &= ` |
| Increment/Decrement | ++ -- |
| Member Access | -> ->* |
| Subscript | [] |
| Function Call | () |
| Memory Management | new new[] delete delete[] |
| Other | , (comma operator) |
Operators That CANNOT Be Overloaded
| Operator | Name | Reason |
|---|---|---|
:: | Scope resolution | Fundamental to C++ structure |
. | Member access | Direct member access must remain fixed |
.* | Pointer-to-member access | Core language feature |
?: | Ternary conditional | Requires special evaluation rules |
sizeof | Size-of operator | Compile-time operator |
typeid | Type identification | RTTI operator |
# | Preprocessor stringification | Preprocessor directive |
## | Preprocessor concatenation | Preprocessor directive |
Why Use Operator Overloading?
Let’s say we have a simple Number class that wraps an integer value. Without operator overloading, adding two numbers looks awkward:
Without Operator Overloading
class Number {
public:
Number(int val) : value(val) {}
Number add(const Number& other) const {
return Number(value + other.value);
}
int getValue() const { return value; }
private:
int value;
};
// Usage
Number a(5);
Number b(3);
Number c = a.add(b); // Awkward syntax
cout << c.getValue() << endl; // Output: 8
With Operator Overloading
class Number {
public:
Number(int val) : value(val) {}
Number operator+(const Number& other) const {
return Number(value + other.value);
}
int getValue() const { return value; }
private:
int value;
};
// Usage
Number a(5);
Number b(3);
Number c = a + b; // Natural and intuitive!
cout << c.getValue() << endl; // Output: 8
Benefits:
- More intuitive and readable code
- Makes custom classes behave like built-in types
- Follows the principle of least surprise for users of your class
Ways to Overload Operators
There are two primary ways to overload operators in C++:
Member Function Overloading
When you overload an operator as a member function, it’s declared inside the class. The left-hand side of the operation becomes this, and the right-hand side is passed as a parameter.
Syntax
class ClassName {
public:
ReturnType operator@(const ClassName& rhs) const;
};
Where @ is the operator you want to overload (e.g., +, -, <, etc.)
Example: Time Class
class Time {
public:
Time(int h, int m, int s) : hours(h), minutes(m), seconds(s) {}
// Overload < operator as a member function
bool operator<(const Time& rhs) const {
if (hours < rhs.hours) return true;
if (rhs.hours < hours) return false;
if (minutes < rhs.minutes) return true;
if (rhs.minutes < minutes) return false;
return seconds < rhs.seconds;
}
// Overload + operator as a member function
Time operator+(const Time& rhs) const {
int totalSeconds = seconds + rhs.seconds;
int totalMinutes = minutes + rhs.minutes + totalSeconds / 60;
int totalHours = hours + rhs.hours + totalMinutes / 60;
return Time(totalHours % 24, totalMinutes % 60, totalSeconds % 60);
}
private:
int hours;
int minutes;
int seconds;
};
// Usage
Time morning(9, 30, 0);
Time duration(2, 45, 30);
if (morning < duration) {
cout << "Morning comes before duration" << endl;
}
Time result = morning + duration; // Calls morning.operator+(duration)
How It Works
When you write a + b, C++ translates it to a.operator+(b):
abecomesthis(the left-hand side)bis passed as therhsparameter (right-hand side)
Advantages:
- Direct access to private members without getters
- Clearly belongs to the class
Limitations:
- Left-hand side must be an instance of your class
- Cannot overload operators where your class is on the right-hand side with a built-in type on the left
Non-Member Function Overloading
When you overload an operator as a non-member function, it’s declared outside the class. Both the left-hand side and right-hand side are passed as parameters.
Syntax
ReturnType operator@(const ClassName& lhs, const ClassName& rhs);
Example: Time Class
class Time {
public:
Time(int h, int m, int s) : hours(h), minutes(m), seconds(s) {}
int getHours() const { return hours; }
int getMinutes() const { return minutes; }
int getSeconds() const { return seconds; }
// Declare as friend to access private members
friend bool operator<(const Time& lhs, const Time& rhs);
friend ostream& operator<<(ostream& out, const Time& t);
private:
int hours;
int minutes;
int seconds;
};
// Define outside the class
bool operator<(const Time& lhs, const Time& rhs) {
if (lhs.hours < rhs.hours) return true;
if (rhs.hours < lhs.hours) return false;
if (lhs.minutes < rhs.minutes) return true;
if (rhs.minutes < lhs.minutes) return false;
return lhs.seconds < rhs.seconds;
}
// Overload << for easy printing
ostream& operator<<(ostream& out, const Time& t) {
out << t.hours << ":" << t.minutes << ":" << t.seconds;
return out; // Return stream for chaining
}
// Usage
Time morning(9, 30, 0);
Time evening(17, 45, 30);
if (morning < evening) {
cout << "Morning comes first!" << endl;
}
cout << "Morning time: " << morning << endl; // Output: Morning time: 9:30:0
The friend Keyword
If your non-member operator function needs to access private members, declare it as a friend inside the class:
class Person {
public:
friend bool operator==(const Person& lhs, const Person& rhs);
private:
int secretID;
};
bool operator==(const Person& lhs, const Person& rhs) {
return lhs.secretID == rhs.secretID; // Can access private members
}
Stream Operator <<
The stream insertion operator is commonly overloaded as a non-member function:
ostream& operator<<(ostream& out, const Time& time) {
out << time.hours << ":" << time.minutes << ":" << time.seconds;
return out; // Must return the stream for chaining
}
// This enables chaining:
cout << "The time is " << myTime << " right now" << endl;
Why non-member? Because cout (an ostream) is on the left side, not your custom class!
Advantages:
- Allows the left-hand side to be a different type (e.g.,
ostreamfor<<) - Works when you can’t modify the left-hand side class
- Preferred by the C++ Standard Library for symmetry
Considerations:
- Needs
frienddeclaration to access private members - Or must use public getters if not declared as friend
Binary vs Unary Operators
Understanding the difference between binary and unary operators is crucial for proper operator overloading.
Binary Operators
Binary operators work with two operands (left-hand side and right-hand side).
Examples: +, -, *, /, <, ==, +=
As Member Functions
- Takes one parameter (the right-hand side)
thisis the left-hand side
class Number {
public:
Number operator+(const Number& rhs) const { // rhs = right-hand side
return Number(value + rhs.value);
}
private:
int value;
};
// Usage: a + b → a.operator+(b)
As Non-Member Functions
- Takes two parameters (both left and right sides)
Number operator+(const Number& lhs, const Number& rhs) {
return Number(lhs.getValue() + rhs.getValue());
}
// Usage: a + b → operator+(a, b)
Unary Operators
Unary operators work with one operand only.
Examples: !, ~, ++, --, - (negation), + (positive)
As Member Functions
- Takes no parameters
thisis the only operand
class Time {
public:
bool operator!() const { // No parameters!
// Returns true if time is "empty" or zero
return (hours == 0 && minutes == 0 && seconds == 0);
}
Time operator-() const { // Unary minus (negation)
return Time(-hours, -minutes, -seconds);
}
private:
int hours, minutes, seconds;
};
// Usage
Time t(0, 0, 0);
if (!t) { // Calls t.operator!()
cout << "Time is zero!" << endl;
}
Time negative = -t; // Calls t.operator-()
As Non-Member Functions
- Takes one parameter (the operand)
bool operator!(const Time& t) {
return (t.getHours() == 0 && t.getMinutes() == 0 && t.getSeconds() == 0);
}
// Usage: !t → operator!(t)
Special Case: Increment and Decrement
The ++ and -- operators come in two forms: prefix and postfix.
class Counter {
public:
Counter(int val = 0) : value(val) {}
// Prefix: ++counter
Counter& operator++() { // No parameter
++value;
return *this; // Return reference to modified object
}
// Postfix: counter++
Counter operator++(int) { // Dummy int parameter to distinguish
Counter temp = *this; // Save current value
++value;
return temp; // Return old value
}
int getValue() const { return value; }
private:
int value;
};
// Usage
Counter c(5);
++c; // c.operator++() → c is now 6
c++; // c.operator++(0) → returns 6, c becomes 7
Key Difference:
- Prefix (
++c): Increments first, then returns reference to the object - Postfix (
c++): Returns copy of original value, then increments - The dummy
intparameter distinguishes postfix from prefix
More Operator Overloading Examples
Let’s explore various operators and how to overload them in real-world scenarios.
Example 1: Complex Number Class
A comprehensive example showing multiple operators:
class Complex {
public:
Complex(double r = 0, double i = 0) : real(r), imag(i) {}
// Binary arithmetic operators
Complex operator+(const Complex& rhs) const {
return Complex(real + rhs.real, imag + rhs.imag);
}
Complex operator-(const Complex& rhs) const {
return Complex(real - rhs.real, imag - rhs.imag);
}
Complex operator*(const Complex& rhs) const {
return Complex(
real * rhs.real - imag * rhs.imag,
real * rhs.imag + imag * rhs.real
);
}
// Unary operators
Complex operator-() const { // Negation
return Complex(-real, -imag);
}
// Comparison operator
bool operator==(const Complex& rhs) const {
return (real == rhs.real && imag == rhs.imag);
}
bool operator!=(const Complex& rhs) const {
return !(*this == rhs);
}
// Compound assignment
Complex& operator+=(const Complex& rhs) {
real += rhs.real;
imag += rhs.imag;
return *this; // Return reference for chaining
}
// Stream output
friend ostream& operator<<(ostream& out, const Complex& c) {
out << c.real;
if (c.imag >= 0) out << "+";
out << c.imag << "i";
return out;
}
private:
double real;
double imag;
};
// Usage
Complex a(3, 4); // 3 + 4i
Complex b(1, -2); // 1 - 2i
Complex sum = a + b; // 4 + 2i
Complex product = a * b; // 11 - 2i
Complex negative = -a; // -3 - 4i
cout << "Sum: " << sum << endl;
a += b; // a is now 4 + 2i
Example 2: Boolean Logic Class
class BoolExpr {
public:
BoolExpr(bool val) : value(val) {}
// Logical operators
BoolExpr operator&&(const BoolExpr& rhs) const {
return BoolExpr(value && rhs.value);
}
BoolExpr operator||(const BoolExpr& rhs) const {
return BoolExpr(value || rhs.value);
}
BoolExpr operator!() const {
return BoolExpr(!value);
}
// Conversion to bool
operator bool() const {
return value;
}
friend ostream& operator<<(ostream& out, const BoolExpr& expr) {
out << (expr.value ? "true" : "false");
return out;
}
private:
bool value;
};
// Usage
BoolExpr a(true);
BoolExpr b(false);
BoolExpr result = a && b; // false
BoolExpr negation = !a; // false
if (a || b) {
cout << "At least one is true" << endl;
}
Best Practices
1. Make Operators Obvious
The operation should be intuitive when reading the code. If someone sees a + b, they should have a good idea what it means.
2. Stay Consistent with Built-in Types
Operators should behave similarly to how they work with built-in types:
+should perform addition-like operations<should perform comparisons- Don’t make
+do subtraction!
3. When In Doubt, Use a Named Function
If the meaning isn’t obvious, use a descriptive function name instead:
// 🚫 Confusing
MyString a("hello");
MyString b("world");
MyString c = a * b; // What does this even mean?
// ✅ Clear
MyString a("hello");
MyString b("world");
MyString c = a.charsInCommon(b); // Much better!
4. Choose Member vs Non-Member Appropriately
- Use member functions when the operator logically belongs to the class
- Use non-member functions when:
- You need a different type on the left-hand side
- You want symmetry between operands
- Overloading stream operators (
<<,>>)
5. Return Appropriate Types
- Comparison operators (
<,==, etc.) should returnbool - Arithmetic operators (
+,-, etc.) should return a new object - Assignment operators (
=,+=, etc.) should return a reference to*this
Templates
What Are Templates?
Templates are C++’s way of writing generic code that can work on any data type (built-in and user-defined).
In essence, templates automate code generation. You write the function logic once, and the compiler generates the necessary versions for each data type you use.
Eventhough template itself needs a separate book to understand each and every aspect of it, here we will cover all the basic things about template.
Function Template
Table of Contents
- Visualize the Problem
- Function Templates
- How Function Templates Work
- How to Call Template Functions
- Templates vs Functions
- Key Takeaways and Summary
Visualize the Problem
Consider a function that returns the smallest of two values, let’s say two integers:
int min(int a, int b) {
return a < b ? a : b;
}
The min function makes sense for more than just integers. What if we want to find the smallest of two doubles, or two strings?
min(106, 107); // int, returns 106
min(1.2, 3.4); // double, returns 1.2
min("Thomas", "Rachel"); // string, returns "Rachel" (alphabetically first)
Attempted Solution: Function Overloading
int min(int a, int b) {
return a < b ? a : b;
}
double min(double a, double b) {
return a < b ? a : b;
}
std::string min(std::string a, std::string b) {
return a < b ? a : b;
}
Problem: The function logic doesn’t change, but we keep duplicating code. What if we need to support more types in the future, including custom classes? We can’t keep adding functions manually.
This problem can be solved using function templates.
Function Templates
Templates let us write the function once and let the compiler generate the necessary versions automatically:
template <typename T>
T min(T a, T b) {
return a < b ? a : b;
}
Syntax
template <typename T> // or template <class T>
return-type functionName(T parameter1, T parameter2, ...) {
// Function logic
}
Note: typename and class are interchangeable in template declarations. Using typename is generally preferred and will make more sense when exploring advanced C++20 features.
How Function Templates Work
When you call a template function, the compiler generates the specific version of the code for the type you’re using:
min(106, 107); // Compiler generates: int min(int a, int b)
min(1.2, 3.4); // Compiler generates: double min(double a, double b)
Behind the scenes, the compiler generates:
// Compiler-generated code
int min(int a, int b) {
return a < b ? a : b;
}
double min(double a, double b) {
return a < b ? a : b;
}
This happens at compile-time, so there’s no runtime overhead.
How to Call Template Functions
Option 1: Implicit Instantiation
Let the compiler infer the types automatically:
min(106, 107); // int, returns 106
min(1.2, 3.4); // double, returns 1.2
Advantage: Clean, concise syntax.
Disadvantage: Can lead to unexpected behavior in ambiguous cases.
Problem 1: String Literals
template <typename T>
T min(T a, T b) {
return a < b ? a : b;
}
min("Thomas", "Rachel"); // Dangerous!
String literals ("Thomas", "Rachel") are passed as const char*, so the compiler generates:
const char* min(const char* a, const char* b) {
return a < b ? a : b;
}
Problem: This performs pointer comparison, not string comparison! ❌
Problem 2: Mismatched Parameter Types
min(106, 3.14); // int and double - doesn't compile!
Since the parameters are different types (int and double), the compiler cannot deduce a single type T. Implicit instantiation fails.
Option 2: Explicit Instantiation
Explicitly specify the type to avoid ambiguity:
min<std::string>("Thomas", "Rachel"); // Specify type explicitly
min<double>(106, 3.14); // Specify type explicitly
Solution to Problem 1: String Comparison
template <typename T>
T min(const T& a, const T& b) {
return a < b ? a : b;
}
min<std::string>("Thomas", "Rachel"); // ✅ Correct!
Here, const char* is converted to std::string, giving us proper string comparison.
Solution to Problem 2: Mismatched Types
When parameters have different types, use explicit instantiation to specify which type to use:
min<double>(106, 3.14); // ✅ Converts 106 to double, returns 3.14
min<int>(106, 3.14); // ✅ Converts 3.14 to int, returns 3
The compiler will perform necessary type conversions based on your explicit type specification.
Templates vs Functions
It’s important to understand the distinction:
| Concept | What It Is |
|---|---|
template<typename T> T min(T a, T b) | This is a TEMPLATE - Not a function, but a blueprint for generating functions |
min<int> | This is a FUNCTION - Also known as a template instantiation |
Key Point: When you write a template, you’re creating a pattern. When the compiler instantiates it with a specific type (like min<int>), that’s when an actual function is generated.
Key Takeaways and Summary
Key Takeaways
- Templates automate code generation - write once, use for any type
- Implicit instantiation is convenient but can be ambiguous
- Explicit instantiation gives you control when types don’t match exactly
- Templates are resolved at compile-time with no runtime overhead
- Works with both built-in types and user-defined classes
Summary
Templates allow you to:
- Define behavior once - Write the logic a single time
- Let the compiler generate type-specific implementations - Automatic code generation
- Write generic, reusable code - Works with any type
- Maintain type safety without code duplication - No manual overloading needed
Think of it as: You provide the blueprint (template), the compiler builds the specific versions you need!
Class Templates
Table of Contents
- What is a Class Template?
- Syntax for Class Templates
- A Simple Class Template Example
- Defining Member Functions Outside the Class
- Instantiating Class Templates
- Understanding Template vs Type
1. What is a Class Template?
A class template is a blueprint for creating classes that work with generic types. Instead of writing separate classes for int, double, string, etc., you write one template that works with any type.
Definition
A class template is a class that is parameterized over one or more types. It contains member variables and functions that use these generic types.
Why Use Class Templates?
Without templates:
class IntBox {
int value;
};
class DoubleBox {
double value;
};
class StringBox {
string value;
};
// ... and so on for every type!
With templates:
template<typename T>
class Box {
T value; // Works with ANY type!
};
2. Syntax for Class Templates
Basic Syntax
template<typename T>
class ClassName {
// Member variables using type T
T member;
// Member functions using type T
void setMember(T value);
T getMember();
};
Syntax Breakdown
template<typename T>
│ │ │
│ │ └─→ Template parameter name (can be any identifier)
│ └─────────→ Keyword (can also use 'class' instead)
└──────────────────→ Keyword introducing template
Multiple Template Parameters
template<typename T, typename U>
class Pair {
T first;
U second;
};
template<typename T, int SIZE>
class Array {
T data[SIZE]; // SIZE is a non-type parameter
};
Common Conventions
| Convention | Example | Notes |
|---|---|---|
| Single letter | template<typename T> | Most common for simple cases |
| Descriptive name | template<typename ValueType> | Better for complex templates |
| Multiple params | template<typename K, typename V> | Key-Value pairs |
3. A Simple Class Template Example
Let’s create a Box class that can hold any type of value.
Simple Box Template
template<typename T>
class Box {
private:
T value; // Generic type member variable
public:
// Constructor
Box(T val) : value(val) {}
// Getter
T getValue() const {
return value;
}
// Setter
void setValue(T val) {
value = val;
}
};
Understanding the Example
template<typename T> // ← Declares this is a template
class Box {
private:
T value; // ← T can be int, double, string, etc.
public:
Box(T val) : value(val) {} // ← Constructor takes type T
T getValue() const { // ← Returns type T
return value;
}
void setValue(T val) { // ← Parameter is type T
value = val;
}
};
Usage Example
// Create a Box for integers
Box<int> intBox(42);
cout << intBox.getValue(); // Output: 42
// Create a Box for doubles
Box<double> doubleBox(3.14);
cout << doubleBox.getValue(); // Output: 3.14
// Create a Box for strings
Box<string> stringBox("Hello");
cout << stringBox.getValue(); // Output: Hello
4. Defining Member Functions Outside the Class
For better code organization, you can define member functions outside the class body.
Syntax for External Definition
template<typename T>
ReturnType ClassName<T>::functionName(parameters) {
// Function body
}
Complete Example: Box with External Definitions
// ============================================
// Class Declaration
// ============================================
template<typename T>
class Box {
private:
T value;
bool isEmpty;
public:
// Constructor declarations
Box();
Box(T val);
// Member function declarations
void store(T val);
T retrieve() const;
bool empty() const;
void clear();
void display() const;
};
// ============================================
// Member Function Definitions (Outside Class)
// ============================================
// Default constructor
template<typename T>
Box<T>::Box() : isEmpty(true) {
// Empty constructor body
}
// Parameterized constructor
template<typename T>
Box<T>::Box(T val) : value(val), isEmpty(false) {
// Initialize with a value
}
// Store function
template<typename T>
void Box<T>::store(T val) {
value = val;
isEmpty = false;
}
// Retrieve function
template<typename T>
T Box<T>::retrieve() const {
if (isEmpty) {
throw runtime_error("Box is empty!");
}
return value;
}
// Empty check function
template<typename T>
bool Box<T>::empty() const {
return isEmpty;
}
// Clear function
template<typename T>
void Box<T>::clear() {
isEmpty = true;
}
// Display function
template<typename T>
void Box<T>::display() const {
if (isEmpty) {
cout << "Box is empty" << endl;
} else {
cout << "Box contains: " << value << endl;
}
}
Anatomy of External Definition
template<typename T> // ← Template declaration (required!)
│
└─→ T Box<T>::retrieve() const {
│ │ │
│ │ └─→ Scope resolution with template parameter
│ └────→ Class name
└────────→ Return type using template parameter
Key Points for External Definitions
Must include:
template<typename T>before each function- Class name with template parameter:
Box<T>:: - Same signature as declaration
Common mistakes:
// WRONG: Missing template declaration
T Box<T>::retrieve() const { }
// WRONG: Missing template parameter on class name
template<typename T>
T Box::retrieve() const { }
// CORRECT
template<typename T>
T Box<T>::retrieve() const { }
5. Instantiating Class Templates
Basic Instantiation
// Syntax: ClassName<Type> objectName;
Box<int> integerBox; // Box that holds int
Box<double> doubleBox; // Box that holds double
Box<string> stringBox; // Box that holds string
Instantiation with Initialization
// Using parameterized constructor
Box<int> box1(42);
Box<double> box2(3.14159);
Box<string> box3("Hello, Templates!");
// Using default constructor then storing
Box<char> box4;
box4.store('A');
Complete Usage Example
#include <iostream>
#include <string>
using namespace std;
// ... (Box class template definition here) ...
int main() {
// ========================================
// Example 1: Integer Box
// ========================================
cout << "=== Integer Box ===" << endl;
Box<int> intBox(100);
intBox.display(); // Box contains: 100
int value = intBox.retrieve();
cout << "Value: " << value << endl; // Value: 100
intBox.clear();
intBox.display(); // Box is empty
// ========================================
// Example 2: Double Box
// ========================================
cout << "\n=== Double Box ===" << endl;
Box<double> doubleBox;
cout << "Empty? " << doubleBox.empty() << endl; // Empty? 1
doubleBox.store(2.71828);
doubleBox.display(); // Box contains: 2.71828
// ========================================
// Example 3: String Box
// ========================================
cout << "\n=== String Box ===" << endl;
Box<string> stringBox("C++ Templates");
stringBox.display(); // Box contains: C++ Templates
string text = stringBox.retrieve();
cout << "Retrieved: " << text << endl; // Retrieved: C++ Templates
// ========================================
// Example 4: Custom Type
// ========================================
struct Point {
int x, y;
friend ostream& operator<<(ostream& os, const Point& p) {
return os << "(" << p.x << ", " << p.y << ")";
}
};
cout << "\n=== Point Box ===" << endl;
Box<Point> pointBox({10, 20});
pointBox.display(); // Box contains: (10, 20)
return 0;
}
Output
=== Integer Box ===
Box contains: 100
Value: 100
Box is empty
=== Double Box ===
Empty? 1
Box contains: 2.71828
=== String Box ===
Box contains: C++ Templates
Retrieved: C++ Templates
=== Point Box ===
Box contains: (10, 20)
Multiple Objects of Same Type
// You can create multiple objects with the same template type
Box<int> scores[3];
scores[0].store(85);
scores[1].store(92);
scores[2].store(78);
for (int i = 0; i < 3; i++) {
cout << "Score " << i << ": " << scores[i].retrieve() << endl;
}
6. Understanding Template vs Type
Now that you’ve seen how to create and use class templates, it’s important to understand the distinction between a template and a type.
Template vs Type Table
| Concept | Code Example | Description |
|---|---|---|
| Template | template<typename T> class Box | The generic blueprint/pattern with parameter T |
| Type | Box<int> | A specific instantiation of the template with T = int |
| Type | Box<double> | A specific instantiation of the template with T = double |
| Type | Box<string> | A specific instantiation of the template with T = string |
Key Point
Box(with template parameter) is not a type — it’s a templateBox<int>,Box<double>, etc. are types — they are instantiated from the template
// This is the TEMPLATE (not a type)
template<typename T>
class Box { /* ... */ };
// These are TYPES (instantiated from the template)
Box<int> myIntBox; // Box<int> is a type
Box<double> myDoubleBox; // Box<double> is a type
Box<string> myStringBox; // Box<string> is a type
// Each type is distinct and independent
Visual Representation
Template
│
template<typename T>
class Box
│
┌─────────┼─────────┐
│ │ │
▼ ▼ ▼
Box<int> Box<double> Box<string>
Type Type Type
Why This Matters
Understanding this distinction is crucial because:
-
You cannot declare a variable of type
Box— you must specify the type parameterBox myBox; // ERROR: Template parameter missing Box<int> myBox; // CORRECT: Specific type -
Each instantiated type is independent
Box<int> intBox; Box<double> doubleBox; // These are completely different types! // You cannot assign one to the other -
The compiler generates separate code for each type
Box<int> b1; // Generates Box code for int Box<double> b2; // Generates Box code for double // Two separate classes in the compiled code
Summary
What You’ve Learned
- Class templates are blueprints for creating generic classes
- Syntax:
template<typename T>before the class declaration - Member functions can use the template parameter
T - External definitions require
template<typename T>andClassName<T>:: - Instantiation:
ClassName<Type> object; - The template (
Box) is different from instantiated types (Box<int>,Box<double>)
Quick Reference
// Declaration
template<typename T>
class Container {
T data;
public:
Container(T val);
void set(T val);
T get() const;
};
// External definition
template<typename T>
Container<T>::Container(T val) : data(val) {}
template<typename T>
void Container<T>::set(T val) { data = val; }
template<typename T>
T Container<T>::get() const { return data; }
// Usage
Container<int> c1(42);
Container<string> c2("Hello");
Why C++ Templates Must Be in Headers
Table of Contents
- The Problem
- Understanding Two-Phase Translation
- Why the Linker Error Occurs
- The Solution
- Alternative Solutions
- Common Errors and How to Fix Them
- Best Practices
The Problem
Let’s start with a real-world example that causes a linker error:
// vector.h
template<typename T>
class vector {
public:
T& at(int);
};
// vector.cpp
#include "vector.h"
template <typename T>
T& vector<T>::at(int i) {
// some code
}
// main.cpp
#include "vector.h"
int main() {
vector<int> a;
a.at(5);
}
When you compile this:
g++ vector.cpp main.cpp
You get a linker error:
/usr/bin/ld: /tmp/cc6PAyEd.o: in function `main':
main.cpp:(.text+0x28): undefined reference to `vector<int>::at(int)'
collect2: error: ld returned 1 exit status
Why does this happen? The answer lies in how C++ compiles templates.
Understanding Two-Phase Translation
C++ templates use a two-phase translation model. Understanding this is crucial to understanding why templates must be in headers.
Phase 1: Template Parsing (Definition Point)
When the compiler first encounters a template definition, it performs Phase 1 processing:
┌─────────────────────────────────────────────┐
│ Phase 1: Template Parsing │
├─────────────────────────────────────────────┤
│ ✓ Parse the syntax │
│ ✓ Check template structure │
│ ✓ Store the template body │
│ ✓ Resolve non-dependent names │
│ ✗ Does NOT generate actual code │
│ ✗ Does NOT substitute template parameters │
└─────────────────────────────────────────────┘
In our example (vector.cpp):
template <typename T>
T& vector<T>::at(int i) {
// some code
}
During Phase 1:
- The compiler parses this template
- Checks that the syntax is valid
- Stores the template definition internally
- No actual code is generated yet
- The compiler doesn’t know what
Twill be
Phase 2: Template Instantiation (Usage Point)
Phase 2 happens when you use the template with a specific type:
┌─────────────────────────────────────────────┐
│ Phase 2: Template Instantiation │
├─────────────────────────────────────────────┤
│ ✓ Triggered when template is USED │
│ ✓ Substitute template parameters (T = int) │
│ ✓ Resolve all type-dependent operations │
│ ✓ Check if operations are valid for type │
│ ✓ Generate actual machine code │
└─────────────────────────────────────────────┘
In our example (main.cpp):
vector<int> a;
a.at(5);
When the compiler sees a.at(5), it needs to:
- Substitute
T = int - Generate the actual code for
vector<int>::at(int) - Check if all operations are valid for
int
Critical Point: To do Phase 2, the compiler must see the complete template definition!
The Complete Flow
Template Definition (vector.cpp)
│
▼
┌───────────────────┐
│ Phase 1: │
│ Parse & Store │ ← Compiler stores template
└────────┬──────────┘ but generates NO code
│
│ (Template remains dormant)
│
▼
Template Usage (main.cpp)
vector<int> a;
a.at(5);
│
▼
┌───────────────────┐
│ Phase 2: │
│ Instantiate │ ← Needs template definition!
│ - Substitute T │ But it's in vector.cpp
│ - Generate code │ which is NOT visible here
└────────┬──────────┘
│
▼
❌ ERROR!
Why the Linker Error Occurs
Let’s trace exactly what happens during compilation:
Step 1: Compile vector.cpp
g++ -c vector.cpp -o vector.o
┌─────────────────────────────────────────────┐
│ Compiling vector.cpp │
├─────────────────────────────────────────────┤
│ • Compiler sees template definition │
│ • Phase 1: Parses and stores template │
│ • Phase 2: NOT TRIGGERED │
│ (template is never used in this file) │
│ • Result: vector.o contains NO code │
│ for vector<int>::at(int) │
└─────────────────────────────────────────────┘
Key point: Even though vector.cpp has the template definition, no vector<int>::at(int) code is generated because the template is never instantiated in this file.
Step 2: Compile main.cpp
g++ -c main.cpp -o main.o
┌─────────────────────────────────────────────┐
│ Compiling main.cpp │
├─────────────────────────────────────────────┤
│ • #include "vector.h" → only declaration │
│ • Compiler sees: a.at(5) │
│ • Needs to instantiate vector<int>::at(int) │
│ • Phase 2 TRIGGERED │
│ • Problem: Can only see declaration │
│ NOT the definition! │
│ • Cannot generate code without definition │
│ • Assumes definition exists elsewhere │
│ • Creates undefined reference │
└─────────────────────────────────────────────┘
Key point: main.cpp only sees the declaration from vector.h:
template<typename T>
class vector {
public:
T& at(int); // ← Only this is visible
};
It cannot see the definition in vector.cpp:
template <typename T>
T& vector<T>::at(int i) { // ← This is INVISIBLE
// some code
}
Step 3: Linking
g++ vector.o main.o -o program
┌─────────────────────────────────────────────┐
│ Linking │
├─────────────────────────────────────────────┤
│ • Linker examines main.o │
│ • Finds: needs vector<int>::at(int) │
│ • Searches vector.o for this symbol │
│ • vector.o has NO such symbol │
│ (wasn't instantiated there) │
│ • ❌ LINKER ERROR │
│ "undefined reference to │
│ vector<int>::at(int)" │
└─────────────────────────────────────────────┘
Visualization of the Problem
vector.cpp main.cpp
│ │
▼ ▼
┌─────────┐ ┌─────────┐
│Phase 1: │ │Includes │
│Parse │ │vector.h │
│template │ │(decl │
│ │ │ only) │
│No code │ │ │
│generated│ │Uses: │
│ │ │a.at(5) │
└────┬────┘ │ │
│ │Phase 2: │
│ │needs │
│ │def! ❌ │
│ └────┬────┘
▼ ▼
┌─────────┐ ┌─────────┐
│vector.o │ │main.o │
│ │ │ │
│No │ │Undefined│
│vector │ │reference│
│<int>:: │ │to │
│at(int) │ │vector │
│ │ │<int>:: │
│ │ │at(int) │
└────┬────┘ └────┬────┘
│ │
└──────────┬───────────┘
▼
┌─────────┐
│ Linker │
│ ❌ │
│ Error! │
└─────────┘
Why Separate Compilation is the Issue
Each .cpp file is a separate translation unit:
Project Structure:
├── vector.cpp → Compiled independently → vector.o
├── main.cpp → Compiled independently → main.o
└── vector.h → Included in both files
vector.cppandmain.cppdon’t see each other during compilation- They are compiled completely separately
- The compiler cannot “look ahead” to see what’s in other files
- When compiling
main.cpp, the compiler has no idea thatvector.cppexists
The Solution
The solution is simple: Put the template definition in the header file.
Understanding the Key Insight
Templates don’t emit code until instantiated, so include the .cpp in the .h instead of the other way around!
This is the opposite of what you do with regular C++ code:
- Regular code: Declare in
.h, define in.cpp, include the.h - Template code: Declare in
.h, define in.cpp, include the.cppat the end of the.h
Or better yet: Just put everything in the .h file!
Corrected Code
// vector.h
template<typename T>
class vector {
public:
T& at(int i) {
// some code - DEFINITION IN HEADER
}
};
Or if you prefer to separate declaration and definition:
// vector.h
template<typename T>
class vector {
public:
T& at(int);
};
// Definition still in the header
template<typename T>
T& vector<T>::at(int i) {
// some code
}
// main.cpp
#include "vector.h"
int main() {
vector<int> a;
a.at(5); // ✓ Works!
}
Why This Works
┌─────────────────────────────────────────────┐
│ Compiling main.cpp │
├─────────────────────────────────────────────┤
│ • #include "vector.h" │
│ → Full definition is included │
│ • Compiler sees: a.at(5) │
│ • Phase 2: Instantiate vector<int>::at(int) │
│ • Template definition IS VISIBLE │
│ • Compiler substitutes T = int │
│ • Generates actual code │
│ • Code is placed in main.o │
│ • ✓ SUCCESS - No linker error │
└─────────────────────────────────────────────┘
Now delete vector.cpp entirely - you don’t need it!
g++ main.cpp -o program # ✓ Works!
Key Principle
Template definitions must be visible at the point of instantiation.
Since instantiation happens wherever the template is used (not where it’s defined), the definition must be in a header file that can be included everywhere.
Alternative Solutions
While putting definitions in headers is the standard approach, there are alternatives:
Solution 1: Explicit Template Instantiation
If you know exactly which types will be used, you can explicitly instantiate them in the .cpp file:
// vector.h
template<typename T>
class vector {
public:
T& at(int);
};
// vector.cpp
#include "vector.h"
template <typename T>
T& vector<T>::at(int i) {
// some code
}
// Explicit instantiation for specific types
template class vector<int>; // Generate vector<int>
template class vector<double>; // Generate vector<double>
template class vector<std::string>; // Generate vector<string>
// main.cpp
#include "vector.h"
int main() {
vector<int> a;
a.at(5); // ✓ Works! vector<int> was explicitly instantiated
}
Compilation:
g++ vector.cpp main.cpp # ✓ Works!
Pros:
- Definitions can stay in
.cppfiles - Faster compilation for large projects
- Reduces code bloat
Cons:
- Must know all types in advance
- Users cannot use the template with new types
- Less flexible - not truly generic
Solution 2: Include Implementation at End of Header
// vector.h
template<typename T>
class vector {
public:
T& at(int);
};
#include "vector.tpp" // or "vector_impl.h"
// vector.tpp (or vector_impl.h)
template <typename T>
T& vector<T>::at(int i) {
// some code
}
Pros:
- Separates interface from implementation (for readability)
- Still makes definition visible
Cons:
- Confusing naming conventions
- More files to manage
- Not commonly used in practice
Common Errors and How to Fix Them
Error 1: Undefined Reference (Most Common)
undefined reference to `vector<int>::at(int)'
Cause: Template definition in .cpp file, not visible at instantiation point
Fix: Move template definition to header file
Error 2: Multiple Definition Error
multiple definition of `vector<int>::at(int)'
Cause: Template accidentally instantiated explicitly in multiple .cpp files
Fix:
- Remove explicit instantiations
- Keep definition in header (implicit instantiation handles duplicates automatically)
- If using explicit instantiation, only instantiate in ONE
.cppfile
Error 3: Incomplete Type
template<typename T>
class Container {
void process(); // Declaration only
};
// main.cpp
Container<int> c;
c.process(); // Error: incomplete type
Error:
error: invalid use of incomplete type 'class Container<int>'
Fix: Include the full definition in the header
Error 4: Circular Dependencies
// a.h
#include "b.h"
template<typename T>
class A {
B<T> b;
};
// b.h
#include "a.h"
template<typename T>
class B {
A<T> a;
};
Error: Circular inclusion
Fix: Use forward declarations and pointers/references:
// a.h
template<typename T> class B; // Forward declaration
template<typename T>
class A {
B<T>* b; // Pointer instead of value
};
Best Practices
DO
-
Put template definitions in header files
// vector.h template<typename T> T& vector<T>::at(int i) { // definition here } -
Use include guards or
#pragma once#ifndef VECTOR_H #define VECTOR_H // template code #endif -
Use meaningful file extensions
.hor.hppfor headers.tppor_impl.hfor template implementations (if separating)
-
Consider explicit instantiation for large templates with known types
-
Document which types are supported (if using explicit instantiation)
DON’T
-
Don’t put template definitions in
.cppfiles (unless using explicit instantiation) -
Don’t forget that templates need complete visibility
-
Don’t mix implicit and explicit instantiation carelessly
-
Don’t assume the linker will “figure it out”
Quick Decision Guide
Are you writing a generic template library?
└─ Yes → Put definitions in headers
Do you know ALL types that will be used?
├─ Yes → Consider explicit instantiation
└─ No → Put definitions in headers
Is compilation time a major concern?
└─ Yes → Use explicit instantiation for known types
Put definitions in headers for flexibility
Summary: The Golden Rule
Template code must be visible where it’s instantiated, not where it’s defined.
Since instantiation happens at the point of use, and .cpp files are compiled separately, template definitions must be in headers that can be included wherever needed.
C++ Class Template Specialization
Table of Contents
- What is Class Template Specialization?
- Full Template Specialization
- Partial Template Specialization
- Understanding ODR (One Definition Rule)
- Inline Requirements Summary
- Specializing a Single Member Function
- Practical Examples
- Common Mistakes to Avoid
- Key Takeaways
What is Class Template Specialization?
Class template specialization allows you to provide a custom implementation of a template class for specific template arguments. This is useful when the generic implementation doesn’t work well for certain types or when you need optimized behavior for specific types.
There are two types of specialization:
- Full (Explicit) Specialization: Specialize for all template parameters
- Partial Specialization: Specialize for some template parameters or patterns
Full Template Specialization
What is Full Template Specialization?
Full template specialization provides a complete alternative implementation when all template parameters are specified with concrete types.
Syntax and Example
// Primary template
template <typename T>
class Storage {
public:
void store(T value) {
data = value;
std::cout << "Storing generic type\n";
}
private:
T data;
};
// Full specialization for bool
template <> // Empty angle brackets - all parameters specified
class Storage<bool> {
public:
void store(bool value) {
data = value;
std::cout << "Storing bool efficiently\n";
}
private:
unsigned char data; // More efficient storage for bool
};
Key Characteristics
- Uses
template <>syntax (empty template parameter list) - Specifies concrete types for all template parameters:
Storage<bool> - Creates a completely separate class - it’s not a template anymore
- Can have a completely different implementation from the primary template
Important Note: Because full specialization creates a regular (non-template) class, it behaves like any other regular class definition. This has implications for the One Definition Rule, which we’ll explore next.
Partial Template Specialization
What is Partial Template Specialization?
Partial specialization allows you to specialize a template for a pattern or subset of possible template arguments while keeping some template parameters generic.
Syntax and Examples
// Primary template with two parameters
template <typename T, typename U>
class Pair {
public:
void display() {
std::cout << "Generic pair\n";
}
private:
T first;
U second;
};
// Partial specialization: both types are the same
template <typename T> // Still has template parameter
class Pair<T, T> { // Pattern: same type for both parameters
public:
void display() {
std::cout << "Same-type pair\n";
}
private:
T first;
T second;
};
// Partial specialization: second type is int
template <typename T> // Still has template parameter
class Pair<T, int> { // Pattern: any type with int
public:
void display() {
std::cout << "Pair with int as second\n";
}
private:
T first;
int second;
};
// Partial specialization: pointer types
template <typename T, typename U> // Still has template parameters
class Pair<T*, U*> { // Pattern: both are pointers
public:
void display() {
std::cout << "Pointer pair\n";
}
private:
T* first;
U* second;
};
Common Partial Specialization Patterns
// Original template
template <typename T, typename U, int N>
class Container { };
// Specialize for pointer types
template <typename T, typename U, int N>
class Container<T*, U, N> { };
// Specialize when both types are the same
template <typename T, int N>
class Container<T, T, N> { };
// Specialize for arrays
template <typename T, typename U, int N>
class Container<T[], U, N> { };
// Specialize for const types
template <typename T, typename U, int N>
class Container<const T, U, N> { };
Key Characteristics
- Uses
template <...>with remaining template parameters - Specifies a pattern using template parameters:
Pair<T, T>,Pair<T*, U*> - Still a template - not a concrete class
- Gets instantiated by the compiler like any template
Important Note: Because partial specialization is still a template, it behaves like regular templates and doesn’t have the same ODR concerns as full specialization.
Understanding ODR (One Definition Rule)
Now that we’ve seen what full and partial template specializations are, let’s understand the One Definition Rule (ODR). This rule is the foundation for why full specializations require special handling with inline while partial specializations don’t.
What is ODR?
The One Definition Rule states that:
- Variables and non-inline functions can have only one definition in the entire program across all translation units
- Classes, templates, and inline functions can be defined in multiple translation units, but all definitions must be identical
- Templates (both class and function templates) are exempt from ODR violations because they’re not instantiated until used
Why ODR Matters
When you #include a header file in multiple .cpp files, each .cpp file becomes a separate translation unit. The linker combines all translation units into the final executable.
Example of ODR Violation
// header.h
void regularFunction() { // Definition in header
std::cout << "Hello\n";
}
// file1.cpp
#include "header.h" // Translation unit 1 gets a definition
// file2.cpp
#include "header.h" // Translation unit 2 gets a definition
// Linker error: multiple definition of 'regularFunction'
What happens: The linker sees two identical definitions of regularFunction (one from file1.o and one from file2.o) and doesn’t know which one to use.
How ODR Affects Template Specialization
Templates Are Naturally ODR-Safe
Regular templates (both primary and partial specializations) don’t violate ODR because:
- Templates are not compiled until instantiated
- The compiler generates code only when the template is used
- Multiple identical template definitions are expected and merged by the linker
// header.h - This is fine!
template <typename T>
class MyClass {
public:
void method() { } // OK - template definition
};
template <typename T>
void MyClass<T>::method() { } // OK - template definition
// file1.cpp
#include "header.h"
MyClass<int> obj1; // Instantiates template
// file2.cpp
#include "header.h"
MyClass<int> obj2; // Same instantiation - compiler merges them
No ODR violation because these are template definitions, not actual function/class definitions.
Full Specialization Creates Regular Definitions (ODR Risk!)
Here’s the critical point: Full template specialization creates a regular (non-template) class or function, which means it follows ODR rules for regular code.
ODR Violation Example with Full Specialization
// header.h
template <typename T>
class Storage {
public:
void store(T value);
};
// Full specialization - this is now a REGULAR class, not a template!
template <>
class Storage<bool> {
public:
void store(bool value);
};
// Definition outside class - THIS VIOLATES ODR if in header!
template <>
void Storage<bool>::store(bool value) {
// This is a regular function definition now
std::cout << "Storing bool\n";
}
// file1.cpp
#include "header.h" // Gets definition of Storage<bool>::store
// file2.cpp
#include "header.h" // Gets ANOTHER definition of Storage<bool>::store
// Linker error: multiple definition of 'Storage<bool>::store(bool)'
Why ODR is violated:
Storage<bool>::storeis a regular member function, not a template- Both
file1.cppandfile2.cppinclude the header, creating two definitions - The linker sees two definitions and reports an error
The inline Solution
The inline keyword tells the linker: “Multiple identical definitions are allowed; just pick one.”
// header.h
template <>
class Storage<bool> {
public:
void store(bool value);
};
// Using 'inline' makes multiple definitions legal
inline void Storage<bool>::store(bool value) {
std::cout << "Storing bool\n";
}
// file1.cpp
#include "header.h" // Definition 1
// file2.cpp
#include "header.h" // Definition 2 - OK with inline!
With inline: The linker recognizes these as intentionally duplicated definitions and merges them.
Visual Summary: ODR and Templates
Primary Template: ┌─────────────────┐
template <typename T> │ Template │
class MyClass { }; │ (ODR-exempt) │
└─────────────────┘
↓
Multiple includes OK
Compiler handles it
Partial Specialization: ┌─────────────────┐
template <typename T> │ Template │
class MyClass<T*> { }; │ (ODR-exempt) │
└─────────────────┘
↓
Multiple includes OK
Compiler handles it
Full Specialization: ┌─────────────────┐
template <> │ Regular Class │
class MyClass<int> { }; │ (ODR applies!) │
└─────────────────┘
↓
┌──────────┴──────────┐
↓ ↓
Inside class body Outside class body
(implicitly inline) (needs 'inline'!)
↓ ↓
Multiple includes OK Would violate ODR
without 'inline'
Three Ways to Avoid ODR Violations
Option 1: Define Inside Class Body (Implicit Inline)
// header.h
template <>
class Storage<bool> {
public:
void store(bool value) { // Implicitly inline
std::cout << "Storing bool\n";
}
};
No ODR violation: Functions defined inside class bodies are implicitly inline.
Option 2: Use Explicit inline Keyword
// header.h
template <>
class Storage<bool> {
public:
void store(bool value);
};
inline void Storage<bool>::store(bool value) {
std::cout << "Storing bool\n";
}
No ODR violation: Explicit inline keyword allows multiple definitions.
Option 3: Move to CPP File (Single Definition)
// header.h
template <>
class Storage<bool> {
public:
void store(bool value); // Declaration only
};
// storage.cpp
void Storage<bool>::store(bool value) {
std::cout << "Storing bool\n";
}
No ODR violation: Only one translation unit has the definition.
Inline Requirements Summary
Now that we understand ODR and how it applies to template specializations, here’s a quick reference for when inline is required:
Full Template Specialization
| Location | Definition | Inline Required? | Reason |
|---|---|---|---|
| Header | Inside class body | No (implicitly inline) | Functions defined in class body are always implicitly inline |
| Header | Outside class body | YES (must use inline) | Regular class definition - would violate ODR without inline |
| CPP file | Outside class body | No | Only one translation unit has the definition |
Partial Template Specialization
| Location | Definition | Inline Required? | Reason |
|---|---|---|---|
| Header | Inside class body | No (implicitly inline) | Functions defined in class body are always implicitly inline |
| Header | Outside class body | No | Still a template - ODR doesn’t apply to templates |
| CPP file | Outside class body | Not recommended | Templates need to be visible at instantiation point - causes linker errors |
Primary Template (for comparison)
| Location | Definition | Inline Required? | Reason |
|---|---|---|---|
| Header | Inside class body | No (implicitly inline) | Functions defined in class body are always implicitly inline |
| Header | Outside class body | No | Template definition - ODR doesn’t apply to templates |
| CPP file | Outside class body | Not recommended | Templates need to be visible at instantiation point - causes linker errors |
Specializing a Single Member Function
You can specialize individual member functions without specializing the entire class. However, you must fully specialize the class first, then specialize the member.
Example: Specializing a Member Function
// Primary template
template <typename T>
class Calculator {
public:
T add(T a, T b);
T multiply(T a, T b);
};
// Generic implementation
template <typename T>
T Calculator<T>::add(T a, T b) {
return a + b;
}
template <typename T>
T Calculator<T>::multiply(T a, T b) {
return a * b;
}
// Specialize only the add() function for std::string
template <>
std::string Calculator<std::string>::add(std::string a, std::string b) {
return a + " " + b; // Add space between strings
}
// multiply() still uses the generic implementation
Important: You cannot partially specialize individual member functions. You can only fully specialize them for a specific type.
Practical Examples
Example 1: Full Specialization in Header (Methods Outside)
// vector_wrapper.h
#include <vector>
#include <iostream>
template <typename T>
class VectorWrapper {
public:
void add(T value);
void print() const;
private:
std::vector<T> data;
};
// Primary template definitions
template <typename T>
void VectorWrapper<T>::add(T value) {
data.push_back(value);
}
template <typename T>
void VectorWrapper<T>::print() const {
for (const auto& item : data) {
std::cout << item << " ";
}
std::cout << "\n";
}
// Full specialization for bool
template <>
class VectorWrapper<bool> {
public:
void add(bool value);
void print() const;
private:
std::vector<bool> data;
};
// MUST use inline when defined outside in header
inline void VectorWrapper<bool>::add(bool value) {
data.push_back(value);
std::cout << "Added bool\n";
}
inline void VectorWrapper<bool>::print() const {
for (bool b : data) {
std::cout << (b ? "true" : "false") << " ";
}
std::cout << "\n";
}
Example 2: Partial Specialization for Pointers
// smart_container.h
template <typename T>
class SmartContainer {
public:
void process(T value);
};
// Primary template
template <typename T>
void SmartContainer<T>::process(T value) {
std::cout << "Processing value: " << value << "\n";
}
// Partial specialization for pointer types
template <typename T>
class SmartContainer<T*> {
public:
void process(T* ptr);
};
// No inline needed - still a template
template <typename T>
void SmartContainer<T*>::process(T* ptr) {
if (ptr) {
std::cout << "Processing pointer to: " << *ptr << "\n";
} else {
std::cout << "Null pointer\n";
}
}
Example 3: Mixed Definitions (Inside and Outside)
// config.h
template <typename T>
class Config {
public:
// Defined inside - implicitly inline
void setDefault(T value) {
defaultValue = value;
}
T getDefault() const;
private:
T defaultValue;
};
// Defined outside - no inline needed (template)
template <typename T>
T Config<T>::getDefault() const {
return defaultValue;
}
// Full specialization for const char*
template <>
class Config<const char*> {
public:
// Defined inside - implicitly inline
void setDefault(const char* value) {
defaultValue = value ? value : "";
}
const char* getDefault() const;
private:
std::string defaultValue;
};
// MUST use inline (full specialization in header)
inline const char* Config<const char*>::getDefault() const {
return defaultValue.c_str();
}
Common Mistakes to Avoid
// WRONG: Partial specialization in CPP file
// partial_spec.cpp
template <typename T>
void MyClass<T*>::method() { } // Linker error!
// WRONG: Full specialization without inline in header
// full_spec.h
template <>
void MyClass<int>::method() { } // Multiple definition error!
// CORRECT: Full specialization with inline in header
// full_spec.h
template <>
class MyClass<int> {
void method();
};
inline void MyClass<int>::method() { } // OK
// CORRECT: Partial specialization in header
// partial_spec.h
template <typename T>
void MyClass<T*>::method() { } // OK - still a template
Key Takeaways
- Full specialization = regular class, follows regular inline rules
- Partial specialization = still a template, follows template rules
- Inside class body = always implicitly inline
- Outside in header:
- Full specialization → needs
inline - Partial specialization → no
inlineneeded
- Full specialization → needs
- CPP files: Only full specializations should go there (without
inline) - Member function specialization: Only full specialization possible, must specialize entire class type first
- ODR is the reason: Full specializations create regular code that must follow ODR, while templates are ODR-exempt
C++ Function Template Specialization
Table of Contents
- What is Function Template Specialization?
- Full Function Template Specialization
- Partial Function Template Specialization
- Understanding ODR (One Definition Rule)
- Inline Requirements Summary
- Function Template Overloading vs Specialization
- Practical Examples
- Common Mistakes to Avoid
- Key Takeaways
What is Function Template Specialization?
Function template specialization allows you to provide a custom implementation of a template function for specific template arguments. This is useful when the generic algorithm doesn’t work well for certain types or when you need optimized behavior for specific types.
Important distinction from class templates:
- Full specialization: Supported for function templates
- Partial specialization: NOT supported for function templates (use overloading instead)
Full Function Template Specialization
What is Full Function Template Specialization?
Full function template specialization provides a complete alternative implementation when all template parameters are specified with concrete types.
Syntax and Examples
// Primary template
template <typename T>
void print(T value) {
std::cout << "Generic: " << value << "\n";
}
// Full specialization for const char*
template <>
void print<const char*>(const char* value) {
std::cout << "String: " << value << "\n";
}
// Full specialization for bool
template <>
void print<bool>(bool value) {
std::cout << "Boolean: " << (value ? "true" : "false") << "\n";
}
// Usage
int main() {
print(42); // Uses primary template
print("hello"); // Uses const char* specialization
print(true); // Uses bool specialization
}
Template Argument Deduction
You can often omit the template arguments in the specialization if they can be deduced:
// Primary template
template <typename T>
T max(T a, T b) {
return (a > b) ? a : b;
}
// Full specialization - explicit template argument
template <>
const char* max<const char*>(const char* a, const char* b) {
return (strcmp(a, b) > 0) ? a : b;
}
// Alternative: Let compiler deduce (cleaner syntax)
template <>
const char* max(const char* a, const char* b) {
return (strcmp(a, b) > 0) ? a : b;
}
Key Characteristics
- Uses
template <>syntax (empty template parameter list) - Specifies concrete types for all template parameters
- Creates a regular function, not a template
- Must match the primary template’s signature exactly (except for type substitution)
Important Note: Because full specialization creates a regular function, it behaves like any other regular function definition and is subject to ODR rules.
Partial Function Template Specialization
Why Partial Specialization is NOT Supported
Unlike class templates, function templates do NOT support partial specialization. This is a language limitation.
// Primary template
template <typename T, typename U>
void process(T a, U b) {
std::cout << "Generic\n";
}
// ❌ ERROR: Partial specialization not allowed for function templates
template <typename T>
void process<T, int>(T a, int b) {
std::cout << "Specialized for int\n";
}
The Solution: Function Overloading
Instead of partial specialization, use function overloading to achieve similar results:
// Primary template
template <typename T, typename U>
void process(T a, U b) {
std::cout << "Generic: T and U\n";
}
// Overload for when second parameter is int
template <typename T>
void process(T a, int b) {
std::cout << "Overload: T and int\n";
}
// Overload for pointer types
template <typename T, typename U>
void process(T* a, U* b) {
std::cout << "Overload: pointers\n";
}
// Usage
int main() {
process(1.5, 2.5); // Generic: T and U
process(1.5, 2); // Overload: T and int
int x = 1, y = 2;
process(&x, &y); // Overload: pointers
}
Overloading Patterns
Common patterns that would be partial specialization in classes:
// Pattern 1: Same type for multiple parameters
template <typename T>
void compare(T a, T b) {
std::cout << "Same type comparison\n";
}
// Pattern 2: Pointer types
template <typename T>
void process(T* ptr) {
std::cout << "Pointer processing\n";
}
// Pattern 3: Const types
template <typename T>
void handle(const T& value) {
std::cout << "Const reference handling\n";
}
// Pattern 4: Array types
template <typename T, size_t N>
void processArray(T (&arr)[N]) {
std::cout << "Array of size " << N << "\n";
}
Understanding ODR (One Definition Rule)
Now that we’ve seen what function template specializations are, let’s understand the One Definition Rule (ODR). This rule is the foundation for why full specializations require inline when defined in headers.
What is ODR?
The One Definition Rule states that:
- Variables and non-inline functions can have only one definition in the entire program across all translation units
- Templates and inline functions can be defined in multiple translation units, but all definitions must be identical
- Function templates are exempt from ODR violations because they’re not instantiated until used
Why ODR Matters for Function Templates
When you #include a header file in multiple .cpp files, each .cpp file becomes a separate translation unit. The linker combines all translation units into the final executable.
Example of ODR Violation
// utils.h
void regularFunction(int x) { // Regular function definition in header
std::cout << x << "\n";
}
// file1.cpp
#include "utils.h" // Translation unit 1 gets a definition
// file2.cpp
#include "utils.h" // Translation unit 2 gets a definition
// Linker error: multiple definition of 'regularFunction(int)'
How ODR Affects Function Template Specialization
Primary Function Templates Are ODR-Safe
Regular function templates don’t violate ODR because:
- Templates are not compiled until instantiated
- The compiler generates code only when the template is used
- Multiple identical template definitions are expected and merged by the linker
// utils.h - This is fine!
template <typename T>
void print(T value) {
std::cout << value << "\n";
}
// file1.cpp
#include "utils.h"
print(42); // Instantiates print<int>
// file2.cpp
#include "utils.h"
print(100); // Same instantiation - compiler merges them
No ODR violation because this is a template definition, not an actual function definition.
Full Specialization Creates Regular Functions (ODR Risk!)
Here’s the critical point: Full function template specialization creates a regular function, which means it follows ODR rules for regular code.
ODR Violation Example with Full Specialization
// utils.h
template <typename T>
void print(T value) {
std::cout << value << "\n";
}
// Full specialization - THIS VIOLATES ODR if in header!
template <>
void print<bool>(bool value) {
// This is a regular function definition now
std::cout << (value ? "true" : "false") << "\n";
}
// file1.cpp
#include "utils.h" // Gets definition of print<bool>
// file2.cpp
#include "utils.h" // Gets ANOTHER definition of print<bool>
// Linker error: multiple definition of 'print<bool>(bool)'
Why ODR is violated:
print<bool>is a regular function, not a template- Both
file1.cppandfile2.cppinclude the header, creating two definitions - The linker sees two definitions and reports an error
The inline Solution
The inline keyword tells the linker: “Multiple identical definitions are allowed; just pick one.”
// utils.h
template <typename T>
void print(T value) {
std::cout << value << "\n";
}
// Using 'inline' makes multiple definitions legal
template <>
inline void print<bool>(bool value) {
std::cout << (value ? "true" : "false") << "\n";
}
// file1.cpp
#include "utils.h" // Definition 1
// file2.cpp
#include "utils.h" // Definition 2 - OK with inline!
With inline: The linker recognizes these as intentionally duplicated definitions and merges them.
Visual Summary: ODR and Function Templates
Primary Template: ┌─────────────────┐
template <typename T> │ Template │
void func(T) { } │ (ODR-exempt) │
└─────────────────┘
↓
Multiple includes OK
Compiler handles it
Function Overload: ┌─────────────────┐
template <typename T> │ Template │
void func(T*) { } │ (ODR-exempt) │
└─────────────────┘
↓
Multiple includes OK
Compiler handles it
Full Specialization: ┌─────────────────┐
template <> │ Regular Function│
void func<int>(int) { } │ (ODR applies!) │
└─────────────────┘
↓
┌──────────┴──────────┐
↓ ↓
In header file In CPP file
(needs 'inline'!) (no 'inline' needed)
↓ ↓
Would violate ODR Only one definition
without 'inline'
Three Ways to Avoid ODR Violations
Option 1: Use inline Keyword in Header
// utils.h
template <typename T>
void print(T value) {
std::cout << value << "\n";
}
template <>
inline void print<bool>(bool value) { // inline required
std::cout << (value ? "true" : "false") << "\n";
}
No ODR violation: Explicit inline keyword allows multiple definitions.
Option 2: Move to CPP File (Single Definition)
// utils.h
template <typename T>
void print(T value) {
std::cout << value << "\n";
}
// Declaration only
template <>
void print<bool>(bool value);
// utils.cpp
template <>
void print<bool>(bool value) { // No inline needed
std::cout << (value ? "true" : "false") << "\n";
}
No ODR violation: Only one translation unit has the definition.
Option 3: Use Function Overloading Instead
// utils.h - No specialization, just overloading
template <typename T>
void print(T value) {
std::cout << value << "\n";
}
// Regular overload - still a template
inline void print(bool value) {
std::cout << (value ? "true" : "false") << "\n";
}
Note: This is not a specialization but an overload, which may have different resolution rules.
Inline Requirements Summary
Now that we understand ODR and how it applies to function template specializations, here’s a quick reference for when inline is required:
Full Function Template Specialization
| Location | Inline Required? | Reason |
|---|---|---|
| Header | YES (must use inline) | Regular function definition - would violate ODR without inline |
| CPP file | No | Only one translation unit has the definition |
Primary Function Template
| Location | Inline Required? | Reason |
|---|---|---|
| Header | No | Template definition - ODR doesn’t apply to templates |
| CPP file | Not recommended | Templates need to be visible at instantiation point - causes linker errors |
Function Overloads (Alternative to Partial Specialization)
| Location | Inline Required? | Reason |
|---|---|---|
| Header (template overload) | No | Still a template - ODR doesn’t apply to templates |
| Header (non-template overload) | YES | Regular function - would violate ODR without inline |
| CPP file | Depends | Template overloads not recommended; non-template OK |
Key Difference from Class Templates: Function template specializations are always defined in one place (not split between declaration and definition), so the inline requirement is simpler.
Function Template Overloading vs Specialization
Understanding when to use overloading versus specialization is crucial for function templates.
Overload Resolution Order
The compiler selects functions in this order:
- Non-template functions (exact match)
- Template overloads (more specialized)
- Primary template (most generic)
- Template specializations are considered after selecting the best template
Example: Surprising Behavior
// Primary template
template <typename T>
void process(T value) {
std::cout << "Primary template\n";
}
// Overload for pointers
template <typename T>
void process(T* value) {
std::cout << "Pointer overload\n";
}
// Full specialization of primary template
template <>
void process<int*>(int* value) {
std::cout << "int* specialization\n";
}
int main() {
int x = 42;
int* ptr = &x;
process(ptr); // What gets called?
// Answer: "Pointer overload" - NOT the specialization!
// The overload is more specialized than the primary template,
// so the specialization of the primary template is never considered
}
Best Practice: Prefer Overloading
// ✅ BETTER: Use overloading instead of specialization
template <typename T>
void process(T value) {
std::cout << "Generic\n";
}
template <typename T>
void process(T* value) {
std::cout << "Pointer\n";
}
// For specific types, use non-template overload
inline void process(int* value) {
std::cout << "int pointer\n";
}
When to Use Specialization
Use full specialization when:
- You need to completely replace the implementation for a specific type
- The specialization is for the exact template signature being used
- You understand overload resolution and have verified it behaves as expected
Use overloading when:
- You want to handle patterns (pointers, arrays, const, etc.)
- You want more predictable behavior
- You need “partial specialization” behavior (not supported for functions)
Practical Examples
Example 1: String Handling Specialization
// utils.h
#include <iostream>
#include <cstring>
// Primary template
template <typename T>
bool isEqual(T a, T b) {
return a == b;
}
// Full specialization for C-strings (must use inline in header)
template <>
inline bool isEqual<const char*>(const char* a, const char* b) {
return strcmp(a, b) == 0;
}
// Usage
int main() {
std::cout << isEqual(5, 5) << "\n"; // Uses primary template
std::cout << isEqual("hello", "hello") << "\n"; // Uses specialization
}
Example 2: Performance Optimization
// algorithm.h
#include <algorithm>
#include <cstring>
// Primary template - element by element
template <typename T>
void copyArray(T* dest, const T* src, size_t count) {
for (size_t i = 0; i < count; ++i) {
dest[i] = src[i];
}
}
// Specialization for trivially copyable types - use memcpy
template <>
inline void copyArray<int>(int* dest, const int* src, size_t count) {
std::memcpy(dest, src, count * sizeof(int));
}
template <>
inline void copyArray<double>(double* dest, const double* src, size_t count) {
std::memcpy(dest, src, count * sizeof(double));
}
Example 3: Using Overloading Instead of Specialization
// printer.h
#include <iostream>
#include <vector>
// Primary template
template <typename T>
void print(const T& value) {
std::cout << value << "\n";
}
// Overload for vectors (still a template - no inline needed)
template <typename T>
void print(const std::vector<T>& vec) {
std::cout << "[";
for (size_t i = 0; i < vec.size(); ++i) {
std::cout << vec[i];
if (i < vec.size() - 1) std::cout << ", ";
}
std::cout << "]\n";
}
// Overload for bool (non-template - needs inline)
inline void print(bool value) {
std::cout << (value ? "true" : "false") << "\n";
}
Example 4: Multiple Template Parameters
// comparator.h
#include <iostream>
// Primary template
template <typename T, typename U>
bool areEqual(T a, U b) {
return false; // Different types - not equal
}
// Specialization when both types are the same
template <typename T>
inline bool areEqual(T a, T b) {
return a == b;
}
// Specialization for comparing int and double
template <>
inline bool areEqual<int, double>(int a, double b) {
return static_cast<double>(a) == b;
}
Example 5: Separating Declaration and Definition
// math_utils.h
template <typename T>
T square(T value);
// Specialization declaration
template <>
int square<int>(int value);
// math_utils.cpp
#include "math_utils.h"
template <typename T>
T square(T value) {
return value * value;
}
// Specialization definition (no inline needed in .cpp)
template <>
int square<int>(int value) {
std::cout << "Squaring int: " << value << "\n";
return value * value;
}
// Explicit instantiation for types you want to support
template double square<double>(double);
template float square<float>(float);
Common Mistakes to Avoid
Mistake 1: Forgetting inline in Header
// ❌ WRONG: Full specialization in header without inline
// utils.h
template <typename T>
void func(T value) { }
template <>
void func<int>(int value) { } // ODR violation!
// ✅ CORRECT: Use inline
template <>
inline void func<int>(int value) { }
Mistake 2: Attempting Partial Specialization
// ❌ WRONG: Partial specialization not allowed
template <typename T, typename U>
void process(T a, U b) { }
template <typename T>
void process<T, int>(T a, int b) { } // Compilation error!
// ✅ CORRECT: Use overloading
template <typename T>
void process(T a, int b) { }
Mistake 3: Specialization After Overload
// ❌ PROBLEMATIC: Specialization may not be called
template <typename T>
void func(T value) { std::cout << "Primary\n"; }
template <typename T>
void func(T* value) { std::cout << "Pointer overload\n"; }
template <>
void func<int*>(int* value) { std::cout << "int* spec\n"; }
int x = 0;
func(&x); // Calls "Pointer overload", not "int* spec"!
// ✅ BETTER: Use overloading consistently
inline void func(int* value) { std::cout << "int* overload\n"; }
Mistake 4: Declaring Specialization Before Primary Template
// ❌ WRONG: Specialization declared before primary template
template <>
void func<int>(int value);
template <typename T>
void func(T value); // Primary template comes too late
// ✅ CORRECT: Primary template first
template <typename T>
void func(T value);
template <>
void func<int>(int value);
Mistake 5: Template Parameter Mismatch
// Primary template with default argument
template <typename T = int>
void func(T value) { }
// ❌ WRONG: Specialization must match exactly
template <>
void func<>(int value) { } // Ambiguous
// ✅ CORRECT: Explicit type
template <>
void func<int>(int value) { }
Key Takeaways
- Full specialization only: Function templates support full specialization but NOT partial specialization
- Use overloading: For pattern-based behavior, use function overloading instead of attempting partial specialization
- Inline in headers: Full specializations in headers MUST use
inlineto avoid ODR violations - CPP file option: Full specializations can go in
.cppfiles withoutinline - Overload resolution: Specializations are considered AFTER overload resolution, which can lead to surprising behavior
- Prefer overloading: In most cases, function overloading is clearer and more predictable than specialization
- Primary template first: Always declare the primary template before any specializations
- ODR is the reason: Full specializations create regular functions that must follow ODR
Quick Decision Guide
- Need to handle patterns (pointers, const, etc.)? → Use overloading
- Need to completely replace implementation for one specific type? → Use full specialization
- Putting specialization in header? → Must use
inline - Want partial specialization behavior? → Use overloading (or a class template helper)
The Disambiguation: Type vs. Value
Table of Contents
- Introduction: The Dependent Name Problem
- Why is Typename Needed?
- Basic Rules for Using Typename
- Common Examples and Use Cases
- C++11 and Later: Type Aliases
- Common Compilation Errors
- Practical Real-World Example
- C++11 Alternative: Using auto
- Summary and Best Practices
1. Introduction: The Dependent Name Problem
When working with templates in C++, the compiler sometimes encounters names that depend on template parameters. These are called dependent names. The problem is that the compiler cannot always determine whether a dependent name refers to a type or a value until the template is instantiated.
The typename keyword is used to explicitly tell the compiler that a dependent name refers to a type, not a value or other entity.
2. Why is Typename Needed?
The Ambiguity Problem
Consider this scenario:
template<typename T>
void func() {
T::value_type x; // Is value_type a type or a static member variable?
}
The compiler doesn’t know if T::value_type is:
- A type (like
int,std::string, etc.) - A static member variable that’s being multiplied with
x
Without additional information, the compiler assumes it’s a value/variable, not a type. This is where typename comes in.
The Solution
template<typename T>
void func() {
typename T::value_type x; // Now compiler knows it's a type!
}
By adding typename, we explicitly tell the compiler that T::value_type is a type name.
Why the Compiler Cannot Determine This Automatically
The fundamental reason the compiler cannot determine whether a dependent name is a type or value is because of template specialization. A template can be specialized to change the meaning of nested names completely.
Here’s a concrete example:
// Primary template - value_type is a TYPE
template<typename T>
class Container {
public:
typedef int value_type; // This is a type
};
// Template specialization - value_type is a VALUE!
template<>
class Container<double> {
public:
static int value_type; // This is a static variable, not a type!
};
// Initialize the static member
int Container<double>::value_type = 42;
// Now write a template function
template<typename T>
void process() {
// What is Container<T>::value_type?
// - If T is int, it's a TYPE (from primary template)
// - If T is double, it's a VALUE (from specialization)
// Without typename, compiler assumes VALUE (multiplication)
// Container<T>::value_type * x;
// With typename, we assert it's a TYPE (variable declaration)
typename Container<T>::value_type x;
}
int main() {
process<int>(); // Works - value_type is a type here
// process<double>(); // ERROR - value_type is a value, not a type!
}
Key insight: When the compiler sees the template definition of process(), it doesn’t know what T will be instantiated with. The meaning of Container<T>::value_type could change based on specializations that might be defined elsewhere in the code (or even in other translation units).
Another Example: Partial Specialization
// Primary template
template<typename T>
struct Traits {
typedef T value_type; // value_type is a type
};
// Partial specialization for pointers
template<typename T>
struct Traits<T*> {
static const int value_type = 100; // value_type is a value!
};
template<typename T>
void foo() {
// Is Traits<T>::value_type a type or value?
// Depends on whether T is a pointer or not!
// - If T is int, value_type is a TYPE
// - If T is int*, value_type is a VALUE
typename Traits<T>::value_type x; // Must use typename to assert it's a type
}
int main() {
foo<int>(); // OK - value_type is a type
// foo<int*>(); // ERROR - value_type is a value, not a type!
}
The Two-Phase Lookup Problem
The C++ compiler uses two-phase name lookup for templates:
- Phase 1 (Template Definition): When the template is first parsed, the compiler checks syntax and resolves non-dependent names
- Phase 2 (Template Instantiation): When the template is instantiated with actual types, dependent names are resolved
During Phase 1, the compiler cannot look into T to see what members it has because:
Tis not yet known- Even if a primary template exists, there might be specializations defined later
- Specializations can completely change the meaning of nested names
template<typename T>
void example() {
// Phase 1: Compiler sees this but doesn't know what T is
// Cannot determine if T::nested is a type or value
// Must make an assumption or require programmer guidance
T::nested x; // Compiler assumes this is: (T::nested) * x (multiplication)
typename T::nested y; // Programmer explicitly says: it's a type declaration
}
Why Default to Value Instead of Type?
You might wonder: why does the compiler default to interpreting dependent names as values rather than types?
The answer is historical and pragmatic:
- Backward compatibility with older C++ code
- More common case - Most identifiers in code are values/variables, not types
- Explicit is better - Forcing programmers to be explicit about types prevents ambiguity
Consider:
template<typename T>
void func() {
T::x * ptr; // Without special rules, what does this mean?
}
This could be:
- Multiplication:
(T::x) * ptr- multiply static memberT::xby variableptr - Pointer declaration:
T::x* ptr- declareptras pointer to typeT::x
The C++ standard chose to default to the multiplication interpretation (value), requiring typename to explicitly indicate the type interpretation.
3. Basic Rules for Using Typename
Rule 1: Use typename for Dependent Type Names
A dependent name is a name that depends on a template parameter.
template<typename T>
class MyClass {
typename T::nested_type member; // T::nested_type is dependent on T
};
Rule 2: typename is NOT Needed for Non-Dependent Names
class Container {
public:
typedef int value_type;
};
// Not a template - no typename needed
Container::value_type x; // OK without typename
template<typename T>
void func() {
// Not dependent on template parameter - no typename needed
Container::value_type y; // OK without typename
// Dependent on T - typename required
typename T::value_type z; // typename required
}
Rule 3: typename is NOT Needed in Base Class Lists or Initializer Lists
template<typename T>
class Derived : public T::BaseClass { // No typename here
Derived() : T::BaseClass() { // No typename here
typename T::value_type x; // But typename needed here
}
};
4. Common Examples and Use Cases
Example 1: STL Container Iterators
This is one of the most common use cases:
#include <vector>
#include <list>
// Without typename - COMPILATION ERROR
template<typename T>
void printContainer(const T& container) {
// ERROR: need 'typename' before 'T::const_iterator'
for (T::const_iterator it = container.begin();
it != container.end(); ++it) {
std::cout << *it << " ";
}
}
// Correct version with typename
template<typename T>
void printContainer(const T& container) {
// OK: typename tells compiler const_iterator is a type
for (typename T::const_iterator it = container.begin();
it != container.end(); ++it) {
std::cout << *it << " ";
}
}
// Usage
int main() {
std::vector<int> vec = {1, 2, 3, 4, 5};
std::list<double> lst = {1.1, 2.2, 3.3};
printContainer(vec);
printContainer(lst);
}
Example 2: Value Type from Containers
#include <vector>
#include <iostream>
template<typename Container>
void processFirst(const Container& c) {
// Need typename because value_type depends on Container
typename Container::value_type firstElement = c[0];
std::cout << "First element: " << firstElement << std::endl;
}
int main() {
std::vector<int> vec = {10, 20, 30};
processFirst(vec); // value_type is int
std::vector<double> dvec = {1.5, 2.5, 3.5};
processFirst(dvec); // value_type is double
}
Example 3: Nested Type Definitions
template<typename T>
class Outer {
public:
typedef T value_type;
class Inner {
public:
typedef T* pointer_type;
};
};
template<typename T>
void useNestedTypes() {
// Need typename for dependent nested types
typename Outer<T>::value_type val;
typename Outer<T>::Inner::pointer_type ptr;
// Example usage
val = T();
ptr = &val;
}
int main() {
useNestedTypes<int>();
}
Example 4: Return Type Declaration
template<typename Container>
typename Container::value_type getFirst(const Container& c) {
return c[0];
}
// Usage
int main() {
std::vector<int> vec = {100, 200, 300};
int first = getFirst(vec); // Returns int
std::vector<std::string> svec = {"hello", "world"};
std::string str = getFirst(svec); // Returns std::string
}
5. C++11 and Later: Type Aliases
With C++11’s using for type aliases, you still need typename:
template<typename T>
class MyClass {
public:
using value_type = T;
using pointer = T*;
using reference = T&;
};
template<typename T>
void func() {
typename MyClass<T>::value_type val;
typename MyClass<T>::pointer ptr;
typename MyClass<T>::reference ref = val;
}
6. Common Compilation Errors
Error 1: Missing typename
template<typename T>
void func(const T& container) {
T::iterator it = container.begin(); // ERROR
}
Error Message:
error: need 'typename' before 'T::iterator' because 'T' is a dependent scope
Fix:
template<typename T>
void func(const T& container) {
typename T::iterator it = container.begin(); // OK
}
Error 2: Unnecessary typename (Non-dependent Context)
template<typename T>
void func() {
typename std::vector<int>::iterator it; // Warning: unnecessary typename
}
Fix:
template<typename T>
void func() {
std::vector<int>::iterator it; // OK - not dependent on T
}
Error 3: typename in Wrong Places
template<typename T>
class Derived : public typename T::Base { // ERROR: no typename in base class list
};
Fix:
template<typename T>
class Derived : public T::Base { // OK
};
7. Practical Real-World Example
Here’s a complete example that shows typical usage:
#include <iostream>
#include <vector>
#include <list>
#include <algorithm>
// Generic function to find and return an element
template<typename Container>
typename Container::value_type
findElement(const Container& c, const typename Container::value_type& target) {
typename Container::const_iterator it = std::find(c.begin(), c.end(), target);
if (it != c.end()) {
return *it;
}
return typename Container::value_type(); // Return default-constructed value
}
// Generic function to process container elements
template<typename Container>
void processContainer(const Container& c) {
std::cout << "Container contents: ";
for (typename Container::const_iterator it = c.begin();
it != c.end(); ++it) {
std::cout << *it << " ";
}
std::cout << std::endl;
// Use value_type for temporary storage
typename Container::value_type sum = typename Container::value_type();
for (typename Container::const_iterator it = c.begin();
it != c.end(); ++it) {
sum += *it;
}
std::cout << "Sum: " << sum << std::endl;
}
int main() {
std::vector<int> vec = {1, 2, 3, 4, 5};
std::list<double> lst = {1.1, 2.2, 3.3, 4.4};
processContainer(vec);
processContainer(lst);
int found = findElement(vec, 3);
std::cout << "Found in vector: " << found << std::endl;
double foundDouble = findElement(lst, 2.2);
std::cout << "Found in list: " << foundDouble << std::endl;
return 0;
}
8. C++11 Alternative: Using auto
In C++11 and later, you can often use auto to avoid writing typename:
// Before C++11 - need typename
template<typename Container>
void func(const Container& c) {
typename Container::const_iterator it = c.begin();
}
// C++11 and later - auto deduces the type
template<typename Container>
void func(const Container& c) {
auto it = c.begin(); // Much simpler!
}
However, auto cannot be used everywhere (like function return types in C++11), so typename is still necessary in many cases. auto will be covered more in a separate chapter.
9. Summary and Best Practices
When to Use typename:
- When accessing a type that is nested inside a template parameter
- For dependent names (names that depend on template parameters)
- With iterators from template containers
- With
value_type,pointer,reference, and other nested typedefs
When NOT to Use typename:
- In base class lists
- In constructor initializer lists
- For non-dependent names (names that don’t depend on template parameters)
- When the name is not a type (like a static member variable)
Key Takeaway:
The typename keyword disambiguates dependent names in templates, explicitly telling the compiler that a nested name refers to a type rather than a value. Without it, the compiler defaults to interpreting dependent names as values, leading to compilation errors. While modern C++ features like auto can reduce the need for typename in some cases, understanding when and why to use it remains essential for template programming.
C++ Concepts: Constraining Templates (C++20)
Table of Contents
- The Problem: Unclear Template Requirements
- The Solution: C++20 Concepts
- More Concept Examples
- Common Standard Library Concepts (C++20)
- Concepts with Iterators
- Concepts Recap
- Quick Reference: Concept Syntax
- Summary
1. The Problem: Unclear Template Requirements
Consider this simple template function:
template <typename T>
T min(const T& a, const T& b) {
return a < b ? a : b;
}
Question: What must be true of type T for us to be able to use min?
Answer: T must have an operator< defined that returns something convertible to bool.
When Things Go Wrong
struct StudentId {
std::string name;
std::string id;
};
int main() {
StudentId thomas { "Thomas", "S001" };
StudentId rachel { "Rachel", "S002" };
min<StudentId>(thomas, rachel); // Compiler error!
}
The Confusing Error Message
$ g++ main.cpp --std=c++20
main.cpp:9:12: error: invalid operands to binary expression
('const StudentId' and 'const StudentId')
return a < b ? a : b;
~ ^ ~
main.cpp:20:3: note: in instantiation of function template
specialization 'min<StudentId>' requested here
min<StudentId>(thomas, rachel);
^
1 error generated.
What Happened?
Understanding Template Instantiation
Here’s the critical timeline:
Step 1: You write the call
min<StudentId>(thomas, rachel);
Step 2: Compiler sees the template
template <typename T>
T min(const T& a, const T& b) {
return a < b ? a : b;
}
At this point, the compiler thinks: “min for StudentIds, coming right up! The template looks fine, let me instantiate it…”
Step 3: Compiler instantiates the template (creates a concrete function)
StudentId min(const StudentId& a, const StudentId& b) {
return a < b ? a : b; // NOW it tries to compile this line
}
Step 4: Compiler discovers the problem “AHHH what do I do here! I don’t know how to compare two StudentIds with <”
The Critical Problem: Late Error Detection
The compiler CANNOT check if StudentId has operator< until it actually instantiates the template!
Why? Because templates are NOT compiled when they’re defined—they’re only compiled when they’re instantiated with specific types.
// When you write this, the compiler does NOT check if T has operator<
template <typename T>
T min(const T& a, const T& b) {
return a < b ? a : b; // No error yet!
}
// The compiler only checks when you USE it with a specific type
min<StudentId>(thomas, rachel); // NOW the error appears!
This creates several problems:
-
Errors appear far from the actual mistake
- You made the mistake at the call site:
min<StudentId>(...) - But the error points to line 9 inside the template definition:
return a < b ? a : b;
- You made the mistake at the call site:
-
Confusing error messages
- The error talks about template internals, not your code
- “in instantiation of function template specialization” - what does that even mean?
-
No way to know requirements upfront
- How do you know
minrequiresoperator<? - You have to read the implementation or documentation
- The compiler can’t help you until it’s too late
- How do you know
-
Bad templates can produce really confusing compiler errors
- Imagine a template with 50 lines of code
- The error could be buried deep in that implementation
- You see errors about code you didn’t even write!
Big Question: How do we put constraints on templates so the compiler can check them BEFORE instantiation?
2. The Solution: C++20 Concepts
What is a Concept?
A concept is a named set of constraints on template parameters introduced in C++20.
In simple terms:
- A concept defines requirements that a type must satisfy
- It allows you to specify what operations a type must support to be used with a template
- The compiler checks these requirements before instantiating the template
- If the requirements aren’t met, you get a clear error message at the call site
Think of concepts as “compile-time interfaces” or “type constraints” for templates.
How Concepts Solve the Instantiation Problem
Concepts solve the instantiation problem by checking constraints before the compiler tries to instantiate the template.
Concept Syntax
The general syntax for defining a concept is:
template <typename T>
concept ConceptName = constraint_expression;
Where constraint_expression can be:
- A
requiresexpression (most common) - A conjunction of concepts using
&& - A disjunction of concepts using
|| - A simple type trait like
std::is_integral_v<T>
Requires Expression Syntax
requires(parameter_list) {
requirement1;
requirement2;
...
}
Types of requirements:
-
Simple requirement - Expression must be valid
a + b; // a + b must compile a.size(); // a must have a size() method -
Type requirement - Type must exist
typename T::value_type; // T must have a value_type member typename T::iterator; // T must have an iterator member -
Compound requirement - Expression must be valid and return specific type
{ expression } -> concept<args>; { a < b } -> std::convertible_to<bool>; // a < b must return bool-like { a.begin() } -> std::same_as<typename T::iterator>; -
Nested requirement - Another constraint must be satisfied
requires std::is_copy_constructible_v<T>;
Breaking Down the Comparable Concept
template <typename T>
concept Comparable = requires(T a, T b) {
{ a < b } -> std::convertible_to<bool>;
};
Let’s break this down:
concept Comparable = ...
Concept: A named set of constraints
requires(T a, T b) { ... }
Requires clause: “Given two T’s, I expect the following to hold”
{ a < b } -> std::convertible_to<bool>;
Constraint 1: Anything inside the { } must compile without error (i.e., a < b must be valid)
Constraint 2: The result must be convertible to bool (note: std::convertible_to is itself a concept!)
Using the Comparable Concept
There are two syntaxes for applying concepts to templates:
Syntax 1: Using requires clause
template <typename T> requires Comparable<T>
T min(const T& a, const T& b) {
return a < b ? a : b;
}
Syntax 2: Super slick shorthand (preferred)
template <Comparable T>
T min(const T& a, const T& b) {
return a < b ? a : b;
}
This reads naturally: “T must be Comparable”
Concepts Greatly Improve Compiler Errors
Now when you try to use min with StudentId:
template <Comparable T>
T min(const T& a, const T& b) {
return a < b ? a : b;
}
StudentId thomas { "Thomas", "S001" };
StudentId rachel { "Rachel", "S002" };
min<StudentId>(thomas, rachel); // Much clearer error!
New error message:
error: no matching function for call to 'min'
note: candidate template ignored: constraints not satisfied
note: because 'StudentId' does not satisfy 'Comparable'
Much better! The error now clearly states:
- The problem is at the call site (where you used it)
StudentIddoesn’t satisfy theComparableconcept- No template instantiation attempted!
- No confusing template instantiation details
The Game Changer: Constraint Checking Before Instantiation
This is the crucial difference:
| Without Concepts | With Concepts |
|---|---|
| ❌ Try to instantiate template | ✅ Check constraints first |
| ❌ Generate function code | ✅ If constraints fail, STOP |
| ❌ Try to compile generated code | ✅ Never instantiate bad templates |
| ❌ Error deep in template code | ✅ Error at call site |
| ❌ “invalid operands to binary expression” | ✅ “does not satisfy Comparable” |
Key Benefit: Early Error Detection
Without concepts:
- Compiler tries to instantiate
min<StudentId> - Compiler generates the function body
- Compiler tries to compile
a < b - Error discovered! (too late)
With concepts:
- Compiler checks: “Does
StudentIdsatisfyComparable?” - Error discovered immediately! (before instantiation)
- Compiler never even tries to instantiate the template
- You get a clear error at the call site
Concepts allow us to:
- Check constraints BEFORE instantiation (most important!)
- Be explicit about what we require of a template type
- Prevent template instantiation unless all constraints are met
- Get much better compiler error messages
3. More Concept Examples
Example 1: Requiring Multiple Operations
template <typename T>
concept Arithmetic = requires(T a, T b) {
{ a + b } -> std::convertible_to<T>;
{ a - b } -> std::convertible_to<T>;
{ a * b } -> std::convertible_to<T>;
{ a / b } -> std::convertible_to<T>;
};
template <Arithmetic T>
T average(const T& a, const T& b) {
return (a + b) / T(2);
}
Example 2: Requiring Member Functions
template <typename T>
concept Printable = requires(T obj) {
{ obj.toString() } -> std::convertible_to<std::string>;
};
template <Printable T>
void display(const T& obj) {
std::cout << obj.toString() << std::endl;
}
Example 3: Requiring Type Members
template <typename T>
concept Container = requires(T container) {
typename T::value_type; // Must have value_type member
typename T::iterator; // Must have iterator member
{ container.begin() } -> std::same_as<typename T::iterator>;
{ container.end() } -> std::same_as<typename T::iterator>;
{ container.size() } -> std::convertible_to<std::size_t>;
};
template <Container C>
void printSize(const C& container) {
std::cout << "Size: " << container.size() << std::endl;
}
Example 4: Combining Concepts
template <typename T>
concept Sortable = Comparable<T> && std::copyable<T>;
template <Sortable T>
void sort(std::vector<T>& vec) {
// Sort implementation
}
4. Common Standard Library Concepts (C++20)
The STL provides many built-in concepts in <concepts>:
| Concept | Meaning |
|---|---|
std::same_as<T, U> | T and U are the same type |
std::convertible_to<From, To> | From is convertible to To |
std::integral<T> | T is an integral type |
std::floating_point<T> | T is a floating point type |
std::copyable<T> | T can be copied |
std::movable<T> | T can be moved |
std::default_initializable<T> | T can be default constructed |
All the built-in concepts can be found here: https://en.cppreference.com/w/cpp/concepts.html
5. Concepts with Iterators
template <typename It, typename T>
concept SearchableIterator = requires(It it, T value) {
{ *it } -> std::convertible_to<T>; // Can dereference
{ ++it } -> std::same_as<It&>; // Can increment
{ it != it } -> std::convertible_to<bool>; // Can compare
};
template <SearchableIterator<T> It, typename T>
It find(It begin, It end, const T& value) {
for (It it = begin; it != end; ++it) {
if (*it == value) {
return it;
}
}
return end;
}
6. Concepts Recap
Two Main Reasons to Use Concepts
-
Better compiler error messages
- Errors caught at the constraint level, not deep in template code
- Clear indication of which requirements aren’t met
- Errors appear at the call site where they’re most useful
-
Better IDE support
- Improved Intellisense/autocomplete
- IDEs can show which types satisfy which concepts
- Better code navigation and refactoring
Current Limitations
- Concepts are still a relatively new feature (C++20)
- The STL does not yet support them fully across all libraries
- Many older codebases still use older constraint techniques (SFINAE,
std::enable_if) - Compiler support is still maturing
7. Quick Reference: Concept Syntax
// Define a concept
template <typename T>
concept ConceptName = requires(T obj) {
// constraints go here
};
// Use concept - Method 1
template <typename T> requires ConceptName<T>
void function(T param);
// Use concept - Method 2 (preferred)
template <ConceptName T>
void function(T param);
// Use concept with auto parameters (C++20)
void function(ConceptName auto param);
8. Summary
| Before Concepts | With Concepts |
|---|---|
| Template errors deep in instantiation | Errors at call site |
| Unclear requirements | Explicit, named requirements |
| Cryptic error messages | Clear, understandable errors |
| No IDE help | Better IDE support |
| Requirements in documentation only | Requirements in code |
Key Takeaway: Concepts make templates safer, clearer, and much easier to use correctly!
Variadic Templates
Table of Contents
- The Problem: Variable Number of Arguments
- Solution 1: Manual Function Overloading
- Solution 2: Using std::vector
- Variadic Templates
- Parameter Packs Deep Dive
- Modern C++17: Fold Expressions
- Common Variadic Patterns
- Summary
Variadic Templates: From Problem to Solution
The Problem: Variable Number of Arguments
Suppose we want to write a min function that finds the minimum of any number of values:
The following example is taken from the Concepts chapter.
Here in this example Comparable is a concept, so dont get confused.
template <Comparable T>
T min(const T& a, const T& b) {
return a < b ? a : b;
}
min(2.4, 7.5); // ✓ This works
min(2.4, 7.5, 5.3); // ✗ ERROR: No matching function
min(2.4, 7.5, 5.3, 1.2); // ✗ ERROR: No matching function
How do we make min accept a variable number of parameters?
Solution 1: Function Overloading (The Manual Way)
We could manually write overloads for different numbers of parameters:
// 2 parameters
template <Comparable T>
T min(const T& a, const T& b) {
return a < b ? a : b;
}
// 3 parameters
template <Comparable T>
T min(const T& a, const T& b, const T& c) {
auto m = min(b, c); // Calls 2-parameter version
return a < m ? a : m;
}
// 4 parameters
template <Comparable T>
T min(const T& a, const T& b, const T& c, const T& d) {
auto m = min(b, c, d); // Calls 3-parameter version
return a < m ? a : m;
}
Results:
min(2.4, 7.5); // ✓ Works
min(2.4, 7.5, 5.3); // ✓ Works now
min(2.4, 7.5, 5.3, 1.2); // ✓ Works too!
min(2.4, 7.5, 5.3, 1.2, 3.4, 6.7, 8.9, 9.1); // ✗ Need to write more overloads...
Problems with This Approach
Tedious: Need to write many overloads manually
Limited: Only works up to the number of overloads you write
Not scalable: What if someone needs 10 or 20 parameters?
Repetitive: Notice the pattern? The compiler should handle this!
Solution 2: Using std::vector (The Dynamic Way)
Can we use a vector to hold variable numbers of arguments?
template <Comparable T>
T min(const std::vector<T>& values) {
if (values.size() == 1) return values[0];
const auto& first = values[0];
std::vector<T> rest(++values.begin(), values.end());
auto m = min(rest); // Recursive call
return first < m ? first : m;
}
// Usage with brace initialization
min({2.4, 7.5});
min({2.4, 7.5, 5.3});
min({2.4, 7.5, 5.3, 1.2});
Problems with This Approach
Runtime overhead: Must allocate a vector for every call
Recursive copying: Each recursive call copies the remaining elements
Memory allocation: Dynamic memory allocation is expensive
Awkward syntax: Requires braces {} around arguments
No compile-time optimization: Cannot be fully optimized away
Key insight: We need the compiler to generate the code at compile-time, not handle it at runtime!
So how can we ask compiler to generate these underlying functions for us ? Here comes the Variadic Templates.
Variadic Templates
Enter C++11: A Game-Changing Feature
C++11 introduced variadic templates, a powerful feature that allows templates to accept a variable number of arguments. Instead of manually writing overloads or relying on runtime containers, variadic templates let the compiler automatically generate all the code we need at compile-time!
What is a Variadic Template?
A variadic template is a template that can accept any number (zero or more) of template arguments. It uses a special construct called a parameter pack to capture these arguments.
Definition:
A variadic template uses parameter packs (
...) to accept and work with a variable number of types or values, enabling type-safe, compile-time generation of code for any number of arguments.
Basic Syntax
// Template with parameter pack
template <typename... Args>
// ^^^^^^
// Parameter pack (captures 0 or more types)
void function(Args... args) {
// ^^^^^^^^^^^^
// Function parameter pack (captures 0 or more values)
// Use args... here
}
Key syntax elements:
typename... Args- Declares a template parameter pack (types)Args... args- Declares a function parameter pack (values)args...- Expands the parameter pack
The Complete Solution
// Base case: single value (stops recursion)
template <Comparable T>
T min(const T& value) {
return value;
}
// Recursive case: 2 or more values (variadic template)
template <Comparable T, Comparable... Args>
// ^^^^^^^^^^^^^^^^^^
// Parameter pack: accepts 0+ types
T min(const T& first, const Args&... rest) {
// ^^^^^^^^^^^^^^^^^
// Function parameter pack: 0+ arguments
auto min_rest = min(rest...); // Recursive call with remaining args
// ^^^^^^^ // Pack expansion: expands rest...
return first < min_rest ? first : min_rest;
}
Usage:
min(2.4, 7.5); // ✓ Works!
min(2.4, 7.5, 5.3); // ✓ Works!
min(2.4, 7.5, 5.3, 1.2); // ✓ Works!
min(2.4, 7.5, 5.3, 1.2, 3.4); // ✓ Works!
// Works with ANY number of arguments!
How It Works
Let’s trace min(5, 2, 8, 1) and see what template functions the compiler generates:
═══════════════════════════════════════════════════════════════════════════════
COMPILER GENERATES THESE FUNCTIONS FOR US!
═══════════════════════════════════════════════════════════════════════════════
╔═══════════════════════════════════════════════════════════════════════════╗
║ CALL 1: min(5, 2, 8, 1) ║
║ ║
║ Template Deduction: T = int, Args = [int, int, int] ║
║ ┏━━━━━━━━━━━━━━━━━━━━━━━━━━━━━━━━━━━━━━━━━━━━━━━━━━━━━━━━━━━━━━━━━━━━━┓ ║
║ ┃ GENERATED FUNCTION: ┃ ║
║ ┃ int min(const int& v, const int& a0, const int& a1, const int& a2) {┃ ║
║ ┃ auto m = min(a0, a1, a2); // Calls next instantiation ┃ ║
║ ┃ return v < m ? v : m; ┃ ║
║ ┃ } ┃ ║
║ ┗━━━━━━━━━━━━━━━━━━━━━━━━━━━━━━━━━━━━━━━━━━━━━━━━━━━━━━━━━━━━━━━━━━━━━┛ ║
║ ║
║ Runtime Values: v=5, a0=2, a1=8, a2=1 ║
║ Calls: min(2, 8, 1) ────────────────────────────────────────────────────→║
╚═══════════════════════════════════════════════════════════════════════════╝
↓
╔═══════════════════════════════════════════════════════════════════════════╗
║ CALL 2: min(2, 8, 1) ║
║ ║
║ Template Deduction: T = int, Args = [int, int] ║
║ ┏━━━━━━━━━━━━━━━━━━━━━━━━━━━━━━━━━━━━━━━━━━━━━━━━━━━━━━━━━━━━━┓ ║
║ ┃ GENERATED FUNCTION: ┃ ║
║ ┃ int min(const int& v, const int& a0, const int& a1) { ┃ ║
║ ┃ auto m = min(a0, a1); // Calls next instantiation ┃ ║
║ ┃ return v < m ? v : m; ┃ ║
║ ┃ } ┃ ║
║ ┗━━━━━━━━━━━━━━━━━━━━━━━━━━━━━━━━━━━━━━━━━━━━━━━━━━━━━━━━━━━━━┛ ║
║ ║
║ Runtime Values: v=2, a0=8, a1=1 ║
║ Calls: min(8, 1) ──────────────────────────────────────────────────────→ ║
╚═══════════════════════════════════════════════════════════════════════════╝
↓
╔═══════════════════════════════════════════════════════════════════════════╗
║ CALL 3: min(8, 1) ║
║ ║
║ Template Deduction: T = int, Args = [int] ║
║ ┏━━━━━━━━━━━━━━━━━━━━━━━━━━━━━━━━━━━━━━━━━━━━━━━━━━━━━━━━━━━━━┓ ║
║ ┃ GENERATED FUNCTION: ┃ ║
║ ┃ int min(const int& v, const int& a0) { ┃ ║
║ ┃ auto m = min(a0); // Calls base case ┃ ║
║ ┃ return v < m ? v : m; ┃ ║
║ ┃ } ┃ ║
║ ┗━━━━━━━━━━━━━━━━━━━━━━━━━━━━━━━━━━━━━━━━━━━━━━━━━━━━━━━━━━━━━┛ ║
║ ║
║ Runtime Values: v=8, a0=1 ║
║ Calls: min(1) ─────────────────────────────────────────────────────────→ ║
╚═══════════════════════════════════════════════════════════════════════════╝
↓
╔═══════════════════════════════════════════════════════════════════════════╗
║ CALL 4: min(1) ★ BASE CASE ★ ║
║ ║
║ Template Deduction: T = int, Args = [] (empty!) ║
║ ┏━━━━━━━━━━━━━━━━━━━━━━━━━━━━━━━━━━━━━━━━━━━━━━━━━━━━━━━━━━━━━┓ ║
║ ┃ MATCHED BASE CASE FUNCTION: ┃ ║
║ ┃ int min(const int& v) { ┃ ║
║ ┃ return v; // No recursion! ┃ ║
║ ┃ } ┃ ║
║ ┗━━━━━━━━━━━━━━━━━━━━━━━━━━━━━━━━━━━━━━━━━━━━━━━━━━━━━━━━━━━━━┛ ║
║ ║
║ Runtime Values: v=1 ║
║ Returns: 1 ← Recursion stops! ║
╚═══════════════════════════════════════════════════════════════════════════╝
═══════════════════════════════════════════════════════════════════════════════
RETURN VALUES (Unwinding)
═══════════════════════════════════════════════════════════════════════════════
min(1) returns → 1
↑
┌───────────────────────────────────────────────────────────────────┐
│ min(8, 1): m=1, return 8 < 1 ? 8 : 1 → returns 1 │
└───────────────────────────────────────────────────────────────────┘
↑
┌───────────────────────────────────────────────────────────────────┐
│ min(2, 8, 1): m=1, return 2 < 1 ? 2 : 1 → returns 1 │
└───────────────────────────────────────────────────────────────────┘
↑
┌───────────────────────────────────────────────────────────────────┐
│ min(5, 2, 8, 1): m=1, return 5 < 1 ? 5 : 1 → returns 1 │
└───────────────────────────────────────────────────────────────────┘
═══════════════════════════════════════════════════════════════════════════════
FINAL RESULT: 1 ✓
═══════════════════════════════════════════════════════════════════════════════
💡 KEY INSIGHT: The compiler generated 4 complete functions for us!
✓ min(int, int, int, int) - 4 parameters
✓ min(int, int, int) - 3 parameters
✓ min(int, int) - 2 parameters
✓ min(int) - 1 parameter (base case)
All at COMPILE TIME with ZERO runtime overhead!
═══════════════════════════════════════════════════════════════════════════════
Understanding the Syntax: Parameter Packs Deep Dive
What is a Parameter Pack?
A parameter pack is a template parameter that accepts zero or more template arguments. Think of it as a compile-time container that holds a variable number of elements (types or values).
There are three types of parameter packs:
- Template Parameter Pack - holds types
- Function Parameter Pack - holds function arguments (values)
- Template Template Parameter Pack - holds template templates
1. Template Parameter Pack Declaration
template <Comparable T, Comparable... Args>
// ^^^^^^^^^^^^^^^^^
// Template parameter pack
Syntax breakdown:
...Argsdeclares a template parameter pack namedArgs- The
...comes before the identifier when capturing - It can match zero or more types
- Each type must satisfy the
Comparableconcept
Examples:
// Type parameter pack
template<typename... Types>
struct Container {};
Container<int, double, char> c1; // Types = [int, double, char]
Container<std::string> c2; // Types = [std::string]
Container<> c3; // Types = [] (empty!)
// Non-type parameter pack
template<int... Values>
struct IntList {};
IntList<1, 2, 3, 4> list1; // Values = [1, 2, 3, 4]
IntList<42> list2; // Values = [42]
IntList<> list3; // Values = [] (empty!)
// Template template parameter pack
template<template<typename> typename... Templates>
struct TemplateList {};
TemplateList<std::vector, std::list, std::deque> tl;
2. Function Parameter Pack Declaration
T min(const T& first, const Args&... rest)
// ^^^^^^^^^^^^^^^^^
// Function parameter pack
Syntax breakdown:
const Args&... restdeclares a function parameter pack namedrest- The
...comes before the identifier when capturing Argsis expanded first (it’s a template parameter pack)- Then
&...creates references to each expanded type - Finally,
restnames the entire pack
What this expands to:
If Args = [int, double, char], then:
const Args&... rest
↓
const int& r0, const double& r1, const char& r2
More examples:
// By value
void func1(Types... args); // Takes copies
// Expands to: Type1 arg1, Type2 arg2, ...
// By const reference
void func2(const Types&... args); // Takes const refs
// Expands to: const Type1& arg1, const Type2& arg2, ...
// By forwarding reference (perfect forwarding)
void func3(Types&&... args); // Universal references
// Expands to: Type1&& arg1, Type2&& arg2, ...
3. Pack Expansion: The Magic Happens
Pack expansion is where the compiler replaces the pattern with actual elements. The ... comes after the pattern when expanding.
auto min_rest = min(rest...);
// ^^^^^^^^
// Pack expansion
How it works:
If rest contains [a, b, c], then:
min(rest...)
↓
min(a, b, c)
Pack Expansion Contexts
Parameter packs can be expanded in many contexts:
A. Function Call Arguments
template<typename... Args>
void forward_to_func(Args&&... args) {
some_function(std::forward<Args>(args)...);
// ^^^^^^^^^^^^^^^^^^^^^^^^^^^^
// Pattern: std::forward<Args>(args)
// Expands to: std::forward<Arg1>(arg1), std::forward<Arg2>(arg2), ...
}
B. Initializer Lists
template<typename... Args>
void example(Args... args) {
std::vector<int> vec{args...}; // Expands to: {arg1, arg2, arg3, ...}
auto tuple = std::tuple{args...}; // Expands to: tuple{arg1, arg2, arg3, ...}
int array[] = {args...}; // Expands to: {arg1, arg2, arg3, ...}
}
C. Template Arguments
template<typename... Args>
void example(Args... args) {
// Pattern: decltype(args)
std::tuple<decltype(args)...> tpl;
// Expands to: std::tuple<decltype(arg1), decltype(arg2), ...>
// Pattern: std::vector<Args>
std::tuple<std::vector<Args>...> vec_tuple;
// Expands to: std::tuple<std::vector<Arg1>, std::vector<Arg2>, ...>
}
D. Base Class Lists
template<typename... Bases>
struct MultiInherit : Bases... {
// ^^^^^^^^^
// Expands to: Base1, Base2, Base3, ...
using Bases::foo...; // Bring all foo() methods into scope
// ^^^^^
// Expands to: using Base1::foo; using Base2::foo; ...
};
E. Lambda Captures
template<typename... Args>
void example(Args... args) {
// Capture by copy
auto lambda1 = [args...] { return process(args...); };
// ^^^^^^^^ ^^^^^^^^
// Capture pack Expand pack
// Capture by reference
auto lambda2 = [&args...] { return process(args...); };
// Init-capture with move (C++20)
auto lambda3 = [...args = std::move(args)] {
return process(args...);
};
}
Complex Pack Expansion Patterns
The pattern can be arbitrarily complex:
template<typename... Args>
void complex_example(Args... args) {
// Simple pattern: just the pack
func(args...);
// Expands to: func(arg1, arg2, arg3, ...)
// Pattern with function call
func(transform(args)...);
// Expands to: func(transform(arg1), transform(arg2), ...)
// Pattern with template
func(std::make_unique<Args>(args)...);
// Expands to: func(std::make_unique<Arg1>(arg1),
// std::make_unique<Arg2>(arg2), ...)
// Pattern with multiple operations
func((args * 2 + 1)...);
// Expands to: func((arg1 * 2 + 1), (arg2 * 2 + 1), ...)
}
Multiple Parameter Packs in One Expression
When expanding multiple packs simultaneously, they must have the same length:
template<typename... Ts, typename... Us>
void zip(Ts... ts, Us... us) {
// Both packs must have same length
auto pairs = std::tuple{std::pair(ts, us)...};
// Expands to: std::tuple{std::pair(t1, u1), std::pair(t2, u2), ...}
}
zip(1, 2, 3, "a", "b", "c"); // OK: both have 3 elements
zip(1, 2, "a"); // ERROR: first has 2, second has 1
sizeof…() Operator
Get the number of elements in a parameter pack:
template<typename... Args>
void example(Args... args) {
constexpr size_t type_count = sizeof...(Args); // Number of types
constexpr size_t arg_count = sizeof...(args); // Number of arguments
static_assert(sizeof...(Args) == sizeof...(args)); // Always true
std::cout << "Received " << sizeof...(args) << " arguments\n";
}
example(1, 2.5, "hello"); // Prints: Received 3 arguments
Nested Pack Expansion
Packs can be expanded inside other packs:
template<typename... Outer>
void nested(Outer... outer) {
// Inner pack expansion inside outer pack expansion
auto result = std::tuple{
std::vector{outer, outer, outer}...
// For each outer element, create a vector with 3 copies
};
// If outer = [1, 2, 3], creates:
// std::tuple{std::vector{1, 1, 1},
// std::vector{2, 2, 2},
// std::vector{3, 3, 3}}
}
Pack Expansion in sizeof
template<typename... Args>
void example(Args... args) {
// Get total size of all arguments
size_t total_size = (sizeof(args) + ...); // Fold expression
// Or create array of sizes
size_t sizes[] = {sizeof(args)...};
// Expands to: {sizeof(arg1), sizeof(arg2), sizeof(arg3), ...}
}
Key Rules for Pack Expansion
-
Ellipsis position matters:
...Name= capture a packPattern...= expand a pack
-
Expansion must be in valid context (see contexts above)
-
Cannot expand outside valid context:
// ERROR: Can't expand in arbitrary expression template<typename... Args> void bad(Args... args) { int x = args...; // ERROR! Not a valid expansion context } -
Multiple packs in one expansion must have same length
-
Empty packs are valid:
template<typename... Args> void func(Args... args) {} func(); // OK! Args and args are both empty
Visual Summary: Capture vs Expansion
template<typename... Args> // Capture template pack
void example(Args... args) { // Capture function pack
// ^^^^^^^^^^^^
// This is expansion! Args... becomes Arg1 arg1, Arg2 arg2, ...
func(args...); // Expand pack
// ^^^^^^^
// Pattern = args, Expansion = args...
func((args + 1)...); // Expand with pattern
// ^^^^^^^^^^^^^
// Pattern = (args + 1), Expansion = (args + 1)...
}
Remember:
- Ellipsis before = Capture (
...name) - Ellipsis after = Expand (
pattern...)
The Pattern: Base Case + Recursive Case
Variadic templates typically follow this pattern:
// BASE CASE: Handles the "stop condition"
template <typename T>
ReturnType function(T value) {
// Handle single value
return /* something */;
}
// RECURSIVE CASE: Handles 2+ arguments
template <typename T, typename... Args>
ReturnType function(T first, Args... rest) {
auto result = function(rest...); // Recurse with remaining args
// Combine first with result
return /* combined result */;
}
More Examples
Example 1: Print All Arguments
// Base case
void print() {
std::cout << std::endl;
}
// Recursive case
template <typename T, typename... Args>
void print(const T& first, const Args&... rest) {
std::cout << first << " ";
print(rest...); // Recursive call
}
// Usage
print(1, 2.5, "hello", 'x');
// Output: 1 2.5 hello x
Example 2: Sum All Arguments
// Base case
template <typename T>
T sum(T value) {
return value;
}
// Recursive case
template <typename T, typename... Args>
T sum(T first, Args... rest) {
return first + sum(rest...);
}
// Usage
auto result = sum(1, 2, 3, 4, 5); // result = 15
Example 3: Check All Conditions
// Base case
bool all_true(bool value) {
return value;
}
// Recursive case
template <typename... Args>
bool all_true(bool first, Args... rest) {
return first && all_true(rest...);
}
// Usage
bool result = all_true(true, true, false, true); // result = false
Modern C++17 Alternative: Fold Expressions
C++17 introduced fold expressions, which provide a more concise syntax:
// Using fold expression (C++17)
template <Comparable T, Comparable... Args>
T min(T first, Args... rest) {
return (first < ... < rest) ? first : min(rest...);
}
// Even simpler with fold
template <typename... Args>
void print(const Args&... args) {
((std::cout << args << " "), ...); // Fold over comma operator
std::cout << std::endl;
}
template <typename... Args>
auto sum(Args... args) {
return (... + args); // Fold over + operator
}
template <typename... Args>
bool all_true(Args... args) {
return (... && args); // Fold over && operator
}
Fold expression will be covered in a separate section in more details.
Comparison: All Three Approaches
| Approach | Code Size | Runtime Cost | Flexibility | Syntax |
|---|---|---|---|---|
| Manual Overloading | Large (N functions for N args) | None | Limited | Simple |
| Vector | Small | High (allocation, copying) | Unlimited | Awkward braces |
| Variadic Templates | Generated at compile-time | None (fully inlined) | Unlimited | Clean |
Key Advantages of Variadic Templates
Zero runtime overhead: All code generated at compile-time
Type-safe: Compiler checks all types
Unlimited flexibility: Works with any number of arguments
Clean syntax: No braces or wrappers needed
Fully optimizable: Compiler can inline everything
Compile-time errors: Problems caught during compilation
Common Patterns
Pattern 1: Process First, Recurse on Rest
template <typename T>
void process_all(T value) {
process(value); // Base case
}
template <typename T, typename... Args>
void process_all(T first, Args... rest) {
process(first); // Process first
process_all(rest...); // Recurse on rest
}
Pattern 2: Accumulate Result
template <typename T>
T accumulate(T value) {
return value; // Base case
}
template <typename T, typename... Args>
T accumulate(T first, Args... rest) {
return combine(first, accumulate(rest...)); // Combine with result
}
Pattern 3: Check All Elements
template <typename T>
bool check_all(T value) {
return check(value); // Base case
}
template <typename T, typename... Args>
bool check_all(T first, Args... rest) {
return check(first) && check_all(rest...); // Short-circuit on false
}
Important Notes
1. Base Case is Essential
Without a base case, recursion never stops:
// WRONG: No base case!
template <typename T, typename... Args>
void print(T first, Args... rest) {
std::cout << first << " ";
print(rest...); // Infinite recursion when rest is empty!
}
2. Parameter Packs Must Be Last
// CORRECT
template <typename First, typename... Rest>
void func(First f, Rest... r);
// WRONG: Can't have parameters after pack
template <typename... Args, typename Last> // ERROR!
void func(Args... args, Last l);
3. Empty Packs Are Valid
template <typename... Args>
void func(Args... args) {
std::cout << "Number of args: " << sizeof...(args) << "\n";
}
func(); // Valid! sizeof...(args) = 0
func(1); // sizeof...(args) = 1
func(1, 2, 3); // sizeof...(args) = 3
Summary
Variadic templates solve the problem of writing functions that accept a variable number of arguments:
- Syntax:
template <typename... Args>for parameter packs - Pattern: Base case + recursive case
- Expansion:
args...expands the pack - Benefits: Zero runtime cost, type-safe, unlimited flexibility
- Modern C++17: Fold expressions provide even more concise syntax
Variadic templates are a powerful tool that combines:
- The flexibility of runtime solutions (like vectors)
- The performance of compile-time code generation
- The elegance of recursive algorithms
They’re essential for modern C++ generic programming!
C++20 Abbreviated Function Templates
Table of Contents
- What is an Abbreviated Function Template?
- Traditional Template vs Abbreviated Template
- Key Differences
- Constrained Auto Abbreviated Functions
- Important Limitation: No Abbreviated Class Templates
- Advantages of Abbreviated Function Templates
- When to Use
- Compilation
What is an Abbreviated Function Template?
An abbreviated function template is a C++20 feature that allows you to write template functions using auto as a parameter type instead of explicitly declaring template parameters. This provides a more concise and readable syntax for function templates.
In C++20, when you use auto (or a constrained auto with concepts) as a function parameter type, the compiler automatically treats it as a template parameter. Each auto parameter introduces an independent template type parameter.
Syntax:
// Unconstrained auto
auto functionName(auto param1, auto param2) {
// function body
}
// Constrained auto with concepts
auto functionName(ConceptName auto param1, ConceptName auto param2) {
// function body
}
This is equivalent to:
// Unconstrained equivalent
template<typename T1, typename T2>
auto functionName(T1 param1, T2 param2) {
// function body
}
// Constrained equivalent
template<ConceptName T1, ConceptName T2>
auto functionName(T1 param1, T2 param2) {
// function body
}
Traditional Template vs Abbreviated Template
Traditional Template Function
#include <iostream>
#include <typeinfo>
template <typename T>
T min(const T& a, const T& b) {
std::cout << "Type of a: " << typeid(a).name()
<< " Type of b: " << typeid(b).name() << " Min: ";
return a < b ? a : b;
}
int main() {
std::cout << min(1, 2) << std::endl;
std::cout << min(2.7, 2.5) << std::endl;
std::cout << min('a', 'b') << std::endl;
return 0;
}
Output:
Type of a: i Type of b: i Min: 1
Type of a: d Type of b: d Min: 2.5
Type of a: c Type of b: c Min: a
Template Expansion (using clang++ -std=c++20 -Xclang -ast-print -fsyntax-only):
template <typename T> T min(const T &a, const T &b) {
std::cout << "Type of a: " << typeid(a).name()
<< " Type of b: " << typeid(b).name() << " Min: ";
return a < b ? a : b;
}
template<> int min<int>(const int &a, const int &b) { /* ... */ }
template<> double min<double>(const double &a, const double &b) { /* ... */ }
template<> char min<char>(const char &a, const char &b) { /* ... */ }
C++20 Abbreviated Template Function
#include <iostream>
#include <typeinfo>
auto min(const auto& a, const auto& b) {
std::cout << "Type of a: " << typeid(a).name()
<< " Type of b: " << typeid(b).name() << " Min: ";
return a < b ? a : b;
}
int main() {
std::cout << min(1, 2) << std::endl;
std::cout << min(2.7, 2.5) << std::endl;
std::cout << min('a', 'b') << std::endl;
return 0;
}
Output:
Type of a: i Type of b: i Min: 1
Type of a: d Type of b: d Min: 2.5
Type of a: c Type of b: c Min: a
Template Expansion (using clang++ -std=c++20 -Xclang -ast-print -fsyntax-only):
auto min(const auto &a, const auto &b) {
std::cout << "Type of a: " << typeid(a).name()
<< " Type of b: " << typeid(b).name() << " Min: ";
return a < b ? a : b;
}
template<> int min<int, int>(const int &a, const int &b) { /* ... */ }
template<> double min<double, double>(const double &a, const double &b) { /* ... */ }
template<> char min<char, char>(const char &a, const char &b) { /* ... */ }
Key Differences
- Syntax: The abbreviated form uses
autoinstead of explicittemplate<typename T>declaration - Each
autois independent: Notice in the expansion that the abbreviated version createsmin<int, int>,min<double, double>, etc., meaning eachautoparameter is a separate template parameter - Readability: The abbreviated syntax is more concise and resembles regular function syntax
Equivalent Template Syntax
The abbreviated function:
auto min(const auto& a, const auto& b) {
std::cout << "Type of a: " << typeid(a).name()
<< " Type of b: " << typeid(b).name() << " Min: ";
return a < b ? a : b;
}
Is exactly equivalent to:
template<typename T1, typename T2>
auto min(const T1& a, const T2& b) {
std::cout << "Type of a: " << typeid(a).name()
<< " Type of b: " << typeid(b).name() << " Min: ";
return a < b ? a : b;
}
Important: Each auto parameter becomes an independent template parameter (T1, T2). This means the function can accept two different types, such as min(5, 3.14) where a is int and b is double.
Constrained Auto Abbreviated Functions
C++20 also allows you to add constraints to abbreviated function templates using concepts. This ensures that the template parameters meet certain requirements.
The Problem with Unconstrained Auto
Consider this example with a custom type:
#include <iostream>
#include <typeinfo>
#include <string>
struct StudentId {
std::string name;
std::string id;
};
auto min(const auto& a, const auto& b) {
std::cout << "Type of a: " << typeid(a).name()
<< " Type of b: " << typeid(b).name() << " Min: ";
return a < b ? a : b; // Error! StudentId doesn't have operator<
}
int main() {
StudentId s1{"Alice", "001"};
StudentId s2{"Bob", "002"};
std::cout << min(1, 2) << std::endl; // Works
std::cout << min(s1, s2) << std::endl; // Compilation Error!
return 0;
}
Error: StudentId doesn’t have operator< defined, so the comparison a < b fails.
Solution: Using Concepts with Constrained Auto
We can create a custom concept to constrain our function:
#include <iostream>
#include <typeinfo>
#include <string>
#include <concepts>
struct StudentId {
std::string name;
std::string id;
// Define comparison operator
bool operator<(const StudentId& other) const {
return name < other.name;
}
};
// Custom concept for types that support < operator
template<typename T>
concept Comparable = requires(T a, T b) {
{ a < b } -> std::convertible_to<bool>;
};
auto min(const Comparable auto& a, const Comparable auto& b) {
std::cout << "Type of a: " << typeid(a).name()
<< " Type of b: " << typeid(b).name() << " Min: ";
return a < b ? a : b;
}
int main() {
StudentId s1{"Alice", "001"};
StudentId s2{"Bob", "002"};
std::cout << min(1, 2) << std::endl;
std::cout << min(2.7, 2.5) << std::endl;
std::cout << min('a', 'b') << std::endl;
auto result = min(s1, s2);
std::cout << result.name << " (ID: " << result.id << ")" << std::endl;
return 0;
}
Output:
Type of a: i Type of b: i Min: 1
Type of a: d Type of b: d Min: 2.5
Type of a: c Type of b: c Min: a
Type of a: 9StudentId Type of b: 9StudentId Min: Alice (ID: 001)
The Comparable concept checks if a type supports the < operator:
template<typename T>
concept Comparable = requires(T a, T b) {
{ a < b } -> std::convertible_to<bool>;
};
This requires that for type T, the expression a < b must be valid and convertible to bool.
Equivalent Traditional Syntax
The constrained abbreviated function is equivalent to:
template<Comparable T1, Comparable T2>
auto min(const T1& a, const T2& b) {
std::cout << "Type of a: " << typeid(a).name()
<< " Type of b: " << typeid(b).name() << " Min: ";
return a < b ? a : b;
}
Benefits of Constrained Auto
- Compile-time error checking: Catch type errors early with clear error messages
- Self-documenting code: The constraint explains what types are acceptable
- Better IDE support: IDEs can provide better autocomplete and hints
- Type safety: Prevents misuse of generic functions
Important Limitation: No Abbreviated Class Templates
C++20 does NOT support abbreviated class templates. You cannot write:
// This is NOT valid C++20
class MyClass<auto T> { // Error!
T value;
};
Reason: Abbreviated function templates work because the compiler can deduce template parameters from function arguments at the call site. Class templates require explicit instantiation (e.g., MyClass<int>), so there’s no argument deduction context for auto to work with.
You must still use traditional template syntax for classes:
// Correct way for class templates
template<typename T>
class MyClass {
T value;
public:
MyClass(T v) : value(v) {}
// But member functions CAN use abbreviated templates!
auto add(auto other) {
return value + other;
}
auto compare(const auto& other) const {
return value < other;
}
};
Example Usage:
int main() {
MyClass<int> obj(10); // Class needs explicit type
std::cout << obj.add(5) << std::endl; // Member function: auto deduces int
std::cout << obj.add(3.14) << std::endl; // Member function: auto deduces double
std::cout << obj.compare(20) << std::endl; // Member function: auto deduces int
return 0;
}
Output:
15
13.14
1
This demonstrates that while class templates must use traditional syntax, their member functions can freely use abbreviated function template syntax.
Advantages of Abbreviated Function Templates
- Conciseness: Less boilerplate code
- Readability: Easier to read and understand at a glance
- Flexibility: Each
autocan deduce to a different type - Modern: Aligns with modern C++ practices
When to Use
Abbreviated function templates are ideal for:
- Simple generic functions
- Lambda expressions
- Functions where the template nature is obvious from context
- Reducing syntactic noise in template-heavy code
For complex templates with constraints, explicit template syntax or C++20 concepts may be more appropriate for clarity.
Compilation
To compile code using abbreviated function templates:
g++ -std=c++20 program.cpp -o program
clang++ -std=c++20 program.cpp -o program
Template Metaprogramming (TMP)
Table of Contents
- From Variadic Templates to Template Metaprogramming
- Introducing Template Metaprogramming (TMP) (#compile-time-computation-factorial-example)
- More TMP Examples
- TMP is Turing Complete
- Benefits and Drawbacks
- Best Practices
From Variadic Templates to Template Metaprogramming
We’ve learned that with variadic templates:
- The compiler generates any number of overloads using recursion
- This allows us to support any number of function parameters
- Instantiation happens at compile time
This leads us to an important question…
Templates Work at Compile Time
Since templates are instantiated during compilation, all the work of generating different versions of functions and classes happens before the program even runs.
Key Observation: The compiler is doing work for us at compile time!
Can We Use This to Our Advantage?
If templates do work at compile time, can we leverage this to:
- Perform calculations during compilation?
- Generate optimized code automatically?
- Move computations from runtime to compile time?
The answer is YES! This is exactly what Template Metaprogramming allows us to do.
Introducing Template Metaprogramming (TMP)
Template Metaprogramming is a technique where we use C++ templates to perform computations and make decisions at compile time instead of runtime.
Instead of computing values when the program runs, we compute them when the program is being compiled. The results are then embedded directly into the executable.
Template Metaprogramming is:
- A technique for performing computations at compile time using C++ templates
- Based on template recursion and specialization
- A form of functional programming within C++’s type system
- A way to generate optimized code automatically
Core Principles:
- Use templates to represent computations
- Use recursion for iteration
- Use template specialization for base cases
- Store results in enum or static const values
Compile-Time Computation: Factorial Example
Let’s see a concrete example of moving computation from runtime to compile time.
Traditional Runtime Factorial
#include <iostream>
// Runtime factorial - computation happens when program runs
int factorial(int n) {
if (n == 0) return 1;
return n * factorial(n - 1);
}
int main() {
std::cout << factorial(7) << std::endl; // Computed at runtime
return 0;
}
Output: 5040
What happens: Every time you run this program, the CPU calculates 7! = 5040.
Template Metaprogramming Factorial
Now let’s do the same computation at compile time:
#include <iostream>
// Recursive case: Factorial<N> = N * Factorial<N-1>
template <size_t N>
struct Factorial {
enum { value = N * Factorial<N - 1>::value };
};
// Base case: Factorial<0> = 1
// This is a template specialization for N=0
template <>
struct Factorial<0> {
enum { value = 1 };
};
int main() {
std::cout << Factorial<7>::value << std::endl; // Computed at compile time!
return 0;
}
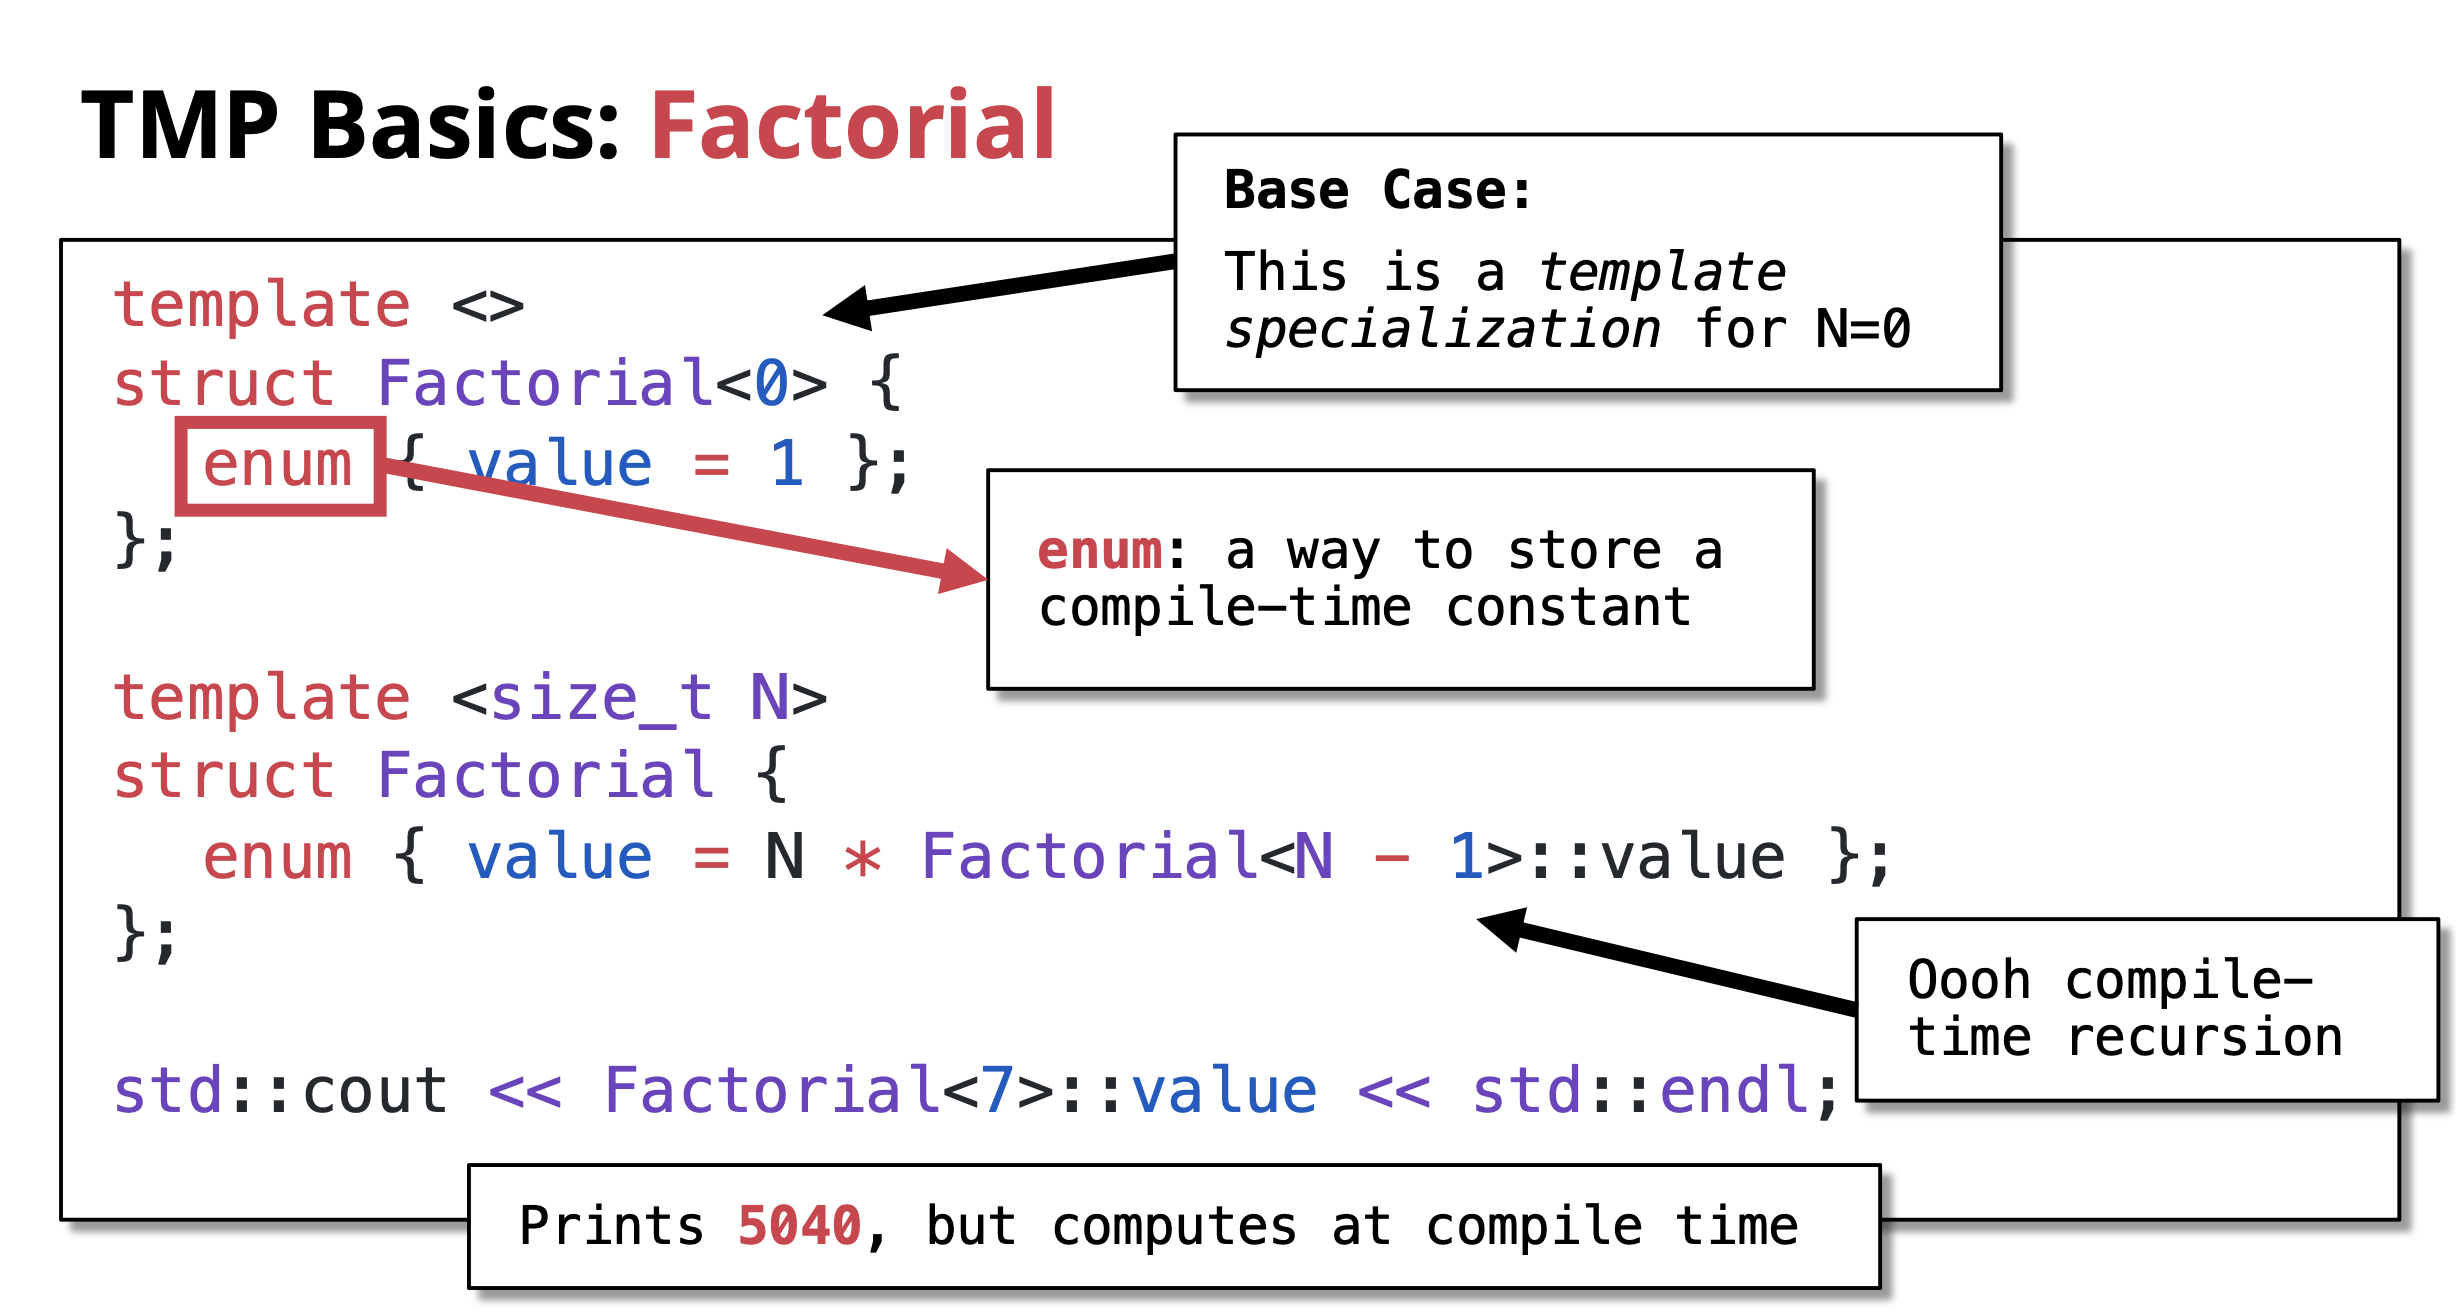 Output:
 5040
What happens: The compiler calculates 7! = 5040 during compilation. The value 5040 is directly embedded in the executable. Zero runtime computation!
Key Components:
-
Recursive case:
template <size_t N> struct Factorial- Defines the general rule: N! = N × (N-1)!
- Uses
enumto store compile-time constant
-
Base case:
template <> struct Factorial<0>- This is a template specialization for N=0
- Defines 0! = 1
- Stops the recursion
-
Compile-time recursion: The compiler recursively instantiates templates until it hits the base case
Understanding the Recursion
Let’s trace how Factorial<7>::value is computed at compile time:
Factorial<7>::value = 7 * Factorial<6>::value
= 7 * (6 * Factorial<5>::value)
= 7 * (6 * (5 * Factorial<4>::value))
= 7 * (6 * (5 * (4 * Factorial<3>::value)))
= 7 * (6 * (5 * (4 * (3 * Factorial<2>::value))))
= 7 * (6 * (5 * (4 * (3 * (2 * Factorial<1>::value)))))
= 7 * (6 * (5 * (4 * (3 * (2 * (1 * Factorial<0>::value))))))
= 7 * (6 * (5 * (4 * (3 * (2 * (1 * 1)))))) ← Base case hit!
= 5040
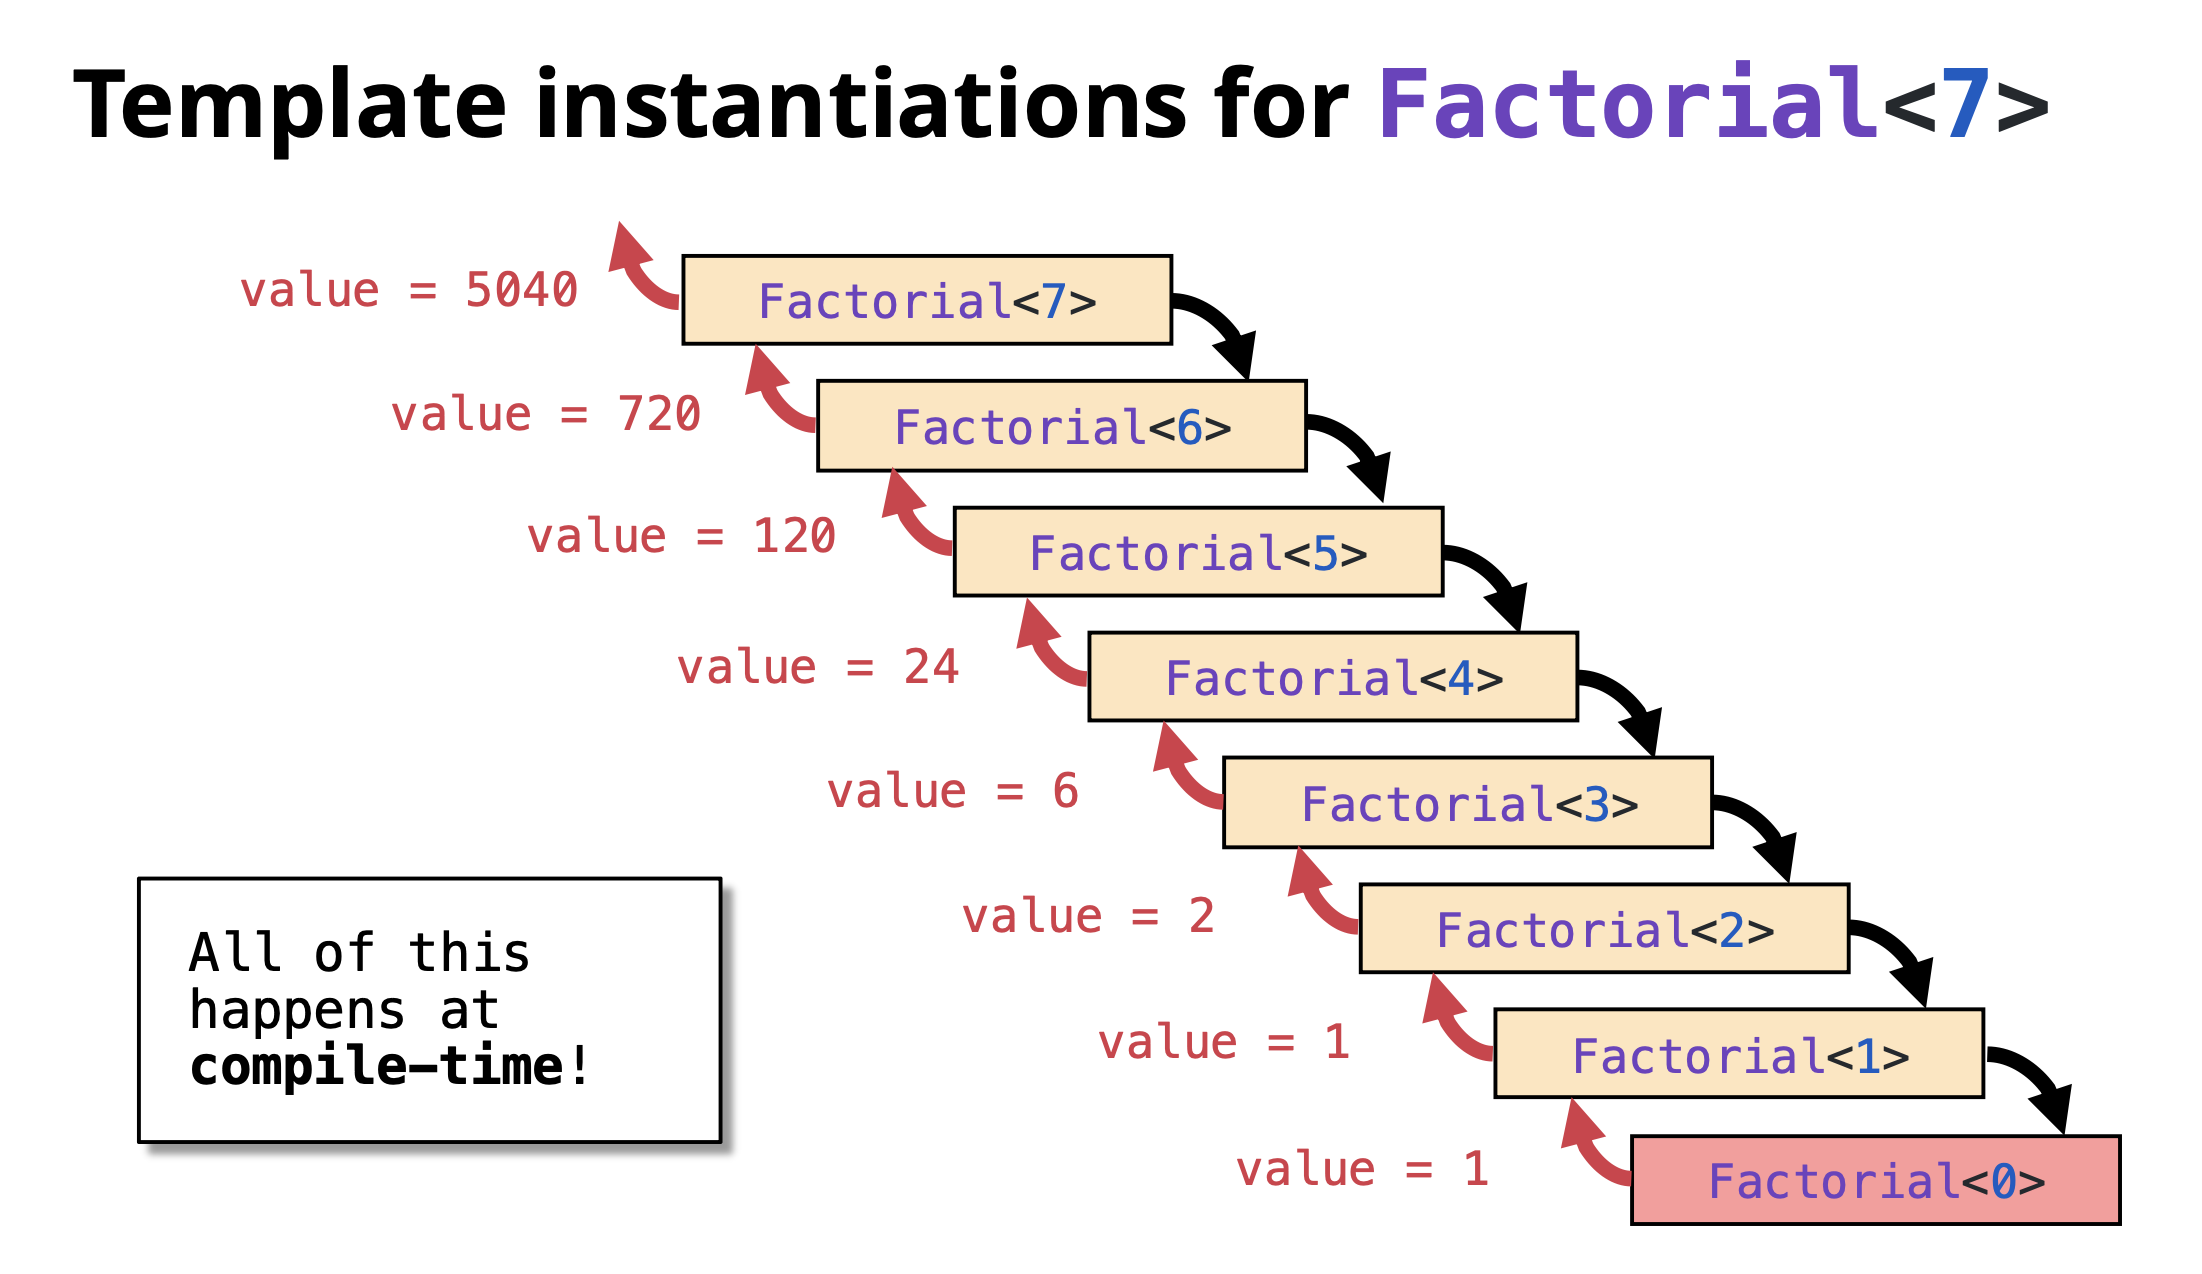 Important: This entire calculation happens during compilation, not when the program runs!
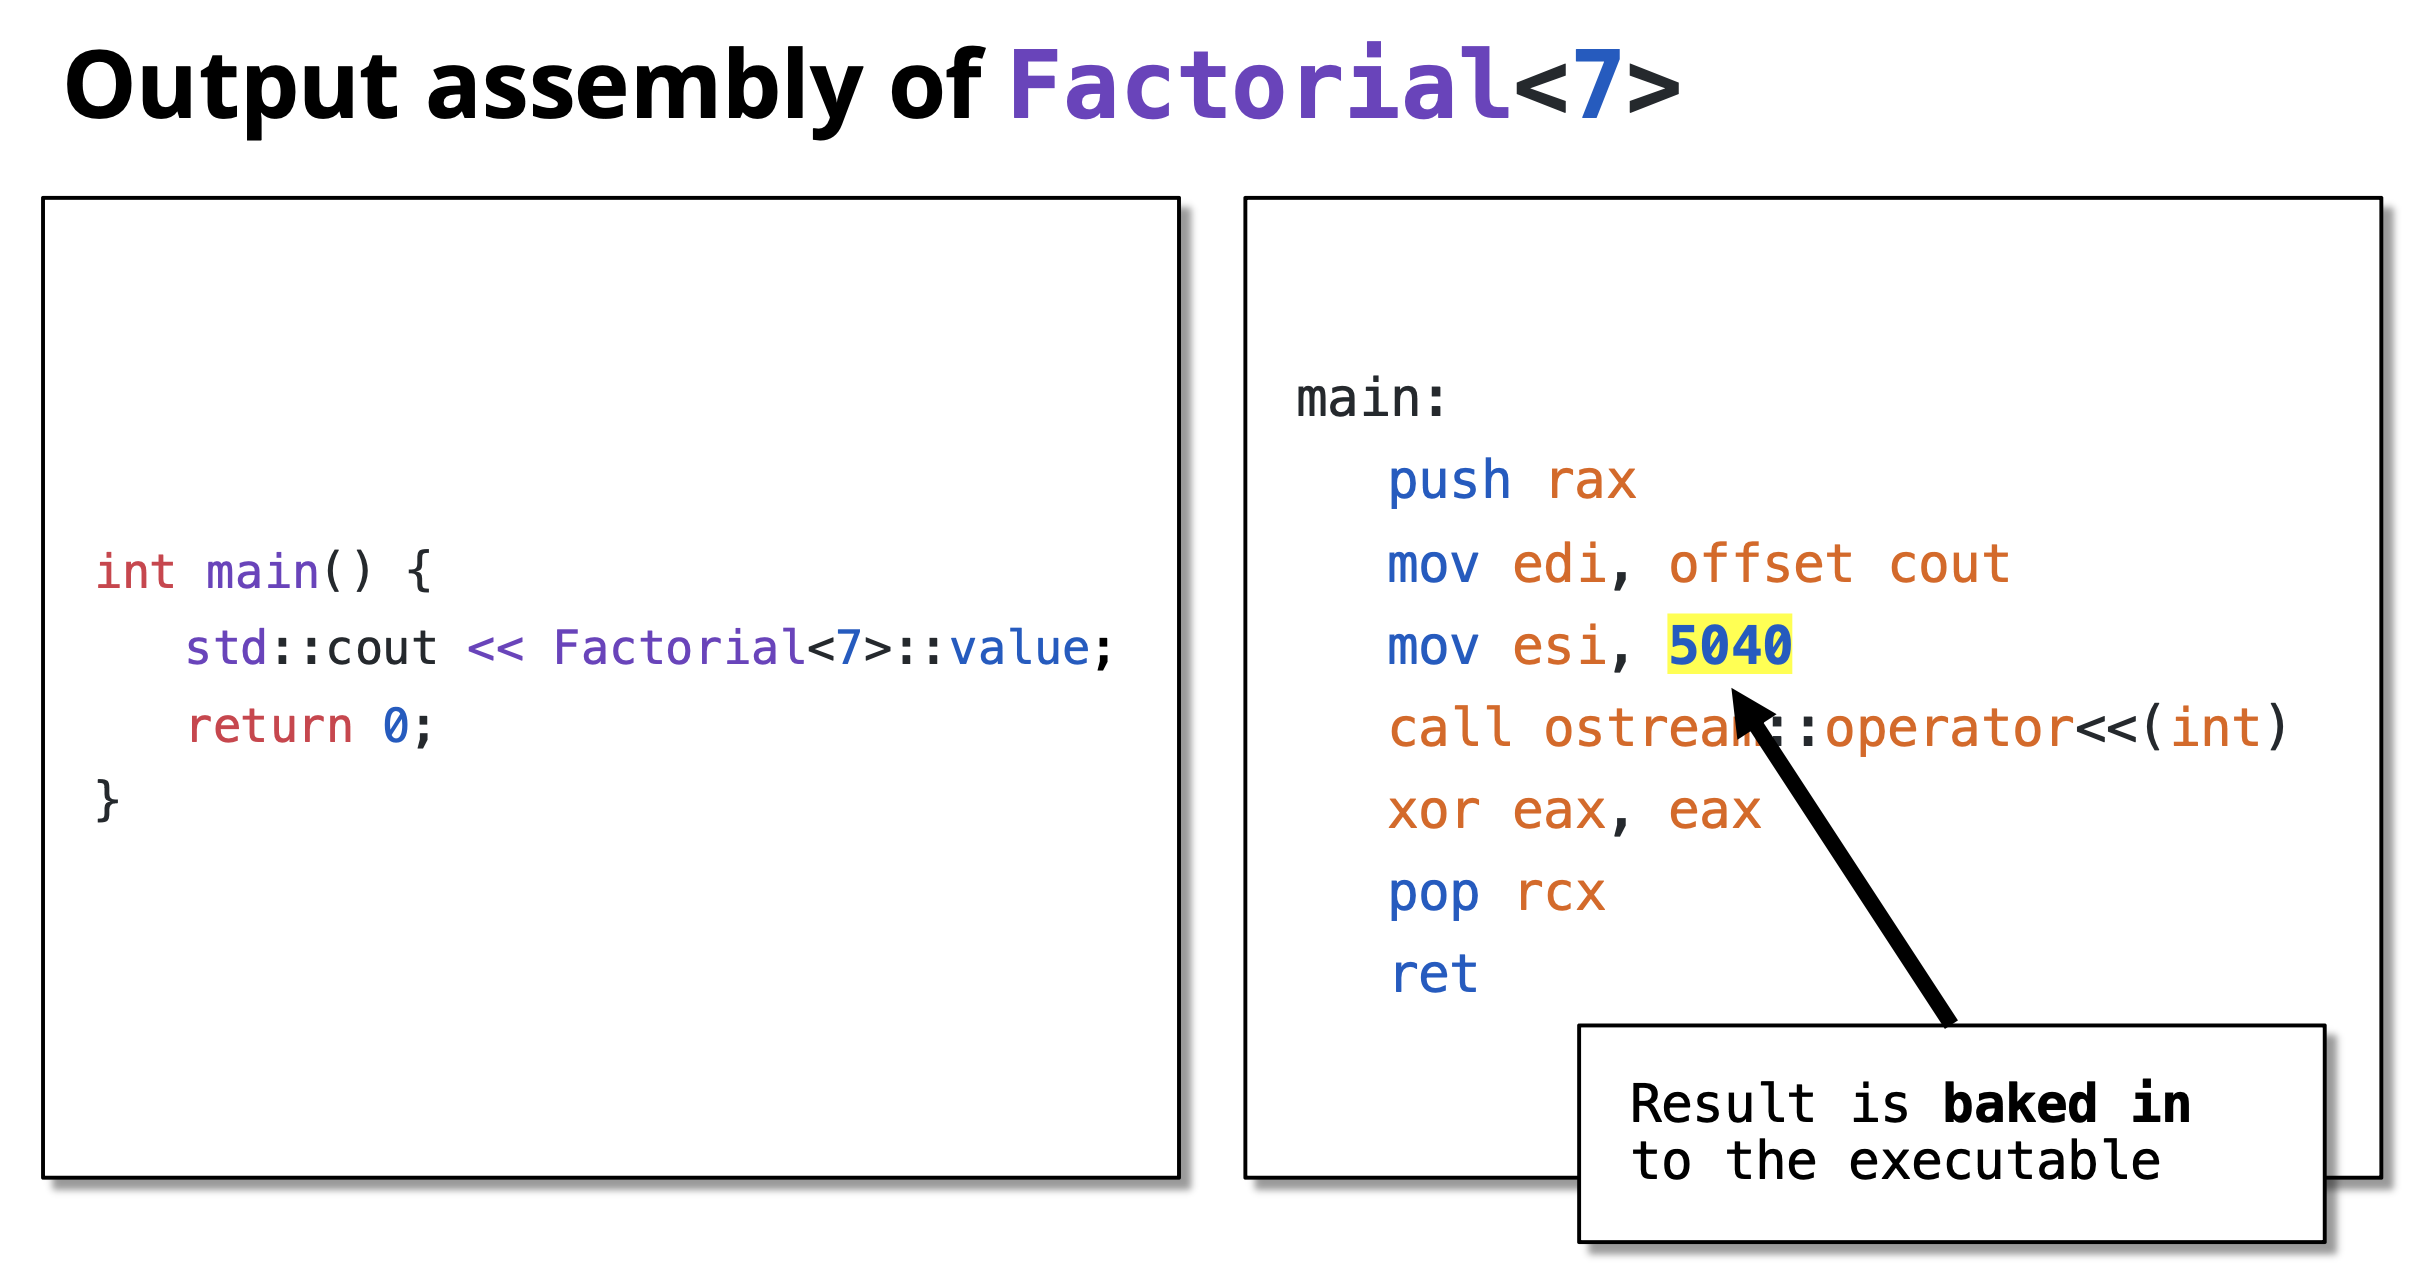
Verification: Compile-Time vs Runtime
You can verify that the computation happens at compile time by looking at the assembly code:
// Runtime version
int result = factorial(7);
// Generates function call instructions
// Compile-time version
int result = Factorial<7>::value;
// Becomes: int result = 5040;
// No function call, just a constant!
More TMP Examples
Compile-Time Power Calculation
Calculate X^N at compile time:
#include <iostream>
// Recursive case: Power<X, N> = X * Power<X, N-1>
template <size_t X, size_t N>
struct Power {
enum { value = X * Power<X, N - 1>::value };
};
// Base case: Power<X, 0> = 1
template <size_t X>
struct Power<X, 0> {
enum { value = 1 };
};
int main() {
std::cout << "2^10 = " << Power<2, 10>::value << std::endl;
std::cout << "3^5 = " << Power<3, 5>::value << std::endl;
std::cout << "5^4 = " << Power<5, 4>::value << std::endl;
return 0;
}
Output:
2^10 = 1024
3^5 = 243
5^4 = 625
All calculated at compile time!
Compile-Time Fibonacci
Calculate Fibonacci numbers at compile time:
#include <iostream>
// Recursive case: Fib<N> = Fib<N-1> + Fib<N-2>
template <size_t N>
struct Fibonacci {
enum { value = Fibonacci<N - 1>::value + Fibonacci<N - 2>::value };
};
// Base cases
template <>
struct Fibonacci<0> {
enum { value = 0 };
};
template <>
struct Fibonacci<1> {
enum { value = 1 };
};
int main() {
std::cout << "Fib(0) = " << Fibonacci<0>::value << std::endl;
std::cout << "Fib(1) = " << Fibonacci<1>::value << std::endl;
std::cout << "Fib(10) = " << Fibonacci<10>::value << std::endl;
std::cout << "Fib(20) = " << Fibonacci<20>::value << std::endl;
return 0;
}
Output:
Fib(0) = 0
Fib(1) = 1
Fib(10) = 55
Fib(20) = 6765
TMP is Turing Complete
Template Metaprogramming in C++ is Turing complete, meaning it can theoretically compute anything that any other programming language can compute (given enough compile time and memory).
This was accidentally discovered and not originally intended! It means you can:
- Perform any calculation at compile time
- Implement any algorithm using templates
- Make complex compile-time decisions
Examples of what’s possible:
- Compile-time sorting
- Compile-time prime number generation
- Compile-time parsers
- Complex type manipulations
- Compile-time unit conversions
However, just because you can doesn’t always mean you should. TMP should be used judiciously where it provides real benefits.
Benefits and Drawbacks
Benefits
- Zero Runtime Cost: Computations are done during compilation
- Performance: Results are embedded as constants in the executable
- Type Safety: Errors caught at compile time
- Optimization: Compiler can optimize better with known constant values
- Code Generation: Generate specialized code automatically
Drawbacks
- Compilation Time: Can significantly increase compile times
- Complexity: Code is harder to read and debug
- Error Messages: Compiler errors can be cryptic and long
- Limited Debugging: Can’t debug compile-time code easily
- Compiler Limits: Recursion depth limits may be hit
Best Practices
- Use TMP when it provides clear benefits: Don’t use it just because you can
- Prefer
constexprfor modern C++: C++11’sconstexpris often simpler and clearer(Will be covered in detail in a separate chatpter) - Document well: TMP code needs good comments
- Keep it simple: Complex TMP can be unmaintainable
- Consider compile time: Balance compile-time vs runtime performance
- Use static_assert: Validate template parameters at compile time
Modern Alternative with constexpr:
// Modern C++11+ approach
constexpr size_t factorial(size_t n) {
return (n == 0) ? 1 : n * factorial(n - 1);
}
int main() {
constexpr size_t result = factorial(7); // Computed at compile time
std::cout << result << std::endl;
return 0;
}
This achieves the same result with much cleaner syntax! Will be covered in detail in separate chapter.
constexpr (>= C++11), consteval (C++20) and constinit (C++20)
Table of Contents
- Introduction
- C++11: Introduction of constexpr
- C++11 Limitations: The Single Return Statement Rule
- C++14: Relaxed constexpr
- C++20: Enhanced Compile-Time Programming
- C++20: Introduction of consteval
- C++20: constinit
- Practical Examples
- Benefits of Modern Compile-Time Programming
- Best Practices
Introduction
Modern C++ has progressively enhanced compile-time programming capabilities. What started with template metaprogramming (TMP) evolved into more readable and powerful features with constexpr (C++11), relaxed constexpr (C++14), and consteval (C++20).
C++11: Introduction of constexpr
What is constexpr?
C++11 introduced the constexpr keyword to enable compile-time computation in a more readable way than template metaprogramming.
Key Features:
- Functions marked
constexprcan be evaluated at compile time - Can also be used at runtime (unlike template metaprogramming)
- More readable than template metaprogramming
- Better error messages
Syntax:
constexpr return_type function_name(parameters) {
return expression;
}
Let’s compare factorial using TMP vs constexpr:
Template Metaprogramming (Pre-C++11):
#include <iostream>
template <size_t N>
struct Factorial {
enum { value = N * Factorial<N - 1>::value };
};
template <>
struct Factorial<0> {
enum { value = 1 };
};
int main() {
std::cout << Factorial<7>::value << std::endl; // Only compile-time
return 0;
}
C++11 constexpr:
#include <iostream>
constexpr int factorial(int n) {
return (n == 0) ? 1 : n * factorial(n - 1);
}
int main() {
// Compile-time evaluation
constexpr int result1 = factorial(7);
std::cout << result1 << std::endl;
// Can also be used at runtime!
int n;
std::cin >> n;
std::cout << factorial(n) << std::endl; // Runtime evaluation
return 0;
}
Output:
5040
constexpr vs Template Metaprogramming
| Feature | Template Metaprogramming | constexpr |
|---|---|---|
| Readability | Complex, hard to read | Clean, looks like normal code |
| Flexibility | Only compile-time | Both compile-time and runtime |
| Error Messages | Cryptic and long | Clear and concise |
| Debugging | Very difficult | Easier to debug |
| Syntax | Requires templates and specialization | Simple function syntax |
C++11 Limitations: The Single Return Statement Rule
The Problem
In C++11, constexpr functions were severely limited:
Restrictions:
- Must contain only a single return statement
- No local variables allowed
- No loops (for, while)
- No if statements (only ternary operator
?:) - Function body must be a single expression
Example of the Limitation:
// This does NOT work in C++11
constexpr int fibonacci(int n) {
if (n <= 1) return n; // Error: multiple return statements
return fibonacci(n-1) + fibonacci(n-2);
}
// This does NOT work in C++11
constexpr int sum_to_n(int n) {
int sum = 0; // Error: local variable
for (int i = 1; i <= n; ++i) { // Error: loop
sum += i;
}
return sum;
}
Workarounds in C++11
To work around the single return statement limitation, you had to use recursion and ternary operators:
#include <iostream>
// C++11 compliant - using ternary operator
constexpr int fibonacci(int n) {
return (n <= 1) ? n : (fibonacci(n-1) + fibonacci(n-2));
}
// C++11 compliant - using recursion for sum
constexpr int sum_to_n_helper(int n, int sum) {
return (n == 0) ? sum : sum_to_n_helper(n - 1, sum + n);
}
constexpr int sum_to_n(int n) {
return sum_to_n_helper(n, 0);
}
int main() {
constexpr int fib10 = fibonacci(10);
constexpr int sum = sum_to_n(100);
std::cout << "Fibonacci(10) = " << fib10 << std::endl;
std::cout << "Sum(1..100) = " << sum << std::endl;
return 0;
}
Output:
Fibonacci(10) = 55
Sum(1..100) = 5050
Problem: This is awkward and hard to read. Simple iterative algorithms require complex recursive solutions.
C++14: Relaxed constexpr
What Changed in C++14?
C++14 relaxed the restrictions on constexpr functions, making them much more practical:
New Capabilities:
- Multiple statements allowed
- Local variables allowed
- Loops (for, while, do-while)
- If-else statements
- Multiple return statements
- switch statements
- Modify local variables
Multiple Statements Allowed
#include <iostream>
// C++14: Multiple statements and local variables
constexpr int sum_to_n(int n) {
int sum = 0; // Local variable allowed!
for (int i = 1; i <= n; ++i) { // Loop allowed!
sum += i;
}
return sum; // Multiple statements allowed!
}
int main() {
constexpr int result = sum_to_n(100);
std::cout << "Sum(1..100) = " << result << std::endl;
return 0;
}
Output:
Sum(1..100) = 5050
Loops in constexpr
#include <iostream>
// C++14: Factorial with loop instead of recursion
constexpr int factorial(int n) {
int result = 1;
for (int i = 2; i <= n; ++i) {
result *= i;
}
return result;
}
// C++14: Fibonacci with loop
constexpr int fibonacci(int n) {
if (n <= 1) return n;
int prev = 0, curr = 1;
for (int i = 2; i <= n; ++i) {
int next = prev + curr;
prev = curr;
curr = next;
}
return curr;
}
int main() {
constexpr int fact7 = factorial(7);
constexpr int fib10 = fibonacci(10);
std::cout << "7! = " << fact7 << std::endl;
std::cout << "Fibonacci(10) = " << fib10 << std::endl;
return 0;
}
Output:
7! = 5040
Fibonacci(10) = 55
Comparison: C++11 vs C++14
Finding the maximum in an array:
C++11 (Complex recursion):
constexpr int max_helper(const int* arr, int size, int current_max, int index) {
return (index == size) ? current_max :
max_helper(arr, size,
(arr[index] > current_max ? arr[index] : current_max),
index + 1);
}
constexpr int find_max(const int* arr, int size) {
return max_helper(arr, size, arr[0], 1);
}
C++14 (Simple loop):
constexpr int find_max(const int* arr, int size) {
int max_val = arr[0];
for (int i = 1; i < size; ++i) {
if (arr[i] > max_val) {
max_val = arr[i];
}
}
return max_val;
}
Much cleaner and more readable!
C++20: Enhanced Compile-Time Programming
C++20 significantly expanded what can be done at compile time, bringing constexpr closer to being as powerful as regular runtime code.
constexpr Enhancements
New C++20 Features:
constexprdestructorsconstexprdynamic memory allocation (new/delete)constexprvirtual functionsconstexprtry-catch blocksconstexprstandard library containersconstexpralgorithms
1. constexpr Destructors
#include <iostream>
struct ConstexprResource {
constexpr ConstexprResource() {}
constexpr ~ConstexprResource() {
// Cleanup operations that must run at compile time
}
};
constexpr void manage_resource() {
ConstexprResource r; // Constructor and destructor called at compile time
}
int main() {
constexpr auto result = manage_resource();
return 0;
}
Use Case: Enables user-defined types (UDTs) with specific cleanup requirements to participate in constexpr contexts, supporting the creation of other constexpr features like containers.
2. constexpr Dynamic Memory Allocation (new/delete)
#include <iostream>
constexpr int sum_array_elements() {
int* arr = new int[4]{1, 2, 3, 4}; // Allocate at compile time
int sum = 0;
for (int i = 0; i < 4; ++i) {
sum += arr[i];
}
delete[] arr; // Deallocate at compile time
return sum;
}
int main() {
constexpr int result = sum_array_elements();
static_assert(result == 10);
std::cout << "Sum: " << result << std::endl;
return 0;
}
Output:
Sum: 10
Use Case: Vital for making standard library containers (std::vector, std::string) fully constexpr, allowing complex data structures to be built and processed entirely at compile time.
3. constexpr Virtual Functions
#include <iostream>
struct Memory {
constexpr virtual unsigned int capacity() const = 0;
constexpr virtual ~Memory() = default;
};
struct EEPROM_25LC160C : Memory {
constexpr unsigned int capacity() const override {
return 2048; // A compile-time constant
}
};
constexpr unsigned int get_eeprom_capacity() {
EEPROM_25LC160C chip;
return chip.capacity(); // Virtual dispatch happens at compile time
}
int main() {
constexpr unsigned int cap = get_eeprom_capacity();
static_assert(cap == 2048);
std::cout << "EEPROM Capacity: " << cap << " bytes" << std::endl;
return 0;
}
Output:
EEPROM Capacity: 2048 bytes
Use Case: Enables compile-time polymorphism for scenarios like hardware abstraction layers (HALs) where component properties can be determined during compilation. This was impossible before C++20!
4. constexpr try-catch Blocks
#include <iostream>
#include <stdexcept>
constexpr int safe_divide(int a, int b) {
if (b == 0) {
throw std::runtime_error("Division by zero!");
}
return a / b;
}
constexpr int compute_quotient(int x) {
try {
return safe_divide(100, x);
} catch (const std::runtime_error&) {
return -1;
}
}
int main() {
constexpr int result1 = compute_quotient(25);
constexpr int result2 = compute_quotient(0);
static_assert(result1 == 4);
static_assert(result2 == -1);
std::cout << "100 / 25 = " << result1 << std::endl;
std::cout << "100 / 0 = " << result2 << " (error handled)" << std::endl;
return 0;
}
Output:
100 / 25 = 4
100 / 0 = -1 (error handled)
Use Case: Allows library writers to maintain exception safety guarantees while still permitting their code to be used in constexpr contexts.
5. constexpr Standard Library Containers
C++20 allows dynamic containers at compile time:
#include <iostream>
#include <vector>
#include <algorithm>
constexpr auto get_sorted_vector_back() {
std::vector<int> my_vec = {1, 4, 2, 3}; // Works at compile time
std::sort(my_vec.begin(), my_vec.end()); // Works at compile time
return my_vec.back();
}
constexpr std::vector<int> create_squares(int n) {
std::vector<int> squares;
for (int i = 1; i <= n; ++i) {
squares.push_back(i * i);
}
return squares;
}
int main() {
constexpr int max_val = get_sorted_vector_back();
static_assert(max_val == 4);
std::cout << "Max value: " << max_val << std::endl;
return 0;
}
Output:
Max value: 4
Use Case: Enables the preparation of complex, pre-processed data structures entirely at compile time, eliminating runtime initialization overhead.
6. constexpr Algorithms
#include <iostream>
#include <algorithm>
#include <array>
constexpr std::array<int, 4> get_sorted_array() {
std::array<int, 4> arr = {3, 1, 4, 2};
std::sort(arr.begin(), arr.end()); // std::sort is constexpr in C++20
return arr;
}
constexpr int find_max_with_algorithm() {
std::array<int, 10> arr = {5, 2, 8, 1, 9, 3, 7, 4, 6, 10};
// Use std::max_element at compile time!
auto max_it = std::max_element(arr.begin(), arr.end());
return *max_it;
}
int main() {
constexpr auto sorted_arr = get_sorted_array();
constexpr int max_val = find_max_with_algorithm();
static_assert(sorted_arr[0] == 1 && sorted_arr[3] == 4);
static_assert(max_val == 10);
std::cout << "Sorted array: ";
for (int val : sorted_arr) {
std::cout << val << " ";
}
std::cout << std::endl;
std::cout << "Max value: " << max_val << std::endl;
return 0;
}
Output:
Sorted array: 1 2 3 4
Max value: 10
Use Case: Permits utility functions that rely on common algorithms (sorting, searching, transforming data) to be evaluated at compile time to produce final, optimized results embedded directly into the executable.
C++20: Introduction of consteval
What is consteval?
C++20 introduced consteval for immediate functions - functions that must be evaluated at compile time.
Key Difference:
constexpr: Can be evaluated at compile time, but may be evaluated at runtimeconsteval: Must be evaluated at compile time, never at runtime
Syntax:
consteval return_type function_name(parameters) {
// function body
}
constexpr vs consteval
#include <iostream>
constexpr int square_constexpr(int x) {
return x * x;
}
consteval int square_consteval(int x) {
return x * x;
}
int main() {
// constexpr: Can use at compile time
constexpr int a = square_constexpr(5); // OK: Compile time
// constexpr: Can also use at runtime
int n = 10;
int b = square_constexpr(n); // OK: Runtime
// consteval: Must use at compile time
constexpr int c = square_consteval(7); // OK: Compile time
// consteval: CANNOT use at runtime
// int d = square_consteval(n); // Error: n is not a constant
std::cout << "a = " << a << std::endl;
std::cout << "b = " << b << std::endl;
std::cout << "c = " << c << std::endl;
return 0;
}
When to Use consteval
Use consteval when:
- You want to guarantee compile-time evaluation
- You want to prevent accidental runtime usage
- You’re generating compile-time constants
- You want to catch errors if non-constant arguments are passed
Example: Compile-Time String Hashing
#include <iostream>
#include <string_view>
// Must be evaluated at compile time
consteval size_t hash_string(std::string_view str) {
size_t hash = 0;
for (char c : str) {
hash = hash * 31 + c;
}
return hash;
}
int main() {
// Compile time - string literal
constexpr auto hash1 = hash_string("Hello");
constexpr auto hash2 = hash_string("World");
std::cout << "Hash of 'Hello': " << hash1 << std::endl;
std::cout << "Hash of 'World': " << hash2 << std::endl;
// This would be a compile error:
// std::string s = "Runtime";
// auto hash3 = hash_string(s); // Error: s is not compile-time constant
return 0;
}
C++20: constinit
C++20 also introduced constinit for variables that must be initialized at compile time but can be modified at runtime.
#include <iostream>
// Must be initialized at compile time
constinit int global_value = 42;
constexpr int compute_value() {
return 100;
}
constinit int computed_global = compute_value();
int main() {
std::cout << "Global value: " << global_value << std::endl;
// Can be modified at runtime (unlike constexpr variables)
global_value = 100;
std::cout << "Modified value: " << global_value << std::endl;
return 0;
}
Key Points:
constinit: Initialization must be at compile time, but value can change at runtimeconstexpr: Must be compile-time constant, cannot be modified
Practical Examples
Compile-Time Prime Checker
#include <iostream>
consteval bool is_prime(int n) {
if (n <= 1) return false;
if (n <= 3) return true;
if (n % 2 == 0 || n % 3 == 0) return false;
for (int i = 5; i * i <= n; i += 6) {
if (n % i == 0 || n % (i + 2) == 0) {
return false;
}
}
return true;
}
int main() {
constexpr bool result1 = is_prime(17); // Compile time
constexpr bool result2 = is_prime(100); // Compile time
std::cout << "17 is prime: " << result1 << std::endl;
std::cout << "100 is prime: " << result2 << std::endl;
return 0;
}
Compile-Time String Length
#include <iostream>
#include <string_view>
consteval size_t string_length(std::string_view str) {
return str.length();
}
int main() {
constexpr auto len = string_length("Hello, World!");
std::cout << "Length: " << len << std::endl;
return 0;
}
Benefits of Modern Compile-Time Programming
- Performance: Zero runtime overhead - calculations done during compilation
- Type Safety: Errors caught at compile time
- Readability: Modern syntax is much cleaner than TMP
- Flexibility:
constexprworks at both compile-time and runtime - Powerful: C++20 allows almost any code to run at compile time
- Guarantees:
constevalensures compile-time evaluation
Evolution Summary:
| Feature | C++11 | C++14 | C++20 |
|---|---|---|---|
| Single return only | ✅ | ❌ | ❌ |
| Multiple statements | ❌ | ✅ | ✅ |
| Loops | ❌ | ✅ | ✅ |
| Virtual functions | ❌ | ❌ | ✅ |
| Dynamic memory | ❌ | ❌ | ✅ |
| STL containers | ❌ | ❌ | ✅ |
| consteval | ❌ | ❌ | ✅ |
Best Practices
- Use
constexprby default for functions that can be compile-time - Use
constevalwhen you want to guarantee compile-time evaluation - Prefer
constexprover TMP for readability - Use
constinitfor globals that need compile-time initialization - Test both paths: If using
constexpr, test both compile-time and runtime paths - Be aware of compile times: Complex
constexprcan increase compilation time - Use
if constexprfor compile-time branching (C++17)
CRTP (Curiously Recurring Template Pattern) in C++
The One-Way Knowledge of Inheritance
Standard inheritance creates a hierarchy where knowledge only flows downward:
Derived Knows Base:
When you derive a class, it inherits all members (functions and variables) from its parent. It can see and use public and protected members of the Base class directly.
class Base {
protected:
int value;
public:
void baseFunction() { }
};
class Derived : public Base {
public:
void derivedFunction() {
value = 10; // Can access Base's protected member
baseFunction(); // Can call Base's function
}
};
Base Has No Knowledge of Derived: The Base class is defined independently. It has absolutely no idea which classes will inherit from it later.
class Base {
public:
void callDerived() {
// ERROR: Base doesn't know about Derived
// derivedFunction(); // Won't compile!
}
};
class Derived : public Base {
public:
void derivedFunction() {
std::cout << "Derived function called\n";
}
};
The “Access” Problem
If you have a Base object or pointer, you cannot access functions that only exist in Derived:
int main() {
Derived d;
Base* ptr = &d;
// ptr->derivedFunction(); // ERROR: Base doesn't know this function
}
In standard OOP, to allow the Base class to “call” a derived function, you must use Virtual Functions:
class Base {
public:
virtual void process() = 0; // Pure virtual
};
class Derived : public Base {
public:
void process() override {
std::cout << "Processing in Derived\n";
}
};
int main() {
Base* ptr = new Derived();
ptr->process(); // Works! Calls Derived::process()
delete ptr;
}
This function dispatch at runtime is dynamic polymorphism. Its really neat feature and very usefull. But in performance critical system it can be an overhead as well. How ?
The Cost of Virtual Functions
However, virtual functions come with a “hidden” cost:
- V-Table Lookups: The program must look up the correct function at runtime through a virtual table (vtable).
- Inlining Failure: Compilers often cannot optimize or “inline” virtual calls, making them slower.
- Memory Overhead: Each object with virtual functions carries a hidden pointer to the vtable (typically 8 bytes on 64-bit systems).
class Base {
public:
virtual void foo() { }
};
// Behind the scenes, compiler generates something like:
// - Global vtable for Base
// - Each Base object contains a hidden vptr (pointer to vtable)
// - Function calls: obj->vptr->vtable[index]()
Performance Impact:
- Direct call: ~1-2 CPU cycles
- Virtual call: ~5-10 CPU cycles (vtable lookup + indirect jump)
- Lost inlining opportunities mean further optimizations are blocked
Let’s revisit what is our goal here:
- Derived class objects can invoke base class functions
- Base class functions need to call derived class methods (without virtuals) (How ?)
Question: How can we make the base class function (invoked using derive class object) able to call derived class methods ?
Answer: The base class function needs to have knowledge of the exact derived class type at compile time.
If we can achieve that, we get static polymorphism – polymorphic behavior resolved at compile time with zero runtime overhead!
What about Templates ? Can we use it for to solve this problem ?
What if we create a base class that takes the derived class type as its template parameter?
This way the Base class has idea about the exact type of the Derived class at compile time and our problem solved.
This is exactly what CRTP (Curiously Recurring Template Pattern) is!
What is CRTP?
CRTP is a pattern that achieves static polymorphism by passing the type of a derived class to a base class. In the Curiously Recurring Template Pattern, a class (let’s call it Derived) inherits from a class template (let’s call it Base) that has been specialized specifically with Derived as its template argument. This enables the base class to have knowledge of the derived class type at compile time, eliminating the runtime overhead of virtual function calls while maintaining polymorphic behavior.
// Step 1: Define a template base class that takes a type T
template<typename T>
class Base {
// Base is a template - T will be the derived class type
};
// Step 2: Derived class inherits from Base, passing its own type as T
class Derived : public Base<Derived> {
// ^^^^^^^^
// Derived passes itself as the template argument!
};
This creates a curious recursive relationship where:
Derivedinherits fromBase<Derived>- Inside
Base, the template parameterTis actuallyDerived Base<Derived>knows the exact typeDerivedat compile timeBase<Derived>can callDerived’s methods usingstatic_cast<T*>(this)
Base<T>
(Template Class)
△
│ T = Derived
│
Derived
(Inherits from Base<Derived>)
│
├─→ static_cast<Derived*>(this)
│
Compile-time
Polymorphism
(Zero overhead)
The Magic is Compile-Time Downcasting
// Base class template - T will be the derived class type
template<typename T>
class Base {
public:
void interface() {
// Cast 'this' to T* (which is Derived*) at compile time
static_cast<T*>(this)->implementation();
}
};
// Derived inherits from Base<Derived>
// So inside Base, T is Derived
class Derived : public Base<Derived> {
public:
void implementation() {
std::cout << "Derived implementation called!\n";
}
};
int main() {
Derived d;
d.interface(); // Base::interface() calls Derived::implementation()
}
Output:
Derived implementation called!
What happened?
- We call
d.interface()which is defined inBase<Derived> - Inside
Base, the template parameterTisDerived - We do
static_cast<T*>(this)which becomesstatic_cast<Derived*>(this) - This cast is resolved at compile time (zero runtime cost!)
- We call
implementation()on the derived class directly - Compiler can inline the entire call chain for maximum performance
Basic CRTP Implementation Example: Template Method Pattern
The Template Method Pattern is a behavioral design pattern where the base class defines the skeleton of an algorithm, and derived classes provide specific implementations for certain steps. While this pattern can be achieved using dynamic polymorphism with virtual functions, CRTP offers a compile-time alternative with zero runtime overhead. Lets look at both.
Comparison: Virtual Functions vs CRTP
Let’s first look at the traditional approach using dynamic polymorphism, then explore how CRTP implements the same pattern.
Approach 1: Virtual Functions (Dynamic Polymorphism)
#include <iostream>
#include <memory>
#include <vector>
// Abstract base class with virtual functions
class DataProcessor {
public:
// The template method - defines the algorithm structure
void process() {
read();
processImpl(); // Virtual dispatch
write();
}
virtual ~DataProcessor() = default;
private:
void read() {
std::cout << "[DataProcessor] Reading data...\n";
}
void write() {
std::cout << "[DataProcessor] Writing results...\n";
}
protected:
virtual void processImpl() = 0; // Pure virtual - customization point
};
// Concrete implementation for CSV data
class CSVProcessor : public DataProcessor {
protected:
void processImpl() override {
std::cout << "[CSVProcessor] Processing CSV format\n";
std::cout << " - Parsing comma-separated values\n";
}
};
// Concrete implementation for JSON data
class JSONProcessor : public DataProcessor {
protected:
void processImpl() override {
std::cout << "[JSONProcessor] Processing JSON format\n";
std::cout << " - Parsing JSON structure\n";
}
};
int main() {
// Can store different types via base class pointers
std::vector<std::unique_ptr<DataProcessor>> processors;
processors.push_back(std::make_unique<CSVProcessor>());
processors.push_back(std::make_unique<JSONProcessor>());
for (auto& proc : processors) {
proc->process(); // Virtual dispatch at runtime
std::cout << "\n";
}
}
Output:
[DataProcessor] Reading data...
[CSVProcessor] Processing CSV format
- Parsing comma-separated values
[DataProcessor] Writing results...
[DataProcessor] Reading data...
[JSONProcessor] Processing JSON format
- Parsing JSON structure
[DataProcessor] Writing results...
Characteristics:
- Uses virtual function for runtime dispatch
- Can store heterogeneous types in containers
- Runtime overhead from vtable lookup
- More flexible for dynamic scenarios
Approach 2: CRTP (Static Polymorphism)
Now let’s implement the same pattern using CRTP. The key difference is that the base class knows the derived type at compile time:
#include <iostream>
// CRTP Base class that defines the template method pattern
template<typename Derived>
class DataProcessor {
public:
// The template method - defines the algorithm structure
void process() {
read();
static_cast<Derived*>(this)->processImpl(); // Compile-time dispatch
write();
}
private:
void read() {
std::cout << "[DataProcessor] Reading data...\n";
}
void write() {
std::cout << "[DataProcessor] Writing results...\n";
}
};
// Concrete implementation for CSV data
class CSVProcessor : public DataProcessor<CSVProcessor> {
public:
void processImpl() {
std::cout << "[CSVProcessor] Processing CSV format\n";
std::cout << " - Parsing comma-separated values\n";
}
};
// Concrete implementation for JSON data
class JSONProcessor : public DataProcessor<JSONProcessor> {
public:
void processImpl() {
std::cout << "[JSONProcessor] Processing JSON format\n";
std::cout << " - Parsing JSON structure\n";
}
};
// Concrete implementation for XML data
class XMLProcessor : public DataProcessor<XMLProcessor> {
public:
void processImpl() {
std::cout << "[XMLProcessor] Processing XML format\n";
std::cout << " - Parsing XML tags\n";
}
};
int main() {
CSVProcessor csv;
csv.process();
std::cout << "\n";
JSONProcessor json;
json.process();
std::cout << "\n";
XMLProcessor xml;
xml.process();
}
Output:
[DataProcessor] Reading data...
[CSVProcessor] Processing CSV format
- Parsing comma-separated values
[DataProcessor] Writing results...
[DataProcessor] Reading data...
[JSONProcessor] Processing JSON format
- Parsing JSON structure
[DataProcessor] Writing results...
[DataProcessor] Reading data...
[XMLProcessor] Processing XML format
- Parsing XML tags
[DataProcessor] Writing results...
Characteristics:
- No virtual functions required
- Compile-time type resolution via
static_cast - Cannot store different types in a single container (trade-off)
- Zero runtime overhead for polymorphic dispatch
- Compiler can fully inline the call chain
Key Differences
| Aspect | Virtual Functions | CRTP |
|---|---|---|
| Dispatch Type | Runtime (dynamic) | Compile-time (static) |
| Polymorphic Containers | Yes | No |
| Virtual Function Overhead | Yes (~5-10 CPU cycles) | None |
| Inlining | Limited | Full inlining possible |
| Type Flexibility | High (runtime types) | Low (compile-time types) |
| Memory Overhead | vtable pointer per object | None |
Virtual Functions - Runtime Dispatch:
Base class (with virtual methods)
△
│ Virtual call
│ (Runtime decision)
│
┌──────┴──────┐
│ │
Derived1 Derived2
│ │
└──────┬──────┘
│ vtable lookup at runtime
│ Indirect jump (5-10 cycles)
▼
Actual Method
CRTP - Compile-time Dispatch:
Base<T> (Template class)
△
│ T = Concrete type
│ (Known at compile time)
│
┌──────┴──────┐
│ │
Base< Base<
Derived1> Derived2>
│ │
└──────┬──────┘
│ static_cast<T*>(this)
│ Resolved at compile time
│ Full inlining possible
▼
Actual Method
(Zero overhead)
When to Use Each
Use Virtual Functions when:
- You need to store different derived types in containers
- Types are determined at runtime
- Flexibility is more important than peak performance
- You’re building extensible plugin systems
Use CRTP when:
- You know all types at compile time
- Performance-critical code needs zero overhead
- You don’t need heterogeneous containers
- You want compiler optimization benefits
Performance Comparison: CRTP vs Virtual Functions
One of the key advantages of CRTP is its superior performance characteristics compared to virtual functions. Let’s examine this with concrete benchmarks.
Benchmark Setup
The following benchmark compares the performance of CRTP against traditional virtual functions. The test scenario involves:
- 3,000 shapes (1,000 circles, 1,000 rectangles, 1,000 triangles)
- 10,000 iterations performing calculations
- 60,000,000 total function calls (
area()andperimeter()on each shape) - 5 runs for statistical accuracy
The code implements both approaches identically in terms of logic, with the only difference being the polymorphism mechanism: virtual functions vs. CRTP.
Benchmark Code
#include <iostream>
#include <chrono>
#include <vector>
#include <memory>
#include <cmath>
#include <iomanip>
// ============================================================================
// APPROACH 1: Virtual Functions (Polymorphism with Runtime Dispatch)
// ============================================================================
class ShapeVirtual {
public:
virtual ~ShapeVirtual() = default;
virtual double area() const = 0;
virtual double perimeter() const = 0;
};
class CircleVirtual : public ShapeVirtual {
private:
double radius_;
public:
CircleVirtual(double r) : radius_(r) {}
double area() const override {
return 3.14159 * radius_ * radius_;
}
double perimeter() const override {
return 2 * 3.14159 * radius_;
}
};
class RectangleVirtual : public ShapeVirtual {
private:
double width_, height_;
public:
RectangleVirtual(double w, double h) : width_(w), height_(h) {}
double area() const override {
return width_ * height_;
}
double perimeter() const override {
return 2 * (width_ + height_);
}
};
class TriangleVirtual : public ShapeVirtual {
private:
double a_, b_, c_;
public:
TriangleVirtual(double a, double b, double c) : a_(a), b_(b), c_(c) {}
double area() const override {
double s = (a_ + b_ + c_) / 2;
return std::sqrt(s * (s - a_) * (s - b_) * (s - c_));
}
double perimeter() const override {
return a_ + b_ + c_;
}
};
// ============================================================================
// APPROACH 2: CRTP (Curiously Recurring Template Pattern)
// ============================================================================
template <typename Derived>
class ShapeCRTP {
public:
double area() const {
return static_cast<const Derived*>(this)->area_impl();
}
double perimeter() const {
return static_cast<const Derived*>(this)->perimeter_impl();
}
~ShapeCRTP() = default;
};
class CircleCRTP : public ShapeCRTP<CircleCRTP> {
private:
double radius_;
public:
CircleCRTP(double r) : radius_(r) {}
double area_impl() const {
return 3.14159 * radius_ * radius_;
}
double perimeter_impl() const {
return 2 * 3.14159 * radius_;
}
};
class RectangleCRTP : public ShapeCRTP<RectangleCRTP> {
private:
double width_, height_;
public:
RectangleCRTP(double w, double h) : width_(w), height_(h) {}
double area_impl() const {
return width_ * height_;
}
double perimeter_impl() const {
return 2 * (width_ + height_);
}
};
class TriangleCRTP : public ShapeCRTP<TriangleCRTP> {
private:
double a_, b_, c_;
public:
TriangleCRTP(double a, double b, double c) : a_(a), b_(b), c_(c) {}
double area_impl() const {
double s = (a_ + b_ + c_) / 2;
return std::sqrt(s * (s - a_) * (s - b_) * (s - c_));
}
double perimeter_impl() const {
return a_ + b_ + c_;
}
};
// ============================================================================
// BENCHMARK FUNCTIONS
// ============================================================================
long long benchmarkVirtual() {
std::vector<std::unique_ptr<ShapeVirtual>> shapes;
// Create mixed shapes
for (int i = 0; i < 1000; ++i) {
shapes.push_back(std::make_unique<CircleVirtual>(5.0 + i*0.001));
shapes.push_back(std::make_unique<RectangleVirtual>(4.0 + i*0.001, 6.0));
shapes.push_back(std::make_unique<TriangleVirtual>(3.0, 4.0, 5.0 + i*0.001));
}
auto start = std::chrono::high_resolution_clock::now();
volatile double totalArea = 0;
volatile double totalPerimeter = 0;
for (int iteration = 0; iteration < 10000; ++iteration) {
double scale = 1.0 + iteration * 0.0001;
for (const auto& shape : shapes) {
totalArea += shape->area() * scale;
totalPerimeter += shape->perimeter() * scale;
}
}
auto end = std::chrono::high_resolution_clock::now();
return std::chrono::duration_cast<std::chrono::milliseconds>(end - start).count();
}
long long benchmarkCRTP() {
std::vector<CircleCRTP> circles; circles.reserve(1000);
std::vector<RectangleCRTP> rects; rects.reserve(1000);
std::vector<TriangleCRTP> tris; tris.reserve(1000);
for (int i = 0; i < 1000; ++i) {
circles.emplace_back(5.0 + i*0.001);
rects.emplace_back(4.0 + i*0.001, 6.0);
tris.emplace_back(3.0, 4.0, 5.0 + i*0.001);
}
auto start = std::chrono::high_resolution_clock::now();
volatile double totalArea = 0, totalPerimeter = 0;
for (int iteration = 0; iteration < 10000; ++iteration) {
double scale = 1.0 + iteration * 0.0001;
for (const auto& c : circles) {
totalArea += c.area() * scale;
totalPerimeter += c.perimeter() * scale;
}
for (const auto& r : rects) {
totalArea += r.area() * scale;
totalPerimeter += r.perimeter() * scale;
}
for (const auto& t : tris) {
totalArea += t.area() * scale;
totalPerimeter += t.perimeter() * scale;
}
}
auto end = std::chrono::high_resolution_clock::now();
return std::chrono::duration_cast<std::chrono::milliseconds>(end - start).count();
}
// ============================================================================
// MAIN - RUN BENCHMARKS
// ============================================================================
int main() {
std::cout << "\n";
std::cout << "╔════════════════════════════════════════════════════════╗\n";
std::cout << "║ CRTP vs Virtual Functions - Performance Benchmark ║\n";
std::cout << "╚════════════════════════════════════════════════════════╝\n";
std::cout << "\n";
std::cout << "Scenario: 3000 shapes (1000 of each type), 10000 iterations\n";
std::cout << "Each iteration calls area() and perimeter() on all shapes\n";
std::cout << "Total function calls: 3000 × 2 × 10000 = 60,000,000 calls\n";
std::cout << "\n";
std::cout << "Running benchmarks 5 times each for accuracy...\n\n";
long long virtualTotal = 0;
long long crptTotal = 0;
for (int run = 1; run <= 5; ++run) {
long long vTime = benchmarkVirtual();
long long cTime = benchmarkCRTP();
virtualTotal += vTime;
crptTotal += cTime;
std::cout << "Run " << run << ": Virtual=" << std::setw(3) << vTime
<< "ms | CRTP=" << std::setw(3) << cTime << "ms\n";
}
double avgVirtual = virtualTotal / 5.0;
double avgCRTP = crptTotal / 5.0;
double improvement = ((avgVirtual - avgCRTP) / avgVirtual) * 100.0;
double speedup = avgVirtual / avgCRTP;
std::cout << "\n";
std::cout << "╔════════════════════════════════════════════════════════╗\n";
std::cout << "║ RESULTS SUMMARY ║\n";
std::cout << "╚════════════════════════════════════════════════════════╝\n";
std::cout << "\n";
std::cout << "Virtual Functions (Average): " << std::fixed << std::setprecision(1)
<< avgVirtual << " ms\n";
std::cout << "CRTP (Average): " << avgCRTP << " ms\n";
std::cout << "\n";
std::cout << "Performance Improvement: " << improvement << "%\n";
std::cout << "Speedup Factor: " << std::setprecision(2) << speedup << "x faster\n";
std::cout << "\n";
std::cout << "═══════════════════════════════════════════════════════════\n\n";
return 0;
}
Benchmark Results
╔════════════════════════════════════════════════════════╗
║ CRTP vs Virtual Functions - Performance Benchmark ║
╚════════════════════════════════════════════════════════╝
Scenario: 3000 shapes (1000 of each type), 10000 iterations
Each iteration calls area() and perimeter() on all shapes
Total function calls: 3000 × 2 × 10000 = 60,000,000 calls
Running benchmarks 5 times each for accuracy...
Run 1: Virtual= 55ms | CRTP= 29ms
Run 2: Virtual= 35ms | CRTP= 25ms
Run 3: Virtual= 34ms | CRTP= 25ms
Run 4: Virtual= 34ms | CRTP= 25ms
Run 5: Virtual= 35ms | CRTP= 25ms
╔════════════════════════════════════════════════════════╗
║ RESULTS SUMMARY ║
╚════════════════════════════════════════════════════════╝
Virtual Functions (Average): 38.6 ms
CRTP (Average): 25.8 ms
Performance Improvement: 33.2%
Speedup Factor: 1.50x faster
═══════════════════════════════════════════════════════════
Analysis
Important Note: Benchmark results are highly dependent on the compiler, optimization flags, CPU architecture, and runtime environment. This benchmark was compiled with:
g++ -O3 -std=c++17 benchmark.cpp -o benchmark
These results are provided to showcase that CRTP can offer significant performance advantages in certain scenarios, particularly with modern optimizers and aggressive optimization levels like -O3. Your actual results may vary significantly depending on your compiler version, optimization flags, CPU architecture, and runtime environment. It’s always recommended to profile your own code with your specific toolchain and hardware.
The benchmark results clearly demonstrate CRTP’s performance advantage in this scenario:
33.2% Performance Improvement over virtual functions on 60 million function calls. The CRTP approach achieves a 1.50x speedup, completing the same workload in approximately two-thirds the time of the virtual function approach.
This significant performance gain stems from several factors:
-
No vtable lookups: CRTP eliminates runtime table lookups entirely, replacing them with compile-time type resolution.
-
Full inlining: The compiler can aggressively inline CRTP calls since the target function is known at compile time. Virtual function calls are typically not inlined due to the indirection involved.
-
Better cache locality: Without vtable pointers, objects have smaller memory footprints and better cache behavior.
-
Optimizer friendly: The compiler has complete visibility into the call chain and can apply more aggressive optimizations.
Performance Comparison Visualization:
Virtual Functions │ CRTP
─────────────────────────────
38.6 ms (100%) │ 25.8 ms (67%)
██████████ │ ███████
Slower ←────────────┼────────→ Faster
│
33.2% improvement
1.50x speedup
The results show that while the theoretical overhead per virtual call is 5-10 CPU cycles, in real-world scenarios with modern optimizers, the actual impact can be even more substantial when considering inlining opportunities and cache effects.
CRTP Limitations
One of the most significant limitations of CRTP is its inability to store different derived types in the same container. This stems from a fundamental constraint: each specialization of a CRTP base template is a completely different type. For example, Shape<Circle> and Shape<Square> are entirely different types with no common base class, making it impossible to store both in a single container through polymorphic pointers or references.
Additionally, CRTP requires all types to be known at compile time, limiting its use in scenarios where types are determined dynamically at runtime, such as plugin systems or highly extensible architectures.
These limitations will be explored in detail in a separate chapter on CRTP limitations and hybrid approaches that combine CRTP with dynamic polymorphism for maximum flexibility and performance.
Summary
This tutorial covers the fundamentals of CRTP and how it enables static polymorphism with concrete performance advantages.
Real-World Projects Using CRTP
Several high-performance and widely-used open-source projects leverage CRTP extensively:
ClickHouse (Column-oriented Database)
- One of the fastest open-source analytical databases
- Uses CRTP extensively for query optimization and column processing
- Achieves extreme performance through compile-time specialization
- CRTP enables efficient data type handling without virtual function overhead
Eigen (Linear Algebra Library)
- Industry-standard C++ library for matrices and vectors
- Uses expression templates with CRTP for lazy evaluation
- Avoids temporary object creation in complex mathematical expressions
- Powers machine learning frameworks like TensorFlow
High-Frequency Trading (HFT) Systems
- Critical latency-sensitive applications in financial markets
- CRTP is a core pattern in order routing and risk management systems
- Eliminates vtable overhead for microsecond-critical operations
- Used in systems that process millions of orders per second
Boost C++ Libraries
- Various Boost libraries use CRTP for type-safe, zero-overhead abstractions
- Examples include Boost.Asio (networking) and Boost.Range
Apache Arrow
- Data processing framework used in big data ecosystems
- Uses CRTP for efficient memory layout and data type handling
These projects demonstrate that CRTP is not just an academic pattern but a proven technique used in the most demanding, performance-critical applications in the industry.
Value Categories in C++
Table of Contents
- Overview
- Value Category Hierarchy Diagram
- prvalue (pure rvalue)
- lvalue
- xvalue (expiring value)
- Summary Table
- Quick Examples
- Intuition
- Visual Relationships
Overview
In C++, every expression has two properties: a type and a value category.
Value categories describe what kind of value an expression yields.
C++11 introduced 3 primary categories:
- lvalue
- xvalue
- prvalue
And two broader categories:
- glvalue = lvalue or xvalue
- rvalue = xvalue or prvalue
Value Category Hierarchy Diagram
expression
|
+------------+------------+
| |
glvalue rvalue
| |
+----+----+ +-----+-----+
| | | |
lvalue xvalue xvalue prvalue
Explanation:
- glvalue (generalized lvalue): Has identity
- rvalue: Can be moved from
- lvalue: Has identity, cannot be moved from (unless explicitly cast)
- xvalue: Has identity AND can be moved from
- prvalue: No identity, temporary value
prvalue (pure rvalue)
A prvalue is a temporary value that does not refer to an existing object.
Examples:
int x = 5; // 5 is a prvalue
int y = x + 10; // (x + 10) is a prvalue
std::string s("hi"); // temporary std::string → prvalue
Characteristics:
- ❌ Not addressable (no identity)
- Creates a new temporary object
- Result of most operators and literals
lvalue
An lvalue refers to an identifiable, persistent object in memory.
Examples:
int a = 10; // a is an lvalue
int &r = a; // r is also an lvalue
struct S { int m; };
S s;
s.m = 5; // s.m is an lvalue
Characteristics:
- ✅ Addressable (has identity)
- Persists beyond a single expression
- Can appear on the left side of assignment
xvalue (expiring value)
An xvalue is a special glvalue that refers to an object whose resources can be reused (i.e., movable).
Examples:
std::string s = "hello";
std::string s2 = std::move(s); // std::move(s) → xvalue
struct S { std::string name; };
S getS();
getS().name = "Alice"; // getS() is prvalue, getS().name is xvalue
Characteristics:
- ✅ Addressable (has identity)
- About to expire (resources can be moved)
- Result of
std::move()or member access on rvalue
Summary Table
| Category | Meaning | Example | Addressable? |
|---|---|---|---|
| prvalue | Temporary / non-object expression | 5, "hi", x+1 | ❌ |
| lvalue | Persistent object with identity | variables, members | ✅ |
| xvalue | Expiring object suitable for move | std::move(obj) | ✅ |
| glvalue | lvalue or xvalue | — | ✅ |
| rvalue | prvalue or xvalue | — | depends |
Quick Examples
int a = 10; // a → lvalue
int b = a + 5; // a + 5 → prvalue
int &r = a; // r → lvalue
int &&rr = 20; // 20 → prvalue; rr → lvalue (named ref)
std::string s = "hello";
std::string s2 = std::move(s); // xvalue
struct S { int m; };
S get();
get().m = 1; // get() → prvalue, .m → xvalue
Intuition
- prvalue → makes a new temporary object
- lvalue → refers to an existing object
- xvalue → refers to a disposable/expiring object
- glvalue → has identity
- rvalue → temporary or movable
Visual Relationships
Properties Matrix:
Has Identity No Identity
──────────── ───────────
Can Move From │ xvalue │ prvalue │
────────────────────────────
Cannot Move From │ lvalue │ N/A │
────────────────────────────
Groupings:
glvalue = { lvalue, xvalue } ← Things with identity
rvalue = { xvalue, prvalue } ← Things you can move from
Key Insight:
- xvalue is the intersection: has identity AND can be moved from
- Think of value categories as answering two questions:
- Does it have an identity (address)?
- Can we steal its resources (move)?
Move Semantics - rvalues and Move Constructors
Understanding the Problem
The Inefficiency of Copying
Let’s start with a basic Photo class that manages dynamic memory:
#include <iostream>
class Photo {
public:
Photo(int width, int height);
Photo(const Photo& other); // Copy constructor
Photo& operator=(const Photo& other); // Copy assignment operator
~Photo();
private:
int width;
int height;
int* data;
};
Photo::Photo(int width, int height):
width(width),
height(height),
data(new int[width * height]) {
std::cout << "Photo::Photo(int, int) invoked\n";
}
Photo::Photo(const Photo& other)
: width(other.width),
height(other.height),
data(new int[width * height])
{
std::cout << "Copy Constructor invoked: Photo(const Photo&)\n";
std::copy(other.data, other.data + width * height, data);
}
Photo& Photo::operator=(const Photo& other) {
std::cout << "Copy assignment operator invoked: operator=(const Photo&)\n";
if (this == &other) return *this;
delete[] data;
width = other.width;
height = other.height;
data = new int[width * height];
std::copy(other.data, other.data + width * height, data);
return *this;
}
Photo::~Photo() {
std::cout << "Destructor invoked\n";
delete[] data;
}
Tracing Object Creation Flow
Let’s see what happens when we create and assign objects:
int main() {
std::cout << "Check - 1\n";
Photo selfie = Photo {0, 0};
std::cout << "------------\n";
Photo retake{4,5};
std::cout << "------------\n";
std::cout << "Check - 2\n";
retake = Photo{1,2};
std::cout << "------------\n";
}
Output (compiled with -O0 -fno-elide-constructors to visalize the in-efficiency without compiler optimization):
Check - 1
Photo::Photo(int, int) invoked
Copy Constructor invoked: Photo(const Photo&)
Destructor invoked
------------
Photo::Photo(int, int) invoked
------------
Check - 2
Photo::Photo(int, int) invoked
Copy assignment operator invoked: operator=(const Photo&)
Destructor invoked
------------
Destructor invoked
Destructor invoked
Notice what happens:
Line: Photo selfie = Photo{0, 0};
- Creates a temporary
Photo{0, 0}object - Copies it to
selfieusing the copy constructor (allocates new memory and copies all data) - Destroys the temporary object
Line: retake = Photo{1,2};
- Creates a temporary
Photo{1,2}object - Copies it to
retakeusing copy assignment (allocates new memory and copies all data) - Destroys the temporary object
The inefficiency: We’re allocating memory and copying data from temporary objects that are about to be destroyed anyway! This is wasteful, especially for large objects.
Understanding rvalues
What is an rvalue?
In the expression Photo selfie = Photo{0, 0}, the Photo{0, 0} is an rvalue.
An rvalue is a temporary object that:
- Doesn’t have a persistent memory address
- Exists only for the duration of the expression
- Cannot have its address taken (cannot use
&on it) - Is about to be destroyed, so we can “steal” its resources instead of copying them
Examples of rvalues and lvalues
rvalues (temporaries):
Photo{1, 2} // rvalue - temporary object
5 // rvalue - literal
x + y // rvalue - result of expression
takePhoto() // rvalue - return value of function
lvalues (persistent objects):
Photo selfie{1, 2}; // selfie is an lvalue - it has a persistent address
int x = 5; // x is an lvalue
Passing Objects to Functions
The Naive Approach
Let’s say we want to upload a photo:
void upload(Photo p) {
std::cout << "upload(Photo p) invoked\n";
}
int main() {
Photo selfie = Photo{1,2};
upload(selfie);
}
Problem: This copies the entire Photo object (including allocating memory and copying all pixel data) when calling upload. Very inefficient!
Solution 1: Pass by lvalue Reference
To avoid copying lvalues, pass by reference:
void upload(Photo& p) {
std::cout << "upload(Photo& p) invoked\n";
}
int main() {
Photo selfie = Photo{1,2};
upload(selfie); // No copy! Just passes a reference
}
Much better! No copying occurs.
The Problem with Temporary Objects
What if we try this?
int main() {
upload(Photo{1,2}); // Passing a temporary
}
Compiler error:
error: candidate function not viable: expects lvalue as 1st argument
The problem: Photo{1,2} is an rvalue (temporary), but Photo& only binds to lvalues!
Solution 2: rvalue References
To accept temporary objects without copying, we use rvalue references:
void upload(Photo&& p) {
std::cout << "upload(Photo&& p) invoked\n";
}
int main() {
upload(Photo{1,2}); // Works! No copy!
}
Syntax: Type&& is an rvalue reference.
Key Differences Between Reference Types
| Feature | lvalue reference (Type&) | rvalue reference (Type&&) |
|---|---|---|
| Binds to | Persistent objects (lvalues) | Temporary objects (rvalues) |
| Expectation | Object must remain valid | Object is temporary, can be modified |
| Use case | Avoid copying persistent objects | Avoid copying temporary objects |
Function Overloading with References
You can overload functions based on lvalue vs rvalue references:
void upload(Photo& p) {
std::cout << "upload(Photo& p) - lvalue version\n";
}
void upload(Photo&& p) {
std::cout << "upload(Photo&& p) - rvalue version\n";
}
int main() {
Photo selfie{1,2};
upload(selfie); // Calls lvalue version
upload(Photo{3,4}); // Calls rvalue version
}
The compiler automatically chooses the correct version based on whether the argument is an lvalue or rvalue!
Move Constructor and Move Assignment (C++11)
The Concept
Since rvalues are temporary and about to be destroyed, we can steal (move) their resources instead of copying them. C++11 introduced two new special member functions:
- Move Constructor:
Type(Type&& other) - Move Assignment Operator:
Type& operator=(Type&& other)
Copy Constructor (Expensive)
Before Copy:
temporary selfie
┌────────┐ ┌────────┐
│width: 2│ │ ??? │
│height:3│ │ ??? │
│data: ──┼── │ ??? │
└────────┘ │ └────────┘
│
▼
[pixel data]
[in memory ]
After Copy Constructor:
temporary selfie
┌────────┐ ┌────────┐
│width: 2│ │width: 2│
│height:3│ │height:3│
│data: ──┼── │data: ──┼──
└────────┘ │ └────────┘ │
│ │
▼ ▼
[pixel data] [NEW pixel data]
[original ] [COPIED! ]
- Allocated new memory and copied all data!
- Two separate copies of pixel data exist
Move Constructor (Efficient)
Before Move:
temporary selfie
┌────────┐ ┌────────┐
│width: 2│ │ ??? │
│height:3│ │ ??? │
│data: ──┼── │ ??? │
└────────┘ │ └────────┘
│
▼
[pixel data]
[in memory ]
After Move Constructor:
temporary selfie
┌────────┐ ┌────────┐
│width: 2│ │width: 2│
│height:3│ │height:3│
│data:NULL│ │data: ──┼──
└────────┘ └────────┘ │
│
▼
[pixel data]
[STOLEN! ]
- Just copied the pointer (steal)!
- Set source pointer to nullptr
- No memory allocation, no data copying!
Implementation
class Photo {
public:
// ... (previous members)
Photo(Photo&& obj); // Move constructor
Photo& operator=(Photo&& obj); // Move assignment operator
};
// Move constructor
Photo::Photo(Photo&& obj) {
std::cout << "Move constructor: Photo(Photo&&) invoked\n";
// Steal the resources
this->width = obj.width;
this->height = obj.height;
this->data = obj.data;
// Leave the source object in a valid but empty state
obj.data = nullptr;
}
// Move assignment operator
Photo& Photo::operator=(Photo&& obj) {
std::cout << "Move assignment operator: operator=(Photo&&) invoked\n";
if (this == &obj) return *this;
// Clean up our current resources
delete[] data;
// Steal the resources from obj
this->width = obj.width;
this->height = obj.height;
this->data = obj.data;
// Leave obj in a valid but empty state
obj.data = nullptr;
return *this;
}
Key points:
- Instead of allocating new memory and copying, we just steal the pointer
- We set
obj.data = nullptrso the source object’s destructor won’t delete the memory we stole - Much more efficient: just copying a few integers and a pointer!
The Results
Running the same code with move semantics:
int main() {
std::cout << "Check - 1\n";
Photo selfie = Photo {0, 0};
std::cout << "------------\n";
Photo retake{4,5};
std::cout << "------------\n";
std::cout << "Check - 2\n";
retake = Photo{1,2};
std::cout << "------------\n";
}
Output (with move semantics):
Check - 1
Photo::Photo(int, int) invoked
Move constructor: Photo(Photo&&) invoked
Destructor invoked
------------
Photo::Photo(int, int) invoked
------------
Check - 2
Photo::Photo(int, int) invoked
Move assignment operator: operator=(Photo&&) invoked
Destructor invoked
------------
Destructor invoked
Destructor invoked
Notice: The copy constructor and copy assignment are replaced with their move counterparts!
std::move - Forcing Move Semantics
When lvalue References Aren’t Enough
Sometimes we have an lvalue that we know will never be used again. In these cases, copying is still inefficient.
Problem: Unnecessary Copies of lvalues
Consider this code that inserts a photo into a collection:
void PhotoCollection::insert(const Photo& pic, int pos) {
for (int i = size(); i > pos; i--)
myPhotos[i] = myPhotos[i - 1]; // Line 3: Shuffle elements down
myPhotos[pos] = pic;
}
The inefficiency on line 3:
myPhotos[i - 1]is an lvalue (it has a persistent address)- The copy assignment operator is called
- Each element is copied into its new position
- But the original value at
myPhotos[i - 1]is never used again - it will be immediately overwritten!
We’re doing expensive deep copies when we could just move the resources!
Solution: Using std::move
We can use std::move to treat an lvalue as an rvalue:
void PhotoCollection::insert(const Photo& pic, int pos) {
for (int i = size(); i > pos; i--)
myPhotos[i] = std::move(myPhotos[i - 1]); // Use move assignment!
myPhotos[pos] = pic;
}
Now the move assignment operator is called instead of copy assignment, making the shuffling much more efficient!
What is std::move?
Important: std::move doesn’t actually move anything!
std::move is just a type cast that converts an lvalue to an rvalue reference:
Photo selfie{1, 2};
Photo moved = std::move(selfie); // std::move(selfie) casts selfie to Photo&&
After std::move:
- The compiler sees an rvalue reference (
Photo&&) - The move constructor/assignment operator is called
- Resources are stolen from
selfie selfieis left in a valid but unspecified state
The Danger of std::move
Be Careful with Moved-From Objects!
Photo takePhoto() {
return Photo{100, 100};
}
void foo(Photo whoAmI) {
Photo selfie = std::move(whoAmI); // Force move from lvalue
whoAmI.get_pixel(21, 24); // ⚠️ DANGER!
}
What happens to whoAmI after it’s moved?
- Its resources have been stolen by
selfie - It’s in a valid but unspecified state
- In our
Photoimplementation,whoAmI.data == nullptr - Calling
get_pixel()will likely crash or cause undefined behavior!
Moved-From Object Guarantees
After an object is moved from:
- It’s in a valid state (you can safely destroy it)
- You can assign a new value to it
- You cannot assume anything else about its state
- Don’t call methods that depend on its resources
Example:
Photo a{10, 10};
Photo b = std::move(a);
// Safe operations on 'a':
a = Photo{5, 5}; // OK: assign new value
// a is destroyed // OK: destructor works
// Unsafe operations on 'a':
a.get_pixel(1, 1); // NOT OK: might crash
int w = a.width; // NOT OK: undefined value
Best Practices
When to Use std::move
Good use cases:
1. You know for certain the object won’t be used again
std::vector<Photo> photos;
Photo temp{100, 100};
photos.push_back(std::move(temp)); // OK: temp not used after this
2. Performance is critical and you control the object lifetime
Photo a{1000, 1000};
Photo b = std::move(a);
// Don't touch 'a' again!
3. Implementing move constructors/assignment operators
Photo(Photo&& other) {
data = std::move(other.data); // Moving members
}
Avoid std::move when:
- You’re not sure if the object will be used later
- The performance gain is negligible (e.g., moving small objects)
- You’re working with function parameters that might be accessed after
General Guidelines
1. Don’t overuse std::move
The compiler automatically uses move semantics for rvalues (temporaries). Only use std::move when you need to force move semantics on an lvalue.
2. After moving, either:
- Don’t touch the object again, or
- Assign it a new value before using it
3. Document when functions take ownership:
// Takes ownership of photo (moves it)
void PhotoCollection::insert(Photo&& photo) {
// ...
}
4. In most code, prefer copy semantics for clarity
Use move semantics only when performance profiling shows it’s necessary.
Summary
Quick Reference Table
| Concept | Syntax | Purpose |
|---|---|---|
| lvalue reference | Type& | Bind to persistent objects to avoid copying |
| rvalue reference | Type&& | Bind to temporary objects to enable moving |
| Move constructor | Type(Type&& other) | Construct by stealing resources from a temporary |
| Move assignment | Type& operator=(Type&& other) | Assign by stealing resources from a temporary |
The Big Idea
Copy semantics (lvalue): Object will continue to exist, must keep it valid → expensive deep copy
Move semantics (rvalue): Object is temporary and will be destroyed → cheap resource transfer
Move semantics provide significant performance improvements for classes that manage resources (dynamic memory, file handles, network connections, etc.) by eliminating unnecessary copies of temporary objects.
The Complete Picture
// 1. Automatic move (compiler does this)
Photo a = Photo{1, 2}; // Temporary → move constructor called
// 2. Copy an lvalue (default behavior)
Photo b{3, 4};
Photo c = b; // lvalue → copy constructor called
// 3. Force move an lvalue (use with caution!)
Photo d = std::move(b); // std::move casts lvalue to rvalue
// move constructor called
// b is now in unspecified state!
Key Takeaway: Move semantics are a powerful optimization, but with great power comes great responsibility. Use std::move sparingly and only when you’re certain the moved-from object won’t be accessed again.
Return Value Optimization(RVO) and the Rule of 0/3/5
Return Value Optimization (RVO)
When returning objects from functions, you might expect that temporary objects would be created and then copied or moved. However, modern C++ compilers can optimize this away entirely!
What is RVO?
Return Value Optimization (RVO) is a compiler optimization that eliminates temporary objects when returning values from functions, constructing the return value directly in the caller’s memory location.
Before diving into RVO, we need to understand the value catagory prvalues (pure rvalues): (You can refer the Value catagories chapter for more detail to understad various value catagories since C++11)
Prvalue (pure rvalue) = A temporary object or value that doesn’t have a persistent memory location
- Examples:
Photo{100, 200},5,x + y, function return values - These are “pure” rvalues because they’re truly temporary - about to be created or just created
- Before C++17: prvalues would trigger move operations
- From C++17 onward: prvalues trigger mandatory copy elision (RVO)
Example: Without RVO
Let’s see what would happen without optimization:
Photo createPhoto() {
Photo temp{100, 200};
return temp; // Without RVO: copy or move temp to return location
}
int main() {
Photo myPhoto = createPhoto(); // Without RVO: another copy/move
}
Expected behavior without RVO:
- Create
tempinsidecreatePhoto() - Copy/move
tempto a temporary return object - Copy/move the return object to
myPhoto - Destroy temporaries
This could involve multiple copy or move operations!
With RVO: Direct Construction (C++17)
Photo createPhoto() {
return Photo{100, 200}; // Prvalue: mandatory copy elision since C++17
}
int main() {
Photo myPhoto = createPhoto();
}
C++17 output:
Photo::Photo(int, int) invoked
Destructor invoked
Only ONE constructor call! The object is constructed directly in myPhoto’s memory location. No copy, no move, not even a move constructor call!
Before C++17: The move constructor would be called:
Photo::Photo(int, int) invoked
Move constructor: Photo(Photo&&) invoked
Destructor invoked
Destructor invoked
Visual Representation of RVO
Without RVO (theoretical):
┌─────────────────────────┐
│ createPhoto() stack │
│ ┌──────────────┐ │
│ │ temp{100,200}│ │
│ └──────┬───────┘ │
│ │ copy/move │
│ ▼ │
│ ┌──────────────┐ │
│ │return object │ │
│ └──────┬───────┘ │
└─────────┼───────────────┘
│ copy/move
▼
┌─────────────────────────┐
│ main() stack │
│ ┌──────────────┐ │
│ │ myPhoto │ │
│ └──────────────┘ │
└─────────────────────────┘
With RVO (C++17):
┌─────────────────────────┐
│ main() stack │
│ ┌──────────────┐ │
│ │ myPhoto │◄──────┼─── Constructed directly here!
│ └──────────────┘ │
└─────────────────────────┘
▲
│
createPhoto() constructs
the object directly in
myPhoto's memory location
When Does RVO Apply and When it cannot/won’t ?
RVO works in specific scenarios. Let’s explore when it applies and when it doesn’t.
Case 1: Returning a Temporary (Prvalue)
Photo createPhoto() {
return Photo{100, 200}; // Prvalue: RVO applies in C++17!
}
C++17 and later output:
Photo::Photo(int, int) invoked
Destructor invoked
RVO applies (mandatory since C++17) - Direct construction, no copy, no move!
Before C++17: This would have called the move constructor:
Photo::Photo(int, int) invoked
Move constructor: Photo(Photo&&) invoked
Destructor invoked
Destructor invoked
Key point: Photo{100, 200} is a prvalue (pure rvalue) - a temporary being created. Since C++17, the compiler is required to perform copy elision for prvalues, constructing the object directly in the caller’s location.
Case 2: Returning a Single Local Variable (NRVO)
Photo createPhoto() {
Photo temp{100, 200};
// ... do some work with temp ...
return temp; // Named RVO (NRVO) may apply
}
Note: This is Named Return Value Optimization (NRVO). In C++17, NRVO is not mandatory but most compilers still perform it. You might see:
Photo::Photo(int, int) invoked
Destructor invoked
Or with some compilers/flags:
Photo::Photo(int, int) invoked
Move constructor: Photo(Photo&&) invoked
Destructor invoked
Destructor invoked
Case 3: Returning Different Objects Based on Condition
Photo createPhoto(bool highRes) {
if (highRes) {
Photo temp1{1920, 1080};
return temp1; // RVO does NOT apply!
} else {
Photo temp2{640, 480};
return temp2; // RVO does NOT apply!
}
}
int main() {
Photo myPhoto = createPhoto(true);
}
Output:
Photo::Photo(int, int) invoked
Move constructor: Photo(Photo&&) invoked
Destructor invoked
Destructor invoked
RVO does NOT apply because the compiler can’t determine at compile time which object will be returned. The move constructor is used instead!
Case 4: Returning Function Parameters
Photo processPhoto(Photo input) {
// ... process input ...
return input; // RVO does NOT apply!
}
int main() {
Photo original{100, 200};
Photo processed = processPhoto(original);
}
Output:
Photo::Photo(int, int) invoked
Copy Constructor invoked: Photo(const Photo&)
Move constructor: Photo(Photo&&) invoked
Destructor invoked
Destructor invoked
Destructor invoked
RVO does NOT apply to function parameters. The move constructor is used when returning.
Case 5: Returning with std::move (Anti-pattern!)
Photo createPhoto() {
Photo temp{100, 200};
return std::move(temp); // DON'T DO THIS! Prevents RVO!
}
Output:
Photo::Photo(int, int) invoked
Move constructor: Photo(Photo&&) invoked
Destructor invoked
Destructor invoked
Using std::move on return values PREVENTS RVO! This is an anti-pattern. The compiler would have optimized this, but std::move forces a move operation.
Rule: Never use std::move on return values when returning local variables.
Why We Still Need Move Semantics
Even with C++17’s mandatory RVO for prvalues, we still need move constructors and move assignment operators. RVO and move semantics solve DIFFERENT problems!
Understanding the Difference
┌─────────────────────────────────────────────────────────────┐
│ RVO solves: The cost of returning PRVALUES │
│ Move constructor solves: The cost of moving EXISTING objects│
│ Move assignment solves: The cost of REASSIGNING objects │
└─────────────────────────────────────────────────────────────┘
Problem 1: RVO Only Works for Prvalues
✅ RVO handles this:
Photo make() {
return Photo{100, 200}; // Prvalue → RVO: constructed directly in caller
}
Photo p = make(); // Only ONE constructor call!
RVO cannot handle this:
Photo a{100, 200};
Photo b = std::move(a); // NEED move constructor!
Here, a is a real existing object in memory. RVO doesn’t apply because:
- We’re not returning from a function
ais an lvalue, not a prvalue- We want to transfer resources from an existing object
Without move constructor: This would call the copy constructor (expensive deep copy)!
Problem 2: Move Assignment - Reassigning Existing Objects
RVO applies only during construction. Move assignment handles reassignment when the object already exists.
Photo a{100, 200};
Photo b{640, 480};
a = std::move(b); // NEED move assignment operator!
Why RVO doesn’t apply:
- No construction happening
aalready exists in memory- We’re overwriting an existing object
- Need to clean up
a’s old resources first, then steal fromb
Without move assignment: This would call the copy assignment operator (expensive)!
Problem 3: Containers Rely Heavily on Move Constructors
Standard library containers like std::vector cannot use RVO for internal operations.
Example: Vector Growth
std::vector<Photo> photos;
photos.push_back(Photo{100, 200}); // Move constructor needed!
// When vector grows:
photos.reserve(100);
What happens during vector reallocation:
Old storage: New storage:
┌─────────┐ ┌─────────┐
│ Photo 1 │ ─── move ────────> │ Photo 1 │
├─────────┤ ├─────────┤
│ Photo 2 │ ─── move ────────> │ Photo 2 │
├─────────┤ ├─────────┤
│ Photo 3 │ ─── move ────────> │ Photo 3 │
└─────────┘ ├─────────┤
│ ... │
└─────────┘
Steps:
- Allocate larger block
- Move construct each element into new block (move constructor!)
- Destroy old elements
RVO cannot help because:
- Elements already exist in the old storage
- We’re moving existing objects, not returning prvalues
- This is a runtime operation based on vector size
Without move constructors: Every reallocation would copy all elements (extremely slow for large objects)!
More Container Examples
std::vector<Photo> photos;
// 1. push_back with temporary
photos.push_back(Photo{100, 200});
// - Prvalue → RVO might help in some cases
// - But vector still needs move constructor to store it
// 2. push_back with existing object
Photo temp{640, 480};
photos.push_back(std::move(temp));
// - NEED move constructor (RVO doesn't apply)
// 3. Sorting
std::sort(photos.begin(), photos.end());
// - Uses move operations to shuffle elements
// - NEED move constructor and move assignment
// 4. Vector assignment
std::vector<Photo> vec1, vec2;
vec1 = std::move(vec2);
// - NEED move assignment for vector itself
Problem 4: Generic Code and Templates Need Moves
Templates work with many types and cannot rely on RVO for all scenarios.
template<typename T>
T make_twice(T x) {
return x; // Named variable, NOT a prvalue!
}
Photo p{100, 200};
Photo result = make_twice(p); // NEED move or copy constructor
Why RVO doesn’t apply:
xis a named object (lvalue)- NRVO (Named RVO) is not guaranteed
- The compiler may or may not optimize this
- Move constructor is the fallback
Problem 5: NRVO is Not Guaranteed
When returning a named local variable, NRVO may apply, but it’s not mandatory.
Photo createPhoto() {
Photo temp{100, 200};
// ... do work ...
return temp; // NRVO: compiler *may* optimize
}
Possible outcomes:
Best case (NRVO applies):
Photo::Photo(int, int) invoked
Destructor invoked
Without NRVO (move constructor used):
Photo::Photo(int, int) invoked
Move constructor: Photo(Photo&&) invoked
Destructor invoked
Destructor invoked
Without move constructor (only copy available):
Photo::Photo(int, int) invoked
Copy Constructor invoked: Photo(const Photo&)
Destructor invoked
Destructor invoked
Problem 6: Conditional Returns Cannot Use RVO
Photo createPhoto(bool highRes) {
Photo small{640, 480};
Photo large{1920, 1080};
return highRes ? large : small; // RVO cannot optimize!
}
Why RVO fails:
- Compiler can’t determine at compile time which object is returned
- Both
smallandlargeare lvalues - Move constructor is used as fallback
Problem 7: Algorithms and STL Operations
// Swapping
Photo a{100, 200}, b{640, 480};
std::swap(a, b); // Uses move constructor and move assignment!
// Moving into data structures
std::map<int, Photo> photoMap;
Photo temp{100, 200};
photoMap[1] = std::move(temp); // NEED move assignment!
// Returning from algorithms
auto it = std::find(photos.begin(), photos.end(), target);
Photo found = std::move(*it); // NEED move constructor!
Summary: Different Problems, Different Solutions
| Scenario | Solution | Why RVO Doesn’t Help |
|---|---|---|
return Photo{}; | ✅ RVO (C++17) | N/A - RVO applies! |
Photo b = std::move(a); | Move constructor | a is existing object, not prvalue |
a = std::move(b); | Move assignment | Reassignment, not construction |
vector::push_back() | Move constructor | Storing existing objects |
vector reallocation | Move constructor | Moving existing elements |
return namedVar; | Move constructor | NRVO not guaranteed |
return cond ? a : b; | Move constructor | Runtime decision, lvalues |
std::swap(a, b) | Move ctor + assignment | Operating on existing objects |
The Complete Picture
// 1. RVO handles this perfectly (C++17+)
Photo p1 = Photo{100, 200}; // ✅ RVO
// 2. These ALL need move semantics
Photo a{100, 200};
Photo b = std::move(a); // ❌ No RVO → move constructor
Photo c{640, 480};
b = std::move(c); // ❌ No RVO → move assignment
std::vector<Photo> photos;
photos.push_back(std::move(b)); // ❌ No RVO → move constructor
photos.reserve(100); // ❌ No RVO → move constructor (realloc)
std::sort(photos.begin(), photos.end()); // ❌ No RVO → move operations
Key Insight: RVO eliminates moves during prvalue return, but the vast majority of move operations happen in other contexts where RVO cannot apply. Move semantics are essential for efficient C++ code!
Summary: RVO Rules
| Scenario | Value Category | RVO Applies? | Fallback |
|---|---|---|---|
return Photo{...}; | Prvalue | ✅ Yes (mandatory C++17) | N/A |
Photo x{...}; return x; | Lvalue | ⚠️ Maybe (NRVO, not mandatory) | Move constructor |
return condition ? x : y; | Lvalue | ❌ No | Move constructor |
return parameter; | Lvalue | ❌ No | Move constructor |
return std::move(x); | Xvalue | ❌ No (prevents RVO!) | Move constructor |
Key Takeaway:
- C++17 and later: RVO is mandatory for prvalues (pure rvalues) - zero copies, zero moves
- Before C++17: Prvalues would use move constructor
- Move semantics are still essential as a fallback when RVO can’t be applied (lvalues, conditionals, etc.)
The Rule of Zero, Three, and Five
Now that we understand copy and move semantics, let’s discuss best practices for implementing special member functions.
Special Member Functions
C++ has six special member functions that the compiler can generate automatically:
- Default constructor:
Photo() - Destructor:
~Photo() - Copy constructor:
Photo(const Photo&) - Copy assignment operator:
Photo& operator=(const Photo&) - Move constructor:
Photo(Photo&&)(C++11) - Move assignment operator:
Photo& operator=(Photo&&)(C++11)
Rule of Zero
If your class doesn’t directly manage resources, don’t define any special member functions.
// Good example: Rule of Zero
class Photo {
public:
Photo(int w, int h) : width(w), height(h), data(w * h) {}
// No destructor, no copy/move operations defined!
// Compiler generates them correctly.
private:
int width;
int height;
std::vector<int> data; // std::vector manages memory for us
};
Why this works:
std::vectoralready handles memory management correctly- The compiler-generated special members correctly copy/move the
std::vector - Less code to write and maintain
- No chance of getting it wrong!
When to use: Whenever possible! Use standard library containers (std::vector, std::string, std::unique_ptr, etc.) instead of raw pointers.
Rule of Three (Pre-C++11)
If you define any one of these three, you should probably define all three:
- Destructor
- Copy constructor
- Copy assignment operator
// Rule of Three example
class Photo {
public:
Photo(int w, int h)
: width(w), height(h), data(new int[w * h]) {}
// 1. Destructor
~Photo() {
delete[] data;
}
// 2. Copy constructor
Photo(const Photo& other)
: width(other.width), height(other.height),
data(new int[width * height]) {
std::copy(other.data, other.data + width * height, data);
}
// 3. Copy assignment operator
Photo& operator=(const Photo& other) {
if (this != &other) {
delete[] data;
width = other.width;
height = other.height;
data = new int[width * height];
std::copy(other.data, other.data + width * height, data);
}
return *this;
}
private:
int width;
int height;
int* data; // Raw pointer: we manage the memory!
};
Why all three?
- If you need a destructor, you’re managing a resource
- If you’re managing a resource, the default copy operations will be wrong (shallow copy)
- You need to implement deep copy semantics
Rule of Five (C++11 and later)
If you define any one of the five operations below, you should probably define all five:
- Destructor
- Copy constructor
- Copy assignment operator
- Move constructor (new in C++11)
- Move assignment operator (new in C++11)
// Rule of Five example
class Photo {
public:
Photo(int w, int h)
: width(w), height(h), data(new int[w * h]) {}
// 1. Destructor
~Photo() {
delete[] data;
}
// 2. Copy constructor
Photo(const Photo& other)
: width(other.width), height(other.height),
data(new int[width * height]) {
std::copy(other.data, other.data + width * height, data);
}
// 3. Copy assignment operator
Photo& operator=(const Photo& other) {
if (this != &other) {
delete[] data;
width = other.width;
height = other.height;
data = new int[width * height];
std::copy(other.data, other.data + width * height, data);
}
return *this;
}
// 4. Move constructor
Photo(Photo&& other) noexcept
: width(other.width), height(other.height), data(other.data) {
other.data = nullptr;
other.width = 0;
other.height = 0;
}
// 5. Move assignment operator
Photo& operator=(Photo&& other) noexcept {
if (this != &other) {
delete[] data;
width = other.width;
height = other.height;
data = other.data;
other.data = nullptr;
other.width = 0;
other.height = 0;
}
return *this;
}
private:
int width;
int height;
int* data;
};
Why add move operations?
- Without them, moving will fall back to copying (inefficient!)
- Move operations provide significant performance improvements
- They’re expected by modern C++ code (containers, algorithms)
Note: Mark move operations as noexcept when possible - this allows standard containers to use them more aggressively for optimization.
Quick Decision Guide
Do you directly manage resources (raw pointers, file handles, etc.)?
│
├─ NO → Rule of Zero
│ Use std::vector, std::string, std::unique_ptr, etc.
│ Let the compiler generate everything.
│
└─ YES → Rule of Five
Implement all five special member functions.
(Or better yet: refactor to use Rule of Zero!)
Common Mistake: Rule of Three/Four
// Bad: Defined destructor and copy operations, but no move operations
class Photo {
public:
~Photo() { delete[] data; }
Photo(const Photo& other) { /* ... */ }
Photo& operator=(const Photo& other) { /* ... */ }
// Missing move constructor and move assignment!
// Moving will fall back to expensive copying!
private:
int* data;
};
Problem: This class can’t be moved efficiently. Any attempt to move will result in copying.
Solution: Either add move operations (Rule of Five) or use RAII types (Rule of Zero).
Best Practices Summary
- Prefer Rule of Zero - Use standard library types that manage resources for you
- If you must manage resources directly, follow Rule of Five - Implement all five special member functions
- Mark move operations as
noexcept- Enables better optimizations in standard containers - Trust RVO - Don’t use
std::moveon return values of local variables - Test your special member functions - Easy to get wrong, especially self-assignment and move operations
Complete Example: Comparing All Three Rules
Rule of Zero (Preferred)
class Photo {
public:
Photo(int w, int h) : width(w), height(h), data(w * h) {}
// That's it! Compiler handles everything correctly.
private:
int width, height;
std::vector<int> data;
};
Rule of Five (When Necessary)
class Photo {
public:
Photo(int w, int h);
~Photo();
Photo(const Photo&);
Photo& operator=(const Photo&);
Photo(Photo&&) noexcept;
Photo& operator=(Photo&&) noexcept;
private:
int width, height;
int* data; // Raw resource
};
Rule of thumb: If you can use Rule of Zero, do it. It’s simpler, safer, and less error-prone!
C++11 auto Keyword
Table of Contents
- What is the Auto Keyword?
- Type Deduction Rules for Auto
- Benefits of Using Auto
- Restrictions: Where Auto Cannot Be Used
- Common Compilation Errors with Auto
- Best Practices Summary
- Conclusion
1. What is the Auto Keyword?
The auto keyword in C++11 allows the compiler to automatically deduce the type of a variable from its initializer.
This simplifies code and reduces redundancy, especially when dealing with complex type names.
Basic Example
#include <iostream>
#include <vector>
#include <map>
int main() {
// Traditional way
int x = 42;
double y = 3.14;
// Using auto - compiler deduces the type
auto a = 42; // int
auto b = 3.14; // double
auto c = "Hello"; // const char*
auto d = 'A'; // char
// Especially useful with complex types
std::vector<int> vec = {1, 2, 3};
// Traditional iterator
std::vector<int>::iterator it1 = vec.begin();
// With auto - much cleaner!
auto it2 = vec.begin();
// Complex types become manageable
std::map<std::string, std::vector<int>> myMap;
// Without auto - verbose!
std::map<std::string, std::vector<int>>::iterator mapIt1 = myMap.begin();
// With auto - readable!
auto mapIt2 = myMap.begin();
return 0;
}
2. Type Deduction Rules for Auto
The type deduction for auto follows rules similar to template argument deduction. Understanding these rules is crucial for using auto correctly.
Rule 0: Auto Variables Must Be Initialized (Fundamental Rule)
This is the most important rule: An auto variable must always be initialized at the point of declaration. The compiler needs the initializer to deduce the type.
auto x; // ERROR: cannot deduce type without initializer
auto y = 10; // OK: type deduced as int from initializer
auto z = 3.14; // OK: type deduced as double from initializer
// Even default initialization is not allowed
auto a{}; // ERROR in C++11, OK in C++17 (deduces std::initializer_list<int>)
Why this rule exists: Unlike traditional type declarations where the compiler knows the type upfront, auto requires an initializer to determine what type the variable should be. Without an initializer, there’s no way for the compiler to deduce the type.
Rule 1: Plain Auto (Value Semantics)
By default, auto deduces by value and drops references and top-level const qualifiers.
int x = 10;
const int cx = x;
const int& rx = x;
auto a = x; // int (not int&)
auto b = cx; // int (const is dropped)
auto c = rx; // int (reference and const are dropped)
// To preserve const, use const auto
const auto d = cx; // const int
Rule 2: Auto with References
Use auto& to deduce a reference type, which preserves const-ness.
int x = 10;
const int cx = x;
auto& r1 = x; // int&
auto& r2 = cx; // const int& (const is preserved)
const auto& r3 = x; // const int&
Rule 3: Auto with Pointers
Pointers work naturally with auto.
int x = 10;
const int cx = 20;
auto p1 = &x; // int*
auto p2 = &cx; // const int* (const is preserved in pointer context)
const auto p3 = &x; // int* const (constant pointer)
Rule 4: Auto with R-value References
Use auto&& for universal references (forwarding references).
int x = 10;
auto&& r1 = x; // int& (lvalue reference)
auto&& r2 = 10; // int&& (rvalue reference)
auto&& r3 = std::move(x); // int&& (rvalue reference)
Rule 5: Array and Function Decay
Arrays and functions decay to pointers when using plain auto.
int arr[5] = {1, 2, 3, 4, 5};
auto a = arr; // int* (array decays to pointer)
auto& b = arr; // int (&)[5] (reference preserves array type)
void func() {}
auto f = func; // void(*)() (function decays to function pointer)
Complete Example
#include <iostream>
#include <vector>
void demonstrateDeduction() {
int x = 42;
const int cx = 100;
auto a = x; // int
auto b = cx; // int (const dropped)
const auto c = x; // const int
auto& d = x; // int&
auto& e = cx; // const int& (const preserved with reference)
auto* p1 = &x; // int*
auto p2 = &x; // int* (pointer deduced without *)
std::vector<int> vec = {1, 2, 3};
auto it = vec.begin(); // std::vector<int>::iterator
auto&& u1 = x; // int& (universal reference to lvalue)
auto&& u2 = 42; // int&& (universal reference to rvalue)
}
3. Benefits of Using Auto
Reduces Code Verbosity
// Verbose
std::map<std::string, std::vector<int>>::const_iterator it = myMap.begin();
// Clean
auto it = myMap.cbegin();
Prevents Type Mismatch Issues
// Potential problem - implicit conversion
unsigned int size = vec.size(); // size_t converted to unsigned int
// Correct type automatically
auto size = vec.size(); // size_t (correct type)
Easier Refactoring
If you change a function’s return type, code using auto doesn’t need updates.
// If getValue() return type changes from int to long,
// this code still works without modification
auto value = getValue();
Works with Lambda Expressions
Before C++14, you couldn’t write the type of a lambda explicitly.
auto lambda = [](int x, int y) { return x + y; };
Simplifies Template Code
template<typename T1, typename T2>
void multiply(T1 a, T2 b) {
auto result = a * b; // Type deduced correctly regardless of T1, T2
std::cout << result << std::endl;
}
4. Restrictions: Where Auto Cannot Be Used
Restriction 1: Function Parameters (until C++20)
// ERROR in C++11/14/17
void func(auto param) { // Not allowed
// ...
}
// Correct way
template<typename T>
void func(T param) {
// ...
}
// Note: C++20 introduces abbreviated function templates
// which allow auto in parameters
Restriction 2: Non-Static Member Variables
class MyClass {
auto member; // ERROR: cannot deduce type
// Must specify type
int member; // OK
// Exception: static const integral members with initializer
static const auto value = 42; // OK in C++17
};
Restriction 3: Function Return Type (partial restriction)
While C++14 allows auto for return type deduction, C++11 requires trailing return type or explicit type.
// C++11 - Need trailing return type
auto add(int a, int b) -> int {
return a + b;
}
// C++14 and later - auto deduction works
auto multiply(int a, int b) {
return a * b;
}
Restriction 4: Array Declarations
auto arr[10]; // ERROR: cannot deduce array type
int arr[10]; // OK
auto arr = new int[10]; // OK - deduces int*
Restriction 5: Template Arguments
std::vector<auto> vec; // ERROR
std::vector<int> vec; // OK
Restriction 6: Virtual Function Return Types
class Base {
virtual auto getValue() { return 42; } // ERROR
virtual int getValue() { return 42; } // OK
};
5. Common Compilation Errors with Auto
Error 1: Using Auto Without Initialization
auto x; // ERROR: declaration of 'auto x' has no initializer
auto x = 10; // OK
Error Message:
error: declaration of 'auto x' has no initializer
Error 2: Deducing from Initializer List
auto x = {1, 2, 3}; // Deduces std::initializer_list<int> (might be unexpected)
auto y{1}; // C++11: std::initializer_list<int>, C++17: int
auto z{1, 2}; // ERROR in C++17 (direct-list-init with multiple elements)
Best Practice: Be explicit when you want an initializer list:
std::initializer_list<int> x = {1, 2, 3}; // Clear intent
auto x = std::initializer_list<int>{1, 2, 3}; // Also clear
Error 3: Auto with Multiple Declarations
auto x = 1, y = 2; // OK - both int
auto a = 1, b = 2.0; // ERROR - conflicting types
// Error message:
// error: inconsistent deduction for 'auto': 'int' and then 'double'
Error 4: Losing Important Type Information
std::vector<bool> flags = {true, false, true};
auto flag = flags[0]; // Not bool! It's std::vector<bool>::reference (proxy)
// This can cause issues:
bool& ref = flags[0]; // ERROR
auto& ref = flags[0]; // OK, but ref is not bool&
Solution:
bool flag = flags[0]; // Explicitly convert to bool
Error 5: Unintended Copies vs References
std::vector<int> vec = {1, 2, 3, 4, 5};
// Creates a COPY
auto v = vec; // Expensive copy
// Creates a reference
auto& v = vec; // No copy
// For iteration:
for (auto item : vec) { // Copies each element
// ...
}
for (const auto& item : vec) { // No copies
// ...
}
Error 6: Auto with Proxy Objects
Some classes return proxy objects that cause issues with auto.
Eigen::Matrix<double, 3, 3> A, B;
auto C = A + B; // C is an expression template, not a matrix!
// When C is used later, A and B might be out of scope - undefined behavior!
// Solution:
Eigen::Matrix<double, 3, 3> C = A + B; // Forces evaluation
Error 7: Auto with String Literals
auto str = "Hello"; // const char*, not std::string
// To get std::string:
auto str = std::string("Hello");
// or with C++14 string literal:
using namespace std::string_literals;
auto str = "Hello"s;
Best Practices Summary
- Use
autowhen the type is obvious from context or overly verbose - Use
const auto&for loop variables to avoid copies - Be careful with proxy objects and expression templates
- Be explicit when the deduced type might be surprising
- Prefer
autowith templates to let the compiler handle complex types - Always initialize
autovariables at declaration - Use trailing return types in C++11 for complex return type deduction
Conclusion
The auto keyword is a powerful feature that makes C++ code more maintainable and less error-prone. Understanding its type deduction rules and limitations helps you use it effectively while avoiding common pitfalls.
decltype (C++11 to C++20)
Table of Contents
- What is decltype?
- Why decltype is Needed
- How decltype Works in C++11
- Type Deduction Rules
- Evolution in C++14
- Evolution in C++17
- Evolution in C++20
- Common Pitfalls
- Best Practices
What is decltype?
decltype is a compile-time type specifier introduced in C++11 that inspects the declared type of an entity or deduces both the type and value category of an expression without evaluating it. The name stands for “declared type”.
Key Characteristics
- Compile-time only: Type deduction happens during compilation, producing zero runtime cost
- Non-evaluating: Expressions inside
decltypeare never executed, only analyzed for their type - Value category preservation:
decltypepreserves whether an expression is an lvalue, xvalue, or prvalue, encoding this information in the resulting type (through references)
Basic Syntax
decltype(expression)
Simple Example
int x = 42;
decltype(x) y = 10; // y has type int
const int& z = x;
decltype(z) w = x; // w has type const int&
Why decltype is Needed
Before C++11, there was no way to determine the exact type of an expression at compile time. This created several problems:
Problem 1: Template Return Type Deduction
// Before C++11 - impossible to write correctly for all types
template<typename T, typename U>
??? multiply(T a, U b) {
return a * b; // What's the return type?
}
Problem 2: Complex Type Expressions
// Hard to maintain - if container type changes, code breaks
std::vector<int> vec;
std::vector<int>::iterator it = vec.begin();
Problem 3: Perfect Forwarding Return Types
// How do we preserve the exact return type?
template<typename Func, typename... Args>
??? wrapper(Func f, Args&&... args) {
return f(std::forward<Args>(args)...);
}
Solutions with decltype
// Solution 1: Template return type
template<typename T, typename U>
auto multiply(T a, U b) -> decltype(a * b) {
return a * b;
}
// Solution 2: Type inference
auto it = vec.begin(); // Type automatically deduced
// Solution 3: Perfect forwarding
template<typename Func, typename... Args>
auto wrapper(Func f, Args&&... args) -> decltype(f(std::forward<Args>(args)...)) {
return f(std::forward<Args>(args)...);
}
How decltype Works in C++11
In C++11, decltype has two completely different behaviors depending on whether the argument is parenthesized or not.
The Two Forms
Form 1: Variable decltype (unparenthesized id-expression)
Returns the exact declared type of a variable, including references.
int x = 5;
int& rx = x;
int&& rrx = std::move(x);
decltype(x) // int
decltype(rx) // int&
decltype(rrx) // int&&
Form 2: Expression decltype (anything else, including parenthesized)
Returns type based on value category:
- prvalue →
T - lvalue →
T& - xvalue →
T&&
int x = 5;
decltype((x)) // int& (lvalue)
decltype(x + 1) // int (prvalue)
decltype(std::move(x)) // int&& (xvalue)
Critical Difference Example
int i = 42;
// Safe: returns int (copy)
decltype(auto) fn_A(int i) {
return i; // decltype(i) = int
}
// DANGEROUS: returns int& (reference to local variable!)
decltype(auto) fn_B(int i) {
return (i); // decltype((i)) = int&
}
int main() {
int a = fn_A(10); // OK
int& b = fn_B(10); // Undefined behavior - dangling reference!
}
Type Deduction Rules
Rule 1: Unparenthesized Variables
int x;
const int cx = x;
int& rx = x;
const int& crx = x;
decltype(x) // int
decltype(cx) // const int
decltype(rx) // int&
decltype(crx) // const int&
Rule 2: Parenthesized Variables
int x;
decltype((x)) // int& (always lvalue reference for variables)
Rule 3: Member Access
struct S {
int member;
};
S s;
S f();
decltype(s.member) // int& (lvalue)
decltype(f().member) // int&& (xvalue - temporary object)
decltype(S::member) // int& (even outside class context)
Rule 4: Function Calls
Function call expressions take the return type of the function:
int func();
int& func_ref();
int&& func_rref();
decltype(func()) // int
decltype(func_ref()) // int&
decltype(func_rref()) // int&&
Rule 5: Operators
int a = 5, b = 10;
decltype(a + b) // int (prvalue)
decltype(a = b) // int& (assignment returns lvalue reference)
decltype(++a) // int& (pre-increment returns lvalue reference)
decltype(a++) // int (post-increment returns prvalue)
decltype(a > b) // bool (prvalue)
Rule 6: Literals and Constants
decltype(42) // int
decltype(3.14) // double
decltype("hello") // const char(&)[6] (array reference)
decltype(nullptr) // std::nullptr_t
Value Categories Summary
Based on the Stanford article, here’s how value categories relate to decltype:
| Value Category | decltype Result | Example |
|---|---|---|
| prvalue (pure rvalue) | T | 42, func() returning by value |
| lvalue | T& | Variables, (x), pre-increment |
| xvalue (expiring value) | T&& | std::move(x), f().member |
Evolution in C++14
C++14 introduced significant improvements to make decltype easier to use.
decltype(auto)
The biggest addition was decltype(auto), which combines auto type deduction with decltype rules.
Without decltype(auto) (C++11)
template<typename Container>
auto getElement(Container& c, int index) -> decltype(c[index]) {
return c[index];
}
With decltype(auto) (C++14)
template<typename Container>
decltype(auto) getElement(Container& c, int index) {
return c[index]; // Preserves reference if c[index] returns reference
}
Key Benefits
- Preserves Value Category
std::vector<int> vec = {1, 2, 3};
decltype(auto) elem = vec[0]; // int&, can modify
elem = 42; // Modifies vec[0]
auto elem2 = vec[0]; // int, copy
elem2 = 42; // Does NOT modify vec[0]
- Simpler Return Type Deduction
// C++11
template<typename F, typename... Args>
auto wrapper(F f, Args&&... args) -> decltype(f(std::forward<Args>(args)...)) {
return f(std::forward<Args>(args)...);
}
// C++14 - much cleaner!
template<typename F, typename... Args>
decltype(auto) wrapper(F f, Args&&... args) {
return f(std::forward<Args>(args)...);
}
- Variable Initialization
int x = 5;
int& rx = x;
decltype(auto) y = rx; // y is int&
auto z = rx; // z is int (copy)
Return Type Rules in C++14
decltype(auto) f1() { return 5; } // Returns int
decltype(auto) f2() { int x = 5; return x; } // Returns int
decltype(auto) f3() { int x = 5; return (x); } // Returns int& - DANGEROUS!
Evolution in C++17
C++17 brought conceptual changes to how prvalues work, affecting decltype indirectly.
Guaranteed Copy Elision
C++17 changed prvalues to be initialization expressions rather than temporary objects.
struct S {
S() { std::cout << "Constructor\n"; }
S(const S&) { std::cout << "Copy\n"; }
};
S factory() { return S(); }
// C++14: Constructor, Copy (maybe elided)
// C++17: Constructor only (guaranteed)
S s = factory();
decltype(factory()) // Still S (prvalue), but semantic change
Structured Bindings with decltype
C++17 introduced structured bindings, which work well with decltype:
std::pair<int, double> getPair() {
return {42, 3.14};
}
auto [i, d] = getPair();
decltype(i) // int
decltype(d) // double
// With references
auto& [ri, rd] = getPair(); // Error: can't bind to temporary
std::pair<int, double> p = getPair();
auto& [ri, rd] = p; // OK
decltype(ri) // int&
Template Argument Deduction for Class Templates
// C++17
std::pair p{1, 2.0}; // std::pair<int, double>
decltype(p) // std::pair<int, double>
// Works with complex expressions
decltype(std::pair{1, 2.0}) // std::pair<int, double>
Evolution in C++20
C++20 introduced concepts and constraints, which heavily use decltype in requires expressions.
Requires Expressions
#include <concepts>
template<typename T>
concept Addable = requires(T a, T b) {
{ a + b } -> std::same_as<T>; // decltype((a + b)) must be T
};
template<typename T>
concept HasSize = requires(T t) {
{ t.size() } -> std::convertible_to<std::size_t>;
};
Common Mistake in Requires Expressions
template<typename TA, typename TB>
auto add(TA a, TB b)
requires requires {
{ a + b } -> std::same_as<TA>;
{ b } -> std::same_as<int>; // WRONG! decltype((b)) is int&, not int
}
{
return a += b;
}
// Correct version
template<typename TA, typename TB>
auto add(TA a, TB b)
requires requires {
{ a + b } -> std::same_as<TA>;
{ b } -> std::same_as<int&>; // Correct!
}
{
return a += b;
}
decltype in Abbreviated Function Templates
// C++20 abbreviated function template
void process(auto x) {
using T = decltype(x);
T copy = x;
// ...
}
// Equivalent to:
template<typename T>
void process(T x) {
T copy = x;
// ...
}
Concepts with decltype
template<typename T>
concept Container = requires(T t) {
typename T::value_type;
{ t.begin() } -> std::same_as<typename T::iterator>;
{ t.size() } -> std::same_as<typename T::size_type>;
};
template<Container C>
decltype(auto) getFirst(C& c) {
return *c.begin(); // Preserves reference type
}
Common Pitfalls
Pitfall 1: Parentheses Matter!
int x = 5;
decltype(x) a = x; // int
decltype((x)) b = x; // int&
// Dangerous in return statements
decltype(auto) bad() {
int x = 42;
return (x); // Returns int& to local variable!
}
Pitfall 2: Temporary Object Member Access
struct S {
int member = 0;
};
S f() { return S{}; }
decltype(f().member) // int&& (xvalue)
// Dangerous!
decltype(auto) getMember() {
return S{}.member; // Returns int&& to destroyed temporary!
}
Pitfall 3: Reference Collapsing Confusion
int x = 5;
int& rx = x;
decltype(rx) y = x; // int&
decltype((rx)) z = x; // int& (parentheses don't add another reference)
Pitfall 4: Conditional Operator Surprises
int a = 1, b = 2;
decltype(a > b ? a : b) // int& (both operands are lvalues)
decltype(true ? 0 : 1) // int (both operands are prvalues)
decltype(a > b ? a : 0) // int (mixed: unifies to prvalue)
Best Practices
1. Use decltype(auto) for Perfect Return Type Forwarding
// Good: Preserves exact return type
template<typename Func, typename... Args>
decltype(auto) invoke(Func&& f, Args&&... args) {
return std::forward<Func>(f)(std::forward<Args>(args)...);
}
2. Avoid Parentheses in Return Statements
// Bad
decltype(auto) bad(int x) {
return (x); // int& - dangerous!
}
// Good
decltype(auto) good(int x) {
return x; // int - safe
}
3. Use Macros for Safe decltype Usage
// Prevent accidental expression decltype
#define exprtype(E) decltype((E))
#define vartype(v) decltype(v)
int x = 5;
vartype(x) y = 10; // Clear intent: copy variable type
exprtype(x) z = x; // Clear intent: get expression type (lvalue ref)
4. Prefer auto for Variable Declarations
// Usually prefer this
auto x = someFunction();
// Use decltype(auto) only when you need to preserve references
decltype(auto) y = someFunction(); // If someFunction returns a reference
5. Use Trailing Return Types for Clarity
// Clear and readable
template<typename T, typename U>
auto multiply(T a, U b) -> decltype(a * b) {
return a * b;
}
6. Test Value Categories at Compile Time
template<typename T> constexpr const char* category = "prvalue";
template<typename T> constexpr const char* category<T&> = "lvalue";
template<typename T> constexpr const char* category<T&&> = "xvalue";
#define SHOW_CATEGORY(E) \
std::cout << #E << ": " << category<decltype((E))> << '\n'
int x = 5;
SHOW_CATEGORY(x); // lvalue
SHOW_CATEGORY(x + 1); // prvalue
SHOW_CATEGORY(std::move(x)); // xvalue
7. Document Intent with Type Aliases
template<typename T>
using RemoveRef = std::remove_reference_t<T>;
template<typename Func>
auto wrapper(Func&& f) -> RemoveRef<decltype(f())> {
return f(); // Always returns by value
}
Summary Table
| Feature | C++11 | C++14 | C++17 | C++20 |
|---|---|---|---|---|
Basic decltype | ✓ | ✓ | ✓ | ✓ |
decltype(auto) | ✗ | ✓ | ✓ | ✓ |
| Trailing return types | ✓ | ✓ | ✓ | ✓ |
| Guaranteed copy elision | ✗ | ✗ | ✓ | ✓ |
| Requires expressions | ✗ | ✗ | ✗ | ✓ |
| Abbreviated templates | ✗ | ✗ | ✗ | ✓ |
Conclusion
decltype is a powerful feature that enables:
- Type introspection at compile time
- Perfect forwarding of return types
- Generic programming with exact type preservation
- Metaprogramming with type computations
Understanding the two forms of decltype (variable vs expression) and value categories is crucial for avoiding bugs. The evolution from C++11 through C++20 has made decltype progressively more powerful and easier to use, especially with decltype(auto) in C++14 and concepts in C++20.
Remember: Parentheses matter! decltype(x) and decltype((x)) can be completely different types.
C++11 Scoped Enum
Enumerations (enums) are a user-defined data type in C++ that consists of a set of named integral constants. They allow programmers to define a type with a restricted set of possible values, making code more readable, self-documenting, and type-safe.
An enum defines a new type and a set of named constants (enumerators) that belong to that type:
enum DayOfWeek {
MONDAY, // 0
TUESDAY, // 1
WEDNESDAY, // 2
THURSDAY, // 3
FRIDAY, // 4
SATURDAY, // 5
SUNDAY // 6
};
DayOfWeek today = WEDNESDAY; // today has value 2
By default, enumerators start at 0 and increment by 1, but you can assign custom values:
enum HttpStatus {
OK = 200,
NOT_FOUND = 404,
INTERNAL_ERROR = 500
};
Instead of using “magic numbers” or strings scattered throughout your code, enums provide meaningful names for values:
// Without enums - unclear and error-prone
int status = 2; // What does 2 mean?
if (status == 1) {
// Do something
}
// With enums - clear and maintainable
enum Status { IDLE, RUNNING, STOPPED };
Status status = RUNNING;
if (status == RUNNING) {
// Do something
}
Before C++11, C++ used C-style enums (also called “unscoped enums” or “plain enums”). While useful, C-style enums used in C++ programming before C++11 have several issues and drawbacks that can lead to bugs, maintenance problems, and poor code quality.
Let’s examine each drawback one by one before exploring how C++11 scoped enums solve these problems.
Problem 1: Scope Issues and Name Conflicts
C-style enums have their enumerators placed in the same scope as the enum itself.
This means the enumerator names (like OFF, ON, AUTO) are visible throughout the entire scope where the enum is declared.
Lets look at the below example:
#include <iostream>
enum DisplayMode {
OFF,
ON,
AUTO
};
/*
enum PowerState {
SLEEP,
OFF, // ERROR: 'OFF' already declared in DisplayMode
RUN
};
*/
int main() {
DisplayMode mode_1 = OFF; // Works
DisplayMode mode_2 = DisplayMode::OFF; // Also works
// If PowerState was uncommented:
// PowerState state_1 = OFF; // Ambiguous!
// PowerState state_2 = PowerState::OFF; // Still ambiguous!
return 0;
}
The enumerators OFF, ON, and AUTO are visible throughout the file.
If we try to create another enum with a duplicate enumerator name (like OFF in PowerState), the compiler throws an error because OFF is already defined in the same scope.
Workaround (Ugly):
You could wrap enums in namespaces, but this is verbose and cumbersome:
namespace Display {
enum Mode { OFF, ON, AUTO };
}
namespace Power {
enum State { SLEEP, OFF, RUN };
}
int main() {
Display::Mode mode = Display::OFF;
Power::State state = Power::OFF;
}
Problem 2: Non-Fixed Underlying Type
The underlying type of a C-style enum is implementation-defined. The compiler optimizes the storage type based on the enum’s content, which can lead to portability and interoperability issues.
Example:
#include <iostream>
#include <type_traits>
#include <cstdint>
// 1. Standard C-style enum (Usually defaults to int)
enum Standard { A, B };
// 2. Large C-style enum (Forces a 64-bit underlying type)
enum Huge {
BigValue = 0xFFFFFFFFFFFFFFFFULL
};
// 3. Explicitly fixed type (Using C++11 fixed underlying type syntax)
enum Small : std::uint8_t {
Low,
High
};
// Helper template to print the name and size of the underlying type
template <typename T>
void printUnderlyingTypeInfo(const char* enumName) {
using Underlying = std::underlying_type_t<T>;
std::cout << "Enum [" << enumName << "]:\n";
std::cout << " - Size: " << sizeof(Underlying) << " byte(s)\n";
if (std::is_signed_v<Underlying>)
std::cout << " - Signed: Yes\n";
else
std::cout << " - Signed: No\n";
std::cout << "--------------------------\n";
}
int main() {
printUnderlyingTypeInfo<Standard>("Standard");
printUnderlyingTypeInfo<Huge>("Huge");
printUnderlyingTypeInfo<Small>("Small");
return 0;
}
Output:
Enum [Standard]:
- Size: 4 byte(s)
- Signed: No
--------------------------
Enum [Huge]:
- Size: 8 byte(s)
- Signed: No
--------------------------
Enum [Small]:
- Size: 1 byte(s)
- Signed: No
--------------------------
Note: This example uses C++17 type traits (std::underlying_type_t and std::is_signed_v) to identify the underlying storage size.
The size varies based on the enum values. This causes issues in:
- Network communication protocols (where fixed sizes are expected)
- Binary file formats
- Interfacing with hardware or external libraries
- Cross-platform compatibility
While C++11 allows specifying a fixed underlying type (as shown with Small), it’s not enforced by default for C-style enums.
Problem 3: Implicit Conversion to int (Type Safety Issues)
C-style enums can be implicitly converted to integers, breaking type safety and potentially causing undefined behavior.
Example:
#include <iostream>
enum Color { Red, Green, Blue };
void draw(Color c) {
std::cout << "draw(Color) called\n";
}
void draw(int x) {
std::cout << "draw(int) called with " << x << "\n";
}
int main() {
Color c = Red;
draw(c); // OK: calls draw(Color)
draw(42); // OK: calls draw(int), but 42 is not a valid Color
int n = Green; // Implicit conversion from Color to int
draw(n); // OK: calls draw(int), even though n came from Color
// Even worse:
Color invalid = static_cast<Color>(999); // Compiles! Undefined behavior!
return 0;
}
Output:
draw(Color) called
draw(int) called with 42
draw(int) called with 1
Enums are not type-safe. You can:
- Assign arbitrary integers to enum variables
- Implicitly convert enums to integers
- Lose the semantic meaning of the enum type
- Accidentally pass wrong values without compiler warnings
Problem 4: No Forward Declaration
C-style enums cannot be forward declared (in C++03 and earlier) because the compiler needs to know the underlying type to determine the enum’s size.
Example:
#include <iostream>
// This WILL NOT compile in C++03:
// enum Color; // Error: cannot forward declare
// You must provide the full definition:
enum Color { Red, Green, Blue };
class Widget {
Color favoriteColor; // Must have full enum definition above
public:
void setColor(Color c);
};
void Widget::setColor(Color c) {
favoriteColor = c;
}
int main() {
Widget w;
w.setColor(Red);
return 0;
}
Why is this a problem?
-
Compilation dependencies: Every file that includes a header with an enum must see the complete definition, even if it only needs to know the enum exists. This increases compilation time and creates tight coupling.
-
Circular dependencies: If two classes need to reference each other’s enums, you can’t forward declare, leading to difficult header organization.
-
Reduced encapsulation: You can’t hide the enum values in the header; everything is exposed.
Example showing the circular dependency problem:
// device.h
#ifndef DEVICE_H
#define DEVICE_H
// Cannot forward declare!
// enum PowerState; // Error!
// Must include full definition
enum PowerState { SLEEP, OFF, RUN };
class Device {
PowerState state;
public:
void setState(PowerState s);
};
#endif
Compare this to classes/structs where forward declaration works fine:
// device.h
#ifndef DEVICE_H
#define DEVICE_H
class PowerManager; // Forward declaration works!
class Device {
PowerManager* manager; // Only need pointer/reference
public:
void setManager(PowerManager* pm);
};
#endif
Why forward declaration fails for C-style enums:
The compiler must know the size of the enum to allocate memory for enum variables. Since the underlying type is implementation-defined and depends on the enum’s values (as shown in Problem 2), the compiler needs to see all the enumerators to determine the size.
C++11 Scoped Enums (enum class) - The Solution
C++11 introduced scoped enums (also called strongly-typed enums) using the enum class or enum struct syntax.
Basic Syntax
// Basic scoped enum syntax
enum class EnumName {
Enumerator1,
Enumerator2,
Enumerator3
};
// With explicit underlying type
enum class EnumName : UnderlyingType {
Enumerator1,
Enumerator2,
Enumerator3
};
// Both 'enum class' and 'enum struct' are equivalent
enum class Mode { A, B, C }; // More commonly used
enum struct Mode { A, B, C }; // Exactly the same behavior
Examples:
enum class DisplayMode {
OFF,
ON,
AUTO
};
enum class PowerState {
SLEEP,
OFF, // No conflict! Different scope
RUN
};
// With explicit underlying type
enum class Priority : std::uint8_t {
LOW = 0,
MEDIUM = 1,
HIGH = 2
};
// With custom values
enum class ErrorCode : int {
SUCCESS = 0,
FILE_NOT_FOUND = 404,
INTERNAL_ERROR = 500
};
The new C++11 scoped enums solve all the problems we have discussed above when we use c-style enums.
Lets now look at how its solving these problems and why you should start using the C++11 scoped enums.
Solution 1: Proper Scoping - No More Name Conflicts
Scoped enums keep their enumerators within the enum’s scope, preventing naming conflicts.
#include <iostream>
enum class DisplayMode {
OFF,
ON,
AUTO
};
enum class PowerState {
SLEEP,
OFF, // No conflict with DisplayMode::OFF
RUN
};
int main() {
// Must use scope resolution operator
DisplayMode mode = DisplayMode::OFF;
PowerState state = PowerState::OFF;
// This won't compile:
// DisplayMode bad = OFF; // Error: 'OFF' not found in this scope
std::cout << "Code compiles successfully!\n";
return 0;
}
Benefits:
- No naming conflicts between different enums
- More explicit and readable code
- Clearer intent and namespace pollution prevention
Solution 2: Fixed Underlying Type
Scoped enums have a default underlying type of int, and you can explicitly specify any integral type you want. This ensures consistency across platforms.
#include <iostream>
#include <type_traits>
#include <cstdint>
// Default underlying type is int
enum class Status {
OK,
ERROR,
PENDING
};
// Explicitly specify underlying type
enum class Priority : std::uint8_t {
LOW,
MEDIUM,
HIGH
};
enum class LargeValue : std::uint64_t {
HUGE = 0xFFFFFFFFFFFFFFFFULL
};
template <typename T>
void printEnumInfo(const char* enumName) {
using Underlying = std::underlying_type_t<T>;
std::cout << "Enum [" << enumName << "]:\n";
std::cout << " - Size: " << sizeof(Underlying) << " byte(s)\n";
std::cout << " - Signed: " << (std::is_signed_v<Underlying> ? "Yes" : "No") << "\n";
std::cout << "--------------------------\n";
}
int main() {
printEnumInfo<Status>("Status");
printEnumInfo<Priority>("Priority");
printEnumInfo<LargeValue>("LargeValue");
return 0;
}
Output:
Enum [Status]:
- Size: 4 byte(s)
- Signed: Yes
--------------------------
Enum [Priority]:
- Size: 1 byte(s)
- Signed: No
--------------------------
Enum [LargeValue]:
- Size: 8 byte(s)
- Signed: No
--------------------------
Benefits:
- Predictable size across platforms
- Safe for serialization and network protocols
- Memory-efficient when using smaller types like
uint8_t
Solution 3: No Implicit Conversion - Type Safety
The key feature of C++11 scoped enums: They do NOT allow implicit conversion to integers or other types. This provides strong type safety and prevents many common programming errors.
The Rule:
- No implicit conversion from scoped enum to int or any other type
- Must use
static_castfor explicit conversion when needed - This forces programmers to be explicit about their intentions
#include <iostream>
enum class Color {
Red,
Green,
Blue
};
enum class Size {
Small,
Medium,
Large
};
void draw(Color c) {
std::cout << "draw(Color) called\n";
}
void draw(int x) {
std::cout << "draw(int) called with " << x << "\n";
}
int main() {
Color c = Color::Red;
draw(c); // OK: calls draw(Color)
draw(42); // OK: calls draw(int)
// ===== These WON'T compile (No implicit conversion) =====
// int n = Color::Green; // Error: cannot convert Color to int
// int m = c; // Error: cannot convert Color to int
// Color c2 = 1; // Error: cannot convert int to Color
// Size s = Color::Red; // Error: cannot convert Color to Size
// if (c == 0) { } // Error: cannot compare Color with int
// bool b = c; // Error: cannot convert Color to bool
// ===== Must use static_cast for explicit conversion =====
// Enum to int
int value = static_cast<int>(Color::Green);
std::cout << "Green value: " << value << "\n";
// Enum to underlying type
auto underlying_value = static_cast<std::underlying_type_t<Color>>(c);
std::cout << "Red underlying value: " << underlying_value << "\n";
// Int to enum (use with caution - no validation!)
Color c3 = static_cast<Color>(2); // Becomes Color::Blue
// Enum to another enum type (requires double cast)
Size s = static_cast<Size>(static_cast<int>(Color::Medium));
// Comparison between enums (same type only)
Color c4 = Color::Red;
if (c == c4) { // OK: same enum type
std::cout << "Colors match!\n";
}
// if (c == Size::Small) { } // Error: cannot compare different enum types
return 0;
}
Output:
draw(Color) called
draw(int) called with 42
Green value: 1
Red underlying value: 0
Colors match!
Why This Matters - Comparison with C-Style Enums:
#include <iostream>
// C-style enum (OLD - implicit conversion allowed)
enum OldColor { OLD_RED, OLD_GREEN, OLD_BLUE };
// Scoped enum (NEW - no implicit conversion)
enum class NewColor { RED, GREEN, BLUE };
void processColor(int value) {
std::cout << "Processing value: " << value << "\n";
}
int main() {
OldColor oldColor = OLD_RED;
NewColor newColor = NewColor::RED;
// C-style enum problems:
processColor(oldColor); // Compiles! Implicit conversion
int x = oldColor; // Compiles! Implicit conversion
if (oldColor == 0) { } // Compiles! Can compare with int
bool b = oldColor; // Compiles! Converts to bool
OldColor bad = 999; // Compiles! Invalid value allowed
// Scoped enum - all these are errors:
// processColor(newColor); // Error: no implicit conversion
// int y = newColor; // Error: no implicit conversion
// if (newColor == 0) { } // Error: cannot compare with int
// bool c = newColor; // Error: no implicit conversion
// NewColor bad2 = 999; // Error: cannot convert int to NewColor
// Must be explicit with scoped enums:
processColor(static_cast<int>(newColor)); // OK: explicit intent
int y = static_cast<int>(newColor); // OK: explicit conversion
return 0;
}
Benefits of No Implicit Conversion:
- Type safety: Prevents accidental mixing of unrelated enum types
- Compiler protection: Catches errors at compile time instead of runtime
- Explicit intent: Forces you to be clear about conversions
- Prevents invalid values: Can’t accidentally assign random integers
- More maintainable: Clear what the code is doing
- Prevents logic errors: Can’t accidentally compare enums with integers
Solution 4: Forward Declaration Support
Scoped enums can be forward declared because they have a known underlying type (default int or explicitly specified).
Example:
// device.h
#ifndef DEVICE_H
#define DEVICE_H
// Forward declaration works!
enum class PowerState;
enum class DisplayMode : unsigned char; // With explicit type
class Device {
PowerState* state; // Pointer to forward-declared enum
DisplayMode* display; // Pointer to forward-declared enum
public:
void setState(PowerState s);
void setDisplay(DisplayMode d);
};
#endif
// device.cpp
#include "device.h"
// Full definitions in implementation file
enum class PowerState {
SLEEP,
OFF,
RUN
};
enum class DisplayMode : unsigned char {
OFF,
ON,
AUTO
};
void Device::setState(PowerState s) {
// Implementation
}
void Device::setDisplay(DisplayMode d) {
// Implementation
}
Benefits:
- Reduces compilation dependencies
- Enables better header organization
- Solves circular dependency issues
- Faster compilation times
- Better encapsulation
Here’s a side-by-side comparison showing all the differences:
#include <iostream>
#include <type_traits>
// ========== C-STYLE ENUM ==========
enum OldColor {
OLD_RED,
OLD_GREEN,
OLD_BLUE
};
// ========== SCOPED ENUM ==========
enum class NewColor {
RED,
GREEN,
BLUE
};
void processOldColor(OldColor c) {
std::cout << "Old color value: " << c << "\n";
}
void processNewColor(NewColor c) {
// Must explicitly cast to print value
std::cout << "New color value: " << static_cast<int>(c) << "\n";
}
int main() {
// ===== C-style enum usage =====
OldColor old1 = OLD_RED; // Works
OldColor old2 = OldColor::OLD_RED; // Also works
int oldVal = OLD_GREEN; // Implicit conversion - BAD!
processOldColor(old1);
// ===== Scoped enum usage =====
NewColor new1 = NewColor::RED; // Must use scope
// NewColor new2 = RED; // ERROR: RED not in scope
// int newVal = NewColor::GREEN; // ERROR: no implicit conversion
int newVal = static_cast<int>(NewColor::GREEN); // Must be explicit
processNewColor(new1);
// ===== Size comparison =====
std::cout << "\nSize comparison:\n";
std::cout << "sizeof(OldColor): " << sizeof(OldColor) << " bytes\n";
std::cout << "sizeof(NewColor): " << sizeof(NewColor) << " bytes\n";
// ===== Underlying type =====
std::cout << "\nUnderlying types:\n";
std::cout << "OldColor is signed: "
<< std::is_signed_v<std::underlying_type_t<OldColor>> << "\n";
std::cout << "NewColor is signed: "
<< std::is_signed_v<std::underlying_type_t<NewColor>> << "\n";
return 0;
}
Best Practices and Recommendations
When to Use Scoped Enums
Always prefer enum class over plain enum in modern C++ code unless you have a specific reason not to.
Use scoped enums when:
- You want type safety and explicit scoping
- Working with APIs, serialization, or network protocols
- You need forward declarations
- Multiple enums might have similar enumerator names
- Writing new code (C++11 and later)
When C-Style Enums Might Be Acceptable
- Legacy code that you cannot modify
- When you explicitly want implicit conversion (rare cases)
- When working with C APIs that expect C-style enums
Syntax Variations
Both enum class and enum struct are equivalent:
enum class Mode { A, B, C }; // More common
enum struct Mode { A, B, C }; // Exactly the same
Specifying Underlying Type
// Default (int)
enum class Status { OK, ERROR };
// Custom type
enum class TinyEnum : std::uint8_t { A, B, C };
enum class BigEnum : std::uint64_t { HUGE = 0xFFFFFFFF };
Working with Underlying Values
When you need the integer value:
enum class Level : int { LOW = 1, MEDIUM = 5, HIGH = 10 };
Level lv = Level::MEDIUM;
// Get underlying value
int value = static_cast<int>(lv);
std::cout << "Level value: " << value << "\n"; // Prints: 5
// Convert integer to enum (be careful!)
Level lv2 = static_cast<Level>(10);
Summary
| Feature | C-Style Enum | Scoped Enum (enum class) |
|---|---|---|
| Scoping | Enumerators in surrounding scope | Enumerators in enum scope |
| Name conflicts | Common problem | No conflicts |
| Type safety | Weak (implicit int conversion) | Strong (no implicit conversion) |
| Underlying type | Implementation-defined | int by default, explicitly specifiable |
| Forward declaration | Not possible (C++03) | Supported |
| Syntax | enum Name { ... } | enum class Name { ... } |
| Access | Name or EnumName::Name | EnumName::Name only |
| Usage recommendation | Legacy code only | Modern C++ (C++11+) |
Key Takeaway: Scoped enums (enum class) solve all major problems with C-style enums and should be your default choice in modern C++ programming.
Type Traits for Enums
C++11 and later versions provide several type traits in the <type_traits> header for working with enums.
These are useful for template metaprogramming and generic code.
Available Enum Type Traits
#include <iostream>
#include <type_traits>
#include <cstdint>
enum OldStyle { A, B, C };
enum class NewStyle : std::uint16_t {
X = 100,
Y = 200,
Z = 300
};
enum class DefaultStyle {
P, Q, R
};
int main() {
// ===== 1. std::is_enum =====
// Checks if a type is an enumeration type
std::cout << std::boolalpha;
std::cout << "std::is_enum:\n";
std::cout << " OldStyle: " << std::is_enum<OldStyle>::value << "\n";
std::cout << " NewStyle: " << std::is_enum<NewStyle>::value << "\n";
std::cout << " int: " << std::is_enum<int>::value << "\n";
std::cout << " DefaultStyle: " << std::is_enum<DefaultStyle>::value << "\n\n";
// C++17 shorthand
std::cout << " OldStyle (v): " << std::is_enum_v<OldStyle> << "\n\n";
// ===== 2. std::underlying_type =====
// Gets the underlying integer type of an enum
std::cout << "std::underlying_type:\n";
using OldUnderlying = std::underlying_type<OldStyle>::type;
using NewUnderlying = std::underlying_type<NewStyle>::type;
using DefaultUnderlying = std::underlying_type<DefaultStyle>::type;
std::cout << " OldStyle underlying type size: "
<< sizeof(OldUnderlying) << " bytes\n";
std::cout << " NewStyle underlying type size: "
<< sizeof(NewUnderlying) << " bytes\n";
std::cout << " DefaultStyle underlying type size: "
<< sizeof(DefaultUnderlying) << " bytes\n\n";
// C++14 shorthand: std::underlying_type_t
using NewUnderlyingT = std::underlying_type_t<NewStyle>;
std::cout << " NewStyle underlying (using _t): "
<< sizeof(NewUnderlyingT) << " bytes\n\n";
// ===== 3. Checking if underlying type is signed =====
std::cout << "Is underlying type signed:\n";
std::cout << " OldStyle: "
<< std::is_signed<std::underlying_type_t<OldStyle>>::value << "\n";
std::cout << " NewStyle: "
<< std::is_signed<std::underlying_type_t<NewStyle>>::value << "\n";
std::cout << " DefaultStyle: "
<< std::is_signed<std::underlying_type_t<DefaultStyle>>::value << "\n\n";
// C++17 shorthand
std::cout << " NewStyle (v): "
<< std::is_signed_v<std::underlying_type_t<NewStyle>> << "\n\n";
// ===== 4. Checking if underlying type is unsigned =====
std::cout << "Is underlying type unsigned:\n";
std::cout << " OldStyle: "
<< std::is_unsigned_v<std::underlying_type_t<OldStyle>> << "\n";
std::cout << " NewStyle: "
<< std::is_unsigned_v<std::underlying_type_t<NewStyle>> << "\n";
std::cout << " DefaultStyle: "
<< std::is_unsigned_v<std::underlying_type_t<DefaultStyle>> << "\n\n";
// ===== 5. std::is_scoped_enum (C++23) =====
// Note: This requires C++23 support
#if __cplusplus >= 202302L
std::cout << "std::is_scoped_enum (C++23):\n";
std::cout << " OldStyle: " << std::is_scoped_enum_v<OldStyle> << "\n";
std::cout << " NewStyle: " << std::is_scoped_enum_v<NewStyle> << "\n\n";
#endif
return 0;
}
Output:
std::is_enum:
OldStyle: true
NewStyle: true
int: false
DefaultStyle: true
OldStyle (v): true
std::underlying_type:
OldStyle underlying type size: 4 bytes
NewStyle underlying type size: 2 bytes
DefaultStyle underlying type size: 4 bytes
NewStyle underlying (using _t): 2 bytes
Is underlying type signed:
OldStyle: false
NewStyle: false
DefaultStyle: true
NewStyle (v): false
Is underlying type unsigned:
OldStyle: true
NewStyle: true
DefaultStyle: false
Practical Example: Generic Enum to String Conversion
#include <iostream>
#include <type_traits>
#include <string>
// Generic function to convert any enum to its underlying value
template<typename E>
constexpr auto toUnderlying(E e) noexcept {
static_assert(std::is_enum_v<E>, "toUnderlying requires an enum type");
return static_cast<std::underlying_type_t<E>>(e);
}
enum class Status : std::uint8_t {
IDLE = 0,
RUNNING = 1,
PAUSED = 2,
STOPPED = 3
};
enum class Priority : int {
LOW = -1,
NORMAL = 0,
HIGH = 1
};
int main() {
Status s = Status::RUNNING;
Priority p = Priority::HIGH;
std::cout << "Status value: " << toUnderlying(s) << "\n";
std::cout << "Priority value: " << toUnderlying(p) << "\n";
// Type information
std::cout << "\nStatus underlying type size: "
<< sizeof(std::underlying_type_t<Status>) << " byte(s)\n";
std::cout << "Priority underlying type size: "
<< sizeof(std::underlying_type_t<Priority>) << " byte(s)\n";
std::cout << "\nStatus is signed: "
<< std::is_signed_v<std::underlying_type_t<Status>> << "\n";
std::cout << "Priority is signed: "
<< std::is_signed_v<std::underlying_type_t<Priority>> << "\n";
return 0;
}
Output:
Status value: 1
Priority value: 1
Status underlying type size: 1 byte(s)
Priority underlying type size: 4 byte(s)
Status is signed: 0
Priority is signed: 1
Summary of Enum Type Traits
| Type Trait | C++ Version | Purpose | Example |
|---|---|---|---|
std::is_enum<T> | C++11 | Check if T is an enum | std::is_enum<Color>::value |
std::is_enum_v<T> | C++17 | Shorthand for is_enum | std::is_enum_v<Color> |
std::underlying_type<T> | C++11 | Get underlying type | std::underlying_type<Color>::type |
std::underlying_type_t<T> | C++14 | Shorthand for underlying_type | std::underlying_type_t<Color> |
std::is_scoped_enum<T> | C++23 | Check if enum is scoped | std::is_scoped_enum_v<Color> |
std::is_signed<T> | C++11 | Check if type is signed | Works on underlying type |
std::is_unsigned<T> | C++11 | Check if type is unsigned | Works on underlying type |
std::is_signed_v<T> | C++17 | Shorthand for is_signed | std::is_signed_v<int> |
std::is_unsigned_v<T> | C++17 | Shorthand for is_unsigned | std::is_unsigned_v<uint8_t> |
Common Use Cases for Enum Type Traits
- Template constraints: Ensure template parameters are enums
- Generic conversions: Write functions that work with any enum type
- Serialization: Determine the size needed to serialize an enum
- Reflection: Build runtime type information systems
- Static assertions: Enforce enum properties at compile time
#include <type_traits>
#include <cstdint>
// Example: Ensure an enum uses a specific underlying type
enum class ErrorCode : std::uint32_t {
SUCCESS = 0,
FAILURE = 1
};
static_assert(std::is_enum_v<ErrorCode>, "ErrorCode must be an enum");
static_assert(sizeof(std::underlying_type_t<ErrorCode>) == 4,
"ErrorCode must be 4 bytes");
static_assert(std::is_unsigned_v<std::underlying_type_t<ErrorCode>>,
"ErrorCode must be unsigned");
C++11 Range-Based For Loops
Introduction
The range-based for loop, introduced in C++11, provides a simpler, more readable syntax for iterating over elements of a range, such as arrays, standard library containers, and custom types that satisfy the necessary requirements.
Basic Syntax
for (declaration : expression) {
// loop statement(s)
}
Where declaration is type variable:
for (type variable : expression) {
// loop statement(s)
}
type: The type of the elements (can be explicit likeint,std::string, or useauto)variable: The name of the variable that will hold each elementdeclaration: The complete variable declaration (type variable), whose type must be compatible with the element type of the sequence. Theautokeyword is highly recommended here.expression: The range to iterate over (e.g., an array, astd::vector,std::string, or an initializer list).
#include <iostream>
#include <vector>
#include <string>
int main() {
// Vector
std::vector<int> numbers = {1, 2, 3, 4, 5};
for (int num : numbers) {
std::cout << num << " ";
}
std::cout << std::endl;
// C-style array
int arr[] = {10, 20, 30, 40};
for (int value : arr) {
std::cout << value << " ";
}
std::cout << std::endl;
// String (iterates over characters)
std::string text = "Hello";
for (char c : text) {
std::cout << c << " ";
}
std::cout << std::endl;
// Initializer list
for (double d : {1.1, 2.2, 3.3}) {
std::cout << d << " ";
}
std::cout << std::endl;
return 0;
}
Comparison: Old vs. New Syntax
std::vector<int> numbers = {1, 2, 3, 4, 5};
// Old way with index
for (size_t i = 0; i < numbers.size(); i++) {
std::cout << numbers[i] << " ";
}
// Old way with iterators
for (std::vector<int>::iterator it = numbers.begin(); it != numbers.end(); ++it) {
std::cout << *it << " ";
}
// Range-based for loop (much cleaner!)
for (int num : numbers) {
std::cout << num << " ";
}
Using auto Keyword
With the introduction of auto keyword in C++11, using auto in Range based for loops we can greatly reduce complexity as
the porgrammer does not have to explicitly know the type of the entry in the containers or ranges.
Simply use auto instead of the type.
Compiler will deduce the type automatically from auto.
std::vector<std::string> words = {"hello", "world", "C++11"};
// Read-only, makes copies
for (auto word : words) {
std::cout << word << " ";
}
Using References
So auto& can be used as well to get reference for entries that programmer can modify.
std::vector<std::string> words = {"hello", "world"};
// Read-only, no copies (efficient for large objects)
for (const auto& word : words) {
std::cout << word << " ";
}
// Modify elements
for (auto& word : words) {
word += "!"; // modifies the actual elements
}
How It Works Under the Hood
The Mechanism
The range-based for loop is essentially syntactic sugar that the compiler translates into a standard for loop that relies explicitly on iterators. This is why the underlying data structure needs begin() and end() functions.
Compiler Transformation
The C++ code you write:
for (const auto& element : container) {
// user code
}
Is internally transformed by the compiler into something conceptually similar to:
{
auto&& __range = container;
auto __begin = begin(__range); // Calls the begin() function
auto __end = end(__range); // Calls the end() function
for (; __begin != __end; ++__begin) {
const auto& element = *__begin; // Uses operator* on the iterator
// ... user loop body ...
}
}
Why Iterators Are Necessary
The loop requires the begin() and end() functions to define the boundaries and the traversal logic:
begin(): Establishes the starting point of the iteration.end(): Defines the termination condition (the loop stops when the current iterator equals theenditerator).- Iterators: The objects returned by these functions handle the mechanics of accessing (
operator*) and moving to the next element (operator++).
Without begin() and end(), the compiler has no standardized way to obtain the starting and ending iterators required for this translation process to work.
Working with Different Container Types
Standard Containers
#include <vector>
#include <list>
#include <map>
// Vector
std::vector<int> vec = {1, 2, 3};
for (auto v : vec) {
std::cout << v << " ";
}
// List
std::list<double> lst = {1.1, 2.2, 3.3};
for (const auto& l : lst) {
std::cout << l << " ";
}
// Map
std::map<std::string, int> ages = {{"Alice", 30}, {"Bob", 25}};
for (const auto& pair : ages) {
std::cout << pair.first << ": " << pair.second << std::endl;
}
Static Arrays
The range-based for loop works seamlessly with static (fixed-size) arrays because the compiler knows the exact size at compile time.
int static_array[] = {10, 20, 30, 40, 50};
for (int x : static_array) {
std::cout << x << " ";
}
How It Works:
When you declare a static array, the compiler internally tracks both the memory location and the number of elements. The compiler calculates:
begin(): The array name (decays to a pointer to the first element)end(): Uses pointer arithmetic with the known size (array + size)
The compiler treats it like:
auto* __begin = static_array;
auto* __end = static_array + 5; // '5' is known at compile time
Dynamic Arrays (Allocated with new)
The Problem
You cannot use a range-based for loop directly on a dynamically allocated array using new, because the compiler only sees a raw pointer (int*) and doesn’t know the size.
int* dynamicArray = new int[5];
// for (int x : dynamicArray) {} // Error: 'begin' was not found
Raw pointers don’t have begin() or end() member functions, and the compiler cannot determine the array size at compile time.
The Solution: Using Standard Library Helpers
You must explicitly provide the range boundaries using standard library functions.
Using std::ranges::subrange (C++20)
#include <iostream>
#include <ranges>
int main() {
size_t size = 5;
int* dynamicArray = new int[size];
// Initialize the array
for (size_t i = 0; i < size; ++i) {
dynamicArray[i] = i * 10;
}
// Explicitly define the range using pointer arithmetic
for (int x : std::ranges::subrange(dynamicArray, dynamicArray + size)) {
std::cout << x << " "; // Output: 0 10 20 30 40
}
std::cout << std::endl;
delete[] dynamicArray;
return 0;
}
Using std::span (C++20 - Recommended)
#include <iostream>
#include <span>
int main() {
size_t size = 5;
int* dynamicArray = new int[size];
for (size_t i = 0; i < size; ++i) {
dynamicArray[i] = i * 10;
}
// Wrap the pointer and size in a span
std::span<int> span_of_array(dynamicArray, size);
for (int x : span_of_array) {
std::cout << x << " "; // Output: 0 10 20 30 40
}
std::cout << std::endl;
delete[] dynamicArray;
return 0;
}
By using std::ranges::subrange or std::span, you wrap your raw pointer and size into a type that satisfies the range concept (it has begin() and end() member functions), allowing the range-based for loop to work correctly.
Custom Classes and the Range Concept
To use a custom class with a range-based for loop, the class must satisfy the range concept.
Requirements
Your class must provide:
-
begin()andend()functions, either as:- Member functions, or
- Non-member functions in the same namespace (found via argument-dependent lookup)
-
An iterator type that supports:
operator*(dereference)operator!=(inequality comparison)- Pre-increment
operator++
Example: Custom Container
#include <iostream>
class SimpleContainer {
private:
int data[5] = {1, 2, 3, 4, 5};
public:
// Iterator class
class Iterator {
private:
int* ptr;
public:
Iterator(int* p) : ptr(p) {}
// Dereference operator
int& operator*() { return *ptr; }
// Pre-increment operator
Iterator& operator++() {
++ptr;
return *this;
}
// Inequality comparison
bool operator!=(const Iterator& other) const {
return ptr != other.ptr;
}
};
// begin() function
Iterator begin() { return Iterator(data); }
// end() function
Iterator end() { return Iterator(data + 5); }
};
int main() {
SimpleContainer container;
for (int value : container) {
std::cout << value << " "; // Output: 1 2 3 4 5
}
std::cout << std::endl;
return 0;
}
Best Practices
Use const auto& for Read-Only Access
When you don’t need to modify elements and want to avoid copying (especially for large objects):
std::vector<std::string> large_strings = {"very", "long", "strings"};
for (const auto& str : large_strings) {
std::cout << str << " ";
}
Use auto& for Modifications
When you need to modify the elements in place:
std::vector<int> numbers = {1, 2, 3, 4, 5};
for (auto& num : numbers) {
num *= 2; // doubles each element
}
Use Plain auto for Copies
When you explicitly want to work with copies:
std::vector<int> numbers = {1, 2, 3};
for (auto num : numbers) {
num *= 2; // modifies the copy, not the original
}
Summary
Range-based for loops provide:
- Cleaner syntax: No need for explicit iterators or index management
- Less error-prone: Eliminates off-by-one errors and iterator mistakes
- More readable: Intent is immediately clear
- Flexible: Works with standard containers, arrays, and custom types
The key requirement is that the range must provide begin() and end() functions that return iterators supporting the basic iterator operations.
In-Class Member Initialization (C++11)
Introduction
In-class member initialization (also called default member initialization) was introduced in C++11 and represents a significant improvement in how we initialize class data members. This feature allows you to specify default values for non-static data members directly in the class definition, rather than solely in constructors.
The Problem Before C++11
Before C++11, the only way to initialize non-static data members was through constructor initializer lists or in the constructor body. This created several issues:
Issue 1: Repetitive Initialization Code
// Pre-C++11: Repetitive and error-prone
class Server {
private:
std::string host;
int port;
int timeout;
bool ssl_enabled;
int max_connections;
public:
// Default constructor - must initialize everything
Server()
: host("localhost"),
port(8080),
timeout(30),
ssl_enabled(false),
max_connections(100) {
}
// Parameterized constructor - must repeat defaults
Server(const std::string& h, int p)
: host(h),
port(p),
timeout(30), // Repeated!
ssl_enabled(false), // Repeated!
max_connections(100) { // Repeated!
}
// Another constructor - more repetition
Server(const std::string& h, int p, bool ssl)
: host(h),
port(p),
timeout(30), // Repeated again!
ssl_enabled(ssl),
max_connections(100) { // Repeated again!
}
};
Problems:
- Default values duplicated across multiple constructors
- Easy to forget a member in one constructor
- Maintenance nightmare when changing default values
- Inconsistency risk across constructors
Issue 2: Mandatory Default Constructor
// Pre-C++11: Forced to write default constructor just for initialization
class Configuration {
private:
int retry_count;
double timeout_seconds;
bool auto_reconnect;
public:
// Must write this just to set defaults
Configuration()
: retry_count(3),
timeout_seconds(5.0),
auto_reconnect(true) {
}
};
Issue 3: Const and Reference Members Were Painful
// Pre-C++11: Const members required initialization in ALL constructors
class Document {
private:
const std::string document_id; // Must initialize in every constructor
const int version; // Must initialize in every constructor
std::string content;
public:
// Every constructor must initialize const members
Document(const std::string& id)
: document_id(id),
version(1), // Always the same
content("") {
}
Document(const std::string& id, const std::string& text)
: document_id(id),
version(1), // Duplicated!
content(text) {
}
Document(const std::string& id, int ver, const std::string& text)
: document_id(id),
version(ver),
content(text) {
}
};
In-Class Member Initialization (C++11)
C++11 introduced the ability to initialize non-static data members directly at their point of declaration.
Basic Syntax
class MyClass {
private:
int value = 42; // Direct initialization
std::string name = "default"; // Works with any type
double pi{3.14159}; // Brace initialization also works
bool flag = false;
};
Solving the Repetition Problem
// C++11: Clean and DRY (Don't Repeat Yourself)
class Server {
private:
std::string host = "localhost";
int port = 8080;
int timeout = 30;
bool ssl_enabled = false;
int max_connections = 100;
public:
// Default constructor becomes trivial (or can be omitted)
Server() = default;
// Only specify what changes from defaults
Server(const std::string& h, int p)
: host(h), port(p) {
// timeout, ssl_enabled, max_connections use in-class defaults
}
// Selectively override defaults
Server(const std::string& h, int p, bool ssl)
: host(h), port(p), ssl_enabled(ssl) {
// Other members use in-class defaults
}
};
No More Mandatory Default Constructor
// C++11: Default constructor often not needed
class Configuration {
private:
int retry_count = 3;
double timeout_seconds = 5.0;
bool auto_reconnect = true;
public:
// No need to define default constructor - compiler generates one
// that uses in-class initializers
// Can still add parameterized constructors
explicit Configuration(int retries)
: retry_count(retries) {
}
};
// Usage
Configuration cfg1; // Uses all defaults
Configuration cfg2{10}; // Uses custom retry_count
Const Non-Static Data Members
In-class member initialization significantly simplifies working with const non-static data members.
Before C++11: Const Members Were Painful
// Pre-C++11: Must initialize const members in EVERY constructor
class Product {
private:
const std::string product_id; // Const - can't be changed after construction
const double tax_rate; // Const - fixed value
std::string name;
double price;
public:
// Constructor 1 - must initialize all const members
Product(const std::string& id, const std::string& n, double p)
: product_id(id),
tax_rate(0.08), // Always 0.08, but must repeat
name(n),
price(p) {
}
// Constructor 2 - must initialize all const members again
Product(const std::string& id, const std::string& n, double p, double tax)
: product_id(id),
tax_rate(tax),
name(n),
price(p) {
}
// Can't have default constructor without default product_id
// Product() { } // ERROR! Const members not initialized
};
C++11: Const Members with In-Class Initialization
// C++11: Much cleaner with in-class initialization
class Product {
private:
const std::string product_id; // Must still be initialized in constructor
const double tax_rate = 0.08; // Can have default value!
std::string name = "Unnamed"; // Non-const can also have default
double price = 0.0;
public:
// Constructor only needs to initialize what doesn't have defaults
Product(const std::string& id, const std::string& n, double p)
: product_id(id), // Must initialize (no default possible)
name(n),
price(p) {
// tax_rate uses in-class default (0.08)
}
// Can override the const default if needed
Product(const std::string& id, const std::string& n, double p, double tax)
: product_id(id),
tax_rate(tax), // Overrides default
name(n),
price(p) {
}
};
Important Rules for Const Members
class Example {
private:
// ✅ Const members CAN have in-class initializers
const int fixed_value = 100;
const std::string constant_name = "Example";
// ✅ Const members without defaults must be initialized in constructor
const int must_initialize_in_constructor;
// ✅ Can override in-class initializer in constructor
const int can_override = 50;
public:
Example(int value)
: must_initialize_in_constructor(value),
can_override(value * 2) { // Overrides the default 50
// fixed_value and constant_name use in-class defaults
}
// ❌ Cannot modify const members after construction
void setValue(int v) {
// fixed_value = v; // ERROR! Cannot modify const
}
};
Const Members: Common Patterns
// Pattern 1: Configuration with const settings
class DatabaseConnection {
private:
const std::string connection_string; // Must be set in constructor
const int max_pool_size = 10; // Has reasonable default
const int timeout_seconds = 30; // Has reasonable default
bool is_connected = false; // Non-const, can change
public:
explicit DatabaseConnection(const std::string& conn_str)
: connection_string(conn_str) {
// max_pool_size and timeout_seconds use defaults
}
DatabaseConnection(const std::string& conn_str, int pool_size)
: connection_string(conn_str),
max_pool_size(pool_size) {
// timeout_seconds uses default
}
};
// Pattern 2: Immutable identifier with defaults
class Transaction {
private:
const std::string transaction_id;
const std::chrono::system_clock::time_point timestamp =
std::chrono::system_clock::now();
const std::string currency = "USD"; // Default currency
public:
explicit Transaction(const std::string& id)
: transaction_id(id) {
// timestamp and currency use defaults
}
Transaction(const std::string& id, const std::string& curr)
: transaction_id(id),
currency(curr) {
// timestamp uses default
}
};
How It Reduces Constructor Headaches
Benefit 1: Fewer Constructors Needed
// Before C++11: Need multiple constructors for different defaults
class Window {
private:
int width;
int height;
bool visible;
bool resizable;
std::string title;
public:
Window()
: width(800), height(600), visible(true),
resizable(true), title("Window") {}
Window(int w, int h)
: width(w), height(h), visible(true),
resizable(true), title("Window") {}
Window(int w, int h, const std::string& t)
: width(w), height(h), visible(true),
resizable(true), title(t) {}
// ... more constructors for different combinations
};
// C++11: One or two constructors handle everything
class Window {
private:
int width = 800;
int height = 600;
bool visible = true;
bool resizable = true;
std::string title = "Window";
public:
// Default constructor - not even needed, compiler generates it
Window() = default;
// One flexible constructor covers most cases
Window(int w, int h, const std::string& t = "Window")
: width(w), height(h), title(t) {
// visible and resizable use defaults
}
};
Benefit 2: Constructor Delegation Made Simpler
// C++11: Delegating constructors + in-class initialization
class User {
private:
std::string username;
std::string email;
bool is_admin = false; // Default for most users
int login_attempts = 0; // Fresh start
bool account_locked = false; // Not locked initially
public:
// Primary constructor
User(const std::string& name, const std::string& mail)
: username(name), email(mail) {
// is_admin, login_attempts, account_locked use defaults
}
// Delegating constructor for admin
User(const std::string& name, const std::string& mail, bool admin)
: User(name, mail) { // Delegate to primary constructor
is_admin = admin; // Only override what's different
}
};
Benefit 3: Consistent Defaults Across Inheritance
class Base {
protected:
int base_value = 100; // Default in base class
bool base_flag = true;
public:
Base() = default;
explicit Base(int val) : base_value(val) {}
};
class Derived : public Base {
private:
int derived_value = 200; // Derived's own default
std::string name = "Derived";
public:
// Default constructor uses all in-class defaults
Derived() = default;
// Can initialize base and derived selectively
Derived(int base_val, int derived_val)
: Base(base_val),
derived_value(derived_val) {
// name uses default, base_flag uses default
}
};
Benefit 4: Less Error-Prone Maintenance
// Scenario: Need to change default timeout from 30 to 60 seconds
// Before C++11: Update in multiple places (error-prone)
class Service {
private:
int timeout;
public:
Service() : timeout(30) {} // Change here
Service(const std::string& url) : timeout(30) {} // And here
Service(const std::string& url, int retries) : timeout(30) {} // And here
// Easy to miss one!
};
// C++11: Change in ONE place only
class Service {
private:
int timeout = 30; // Change ONLY here
public:
Service() = default;
Service(const std::string& url) { }
Service(const std::string& url, int retries) { }
// All constructors automatically use updated default
};
Benefit 5: Cleaner Move and Copy Constructors
class Resource {
private:
std::unique_ptr<int> data;
int ref_count = 0; // Always start at 0
bool is_valid = true; // Always start valid
public:
Resource() : data(std::make_unique<int>(42)) {}
// Move constructor - only handle complex members
Resource(Resource&& other) noexcept
: data(std::move(other.data)) {
// ref_count and is_valid automatically initialized to defaults
other.is_valid = false;
}
// Copy constructor
Resource(const Resource& other)
: data(std::make_unique<int>(*other.data)) {
// ref_count and is_valid automatically use in-class defaults
}
};
Initialization Order and Priority
Understanding the initialization order is crucial:
Priority Rules
- In-class initializers are applied first
- Constructor initializer list overrides in-class initializers
- Constructor body can modify (but not initialize const members)
class Example {
private:
int a = 10; // In-class initializer
int b = 20;
int c = 30;
public:
Example() {
// a = 10, b = 20, c = 30 (all use in-class defaults)
}
Example(int x)
: a(x) { // Constructor initializer list overrides
// a = x, b = 20, c = 30
}
Example(int x, int y)
: a(x), b(y) { // Multiple overrides
c = 40; // Can still modify in body (if not const)
// a = x, b = y, c = 40
}
};
What Happens Behind the Scenes
class Demo {
private:
int value = 100;
std::string name = "Default";
public:
Demo(int v) : value(v) {
std::cout << "Constructor body\n";
}
};
// Conceptually equivalent to:
class Demo {
private:
int value;
std::string name;
public:
Demo(int v)
: value(v), // Constructor list takes priority
name("Default") { // In-class initializer applied
std::cout << "Constructor body\n";
}
};
Syntax Options
C++11 supports multiple initialization syntaxes for in-class member initialization:
class SyntaxExamples {
private:
// ✅ Copy initialization (most common)
int a = 42;
std::string name = "example";
// ✅ Brace initialization (preferred for preventing narrowing)
int b{42};
double pi{3.14159};
std::vector<int> vec{1, 2, 3};
// ❌ Parentheses NOT allowed for in-class initialization
// int c(42); // ERROR in C++11/14/17
// std::string s("hi"); // ERROR in C++11/14/17
// Note: C++20 allows parentheses in some cases
};
Static vs Non-Static Members
Important distinction between static and non-static initialization:
class MemberTypes {
private:
// ✅ Non-static: Can use in-class initialization (C++11)
int non_static = 42;
std::string name = "example";
// ✅ Static const integral: Could always be initialized in-class
static const int static_const = 100;
// ✅ Static constexpr: Can be initialized in-class (C++11)
static constexpr double pi = 3.14159;
// ❌ Static non-const: Still needs out-of-class definition (until C++17)
static int static_value; // Declared here
// ✅ C++17: inline static can be initialized in-class
inline static int inline_static = 200;
public:
void print() {
std::cout << non_static << ", " << static_const << "\n";
}
};
// Out-of-class definition still needed for static non-const (pre-C++17)
int MemberTypes::static_value = 50;
Best Practices
1. Use In-Class Initialization for Defaults
// ✅ Good: Clear default values
class Config {
private:
int timeout = 30;
bool debug_mode = false;
std::string log_file = "app.log";
};
// ❌ Avoid: Initializing in constructor when default makes sense
class Config {
private:
int timeout;
bool debug_mode;
public:
Config() : timeout(30), debug_mode(false) {} // Unnecessary
};
2. Prefer Brace Initialization for Safety
class SafeInit {
private:
int value{42}; // ✅ Prevents narrowing
double pi{3.14159}; // ✅ Consistent with uniform initialization
// int x{3.14}; // ❌ Error: narrowing conversion
};
3. Document Non-Default Values
class Service {
private:
int retry_count = 3; // Standard retry count
int timeout_ms = 5000; // 5 second timeout
bool use_compression = true; // Enable compression by default
// Special value - document why it's different
int buffer_size = 8192; // Must match OS page size
};
4. Use with Constructor Delegation
class User {
private:
std::string name;
int age = 0;
bool active = true;
public:
// Primary constructor
User(const std::string& n) : name(n) {}
// Delegate and override specific members
User(const std::string& n, int a) : User(n) {
age = a;
}
};
Common Pitfalls and Solutions
Pitfall 1: Order of Initialization
class BadOrder {
private:
int a = b + 1; // ❌ Problem: b not initialized yet!
int b = 10; // Member declaration order matters
public:
BadOrder() {
// a is initialized with undefined b value
}
};
// ✅ Solution: Be aware of declaration order
class GoodOrder {
private:
int b = 10; // Declare first
int a = b + 1; // Then use it
};
Pitfall 2: Expensive Initialization
class Expensive {
private:
std::vector<int> data = createLargeVector(); // ❌ Called for every object
static std::vector<int> createLargeVector() {
return std::vector<int>(1000000, 0);
}
};
// ✅ Solution: Use default constructor or lazy initialization
class Better {
private:
std::vector<int> data; // Start empty
public:
void ensureData() {
if (data.empty()) {
data = createLargeVector();
}
}
};
Summary
In-class member initialization, introduced in C++11, dramatically simplified C++ class initialization by:
Key Benefits:
- Eliminates repetition across multiple constructors
- Reduces bugs from inconsistent defaults
- Simplifies maintenance - change defaults in one place
- Reduces constructor count - often don’t need default constructor
- Works with const members - provide reasonable defaults
- Clearer intent - defaults visible at member declaration
- Better for generated code - compiler can optimize better
Best For:
- Default values that apply to most cases
- Configuration classes with many optional parameters
- Const members with standard defaults
- Classes with multiple constructors
- Simple, consistent initialization values
Remember:
- Constructor initializer list overrides in-class initializers
- Member declaration order matters for initialization
- Works with brace and copy initialization syntax
- C++20 added parentheses syntax support
- Combines perfectly with delegating constructors
In-class member initialization represents a significant quality-of-life improvement in modern C++, making code cleaner, safer, and more maintainable.
Uniform Initialization (C++11)
What is Uniform Initialization?
Uniform initialization, introduced in C++11, provides a consistent syntax for initializing objects using braces {}. Before C++11, C++ had multiple initialization syntaxes that were context-dependent and sometimes ambiguous. Uniform initialization aims to provide a single, unified approach that works in all contexts.
Traditional Initialization (Pre-C++11)
int x = 5; // Copy initialization
int y(10); // Direct initialization
int arr[] = {1, 2, 3}; // Aggregate initialization
std::vector<int> v(5, 100); // Constructor call
Widget w(); // Most vexing parse - declares a function!
Uniform Initialization (C++11+)
int x{5}; // Direct-list-initialization
int y = {10}; // Copy-list-initialization
int arr[]{1, 2, 3}; // List initialization for arrays
std::vector<int> v{5, 100}; // Initializer list constructor
Widget w{}; // Object initialization (not a function!)
Problems Solved by Uniform Initialization
1. Prevents Narrowing Conversions
Uniform initialization protects against implicit narrowing conversions that could lose data.
// Traditional initialization - compiles with warning or silently loses data
int x = 7.9; // x = 7, fractional part lost
char c = 1000; // Overflow, undefined behavior
// Uniform initialization - compilation error
int x{7.9}; // ERROR: narrowing conversion from double to int
char c{1000}; // ERROR: narrowing conversion, value out of range
// Safe conversions are allowed
int x{7}; // OK: no data loss
double d{5}; // OK: widening conversion
Why this matters: Catches potential bugs at compile-time rather than runtime, preventing subtle data loss issues.
2. Solves the “Most Vexing Parse”
The Most Vexing Parse is a counterintuitive C++ parsing rule where something that looks like an object declaration is actually parsed as a function declaration.
// Traditional syntax - ambiguous
Widget w(); // NOT an object! This declares a function returning Widget
Timer t(TimeKeeper()); // NOT a Timer object! Function declaration with
// function pointer parameter
// These are the workarounds (pre-C++11)
Widget w1; // Default construction without parentheses
Widget w2 = Widget(); // Extra copy (may be optimized away)
Timer t((TimeKeeper())); // Extra parentheses (confusing!)
// Uniform initialization - clear and unambiguous
Widget w{}; // Object with default constructor - no ambiguity!
Timer t{TimeKeeper()}; // Object initialization, not function declaration
3. Prevents Accidental Type Conversions
// Traditional initialization
std::vector<int> v(5, 2); // Creates vector with 5 elements, each = 2
// If you mistakenly write:
std::vector<int> v(5); // Creates vector with 5 default-initialized elements
// Uniform initialization
std::vector<int> v{5, 2}; // Creates vector with 2 elements: {5, 2}
std::vector<int> v{5}; // Creates vector with 1 element: {5}
// For size-based construction, use parentheses explicitly
std::vector<int> v(5, 2); // Still valid when you want size + value
4. Works Everywhere
Uniform initialization syntax works in contexts where other syntaxes don’t:
// Return values
auto createWidget() -> Widget {
return {arg1, arg2}; // Works!
}
// Member initialization in constructors
class MyClass {
std::vector<int> vec{1, 2, 3}; // In-class member initialization
std::string name{"Default"};
};
// Temporary objects as function arguments
processData(Widget{42, "temp"});
// Heap allocation
auto ptr = new Widget{arg1, arg2};
auto ptr2 = std::make_unique<Widget>(arg1, arg2); // Parentheses still work here
How Uniform Initialization Enables Advanced Features
1. Initializer Lists (std::initializer_list)
Uniform initialization introduced std::initializer_list<T>, enabling container-style initialization for user-defined types.
#include <initializer_list>
class MyContainer {
std::vector<int> data;
public:
MyContainer(std::initializer_list<int> list) : data(list) {}
};
MyContainer mc{1, 2, 3, 4, 5}; // Clean, intuitive syntax
2. Aggregate Initialization Enhancement
struct Point {
int x;
int y;
};
Point p{10, 20}; // Aggregate initialization with uniform syntax
struct Line {
Point start;
Point end;
};
Line l{{0, 0}, {10, 20}}; // Nested aggregate initialization
3. Perfect Forwarding and Variadic Templates
Uniform initialization works seamlessly with modern C++ template features:
template<typename T, typename... Args>
std::unique_ptr<T> make_unique(Args&&... args) {
return std::unique_ptr<T>(new T{std::forward<Args>(args)...});
}
auto widget = make_unique<Widget>(42, "test");
4. Designated Initializers (C++20)
Building on uniform initialization, C++20 added designated initializers:
struct Config {
int timeout = 30;
bool verbose = false;
std::string mode = "auto";
};
Config cfg{
.timeout = 60,
.verbose = true
}; // Unspecified members use default values
Evolution: C++11 to C++20
C++11: Initial Introduction
- Basic brace initialization syntax
std::initializer_list<T>- Prevention of narrowing conversions
- Resolution of most vexing parse
std::vector<int> v{1, 2, 3};
auto x = {1, 2, 3}; // Type: std::initializer_list<int>
C++14: Minor Refinements
- Return type deduction with braced-init-list improved
autowith single-element braced-init-list
auto x{5}; // C++14: x is int (not std::initializer_list<int>)
auto y = {5}; // Still std::initializer_list<int>
C++17: Enhanced Features
- Structured bindings work with brace initialization
- Deduction guides for class templates
// Deduction guides
std::pair p{42, "hello"}; // Deduces std::pair<int, const char*>
std::tuple t{1, 2.0, "three"}; // Deduces types automatically
// Structured bindings
auto [x, y] = Point{10, 20};
C++20: Designated Initializers
- Explicit member initialization by name
- Must be in declaration order
- Cannot mix with non-designated initializers in the same list
struct Data {
int a = 1;
int b = 2;
int c = 3;
};
Data d1{.a = 10, .c = 30}; // OK: b gets default value 2
Data d2{.c = 30, .a = 10}; // ERROR: out of order
Data d3{10, .c = 30}; // ERROR: cannot mix styles
C++20: Parenthesized Initialization of Aggregates
C++20 allows using parentheses for aggregate initialization in some contexts:
struct Point {
int x;
int y;
};
Point p1{10, 20}; // Always worked
Point p2(10, 20); // C++20: now also works for aggregates
Best Practices
When to Use Uniform Initialization
Prefer uniform initialization when:
- Initializing aggregates or POD types
- You want to prevent narrowing conversions
- Avoiding the most vexing parse
- Initializing containers with multiple values
- Using in-class member initializers
struct Settings {
int value{0}; // Clear intent, prevents narrowing
std::string name{"default"};
};
std::vector<int> primes{2, 3, 5, 7, 11};
When to Use Traditional Initialization
Prefer parentheses when:
- Calling constructors with specific arguments (especially containers)
- Avoiding initializer_list constructor overload
- Using
autoand want direct type (notinitializer_list)
std::vector<int> v(100, 0); // 100 zeros - clear intent
std::unique_ptr<Widget> ptr(new Widget(args));
auto x(5); // x is int, not initializer_list
Watch Out for Constructor Overload Resolution
class Widget {
public:
Widget(int x, double y); // Constructor 1
Widget(std::initializer_list<int> list); // Constructor 2
};
Widget w1(10, 5.0); // Calls Constructor 1
Widget w2{10, 5.0}; // ERROR: narrowing conversion (5.0 to int)
Widget w3{10, 5}; // Calls Constructor 2 (initializer_list preferred!)
The initializer_list constructor is strongly preferred during overload resolution when brace initialization is used.
Summary
Uniform initialization provides a consistent, safer way to initialize objects in modern C++. It prevents narrowing conversions, resolves parsing ambiguities, and enables powerful features like initializer lists and designated initializers. While it’s not always the perfect choice for every situation, understanding uniform initialization is essential for writing robust, modern C++ code.
Key Takeaways:
- Use
{}for safety and consistency in most cases - Use
()when you need specific constructor behavior or container sizing - Be aware of
initializer_listconstructor priority - C++20 designated initializers make code more readable and maintainable
- Uniform initialization is foundational to many modern C++ features
std::initializer_list in C++11
What is std::initializer_list?
std::initializer_list<T> is a lightweight, read-only view over a fixed array of objects of type T, created from a brace-enclosed initializer list { ... }. It was introduced in C++11 to support uniform initialization and initializer-list constructors.
std::initializer_list is a C++11 utility type that provides a read-only view over a temporary array created from a brace-enclosed initializer list.
Characteristics
- Compile-time construct (the type and elements are known at compile time)
- Immutable (elements cannot be modified, means its const T)
- Cheap to copy (typically just two pointers)
- Does not own elements
- Elements’ lifetime is tied to the full expression
How It Works Conceptually
When you write:
{1, 2, 3}
The compiler translates it into:
- A temporary array of
const T - Wrapped in a
std::initializer_list<T>
This happens automatically behind the scenes.
Examples
Using std::initializer_list with Standard Containers
#include <iostream>
#include <vector>
#include <string>
#include <initializer_list>
int main() {
// Vector initialized with initializer_list
std::vector<int> numbers = {1, 2, 3, 4, 5};
// String initialized with initializer_list
std::vector<std::string> words = {"hello", "world", "C++11"};
// Direct use in range-based for loop
for (int value : {10, 20, 30, 40}) {
std::cout << value << " ";
}
std::cout << std::endl;
return 0;
}
Custom Function Taking std::initializer_list
#include <iostream>
#include <initializer_list>
// Function that accepts initializer_list
int sum(std::initializer_list<int> values) {
int total = 0;
for (int val : values) {
total += val;
}
return total;
}
int main() {
std::cout << sum({1, 2, 3, 4, 5}) << std::endl; // Output: 15
std::cout << sum({10, 20}) << std::endl; // Output: 30
return 0;
}
Custom Class with Initializer-List Constructor
#include <iostream>
#include <initializer_list>
#include <vector>
class MyContainer {
private:
std::vector<int> data;
public:
// Constructor accepting initializer_list
MyContainer(std::initializer_list<int> init) : data(init) {
std::cout << "Initializer-list constructor called with "
<< init.size() << " elements" << std::endl;
}
void print() const {
for (int val : data) {
std::cout << val << " ";
}
std::cout << std::endl;
}
};
int main() {
MyContainer container = {1, 2, 3, 4, 5};
container.print(); // Output: 1 2 3 4 5
return 0;
}
Rules
Syntax-Driven, Not Type-Driven
Important: std::initializer_list is syntax-driven, not type-driven. It exists to support {} syntax — not to abstract containers.
The One-Line Rule
A std::initializer_list parameter can only bind to a brace-enclosed initializer list, never to a container object.
#include <vector>
#include <initializer_list>
void process(std::initializer_list<int> values) {
// ...
}
int main() {
process({1, 2, 3}); // Works - brace-enclosed list
std::vector<int> vec = {1, 2, 3};
// process(vec); // Error - cannot bind vector to initializer_list
return 0;
}
Overload Resolution Priority
Initializer-list constructors have higher priority than other constructors when using brace initialization:
#include <iostream>
#include <initializer_list>
class X {
public:
X(int a, int b) {
std::cout << "X(int, int) called" << std::endl;
}
X(std::initializer_list<int> init) {
std::cout << "X(std::initializer_list<int>) called" << std::endl;
}
};
int main() {
X x(1, 2); // Output: X(int, int) called
X y{1, 2}; // Output: X(std::initializer_list<int>) called
return 0;
}
This is a very common C++11 pitfall! Even when other constructors match perfectly, the initializer-list constructor takes precedence with {} syntax.
Lifetime Management of std::initializer_list
The Critical Rule You Must Remember
std::initializer_list does NOT own its elements. It only points to a temporary array created by the compiler.
The lifetime of the array behind a std::initializer_list is tied to the lifetime of the initializer_list object that is directly created from {} — NOT to copies made later.
Safe Usage
It is safe to use std::initializer_list as a function parameter:
#include <iostream>
#include <initializer_list>
void safe_usage(std::initializer_list<int> values) {
// Safe: using within the function scope
for (int val : values) {
std::cout << val << " ";
}
std::cout << std::endl;
}
int main() {
safe_usage({1, 2, 3, 4, 5}); // ✅ Safe
return 0;
}
Lifetime Extension with Local Variables
When using std::initializer_list as a local variable, the type declaration matters:
#include <iostream>
#include <initializer_list>
int main() {
// DANGEROUS: auto deduction
auto il1 = {1, 2, 3};
// Temporary array destroyed at end of statement!
// il1 now holds dangling pointers
// AFE: Explicit type
std::initializer_list<int> il2 = {1, 2, 3};
// Lifetime of temporary array is extended to match il2's scope
// Using il1 here is undefined behavior
// for (int val : il1) { } // Dangling!
// Using il2 is safe
for (int val : il2) { // Safe
std::cout << val << " ";
}
std::cout << std::endl;
return 0;
}
Why the Difference?
| Code | Mechanism | Lifetime Rule | Status |
|---|---|---|---|
auto il = {1, 2, 3}; | auto deduction happens after temporary creation | Temporary array destroyed at end of statement | Dangling |
std::initializer_list<int> il = {1, 2, 3}; | Explicitly typed variable binds to the temporary | Lifetime of temporary is extended to match il | Safe |
Case 1: auto il = {1, 2, 3}; (Dangling)
This line works because C++ infers the type of il to be std::initializer_list<int>. However, the underlying temporary array is created within the full expression of that single statement.
The critical issue is the order of operations:
- The temporary array containing
{1, 2, 3}is created autotype deduction happens (determinesilshould bestd::initializer_list<int>)- The
std::initializer_listis constructed to point to the temporary array - The statement ends (semicolon is reached)
- The temporary array is immediately destroyed (standard C++ lifetime rules)
ilis left holding dangling pointers to deallocated memory
Why it fails:
In C++ rules, temporaries are destroyed at the end of the full expression that creates them. As soon as the semicolon is reached, the temporary array is destroyed. The variable il now contains pointers to invalid memory.
While some compilers might extend the lifetime in this specific auto case as an extension or optimization, relying on il after the declaration line is undefined behavior according to the C++ standard. The reason is that auto deduction happens after the temporary is already created, so the lifetime extension rule doesn’t apply.
Case 2: std::initializer_list<int> il = {1, 2, 3}; (Safe)
This works correctly due to a specific lifetime extension rule in the C++ standard.
How it works:
When a temporary object is used to initialize a variable with an explicitly declared type (especially one that acts like a reference to the underlying data), the lifetime of that temporary object is extended to match the lifetime of the variable.
The process:
- You explicitly declare
ilasstd::initializer_list<int>(type is known upfront) - The temporary array
{1, 2, 3}is created - The compiler binds the temporary array to the
ilvariable’s scope - Lifetime extension rule applies: the temporary array’s lifetime is extended to match
il’s lifetime - The array is guaranteed to exist as long as
ilis in scope
Why it succeeds:
Because you explicitly declared the variable type, the compiler knows from the beginning that it needs to bind the temporary to this variable, and therefore applies the lifetime extension rule.
Unsafe Usage: Storing Beyond Lifetime
It is unsafe to store std::initializer_list beyond the lifetime of the initializer expression.
#include <iostream>
#include <initializer_list>
class BuggyContainer {
private:
std::initializer_list<int> stored_list; // DANGER!
public:
BuggyContainer(std::initializer_list<int> init) : stored_list(init) {
// Storing the initializer_list directly!
}
void print() const {
// UNDEFINED BEHAVIOR: The temporary array is gone!
for (int val : stored_list) {
std::cout << val << " ";
}
std::cout << std::endl;
}
};
int main() {
BuggyContainer container({1, 2, 3, 4, 5});
container.print(); // Undefined behavior - accessing dangling pointers!
return 0;
}
Why This Fails:
{1, 2, 3, 4, 5}creates a temporary arraystd::initializer_list<int>points to this temporary- After the constructor finishes, the temporary array is destroyed
stored_listnow contains dangling pointers- Accessing it in
print()causes undefined behavior
Correct Approach: Copy to an Owning Container
Always copy the elements to an owning container when you need to store them:
#include <iostream>
#include <initializer_list>
#include <vector>
class CorrectContainer {
private:
std::vector<int> data; // Owns the data
public:
CorrectContainer(std::initializer_list<int> init) : data(init) {
// Copy elements from initializer_list to vector
// Vector now owns the data
}
void print() const {
// Safe: accessing owned data
for (int val : data) {
std::cout << val << " ";
}
std::cout << std::endl;
}
};
int main() {
CorrectContainer container({1, 2, 3, 4, 5});
container.print(); // Safe and correct!
return 0;
}
Advanced: std::initializer_list with Variadic Templates
std::initializer_list can be combined with variadic templates to create flexible initialization patterns.
Example: Generic Initialization Function
#include <iostream>
#include <initializer_list>
#include <vector>
#include <string>
// Using variadic templates for type-safe initialization
template<typename T>
std::vector<T> make_vector(std::initializer_list<T> init) {
return std::vector<T>(init);
}
// Using variadic templates with perfect forwarding
template<typename T, typename... Args>
std::vector<T> make_vector_variadic(Args&&... args) {
return std::vector<T>{std::forward<Args>(args)...};
}
int main() {
// Using initializer_list
auto vec1 = make_vector({1, 2, 3, 4, 5});
// Using variadic templates
auto vec2 = make_vector_variadic<int>(1, 2, 3, 4, 5);
for (int val : vec1) std::cout << val << " ";
std::cout << std::endl;
for (int val : vec2) std::cout << val << " ";
std::cout << std::endl;
return 0;
}
Example: Combining Both Approaches
#include <iostream>
#include <initializer_list>
#include <vector>
template<typename T>
class FlexibleContainer {
private:
std::vector<T> data;
public:
// Constructor with initializer_list
FlexibleContainer(std::initializer_list<T> init) : data(init) {
std::cout << "Constructed with initializer_list" << std::endl;
}
// Variadic template constructor
template<typename... Args>
FlexibleContainer(Args&&... args) {
std::cout << "Constructed with variadic template" << std::endl;
(data.push_back(std::forward<Args>(args)), ...); // C++17 fold expression
}
void print() const {
for (const auto& val : data) {
std::cout << val << " ";
}
std::cout << std::endl;
}
};
int main() {
// Uses initializer_list constructor (higher priority!)
FlexibleContainer<int> c1{1, 2, 3, 4, 5};
c1.print();
// Uses variadic template constructor
FlexibleContainer<int> c2(1, 2, 3, 4, 5);
c2.print();
return 0;
}
Why Use Variadic Templates Instead?
While std::initializer_list is great for homogeneous collections, variadic templates offer more flexibility:
#include <iostream>
#include <tuple>
// With initializer_list - all same type
void print_same_type(std::initializer_list<int> values) {
for (int val : values) {
std::cout << val << " ";
}
std::cout << std::endl;
}
// With variadic templates - different types allowed
template<typename... Args>
void print_different_types(Args&&... args) {
((std::cout << args << " "), ...); // C++17 fold expression
std::cout << std::endl;
}
int main() {
print_same_type({1, 2, 3}); // All must be int
print_different_types(1, 2.5, "hello", 'x'); // Different types allowed!
return 0;
}
Best Practices Summary
- Use as function parameters for convenient initialization
- Use explicit type when declaring as local variable:
std::initializer_list<int> il = {1, 2, 3}; - Never use
autowith initializer lists:auto il = {1, 2, 3};creates dangling pointers - Copy to owning containers (like
std::vector) when you need to store data - Never store
std::initializer_listas a member variable - Be aware of constructor overload resolution with
{}vs()syntax - Consider variadic templates when you need heterogeneous types or perfect forwarding
Key Takeaways
std::initializer_listis a non-owning view over a temporary array- It’s syntax-driven (works only with
{}) and immutable - Never store it beyond the scope of its creation
- Always copy elements to an owning container for long-term storage
- Be mindful of constructor overload resolution priority
- Combine with variadic templates for more advanced patterns
Designated Initialization (C++20)
Understanding Aggregate Types
Before diving into designated initialization, we need to understand aggregate types, which are the only types that support this feature.
What is an Aggregate Type?
An aggregate type is a specific category of data structure in C++ (usually a struct, class, or array) that meets a strict set of criteria. Essentially, an aggregate is a plain, simple data container that has not implemented any “special” object-oriented features or access controls. Because they are simple data structures, they can be initialized using a straightforward brace-enclosed list of values (aggregate initialization).
C++20 Aggregate Definition
In C++20, the definition of an aggregate was slightly simplified and refined. A class type (struct, class, or union) is an aggregate if it satisfies all the following conditions:
| Condition | Description | Example of Breaking the Rule |
|---|---|---|
| No User-Provided Constructors | You cannot explicitly define any constructors (even default or delete ones). | struct A { A() {} }; |
| No Private/Protected Non-Static Data Members | All non-static data members must be public. | struct A { private: int x; }; |
| No Virtual Functions | The class cannot be part of a polymorphic hierarchy. | struct A { virtual void f() {} }; |
| No Virtual, Private, or Protected Base Classes | It can have public base classes, but they must adhere to specific rules related to access. | struct A : private B {}; |
Examples of Aggregate Types
// Valid aggregate - simple struct
struct Point {
int x;
int y;
};
// Valid aggregate - with default member initializers
struct Config {
int timeout = 30;
bool verbose = false;
std::string mode = "auto";
};
// Valid aggregate - nested aggregates
struct Rectangle {
Point topLeft;
Point bottomRight;
};
// Valid aggregate - array
int numbers[5];
// Valid aggregate - with public base class (C++17+)
struct Base {
int base_value;
};
struct Derived : Base {
int derived_value;
};
Examples of Non-Aggregate Types
// NOT an aggregate - has user-provided constructor
struct WithConstructor {
int x;
WithConstructor() : x(0) {}
};
// NOT an aggregate - has private members
struct WithPrivate {
private:
int x;
public:
int y;
};
// NOT an aggregate - has virtual function
struct WithVirtual {
int x;
virtual void process() {}
};
// NOT an aggregate - has private base class
struct Base { int x; };
struct NotAggregate : private Base {
int y;
};
// NOT an aggregate - has protected members
class WithProtected {
protected:
int x;
public:
int y;
};
Traditional Aggregate Initialization (Pre-C++20)
Aggregates have always supported list initialization, but members had to be initialized in order:
struct Point {
int x;
int y;
int z;
};
// Traditional aggregate initialization
Point p1{10, 20, 30}; // All members
Point p2{10, 20}; // z gets default value (0)
Point p3{10}; // y and z get default values
Point p4{}; // All members get default values
// Problem: What does each number mean?
Point p5{100, 200, 300}; // Not self-documenting
The limitation? You couldn’t skip members or initialize them out of order, and the code wasn’t self-documenting.
Designated Initialization (C++20)
Designated initialization allows you to explicitly name which members you’re initializing, making code more readable, maintainable, and less error-prone.
Basic Syntax
struct Point {
int x;
int y;
int z;
};
// Designated initialization - explicitly name members
Point p1{.x = 10, .y = 20, .z = 30};
Point p2{.x = 10, .z = 30}; // y gets default value (0)
Point p3{.z = 30}; // x and y get default values
Rules and Constraints
Designated initialization has specific rules to maintain clarity and prevent ambiguity:
1. Must Follow Declaration Order
struct Data {
int a;
int b;
int c;
};
// Correct - follows declaration order
Data d1{.a = 1, .b = 2, .c = 3};
Data d2{.a = 1, .c = 3}; // OK: skipping b
// Error - out of order
Data d3{.c = 3, .a = 1}; // Compilation error!
Data d4{.b = 2, .a = 1}; // Compilation error!
2. Cannot Mix Designated and Non-Designated Initializers
struct Point {
int x;
int y;
};
// All designated
Point p1{.x = 10, .y = 20};
// All non-designated
Point p2{10, 20};
// Error - cannot mix
Point p3{10, .y = 20}; // Compilation error!
Point p4{.x = 10, 20}; // Compilation error!
3. Each Member Can Only Be Initialized Once
struct Data {
int value;
};
// Error - duplicate initialization
Data d{.value = 10, .value = 20}; // Compilation error!
Practical Examples
Example 1: Configuration Structures
struct ServerConfig {
std::string host = "localhost";
int port = 8080;
int timeout = 30;
bool ssl_enabled = false;
int max_connections = 100;
};
// Clear and self-documenting
ServerConfig production{
.host = "api.example.com",
.port = 443,
.ssl_enabled = true,
.max_connections = 1000
// timeout uses default value (30)
};
ServerConfig development{
.port = 3000,
.max_connections = 10
// Other members use default values
};
Example 2: Nested Structures
struct Address {
std::string street;
std::string city;
std::string zipcode;
};
struct Person {
std::string name;
int age;
Address address;
};
// Nested designated initialization
Person person{
.name = "Alice Smith",
.age = 30,
.address = {
.street = "123 Main St",
.city = "Springfield",
.zipcode = "12345"
}
};
Example 3: With Default Member Initializers
struct Options {
bool verbose = false;
bool debug = false;
int log_level = 1;
std::string output_file = "output.txt";
};
// Only override what you need
Options opts1{.verbose = true};
Options opts2{.debug = true, .log_level = 3};
Options opts3{.output_file = "custom.log"};
Example 4: Function Parameters
struct RenderOptions {
int width = 800;
int height = 600;
bool fullscreen = false;
int antialias = 4;
};
void render(const RenderOptions& options) {
// Use options...
}
// Clean function calls
render({.width = 1920, .height = 1080, .fullscreen = true});
render({.antialias = 8});
Non-Aggregate Types: Designated Initialization Not Allowed
Designated initialization only works with aggregate types. Let’s see what happens when we try to use it with non-aggregates:
Example 1: Type with Constructor
struct WithConstructor {
int x;
int y;
// User-provided constructor makes this NOT an aggregate
WithConstructor(int a, int b) : x(a), y(b) {}
};
// Error - designated initialization not allowed
WithConstructor obj{.x = 10, .y = 20}; // Compilation error!
// Must use constructor
WithConstructor obj(10, 20); // OK
Example 2: Type with Private Members
class WithPrivate {
private:
int x;
int y;
public:
WithPrivate(int a, int b) : x(a), y(b) {}
int getX() const { return x; }
int getY() const { return y; }
};
// Error - not an aggregate due to private members
WithPrivate obj{.x = 10, .y = 20}; // Compilation error!
// Must use constructor
WithPrivate obj(10, 20); // OK
Example 3: Type with Virtual Functions
struct WithVirtual {
int x;
int y;
virtual void process() { /* ... */ }
};
// Error - not an aggregate due to virtual function
WithVirtual obj{.x = 10, .y = 20}; // Compilation error!
// Must use default initialization or constructor
WithVirtual obj; // OK (default initialization)
obj.x = 10;
obj.y = 20;
Why This Restriction?
The restriction to aggregate types makes sense because:
- Aggregates are simple data containers - No complex initialization logic or invariants to maintain
- Public members ensure visibility - You can only initialize what you can see
- No constructors means no conflicts - Designated initialization doesn’t compete with constructor overloading
- Predictable behavior - Simple, direct member initialization without side effects
Benefits of Designated Initialization
1. Self-Documenting Code
// Without designated initialization - unclear what each value means
ServerConfig config1{"example.com", 443, 60, true, 500};
// With designated initialization - crystal clear
ServerConfig config2{
.host = "example.com",
.port = 443,
.timeout = 60,
.ssl_enabled = true,
.max_connections = 500
};
2. Partial Initialization Made Easy
struct Settings {
int value_a = 10;
int value_b = 20;
int value_c = 30;
int value_d = 40;
};
// Only override what you need, rest use defaults
Settings s1{.value_b = 100};
Settings s2{.value_a = 5, .value_d = 50};
3. Refactoring Safety
When you add new members to a struct, designated initialization is more resilient:
// Original struct
struct Point {
int x;
int y;
};
Point p{.x = 10, .y = 20}; // Designated initialization
// Later, add a new member
struct Point {
int x;
int y;
int z = 0; // New member with default
};
Point p{.x = 10, .y = 20}; // Still works! z gets default value
// Compare with traditional initialization
Point p1{10, 20}; // Also still works, but...
Point p2{10, 20, 30}; // New code must be updated everywhere
4. Reduced Errors
struct Color {
int red;
int green;
int blue;
int alpha = 255;
};
// Easy to mix up the order
Color c1{0, 128, 255}; // Which is which?
Color c2{255, 128, 0}; // Different color, but similarly confusing
// Designated initialization prevents mistakes
Color c3{.red = 0, .green = 128, .blue = 255};
Color c4{.red = 255, .green = 128, .blue = 0};
5. Better Default Handling
struct HTTPRequest {
std::string url;
std::string method = "GET";
int timeout = 30;
bool follow_redirects = true;
int max_redirects = 5;
std::map<std::string, std::string> headers = {};
};
// Only specify what differs from defaults
HTTPRequest req1{
.url = "https://api.example.com/data"
};
HTTPRequest req2{
.url = "https://api.example.com/upload",
.method = "POST",
.timeout = 60
};
6. Improved API Design
Designated initialization encourages cleaner API designs with option structs:
// Before: Multiple overloaded functions
void createWindow(int width, int height);
void createWindow(int width, int height, bool fullscreen);
void createWindow(int width, int height, bool fullscreen, int samples);
// After: Single function with options struct
struct WindowOptions {
int width = 800;
int height = 600;
bool fullscreen = false;
int samples = 1;
bool vsync = true;
std::string title = "Window";
};
void createWindow(const WindowOptions& options);
// Usage is much cleaner
createWindow({.width = 1920, .height = 1080, .fullscreen = true});
createWindow({.title = "My Game", .vsync = false});
Comparison with C Designated Initializers
C++20 designated initializers are inspired by C99, but with stricter rules:
C (C99) - More Flexible
struct Point {
int x;
int y;
int z;
};
// C allows out-of-order
struct Point p1 = {.z = 30, .x = 10, .y = 20}; // OK in C
// C allows mixing
struct Point p2 = {.x = 10, 20, 30}; // OK in C
// C allows array designated initializers
int arr[10] = {[0] = 1, [5] = 2, [9] = 3}; // OK in C
C++ (C++20) - More Restrictive
struct Point {
int x;
int y;
int z;
};
// C++ requires declaration order
Point p1{.z = 30, .x = 10}; // Error in C++
// C++ doesn't allow mixing
Point p2{.x = 10, 20, 30}; // Error in C++
// C++ doesn't support array designated initializers
int arr[10] = {[0] = 1, [5] = 2}; // Error in C++
Why stricter in C++? The restrictions maintain consistency with C++’s stronger type system and make the code more predictable and less error-prone.
Best Practices
1. Use for Configuration and Options
// Perfect use case
struct Config {
std::string database_url = "localhost:5432";
int pool_size = 10;
bool enable_logging = true;
};
Config cfg{.database_url = "prod.db.com", .pool_size = 50};
2. Combine with Default Member Initializers
// Provides sensible defaults, easy to override
struct Settings {
int value = 100;
bool flag = false;
};
Settings s{.flag = true}; // value uses default
3. Prefer for Structs with Many Members
// When you have 5+ members, designated initialization shines
struct ComplexOptions {
int opt1 = 0;
int opt2 = 0;
int opt3 = 0;
int opt4 = 0;
int opt5 = 0;
int opt6 = 0;
};
// Much clearer than: ComplexOptions{0, 0, 5, 0, 0, 10}
ComplexOptions opts{.opt3 = 5, .opt6 = 10};
4. Avoid for Simple Coordinate-Like Types
struct Point { int x; int y; };
// Traditional initialization is fine here
Point p{10, 20}; // Clear enough
// Designated might be overkill
Point p{.x = 10, .y = 20}; // Also fine, but more verbose
Summary
Designated initialization is a powerful C++20 feature that makes code more readable, maintainable, and less error-prone. It works exclusively with aggregate types, which are simple data structures without user-provided constructors, private members, or virtual functions.
Key Takeaways:
- Only works with aggregate types
- Members must be initialized in declaration order
- Cannot mix designated and non-designated initialization
- Improves code clarity and reduces errors
- Excellent for configuration structures and option objects
- More restrictive than C designated initializers, but safer
- Combines beautifully with default member initializers
Designated initialization represents a significant improvement in C++’s ability to write clear, self-documenting initialization code while maintaining type safety and predictability.
Understanding Dynamic memory leaks
Dynamic Memory Allocation in C++
In C++, when you need to allocate memory dynamically (at runtime), you use the new operator to get memory from the heap. Unlike stack memory, heap memory is not automatically managed - you must manually free it using the delete operator.
Stack Memory Heap Memory
┌──────────────┐ ┌──────────────────┐
│ Automatic │ │ Manual Management│
│ Cleaned up │ │ YOU must call │
│ automatically│ │ delete! │
└──────────────┘ └──────────────────┘
↑ ↑
int x = 5; int* p = new int(5);
(destroyed when (YOU must delete p)
out of scope)
C++ does not have automatic garbage collection.
If you allocate memory with new, you must free it with delete.
If you forget, that memory is permanently lost until your program terminates - this is called a memory leak.
Let’s start with an example where the prgram calls new to allocate memory and delete to free the memory:
#include <iostream>
void good_function(int data) {
int* rawPtr = new int(data); // 1. Allocate memory from heap
std::cout << "data: " << *rawPtr << std::endl;
delete rawPtr; // 2. Free the memory
}
int main() {
good_function(10);
return 0;
}
Compile and run with Valgrind:
g++ -g -O0 good_example.cpp -o good_example
valgrind --leak-check=full ./good_example
Valgrind Report (No Leaks):
==3102717== HEAP SUMMARY:
==3102717== in use at exit: 0 bytes in 0 blocks
==3102717== total heap usage: 3 allocs, 3 frees, 73,732 bytes allocated
==3102717==
==3102717== All heap blocks were freed -- no leaks are possible
==3102717==
==3102717== ERROR SUMMARY: 0 errors from 0 contexts (suppressed: 0 from 0)
Memory Lifecycle:
Step 1: int* rawPtr = new int(data)
STACK HEAP
┌──────────────┐ ┌──────────────┐
│ Function │ │ │
│ Stack Frame │ │ [4 bytes] │
│ │ │ value: 10 │
│ rawPtr ─────┼──────────────┼─> [int] │
│ (address) │ │ │
└──────────────┘ └──────────────┘
↑ ↑
Lives here Lives here until
(automatic) delete is called
Step 2: Using *rawPtr
STACK HEAP
┌──────────────┐ ┌──────────────┐
│ │ │ │
│ rawPtr ─────┼──────────────┼─> [10] │
│ (pointer) │ │ │
└──────────────┘ └──────────────┘
Access via pointer
Step 3: delete rawPtr ✅
STACK HEAP
┌──────────────┐ ┌──────────────┐
│ │ │ │
│ rawPtr │ X │ [freed] │
│ (dangling) │ │ │
└──────────────┘ └──────────────┘
Memory returned to OS
Step 4: Function exits
STACK HEAP
┌──────────────┐ ┌──────────────┐
│ │ │ │
│ [destroyed] │ │ [free] │
│ │ │ │
└──────────────┘ └──────────────┘
Stack cleaned up No leak! ✅
Now let’s see what happens when you forget to call delete:
#include <iostream>
void bad_function(int data) {
int* rawPtr = new int(data); // Allocate memory from heap
std::cout << "data: " << *rawPtr << std::endl;
// Forgot to delete!
}
int main() {
bad_function(10);
return 0;
}
Compile and run with Valgrind:
g++ -g -O0 forgot_delete.cpp -o forgot_delete
valgrind --leak-check=full ./forgot_delete
Valgrind Report - Observe the Memory Leak:
==3102369== HEAP SUMMARY:
==3102369== in use at exit: 4 bytes in 1 blocks
==3102369== total heap usage: 3 allocs, 2 frees, 73,732 bytes allocated
==3102369==
==3102369== Searching for pointers to 1 not-freed blocks
==3102369== Checked 147,280 bytes
==3102369==
==3102369== 4 bytes in 1 blocks are definitely lost in loss record 1 of 1
==3102369== at 0x4849013: operator new(unsigned long) (in /usr/libexec/valgrind/vgpreload_memcheck-amd64-linux.so)
==3102369== by 0x109201: bad_function(int) (memory_leak.cpp:5)
==3102369== by 0x10925D: main (memory_leak.cpp:10)
==3102369==
==3102369== LEAK SUMMARY:
==3102369== definitely lost: 4 bytes in 1 blocks
==3102369== indirectly lost: 0 bytes in 0 blocks
==3102369== possibly lost: 0 bytes in 0 blocks
==3102369== still reachable: 0 bytes in 0 blocks
==3102369== suppressed: 0 bytes in 0 blocks
==3102369==
==3102369== ERROR SUMMARY: 1 errors from 1 contexts (suppressed: 0 from 0)
Memory Lifecycle:
Step 1: int* rawPtr = new int(data)
STACK HEAP
┌──────────────┐ ┌──────────────┐
│ Function │ │ │
│ Stack Frame │ │ [4 bytes] │
│ │ │ value: 10 │
│ rawPtr ─────┼──────────────┼─> [int] │
│ (address) │ │ │
└──────────────┘ └──────────────┘
↑ ↑
Lives here Lives here until
(automatic) delete is called
Step 2: Using *rawPtr
STACK HEAP
┌──────────────┐ ┌──────────────┐
│ │ │ │
│ rawPtr ─────┼──────────────┼─> [10] │
│ (pointer) │ │ │
└──────────────┘ └──────────────┘
Access via pointer
Step 3: Function exits (NO delete called!) ❌
STACK HEAP
┌──────────────┐ ┌──────────────┐
│ │ │ │
│ [destroyed] │ X │ [LEAKED!] │
│ │ │ value: 10 │
└──────────────┘ └──────────────┘
rawPtr is gone! Memory orphaned!
(pointer destroyed) No way to free it!
Step 4: Program continues
STACK HEAP
┌──────────────┐ ┌──────────────┐
│ │ │ │
│ │ │ [LEAKED] │
│ │ │ 4 bytes │
└──────────────┘ └──────────────┘
Permanently lost! ❌
The Problem: When bad_function() exits:
- The local variable
rawPtris destroyed (it’s on the stack) - But the memory it pointed to (on the heap) is not freed
- There’s now no way to access or free that memory
- The 4 bytes are permanently lost until the program terminates
Why This Matters at Scale:
int main() {
for (int i = 0; i < 1000000; i++) {
bad_function(i); // Leaks 4 bytes EVERY call!
}
// Total leaked: 4 MB of memory!
return 0;
}
In a long-running application:
- Memory consumption grows continuously
- System performance degrades
- Eventually: out-of-memory crashes
Even if you remember to call delete, exceptions can still cause leaks:
#include <iostream>
#include <stdexcept>
void some_function() {
throw std::runtime_error("Something went wrong");
}
void bad_function(int data) {
int* rawPtr = new int(data); // Allocate memory
std::cout << "data: " << *rawPtr << std::endl;
some_function(); // Exception thrown here!
delete rawPtr; // This line NEVER executes! ❌
}
int main() {
try {
bad_function(10);
} catch (const std::exception& e) {
std::cerr << "Caught: " << e.what() << '\n';
}
return 0;
}
Compile and run with Valgrind:
g++ -g -O0 exception_leak.cpp -o exception_leak
valgrind --leak-check=full ./exception_leak
Valgrind Report - Observe the Exception Leak:
data: 10
Caught: Something went wrong
==3106542==
==3106542== HEAP SUMMARY:
==3106542== in use at exit: 4 bytes in 1 blocks
==3106542== total heap usage: 4 allocs, 3 frees, 73,804 bytes allocated
==3106542==
==3106542== 4 bytes in 1 blocks are definitely lost in loss record 1 of 1
==3106542== at 0x4849013: operator new(unsigned long) (in /usr/libexec/valgrind/vgpreload_memcheck-amd64-linux.so)
==3106542== by 0x109381: bad_function(int) (memory_leak_exc.cpp:9)
==3106542== by 0x1093FD: main (memory_leak_exc.cpp:17)
==3106542==
==3106542== LEAK SUMMARY:
==3106542== definitely lost: 4 bytes in 1 blocks
==3106542== indirectly lost: 0 bytes in 0 blocks
==3106542== possibly lost: 0 bytes in 0 blocks
==3106542== still reachable: 0 bytes in 0 blocks
==3106542== suppressed: 0 bytes in 0 blocks
==3106542==
==3106542== ERROR SUMMARY: 1 errors from 1 contexts (suppressed: 0 from 0)
The Surprising Result:
Observation: Even though we have delete rawPtr in the code, the memory still leaked!
- “4 bytes in 1 blocks are definitely lost” - Memory leaked despite
deletebeing present - The exception caused the function to exit before reaching
delete - Leak originated at line 9 (the
newstatement)
Exception Execution Flow:
Step 1: int* rawPtr = new int(data)
STACK HEAP
┌──────────────┐ ┌──────────────┐
│ Function │ │ │
│ Stack Frame │ │ [4 bytes] │
│ │ │ value: 10 │
│ rawPtr ─────┼──────────────┼─> [int] │
│ │ │ │
└──────────────┘ └──────────────┘
Step 2: some_function() throws exception ⚡
STACK HEAP
┌──────────────┐ ┌──────────────┐
│ │ │ │
│ rawPtr ─────┼──────────────┼─> [10] │
│ │ │ │
└──────────────┘ └──────────────┘
⚡ Exception! Still allocated!
Step 3: Stack unwinding begins
(cleaning up local variables)
STACK HEAP
┌──────────────┐ ┌──────────────┐
│ │ │ │
│ rawPtr │ ? │ [10] │
│ (being │ │ │
│ destroyed) │ │ │
└──────────────┘ └──────────────┘
Pointer about to die Memory still there!
delete rawPtr NEVER runs!
Step 4: Function exited via exception
STACK HEAP
┌──────────────┐ ┌──────────────┐
│ │ │ │
│ [destroyed] │ X │ [LEAKED!] │
│ │ │ value: 10 │
└──────────────┘ └──────────────┘
rawPtr destroyed! Memory orphaned!
delete line skipped! No way to free it! ❌
What happened:
- Memory is allocated with
new - Exception is thrown in
some_function() - Stack unwinding begins (C++ cleans up local objects)
rawPtr(the pointer variable) is destroyed during unwinding- The
delete rawPtrline is never reached - The allocated memory has no way to be freed
The Problems with Manual Memory Management
Managing heap memory manually with new/delete is error-prone because:
Problem 1: Easy to Forget
void process() {
int* data = new int[1000];
// ... lots of code ...
// Did you remember to delete[]? ❌
}
Issue: In complex functions with multiple return paths, it’s easy to forget delete.
Problem 2: Exception Safety is Hard
void process() {
int* data = new int[1000];
// Any function here might throw! ⚡
complexOperation(); // Exception?
delete[] data; // Might never execute!
}
Issue: Any exception between new and delete causes a leak.
Problem 3: Multiple Exit Points
void process(bool condition) {
int* data = new int[1000];
if (condition) {
return; // Oops, forgot delete! ❌
}
// ... more code ...
if (errorOccurred) {
return; // Oops again! ❌
}
delete[] data; // Only this path is safe
}
Issue: Each return path needs its own delete.
Problem 4: Ownership is Unclear
int* createData(); // Who deletes this?
void process(int* data); // Does this take ownership?
int* getData(); // Should caller delete?
Issue: Unclear who is responsible for freeing memory.
Detection Tools you can use to findout memory leaks
- Valgrind - Detects memory leaks at runtime
- AddressSanitizer - Fast leak detection during testing
- Static analyzers - Clang-Tidy, Cppcheck find potential leaks
Uhh So many problems, is there anyway these problems can be fixed. Yes the answer to all these problems is Smart pointers introduced in C++11 based on the RAII concept.
RAII: A Natural Solution to Resource Management
The Problem: Resource Leaks
Let’s start with a common problem. Imagine you’re writing a function that needs to allocate some memory:
void processData(int size) {
int* data = new int[size];
// Do some processing
if (size > 1000) {
// Oops, early return!
return;
}
// More processing
complexCalculation(data);
// Clean up
delete[] data;
}
What’s wrong here? If size > 1000, we return early and never call delete[]. The memory is leaked! The operating system won’t reclaim it until the program terminates.
Flow Diagram:
┌─────────────────┐
│ new int[size] │
└────────┬────────┘
│
▼
┌─────────┐
│size>1000│
└────┬────┘
│
┌────┴────┐
│ │
Yes No
│ │
▼ ▼
┌────────┐ ┌──────────────────┐
│ return │ │complexCalculation│
└───┬────┘ └────────┬─────────┘
│ │
▼ ▼
LEAK! ┌──────────┐
│delete[] │
└────┬─────┘
│
▼
OK ✓
Let’s add error handling to make it worse:
void processData(int size) {
int* data = new int[size];
// Do some processing
if (size > 1000) {
return; // LEAK!
}
// This might throw an exception
riskyOperation(data);
// More processing
complexCalculation(data);
// Clean up
delete[] data; // Never reached if riskyOperation throws!
}
Now we have two ways to leak memory: early returns and exceptions. We could try to fix this with try-catch blocks and remembering to delete in every path, but that’s tedious and error-prone.
There has to be a better way!
Understanding the Stack
Before we solve this, let’s understand how C++ manages automatic variables. When you declare a variable in a function, it lives on the stack:
void myFunction() {
int x = 42; // x lives on the stack
double y = 3.14; // y lives on the stack
if (x > 10) {
int z = 100; // z lives on the stack
} // z automatically destroyed here
} // x and y automatically destroyed here
Stack Lifetime:
┌─────────────────────────────┐
│ myFunction() called │
├─────────────────────────────┤
│ x = 42 [created] │
│ y = 3.14 [created] │
│ │
│ if (x > 10) { │
│ z = 100 [created] │
│ } [z destroyed] │ ← automatic cleanup
│ │
│ } [y destroyed] │ ← automatic cleanup
│ [x destroyed] │ ← automatic cleanup
└─────────────────────────────┘
The beautiful thing about stack variables is they’re automatically cleaned up when they go out of scope. You don’t have to do anything—the compiler handles it for you.
This automatic cleanup happens even if an exception is thrown:
void myFunction() {
int x = 42;
riskyOperation(); // Might throw an exception
} // x is STILL cleaned up, even if exception thrown!
This is called stack unwinding. When an exception occurs or a function returns, C++ walks back through the stack and cleans up all automatic variables.
Constructors and Destructors
C++ classes have special member functions that run automatically:
- Constructor: A special member function called when an object is created to initialize the object. If it has an initializer list, members are initialized during object creation itself.
- Destructor: Called when an object is destroyed
class MyClass {
public:
MyClass() {
std::cout << "Object created!\n";
}
~MyClass() {
std::cout << "Object destroyed!\n";
}
};
void demo() {
MyClass obj; // Constructor called: "Object created!"
// Do stuff...
} // Destructor called: "Object destroyed!"
The destructor runs automatically when the object goes out of scope. Always. Even if there’s an exception.
The Brilliant Idea: Combine Them!
Here’s the insight: What if we acquire resources in the constructor and release them in the destructor?
Let’s wrap our problematic memory allocation:
class IntArray {
private:
int* data;
int size;
public:
// Constructor: acquire the resource
IntArray(int s) : size(s) {
data = new int[size];
std::cout << "Memory allocated\n";
}
// Destructor: release the resource
~IntArray() {
delete[] data;
std::cout << "Memory freed\n";
}
int& operator[](int index) {
return data[index];
}
};
Now watch what happens when we use it:
void processData(int size) {
IntArray data(size); // Memory allocated in constructor
// Do some processing
if (size > 1000) {
return; // Destructor called automatically - NO LEAK!
}
// This might throw an exception
riskyOperation(data); // If it throws, destructor still called - NO LEAK!
// More processing
complexCalculation(data);
} // Destructor called automatically - memory freed
Voila! No manual resource management. No need to worry about ownership. No need to worry about cleanup. It’s all handled automatically when the object goes out of scope.
- Early return? ✓ Memory freed
- Exception thrown? ✓ Memory freed
- Normal path? ✓ Memory freed
Every single path through the function automatically cleans up the memory. You literally cannot forget.
This Technique is Called RAII
RAII stands for “Resource Acquisition Is Initialization.”
The idea is simple:
Acquire the resource in the constructor - This is where initialization happens
Release the resource in the destructor - This happens automatically when the object goes out of scope
Key Principles
- There should never be a half-ready or half-dead object
- When an object is created, it should be in a ready state - fully initialized and usable
- When an object goes out of scope, it should release its resources - automatically, without user intervention
- The user shouldn’t have to do anything more - no manual cleanup calls, no worrying about exceptions
To be honest, “Resource Acquisition Is Initialization” is a bit of a mouthful. More descriptive names might be:
- Constructor Acquires, Destructor Releases (CADR)
- Scope-Based Resource Management (SBRM)
But we’re stuck with RAII, so let’s embrace it!
RAII in Action: File Handling
Let’s see another example with files:
// Without RAII: Easy to leak file handles
void readFile(const char* filename) {
FILE* file = fopen(filename, "r");
if (!file) {
return; // OK, nothing to clean
}
// Process the file
if (errorCondition) {
return; // LEAK! Forgot to fclose
}
processData(file); // Might throw exception - LEAK!
fclose(file); // Only reached on success path
}
// With RAII: File handle always closed
class File {
private:
FILE* file;
public:
File(const char* filename, const char* mode) {
file = fopen(filename, mode);
if (!file) {
throw std::runtime_error("Failed to open file");
}
}
~File() {
fclose(file);
}
FILE* get() { return file; }
};
void readFile(const char* filename) {
File file(filename, "r"); // File opened
// Process the file
if (errorCondition) {
return; // File closed automatically
}
processData(file.get()); // Exception? File still closed automatically
} // File closed automatically
Wait, Can RAII Go Wrong?
Yes! Even with RAII, you can still leak resources if you’re not careful. Let’s see how:
class BadResourceManager {
private:
int* buffer;
FILE* file;
public:
BadResourceManager(const char* filename, int size) {
// Acquire first resource
buffer = new int[size];
std::cout << "Buffer allocated\n";
// Try to acquire second resource
file = fopen(filename, "r");
if (!file) {
// Constructor throws exception
throw std::runtime_error("Failed to open file");
// MEMORY LEAK! buffer is never freed
}
std::cout << "File opened\n";
}
~BadResourceManager() {
std::cout << "Destructor called\n";
delete[] buffer;
if (file) fclose(file);
}
};
void demonstrateProblem() {
try {
BadResourceManager manager("nonexistent.txt", 1000);
} catch (const std::exception& e) {
std::cout << "Caught: " << e.what() << "\n";
}
}
Output:
Buffer allocated
Caught: Failed to open file
Notice what’s missing? “Destructor called” never prints!
The memory allocated for buffer is leaked. Why?
Understanding “Fully Constructed Objects”
Here’s a critical rule in C++:
The destructor is only called for fully constructed objects.
An object is considered fully constructed only when its constructor completes successfully (reaches the end without throwing).
Let’s trace what happens in our bad example:
BadResourceManager(const char* filename, int size) {
buffer = new int[size]; // ✓ Memory allocated
file = fopen(filename, "r");
if (!file) {
throw std::runtime_error("Failed to open file");
// ✗ Constructor did NOT complete
// ✗ Object is NOT fully constructed
// ✗ Destructor will NOT be called
// ✗ buffer memory LEAKED
}
// Constructor completes here - but we never reach this!
}
Object Construction Timeline:
┌────────────────────────────────────┐
│ Constructor starts │
├────────────────────────────────────┤
│ buffer = new int[size] ✓ │ ← Memory allocated
│ file = fopen(...) ✗ │ ← Failed!
│ throw exception ✗ │ ← Constructor interrupted
├────────────────────────────────────┤
│ Constructor did NOT complete │
│ Object is NOT fully constructed │
│ Destructor will NOT be called │
│ buffer is LEAKED! │
└────────────────────────────────────┘
The object is in a half-baked state: some resources acquired, some not, constructor failed. C++ considers this object to have never truly existed, so it doesn’t call the destructor.
Think of it like a failed cake: if you start baking a cake but the oven breaks halfway through, you don’t have a cake—you have a mess. Similarly, a partially constructed object isn’t really an object.
The Manual Cleanup Trap
You might think: “I’ll just clean up before throwing!”
BadResourceManager(const char* filename, int size) {
buffer = new int[size];
file = fopen(filename, "r");
if (!file) {
delete[] buffer; // Manual cleanup
throw std::runtime_error("Failed to open file");
}
}
This works, but now you’re back to manual resource management! You have to remember to clean up in every failure path. If you acquire three resources, you need cleanup logic for three different failure points. This is exactly what RAII was supposed to eliminate.
We need a better solution.
The Solution: RAII All The Way Down
The key insight: use RAII objects as members. When a constructor throws, the destructors of all fully constructed members are automatically called.
// RAII wrapper for memory
class Buffer {
private:
int* data;
int size;
public:
Buffer(int s) : size(s) {
data = new int[size];
std::cout << "Buffer allocated\n";
}
~Buffer() {
delete[] data;
std::cout << "Buffer freed\n";
}
int* get() { return data; }
};
// RAII wrapper for files
class File {
private:
FILE* handle;
public:
File(const char* filename, const char* mode) {
handle = fopen(filename, mode);
if (!handle) {
throw std::runtime_error("Failed to open file");
}
std::cout << "File opened\n";
}
~File() {
fclose(handle);
std::cout << "File closed\n";
}
FILE* get() { return handle; }
};
// Good resource manager using RAII members
class GoodResourceManager {
private:
Buffer buffer; // RAII member
File file; // RAII member
public:
GoodResourceManager(const char* filename, int size)
: buffer(size), // Buffer constructor called
file(filename, "r") // File constructor called
{
// If we reach here, both resources acquired successfully
std::cout << "Manager fully constructed\n";
}
~GoodResourceManager() {
std::cout << "Manager destructor\n";
// buffer and file destructors called automatically
}
};
void demonstrateSolution() {
try {
GoodResourceManager manager("nonexistent.txt", 1000);
} catch (const std::exception& e) {
std::cout << "Caught: " << e.what() << "\n";
}
}
Output:
Buffer allocated
Buffer freed
Caught: Failed to open file
Look at that! Even though File’s constructor threw an exception:
Bufferwas fully constructed (its constructor completed)- So
Buffer’s destructor was called automatically - No memory leak!
The GoodResourceManager object itself was never fully constructed, so its destructor wasn’t called—but that’s fine, because its member destructors were called, and they’re the ones managing the actual resources.
How Member Construction Order Matters
Members are constructed in the order they’re declared in the class:
class Manager {
private:
Buffer buffer; // Constructed first
File file; // Constructed second
public:
Manager(const char* filename, int size)
: buffer(size),
file(filename, "r")
{
}
};
If file construction throws:
bufferwas already fully constructed → its destructor runs ✓filewas never fully constructed → its destructor doesn’t run (but it never acquired anything anyway)Managerwas never fully constructed → its destructor doesn’t run (but that’s OK, the members handle cleanup)
Member Construction Flow with Exception:
┌──────────────────────────────────────────┐
│ Manager construction starts │
├──────────────────────────────────────────┤
│ 1. buffer(size) ✓ SUCCESS │ ← Fully constructed
│ - new int[size] │
│ - Buffer ready │
├──────────────────────────────────────────┤
│ 2. file(filename, "r") ✗ THROWS │ ← Construction fails
│ - fopen fails │
│ - throw exception │
├──────────────────────────────────────────┤
│ Exception caught - cleanup begins: │
│ │
│ • buffer destructor called ✓ │ ← Automatic!
│ - delete[] data │
│ - No leak! │
│ │
│ • file destructor NOT called │ ← Never constructed
│ • Manager destructor NOT called │ ← Never constructed
└──────────────────────────────────────────┘
This is the magic: by composing RAII objects, you get automatic exception safety. Each layer handles its own cleanup, and the language guarantees it all happens in the right order.
The Standard Library Does This
You rarely need to write your own RAII wrappers because the standard library provides them:
#include <memory>
#include <fstream>
class ModernResourceManager {
private:
std::unique_ptr<int[]> buffer; // RAII for memory
std::ifstream file; // RAII for files
public:
ModernResourceManager(const char* filename, int size)
: buffer(std::make_unique<int[]>(size)),
file(filename)
{
if (!file.is_open()) {
// buffer automatically cleaned up when exception thrown!
throw std::runtime_error("Failed to open file");
}
}
// Compiler-generated destructor does the right thing
~ModernResourceManager() = default;
};
If the file fails to open, std::unique_ptr’s destructor is automatically called and frees the memory. You don’t write any cleanup code—the language does it for you.
What Can You Manage with RAII?
RAII isn’t just for memory and files. It works for any resource:
- Memory -
new/delete,malloc/free - Files -
fopen/fclose, file descriptors - Locks -
mutex.lock()/mutex.unlock() - Sockets -
socket()/close() - Database connections -
connect()/disconnect() - OpenGL contexts -
createContext()/destroyContext() - Temporary state - Save/restore settings
The pattern is always the same:
- Acquire in constructor
- Release in destructor
- Let the stack do the work
The C++ Standard Library Uses RAII Everywhere
You don’t have to write RAII wrappers yourself—C++ provides them:
#include <memory>
#include <fstream>
#include <vector>
#include <mutex>
void modernCpp() {
// Smart pointers manage memory
std::unique_ptr<int[]> data(new int[100]);
// Streams manage file handles
std::ifstream file("data.txt");
// Containers manage their own memory
std::vector<int> numbers = {1, 2, 3, 4, 5};
// Lock guards manage mutexes
std::mutex m;
std::lock_guard<std::mutex> lock(m);
} // Everything cleaned up automatically!
Why RAII is Beautiful
RAII transforms resource management from a manual chore into an automatic guarantee.
Instead of remembering to clean up, you cannot forget to clean up. Instead of writing error-prone cleanup logic in every return path and exception handler, you write it once in the destructor.
The destructor is your cleanup code, and the C++ language guarantees it runs. Always. No matter what.
That’s the power of RAII: using the language’s automatic features to enforce correctness.
Summary
- Resource leaks happen when you forget to clean up
- Stack variables are automatically destroyed when they go out of scope
- Destructors run automatically, even during exceptions (stack unwinding)
- RAII combines these: acquire in constructor, release in destructor
- The result: automatic, leak-free resource management
RAII = Let the stack do the work for you!
C++11 Smart Pointers
Overview
C++11 introduced smart pointers to the Standard Library, providing automatic resource management and helping developers avoid resource leaks and dangling pointers. Smart pointers manage the lifetime of resources (memory, files, network connections, etc.) and automatically release them when they’re no longer needed. They leverage the RAII (Resource Acquisition Is Initialization) principle to ensure resources are properly cleaned up.
Smart Pointers Introduced in C++11
C++11 introduced three main smart pointers as class templates:
1. std::unique_ptr
A smart pointer that provides exclusive ownership of a resource, ensuring only one pointer can own it at a time.
2. std::shared_ptr
A smart pointer that allows multiple pointers to share ownership of the same resource using reference counting.
3. std::weak_ptr
A non-owning smart pointer that holds a reference to a resource managed by std::shared_ptr, useful for breaking circular references.
Key Benefits
- Automatic resource management: Resources are automatically released when no longer needed
- Exception safety: Memory is properly released even if exceptions occur
- No overhead for unique ownership:
std::unique_ptrhas zero-cost abstraction - Clear ownership semantics: Code intent is explicit about who owns the resource
Quick Comparison
| Smart Pointer | Ownership | Use Case |
|---|---|---|
std::unique_ptr | Exclusive | Single owner scenarios |
std::shared_ptr | Shared | Multiple owners of the same object |
std::weak_ptr | Non-owning | Breaking circular references |
Exclusive ownership smart pointer - std::unique_ptr<T>
Table of Contents
- What is std::unique_ptr
? - Declaration in C++ Standard
- Creating a std::unique_ptr
- Non-Copyable Semantics
- Move Semantics
- Custom Deleters
- Array Allocation
- std::make_unique
(C++14) - Limitations of std::make_unique
What is std::unique_ptr?
std::unique_ptr<T> is a smart pointer that manages a resource (which may be memory, a file handle, a socket, or a hardware mutex) through exclusive ownership. It acts as an RAII (Resource Acquisition Is Initialization) wrapper that guarantees the resource is released—via a deleter—exactly once: either when the unique_ptr<T> object goes out of scope or when it is reassigned.
Key characteristics:
- Exclusive Ownership: Only one
unique_ptrcan own a given resource at any time - Resource Management: Manages any resource, not just dynamically allocated memory (files, sockets, hardware resources, etc.)
- Guaranteed Cleanup: The resource is released exactly once through the deleter when the
unique_ptris destroyed or reassigned - Zero Overhead: No reference counting; essentially a wrapper around a raw pointer with minimal overhead
- Move-Only Semantics: Cannot be copied (to enforce exclusive ownership), but can be moved to transfer ownership
- RAII Principle: Follows the Resource Acquisition Is Initialization pattern, binding resource lifetime to object lifetime
Declaration in C++ Standard
According to the C++11 standard (and refined in later standards), std::unique_ptr is defined in the <memory> header:
#include <memory>
// Basic declaration
template<class T, class D = std::default_delete<T>> class unique_ptr;
// Partial specialization for array types
template<class T, class D> class unique_ptr<T[], D>;
The template has two parameters:
- T: The type of the object being managed
- D: The deleter (defaults to
std::default_delete<T>, which callsdeleteordelete[])
Creating a std::unique_ptr
Method 1: Using new (C++11)
#include <memory>
#include <iostream>
class Dog {
public:
Dog(const std::string& name) : name_(name) {
std::cout << "Dog " << name_ << " created\n";
}
~Dog() {
std::cout << "Dog " << name_ << " destroyed\n";
}
private:
std::string name_;
};
int main() {
// Create a unique_ptr using new
std::unique_ptr<Dog> dog1(new Dog("Buddy"));
// Access the object
dog1->name();
// When dog1 goes out of scope, the Dog is automatically deleted
return 0;
}
Method 2: Using std::make_unique<T> (C++14)
int main() {
// More safe and concise
auto dog2 = std::make_unique<Dog>("Max");
return 0;
}
Explicit Type Declaration
int main() {
std::unique_ptr<Dog> dog3 = std::make_unique<Dog>("Charlie");
std::unique_ptr<Dog> dog4{new Dog("Daisy")};
return 0;
}
Non-Copyable Semantics
std::unique_ptr cannot be copied because it enforces exclusive ownership. Only one unique_ptr should manage a given resource.
What This Means
When you try to copy a unique_ptr, the compiler will complain and wont allow to copy.
// Compilation ERROR!
std::unique_ptr<Dog> dog1 = std::make_unique<Dog>("Buddy");
std::unique_ptr<Dog> dog2 = dog1; // COMPILER ERROR: copy constructor deleted
std::unique_ptr<Dog> dog3(dog1); // COMPILER ERROR: copy constructor deleted
std::unique_ptr<Dog> dog4 = dog1; // COMPILER ERROR: copy constructor deleted
std::vector<std::unique_ptr<Dog>> dogs;
dogs.push_back(dog1); // COMPILER ERROR: cannot copy
Why This Restriction Exists
// Without this restriction, this would be problematic:
std::unique_ptr<Dog> dog1 = std::make_unique<Dog>("Buddy");
std::unique_ptr<Dog> dog2 = dog1; // If copying were allowed...
// Now which one "owns" the Dog? Both?
// When dog1 goes out of scope, it deletes the Dog.
// When dog2 goes out of scope, it tries to delete the already-deleted Dog.
// Result: DOUBLE DELETE - memory corruption and crash!
The Deleted Copy Operations
This is achieved by deleteing the copy constructor and copy assignment operator of std::unique_ptr class.
// Simplified view of unique_ptr definition:
template<class T>
class unique_ptr {
public:
// Copy operations are explicitly deleted
unique_ptr(const unique_ptr&) = delete;
unique_ptr& operator=(const unique_ptr&) = delete;
// Move operations are available
unique_ptr(unique_ptr&&) noexcept;
unique_ptr& operator=(unique_ptr&&) noexcept;
// ... rest of implementation
};
Move Semantics
std::unique_ptr can be moved, which transfers ownership from one unique_ptr to another. When you move a std::unique_ptr object it invokes the move semantic special member functions.
Basic Move Example
int main() {
std::unique_ptr<Dog> dog1 = std::make_unique<Dog>("Buddy");
// Transfer ownership from dog1 to dog2
std::unique_ptr<Dog> dog2 = std::move(dog1);
// Now dog2 owns the Dog, dog1 is nullptr
if (dog1 == nullptr) {
std::cout << "dog1 is now null\n"; // This prints
}
// dog2 still owns the Dog
// When dog2 goes out of scope, the Dog is deleted
return 0;
}
Using std::move Explicitly
void processDog(std::unique_ptr<Dog> dog) {
// Function takes ownership
std::cout << "Processing dog...\n";
// Dog is deleted when function returns
}
int main() {
std::unique_ptr<Dog> myDog = std::make_unique<Dog>("Max");
// Transfer ownership to the function
processDog(std::move(myDog));
// myDog is now nullptr
std::cout << "myDog after transfer: "
<< (myDog ? "valid" : "null") << "\n"; // Prints "null"
return 0;
}
Move in Return Values
std::unique_ptr<Dog> createDog() {
auto dog = std::make_unique<Dog>("NewDog");
return dog; // Automatically moved (RVO or move semantics)
}
int main() {
std::unique_ptr<Dog> myDog = createDog();
// No copy, no extra allocations - just a move
return 0;
}
Move with Containers
int main() {
std::vector<std::unique_ptr<Dog>> dogs;
dogs.push_back(std::make_unique<Dog>("Buddy")); // Moved into vector
auto dog = std::make_unique<Dog>("Max");
dogs.push_back(std::move(dog)); // Explicitly moved
// All dogs are automatically cleaned up when vector is destroyed
return 0;
}
Custom Deleters
By default, std::unique_ptr<T> uses std::default_delete<T>, which simply calls delete for pointers and delete[] for arrays. However, you can provide a custom deleter for specialized cleanup needs.
Why Custom Deleters Are Needed
Custom deleters are necessary when:
- Resource management differs from
delete: File handles, database connections, memory allocated withmalloc, etc. - Cleanup requires additional operations: Logging, reference counting, resource pool management
- Third-party library resources: APIs that require specific deallocation functions
Syntax for Custom Deleters
// Template parameter specifies the deleter type
std::unique_ptr<T, DeleterType> ptr;
Example 1: File Handle Wrapper
#include <cstdio>
#include <memory>
// Custom deleter for FILE*
struct FileDeleter {
void operator()(FILE* file) const {
if (file) {
std::cout << "Closing file...\n";
std::fclose(file);
}
}
};
int main() {
// FILE* requires fclose, not delete
std::unique_ptr<FILE, FileDeleter> file(
std::fopen("data.txt", "r")
);
if (file) {
// Use the file
char buffer[100];
std::fgets(buffer, sizeof(buffer), file.get());
}
// FileDeleter is called automatically, closing the file
return 0;
}
Example 2: C API Resource
#include <memory>
#include <iostream>
// Simulated C library
extern "C" {
typedef struct {
int* data;
int size;
} DataBuffer;
DataBuffer* createBuffer(int size);
void destroyBuffer(DataBuffer* buffer);
}
// Custom deleter for C API
auto bufferDeleter = [](DataBuffer* buf) {
std::cout << "Destroying buffer via C API...\n";
destroyBuffer(buf);
};
int main() {
using BufferPtr = std::unique_ptr<DataBuffer, decltype(bufferDeleter)>;
BufferPtr buffer(createBuffer(100), bufferDeleter);
// Use buffer
std::cout << "Buffer size: " << buffer->size << "\n";
// destroyBuffer is called automatically
return 0;
}
Example 3: Lambda Deleter
#include <memory>
#include <iostream>
class Resource {
public:
Resource() { std::cout << "Resource acquired\n"; }
~Resource() { std::cout << "Resource destroyed\n"; }
};
int main() {
// Lambda as custom deleter
auto customDeleter = [](Resource* res) {
std::cout << "Custom cleanup before deletion\n";
delete res;
};
using ResourcePtr = std::unique_ptr<Resource, decltype(customDeleter)>;
ResourcePtr res(new Resource(), customDeleter);
// Output:
// Resource acquired
// Custom cleanup before deletion
// Resource destroyed
return 0;
}
Example 4: Stateful Deleter
#include <memory>
#include <iostream>
class MemoryPool {
private:
int allocated_ = 0;
public:
void* allocate(int size) {
allocated_ += size;
std::cout << "Allocated " << size << " bytes (total: "
<< allocated_ << ")\n";
return new char[size];
}
void deallocate(void* ptr, int size) {
allocated_ -= size;
std::cout << "Deallocated " << size << " bytes (total: "
<< allocated_ << ")\n";
delete[] static_cast<char*>(ptr);
}
};
struct PoolDeleter {
MemoryPool* pool;
int size;
void operator()(char* ptr) const {
pool->deallocate(ptr, size);
}
};
int main() {
MemoryPool pool;
const int SIZE = 256;
char* raw = static_cast<char*>(pool.allocate(SIZE));
std::unique_ptr<char[], PoolDeleter> buffer(
raw,
PoolDeleter{&pool, SIZE}
);
// Use buffer...
// Deleter tracks deallocation through the pool
return 0;
}
Array Allocation
std::unique_ptr has a partial specialization for arrays (unique_ptr<T[]>), which uses delete[] instead of delete:
#include <memory>
#include <iostream>
int main() {
// Single object
std::unique_ptr<int> single(new int(42));
// Array of objects - use T[]
std::unique_ptr<int[]> array(new int[100]);
// Access via operator[]
array[0] = 10;
array[99] = 20;
// Use make_unique for arrays (C++20)
auto modern_array = std::make_unique<double[]>(50);
modern_array[0] = 3.14;
// Automatic cleanup with delete[]
return 0;
}
Array with Custom Deleter
struct ArrayDeleter {
void operator()(int* array) const {
std::cout << "Deleting array with custom deleter...\n";
delete[] array;
}
};
int main() {
std::unique_ptr<int[], ArrayDeleter> array(
new int[100],
ArrayDeleter{}
);
array[0] = 42;
return 0;
}
The Problem with Naked new and the Need for std::make_unique<T>
When using new directly with unique_ptr, there’s a critical exception safety issue that can lead to resource leaks.
Example: Exception Safety Problem
Consider this function that takes multiple unique_ptr parameters:
#include <memory>
#include <iostream>
class Data {
public:
Data() { std::cout << "Data created\n"; }
~Data() { std::cout << "Data destroyed\n"; }
};
class Config {
public:
Config() { std::cout << "Config created\n"; }
~Config() { std::cout << "Config destroyed\n"; }
};
void processData(
std::unique_ptr<Data> data,
std::unique_ptr<Config> config
) {
std::cout << "Processing...\n";
// Process data and config
}
int main() {
// UNSAFE: Can leak memory!
processData(
std::unique_ptr<Data>(new Data()), // First allocation
std::unique_ptr<Config>(new Config()) // Second allocation
);
return 0;
}
Why This Is Dangerous
The C++ standard( < C++17) does not guarantee the order of evaluation of function arguments. Here’s what could happen:
new Data()is called → allocates memorynew Config()is called → allocates memory- Exception is thrown (in Config constructor or elsewhere)
- The
Dataobject is deleted successfully (unique_ptr destructor runs) - But the
Configallocation was partial → MEMORY LEAK
Or worse:
new Data()is called → allocates memory- Exception is thrown (in Data constructor)
- No
unique_ptris constructed yet → MEMORY LEAK (raw pointer lost)
The problem is that memory allocation and unique_ptr construction are not atomic. Multiple intermediate states exist where resources can leak.
The Solution: std::make_unique<T> (C++14)
std::make_unique<T> is a factory function that creates and wraps the object atomically. Either the entire operation succeeds and you have a fully constructed unique_ptr, or an exception is thrown before any allocation happens. There is no intermediate state where a resource can leak.
#include <memory>
int main() {
// SAFE: Atomic operation
processData(
std::make_unique<Data>(),
std::make_unique<Config>()
);
return 0;
}
Why it’s atomic:
std::make_uniquecreates the object and immediately wraps it in aunique_ptr- Either both succeed together, or nothing succeeds
- No raw pointers exist in intermediate states
- No possibility of a leak between allocation and
unique_ptrconstruction
Improved and safe version using std::make_unique
#include <memory>
#include <iostream>
class FailingObject {
public:
FailingObject() {
std::cout << "FailingObject constructor started\n";
throw std::runtime_error("Constructor failed!");
std::cout << "FailingObject constructor completed\n";
}
~FailingObject() { std::cout << "FailingObject destroyed\n"; }
};
class SafeObject {
public:
SafeObject() { std::cout << "SafeObject created\n"; }
~SafeObject() { std::cout << "SafeObject destroyed\n"; }
};
void unsafeWay() {
std::cout << "\n=== UNSAFE WAY (with new) ===\n";
try {
auto obj1 = std::make_unique<SafeObject>();
// If exception occurs here, obj1 is properly cleaned up
// But if we had: ptr(new SafeObject()), ptr(new FailingObject())
// We could have a leak
auto obj2 = std::make_unique<FailingObject>();
} catch (const std::exception& e) {
std::cout << "Exception caught: " << e.what() << "\n";
}
std::cout << "End of unsafeWay\n";
}
void safeWay() {
std::cout << "\n=== SAFE WAY (with make_unique) ===\n";
try {
auto obj1 = std::make_unique<SafeObject>();
auto obj2 = std::make_unique<FailingObject>();
} catch (const std::exception& e) {
std::cout << "Exception caught: " << e.what() << "\n";
}
std::cout << "End of safeWay\n";
}
int main() {
unsafeWay();
safeWay();
return 0;
}
std::make_unique (C++14)
std::make_unique<T> (introduced in C++14) is a factory function that creates a unique_ptr atomically and more safely than using new directly.
Syntax
// Single object
auto ptr = std::make_unique<T>(args...);
// Array (C++20)
auto arr = std::make_unique<T[]>(size);
Key Advantage: Atomic Construction
#include <memory>
#include <string>
#include <iostream>
class Person {
public:
Person(const std::string& name, int age)
: name_(name), age_(age) {
std::cout << "Person created: " << name_ << "\n";
}
~Person() {
std::cout << "Person destroyed: " << name_ << "\n";
}
void display() const {
std::cout << name_ << " is " << age_ << " years old\n";
}
private:
std::string name_;
int age_;
};
void processPersons(
std::unique_ptr<Person> person1,
std::unique_ptr<Person> person2
) {
// Process persons
}
int main() {
// SAFE: Each make_unique is atomic
// Either person is created or an exception is thrown
// No intermediate state with leaked resources
processPersons(
std::make_unique<Person>("Alice", 30),
std::make_unique<Person>("Bob", 25)
);
// In containers
std::vector<std::unique_ptr<Person>> people;
people.push_back(std::make_unique<Person>("Carol", 28));
people.push_back(std::make_unique<Person>("Dave", 35));
for (const auto& p : people) {
p->display();
}
return 0;
}
Benefits of std::make_unique
- Exception Safety: Atomic operation - either succeeds completely or fails without leaking
- Less Typing: More concise than
std::unique_ptr<T>(new T(...)) - Type Deduction:
autocan deduce the full type - Consistency: Encourages uniform resource management patterns
Limitations of std::make_unique
std::make_unique uses the default deleter and has several limitations:
1. Cannot Use Custom Deleters
// ERROR: make_unique doesn't support custom deleters
FILE* file = std::fopen("data.txt", "r");
// This won't compile:
auto filePtr = std::make_unique<FILE, FileDeleter>(file); // ERROR!
// Must use new directly:
std::unique_ptr<FILE, FileDeleter> filePtr(file, FileDeleter{});
2. Cannot Use with Pre-existing Pointers
int* raw = new int(42);
// ERROR: make_unique creates a new object, can't wrap existing pointer
auto ptr = std::make_unique<int>(raw); // Creates new int, not what we want
// Must use new directly:
auto ptr = std::unique_ptr<int>(raw);
3. Private Constructors (Indirect Limitation)
class Secret {
private:
Secret(int value) : value_(value) {}
friend class SecretFactory;
int value_;
};
// ERROR: make_unique can't access private constructor
auto secret = std::make_unique<Secret>(42); // Won't compile
// Workaround: Use new with a friend function
class SecretFactory {
public:
static std::unique_ptr<Secret> create(int value) {
return std::unique_ptr<Secret>(new Secret(value));
}
};
4. Inherited Classes Requiring Base Constructor Conversion
class Base {
public:
virtual ~Base() = default;
};
class Derived : public Base {
public:
Derived(int x) {}
};
// This works:
std::unique_ptr<Base> base = std::make_unique<Derived>(42);
// But if you need the deleter to be specific:
struct BaseDeleter {
void operator()(Base* ptr) const { delete ptr; }
};
// ERROR: Can't specify custom deleter with make_unique
auto base2 = std::make_unique<Derived, BaseDeleter>(42); // Won't compile
// Must use new:
auto base2 = std::unique_ptr<Base, BaseDeleter>(
new Derived(42),
BaseDeleter{}
);
5. Array Specialization Not Available Until C++20
// C++14 and C++17: NOT AVAILABLE
auto arr = std::make_unique<int[]>(100); // Compiler error
// Workaround for C++14/C++17:
std::unique_ptr<int[]> arr(new int[100]);
// C++20 and later: Available
auto arr = std::make_unique<int[]>(100); // Works!
Reassigning with reset()
The reset() method allows you to reassign a unique_ptr to a new resource. When you reassign, the old resource is automatically deleted via the deleter, then the new resource is stored.
Basic reset() Usage
#include <memory>
#include <iostream>
class Animal {
public:
Animal(const std::string& name) : name_(name) {
std::cout << "Animal " << name_ << " created\n";
}
~Animal() {
std::cout << "Animal " << name_ << " destroyed\n";
}
private:
std::string name_;
};
int main() {
auto animal = std::make_unique<Animal>("Dog");
// Reset to a new resource
// First, the Dog is destroyed
// Then, the new Cat is stored
animal = std::make_unique<Animal>("Cat");
// Reset to nullptr (releases the resource without assigning new one)
animal.reset();
// Cat is destroyed
// animal is now nullptr
if (!animal) {
std::cout << "animal is now null\n";
}
return 0;
}
// Output:
// Animal Dog created
// Animal Dog destroyed
// Animal Cat created
// Animal Cat destroyed
// animal is now null
reset() with a Raw Pointer
#include <memory>
#include <iostream>
class Resource {
public:
Resource(int id) : id_(id) {
std::cout << "Resource " << id_ << " acquired\n";
}
~Resource() {
std::cout << "Resource " << id_ << " released\n";
}
private:
int id_;
};
int main() {
std::unique_ptr<Resource> resource = std::make_unique<Resource>(1);
std::cout << "\nRessigning with reset()...\n";
// Reset with a new raw pointer
// Old resource (1) is destroyed first
resource.reset(new Resource(2));
std::cout << "\nCalling reset() with no arguments...\n";
// Reset with nullptr (default argument)
resource.reset();
std::cout << "\nEnd of main\n";
return 0;
}
// Output:
// Resource 1 acquired
//
// Reassigning with reset()...
// Resource 1 released
// Resource 2 acquired
//
// Calling reset() with no arguments...
// Resource 2 released
//
// End of main
reset() with Custom Deleter
#include <memory>
#include <cstdio>
#include <iostream>
struct FileDeleter {
void operator()(FILE* file) const {
if (file) {
std::cout << "Closing file with custom deleter\n";
std::fclose(file);
}
}
};
int main() {
std::unique_ptr<FILE, FileDeleter> file(
std::fopen("data1.txt", "r")
);
if (file) {
std::cout << "Opened data1.txt\n";
}
// Reset to a different file
// data1.txt is closed with the custom deleter
// data2.txt is opened
file.reset(std::fopen("data2.txt", "r"));
if (file) {
std::cout << "Opened data2.txt\n";
}
// Close the file explicitly
file.reset();
return 0;
}
// Output:
// Opened data1.txt
// Closing file with custom deleter
// Opened data2.txt
// Closing file with custom deleter
reset() in Practice: Resource Replacement
#include <memory>
#include <iostream>
#include <vector>
class DatabaseConnection {
public:
DatabaseConnection(const std::string& server) : server_(server) {
std::cout << "Connecting to " << server_ << "\n";
}
~DatabaseConnection() {
std::cout << "Disconnecting from " << server_ << "\n";
}
void query() const {
std::cout << "Executing query on " << server_ << "\n";
}
private:
std::string server_;
};
int main() {
std::unique_ptr<DatabaseConnection> db =
std::make_unique<DatabaseConnection>("server1.example.com");
db->query();
std::cout << "\nReconnecting to different server...\n";
// Old connection is closed, new one is opened
db.reset(new DatabaseConnection("server2.example.com"));
db->query();
std::cout << "\nCalling reset() to close connection...\n";
db.reset(); // Closes the connection
// Try to query after reset
if (db) {
db->query();
} else {
std::cout << "No active connection\n";
}
return 0;
}
// Output:
// Connecting to server1.example.com
// Executing query on server1.example.com
//
// Reconnecting to different server...
// Disconnecting from server1.example.com
// Connecting to server2.example.com
// Executing query on server2.example.com
//
// Calling reset() to close connection...
// Disconnecting from server2.example.com
// No active connection
Key Points About reset()
- Deletes old resource first: When you reassign, the old resource is deleted via the deleter before the new one is stored
- Safe with nullptr: Calling
reset()without arguments (orreset(nullptr)) safely releases the resource - Works with custom deleters: The deleter is applied when the old resource is destroyed
- Useful for resource replacement: Allows you to cleanly switch from one resource to another
- Enables cleanup without destruction: You can explicitly release a resource before the
unique_ptrgoes out of scope
Best Practices
- Use
std::make_uniqueby default when possible - Use
newwithstd::unique_ptrwhen:- You need a custom deleter
- Wrapping a pre-existing pointer
- Working with C APIs
- Need to call private constructors (through friend mechanisms)
- Supporting C++14/C++17 with array types
- Never mix approaches in the same codebase without clear reasoning
Summary
| Feature | Details |
|---|---|
| Ownership | Exclusive, single owner |
| Copyable | No (copy constructor/assignment deleted) |
| Movable | Yes (transfer ownership) |
| Overhead | Zero - just a pointer wrapper |
| Default Deleter | delete (or delete[] for arrays) |
| Custom Deleter | Supported via template parameter |
| Factory Function | std::make_unique<T> (C++14) |
| Array Support | unique_ptr<T[]> or make_unique<T[]> (C++20) |
std::unique_ptr is the best choice for exclusive ownership of dynamically allocated objects in modern C++.
Accessing Raw Pointers from std::unique_ptr<T>
As a programmer working with std::unique_ptr<T>, there are instances where you need access to the underlying raw pointer managed by the unique_ptr. Perhaps you need to pass it to a legacy C API that expects raw pointers, or you need to share the pointer temporarily with another part of your code while maintaining the unique ownership model.
To support this need, std::unique_ptr provides two distinct methods for retrieving the raw pointer:
get()- Get the pointer without changing ownershiprelease()- Get the pointer AND transfer ownership
The crucial difference between these two methods lies in what happens to the unique_ptr’s ownership after calling them. Understanding this distinction is vital for writing safe and correct C++ code.
The get() Method
What Does get() Do?
The get() method returns a raw pointer to the underlying resource without transferring ownership. After calling get(), the unique_ptr still holds full responsibility for managing and cleaning up the resource. When you call get(), you’re essentially saying: “I need temporary access to this pointer, but you (unique_ptr) keep managing it.”
Key Characteristics
T* get() const noexcept;
- Returns: A raw pointer (
T*) to the managed object - Returns
nullptrif theunique_ptris empty - Ownership: Remains with the
unique_ptr - Responsibility for cleanup: The
unique_ptrstill owns and will clean up the resource - When cleanup happens: When the
unique_ptrgoes out of scope or is reassigned
Basic Example: Temporary Pointer Access
#include <memory>
#include <iostream>
#include <cstring>
class FileBuffer {
public:
FileBuffer(size_t size) : size_(size) {
std::cout << "FileBuffer allocated (" << size_ << " bytes)\n";
}
~FileBuffer() {
std::cout << "FileBuffer deallocated\n";
}
private:
size_t size_;
};
int main() {
// Create a unique_ptr managing a FileBuffer
std::unique_ptr<FileBuffer> buffer = std::make_unique<FileBuffer>(1024);
std::cout << "\n--- Using get() ---\n";
// get() returns the raw pointer without transferring ownership
FileBuffer* ptr = buffer.get();
std::cout << "Obtained raw pointer: " << ptr << "\n";
std::cout << "unique_ptr still owns the buffer\n";
// Use the pointer temporarily
std::cout << "Using the pointer for operations...\n";
// Do NOT delete ptr here!
// The unique_ptr will handle cleanup
std::cout << "\nExiting scope...\n";
// When buffer goes out of scope, the FileBuffer is automatically destroyed
return 0;
}
// Output:
// FileBuffer allocated (1024 bytes)
//
// --- Using get() ---
// Obtained raw pointer: 0x556a8620
// unique_ptr still owns the buffer
// Using the pointer for operations...
//
// Exiting scope...
// FileBuffer deallocated
Why get() Is Dangerous
The get() method returns a non-owning pointer. This creates a critical danger: you must never use the pointer after the unique_ptr destroys the object it was managing.
Danger: Use-After-Free
#include <memory>
#include <iostream>
class Resource {
public:
Resource() { std::cout << "Resource created\n"; }
~Resource() { std::cout << "Resource destroyed\n"; }
void doSomething() { std::cout << "Doing work...\n"; }
};
int main() {
Resource* dangling_ptr = nullptr;
{
std::unique_ptr<Resource> res = std::make_unique<Resource>();
// Get raw pointer
dangling_ptr = res.get();
std::cout << "Pointer obtained\n";
// res goes out of scope here - Resource is destroyed
}
std::cout << "Outside scope\n";
// DANGER: dangling_ptr now points to freed memory!
// dangling_ptr->doSomething(); // UNDEFINED BEHAVIOR - DO NOT DO THIS!
return 0;
}
// Output:
// Resource created
// Pointer obtained
// Resource destroyed
// Outside scope
The raw pointer from get() is only valid as long as the unique_ptr manages the resource. Once the unique_ptr goes out of scope or is reassigned, the pointer becomes dangling and must never be accessed.
Using get() with Legacy C APIs
One of the legitimate uses of get() is passing the pointer to legacy C-style functions that expect raw pointers but don’t take ownership:
#include <memory>
#include <cstdio>
// Legacy C function - doesn't own the pointer
void legacyPrintData(const char* data) {
std::printf("Data: %s\n", data);
}
int main() {
std::unique_ptr<char[]> buffer = std::make_unique<char[]>(100);
// Fill the buffer
std::strcpy(buffer.get(), "Hello, World!");
// Pass to legacy function using get()
legacyPrintData(buffer.get());
// buffer still owns the memory
// Cleanup happens automatically when buffer goes out of scope
return 0;
}
get() with Custom Deleters and Non-Pointer Resources
When using unique_ptr with custom deleters to manage resources other than heap memory (like file descriptors, database connections, etc.), get() returns a pointer to the underlying resource representation.
Example: File Descriptor
#include <memory>
#include <unistd.h>
#include <fcntl.h>
#include <iostream>
struct FileDescriptorDeleter {
void operator()(int* fd) const {
if (fd && *fd >= 0) {
std::cout << "Closing file descriptor " << *fd << "\n";
close(*fd);
delete fd;
}
}
};
int main() {
int raw_fd = open("data.txt", O_RDONLY);
std::unique_ptr<int, FileDescriptorDeleter> managed_fd(
new int(raw_fd),
FileDescriptorDeleter{}
);
std::cout << "Managing file descriptor\n";
// get() returns pointer to the integer file descriptor
int* fd_ptr = managed_fd.get();
// Read using the file descriptor
char buffer[100];
if (read(*fd_ptr, buffer, sizeof(buffer)) > 0) {
std::cout << "Successfully read from file\n";
}
// managed_fd still manages the resource and will close the fd
return 0;
}
// Output:
// Managing file descriptor
// Successfully read from file
// Closing file descriptor 3
Example: Database Connection
#include <memory>
#include <iostream>
typedef int DB_HANDLE;
DB_HANDLE openDB(const std::string& name) {
std::cout << "Connected to database: " << name << "\n";
return 1001; // Simulated handle
}
void closeDB(DB_HANDLE handle) {
std::cout << "Disconnected from database (handle: " << handle << ")\n";
}
struct DBDeleter {
void operator()(DB_HANDLE* handle) const {
if (handle) {
closeDB(*handle);
delete handle;
}
}
};
int main() {
std::unique_ptr<DB_HANDLE, DBDeleter> db(
new DB_HANDLE(openDB("production")),
DBDeleter{}
);
// get() returns pointer to the database handle
DB_HANDLE* handle = db.get();
std::cout << "Using database handle: " << *handle << "\n";
std::cout << "Executing queries...\n";
// db still manages the database connection
// When it goes out of scope, the connection is closed
return 0;
}
// Output:
// Connected to database: production
// Using database handle: 1001
// Executing queries...
// Disconnected from database (handle: 1001)
Best Practices for get()
- Use
get()only for temporary access within a limited scope where theunique_ptris still alive - Never store the result of
get()beyond the scope where theunique_ptris valid - Always check for
nullptrbefore dereferencing:if (ptr.get() != nullptr) { // Safe to use } - Prefer
get()for read-only operations on legacy C APIs - Never attempt to delete the pointer returned by
get()- it’s not your responsibility - Document that you’re using
get()- make it clear you’re just borrowing the pointer
Summary: What get() Does
| Aspect | Behavior |
|---|---|
| Returns | Raw pointer to managed object |
| Ownership Transfer | No - remains with unique_ptr |
unique_ptr State | Still owns and manages the resource |
| Responsibility | unique_ptr cleans up on destruction |
| Safe to Store | Only within scope where unique_ptr lives |
| Use Case | Temporary access, legacy C APIs |
The release() Method
What Does release() Do?
The release() method returns the underlying raw pointer AND transfers ownership out of the unique_ptr. After calling release(), the unique_ptr becomes empty and is no longer responsible for managing the resource. The pointer’s recipient now owns it and must handle cleanup themselves.
When you call release(), you’re essentially saying: “I’m handing over full responsibility for this pointer. You now own it, and you must clean it up.”
Key Characteristics
T* release() noexcept;
- Returns: A raw pointer (
T*) to the previously managed object - Returns
nullptrif theunique_ptrwas already empty - Ownership: Transferred to the caller
unique_ptrstate: Becomes empty/nullptr- Responsibility for cleanup: Caller must manage the returned pointer
- Deleter applied: No - the deleter is NOT called by
release()
Basic Example: Ownership Transfer
#include <memory>
#include <iostream>
class Data {
public:
Data(int value) : value_(value) {
std::cout << "Data(" << value_ << ") created\n";
}
~Data() {
std::cout << "Data(" << value_ << ") destroyed\n";
}
private:
int value_;
};
int main() {
std::unique_ptr<Data> owned = std::make_unique<Data>(42);
std::cout << "\n--- Using release() ---\n";
// release() transfers ownership OUT of the unique_ptr
Data* raw_ptr = owned.release();
std::cout << "release() called\n";
std::cout << "owned is now empty: " << (owned.get() == nullptr ? "true" : "false") << "\n";
// Now raw_ptr owns the Data object
// We are responsible for cleanup
std::cout << "raw_ptr now owns the object\n";
// Manual cleanup - WE must do this
std::cout << "Manually deleting...\n";
delete raw_ptr;
return 0;
}
// Output:
// Data(42) created
//
// --- Using release() ---
// release() called
// owned is now empty: true
// raw_ptr now owns the object
// Manually deleting...
// Data(42) destroyed
Critical Responsibility: Manual Cleanup
When you call release(), you are accepting full responsibility for cleaning up the resource. This is dangerous because:
- You must remember to delete it - forgetting causes memory leaks
- You must handle exceptions - if an exception occurs before deletion, you leak memory
- You cannot rely on automatic cleanup - the
unique_ptrwon’t help you
Danger: Memory Leak from Forgotten Deletion
#include <memory>
#include <iostream>
class Resource {
public:
Resource() { std::cout << "Resource allocated\n"; }
~Resource() { std::cout << "Resource deallocated\n"; }
};
int main() {
std::unique_ptr<Resource> res = std::make_unique<Resource>();
Resource* raw = res.release();
// DANGER: If we forget to delete here, we have a MEMORY LEAK
// The Resource is never cleaned up
// CORRECT: Must remember to delete
delete raw;
return 0;
}
// Output:
// Resource allocated
// Resource deallocated
Legitimate Use Cases for release()
Example 1: Transferring to Another unique_ptr
#include <memory>
#include <iostream>
class Item {
public:
Item(const std::string& name) : name_(name) {
std::cout << "Item '" << name_ << "' created\n";
}
~Item() {
std::cout << "Item '" << name_ << "' destroyed\n";
}
private:
std::string name_;
};
int main() {
std::unique_ptr<Item> ptr1 = std::make_unique<Item>("Sword");
// Transfer ownership from ptr1 to ptr2
std::unique_ptr<Item> ptr2(ptr1.release());
// ptr1 is now empty
std::cout << "ptr1 is empty: " << (ptr1.get() == nullptr ? "true" : "false") << "\n";
// ptr2 now owns the Item and will clean it up automatically
return 0;
}
// Output:
// Item 'Sword' created
// ptr1 is empty: true
// Item 'Sword' destroyed
Example 2: Returning from Legacy Interface
#include <memory>
#include <iostream>
class Buffer {
public:
Buffer() { std::cout << "Buffer created\n"; }
~Buffer() { std::cout << "Buffer destroyed\n"; }
};
// Legacy C-style function that creates and returns a pointer
// Caller is responsible for deletion
Buffer* createBuffer() {
auto buf = std::make_unique<Buffer>();
return buf.release(); // Hand off ownership to caller
}
int main() {
Buffer* buffer = createBuffer();
std::cout << "Received buffer from legacy function\n";
// Legacy code is responsible for cleanup
delete buffer;
return 0;
}
// Output:
// Buffer created
// Received buffer from legacy function
// Buffer destroyed
Example 3: Returning Raw Pointer with Custom Deleter
#include <memory>
#include <iostream>
typedef int DB_HANDLE;
DB_HANDLE openDB(const std::string& name) {
std::cout << "Opening database: " << name << "\n";
return 1001;
}
void closeDB(DB_HANDLE handle) {
std::cout << "Closing database (handle: " << handle << ")\n";
}
struct DBDeleter {
void operator()(DB_HANDLE* handle) const {
if (handle) {
closeDB(*handle);
delete handle;
}
}
};
int main() {
std::unique_ptr<DB_HANDLE, DBDeleter> db(
new DB_HANDLE(openDB("mydb")),
DBDeleter{}
);
std::cout << "Database managed by unique_ptr\n";
// release() returns the pointer, but does NOT call the deleter
DB_HANDLE* released = db.release();
std::cout << "Database released from unique_ptr\n";
// WE must manually do what the deleter would do
closeDB(*released);
delete released;
return 0;
}
// Output:
// Opening database: mydb
// Database managed by unique_ptr
// Database released from unique_ptr
// Closing database (handle: 1001)
Best Practices for release()
-
Prefer
std::move()when transferringunique_ptrownership - it’s safer and more explicit:// Better than using release() ptr2 = std::move(ptr1); -
Only use
release()for true legacy C APIs that require raw pointers -
Immediately wrap the pointer if you can’t delete it right away:
std::unique_ptr<T> new_owner(old_owner.release()); -
Have a clear cleanup plan before calling
release() -
Document ownership transfer with comments:
// Transferring ownership to caller return buffer.release(); -
Use try-catch when cleanup must happen in exception-prone code:
try { // code that might throw delete raw; } catch (...) { delete raw; // Cleanup in catch block too throw; }
Summary: What release() Does
| Aspect | Behavior |
|---|---|
| Returns | Raw pointer to previously managed object |
| Ownership Transfer | Yes - transferred to caller |
unique_ptr State | Becomes empty (nullptr) |
| Responsibility | Caller must clean up the pointer |
| Deleter Applied | No - deleter is NOT called |
| Safe to Store | Yes, but you must handle cleanup |
| Use Case | Legacy C APIs, explicit ownership transfer |
Quick Comparison: get() vs release()
| Aspect | get() | release() |
|---|---|---|
| What it returns | Raw pointer | Raw pointer |
| Ownership | Stays with unique_ptr | Transferred to caller |
unique_ptr after call | Still owns resource | Becomes empty |
| Who cleans up | The unique_ptr | You must |
| Deleter called | Yes, when unique_ptr destroyed | No |
| Can store for later | No - dangerous | Yes, but risky |
| Primary use | Temporary access to pointer | Legacy C APIs requiring ownership |
| Safety | Safe if used correctly | Dangerous - manual management |
| Exception safe | Yes | No - must handle yourself |
Decision Tree: Which Method to Use?
Do you want the unique_ptr to keep managing the resource?
├─ YES → Use get()
│ (Safe, automatic cleanup)
│
└─ NO → Use release()
├─ Can you immediately wrap in another unique_ptr?
│ YES → wrap it: std::unique_ptr<T>(old.release())
│
└─ NO → Use release() with legacy C API
(Be careful - manual cleanup required)
Key Takeaway
get(): “I need to borrow this pointer temporarily while you keep managing it”release(): “I’m taking full responsibility for this pointer and its cleanup”
Choose wisely based on your actual ownership needs!
std::shared_ptr: Shared Ownership of Resources
When working with unique_ptr<T>, you have exclusive ownership - only one pointer can own a resource at a time. But what if multiple parts of your program legitimately need to own the same resource? What if you have a design where several objects should collectively manage a resource’s lifetime?
This is where std::shared_ptr<T> comes in. Unlike unique_ptr<T>, which enforces exclusive ownership, shared_ptr<T> allows multiple owners to share responsibility for a single resource. The resource is automatically cleaned up only when the last owner is destroyed.
What is std::shared_ptr?
std::shared_ptr<T> is a smart pointer that manages a resource through shared ownership. Multiple shared_ptr instances can point to the same resource and collectively manage its lifetime through a reference counting mechanism.
std::shared_ptr<T> consists of two main components: a data pointer and a control block pointer.
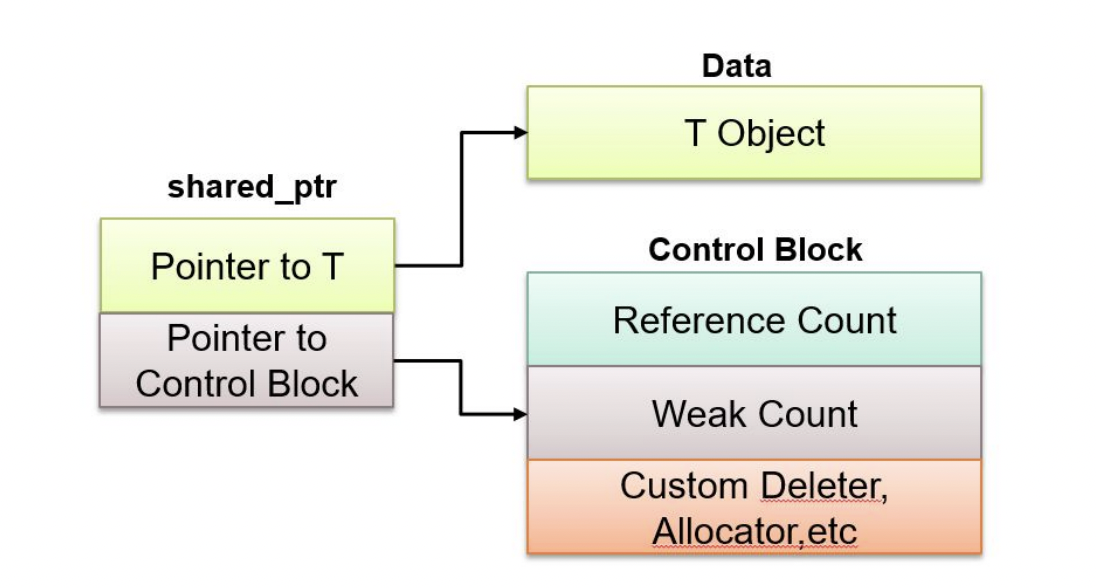
Key Characteristics
- Shared Ownership: Multiple
shared_ptrcan own the same resource - Reference Counting: Internally maintains a count of how many
shared_ptrinstances own the resource - Automatic Cleanup: Resource is deleted only when the last owner is destroyed
- Copyable: Unlike
unique_ptr, you can freely copy ashared_ptr - Movable: You can also move a
shared_ptrto transfer ownership - Reference Counted Overhead: Slightly slower than
unique_ptrdue to atomic reference counting
How Reference Counting Works
Each resource managed by shared_ptr has an associated reference count:
- When created: Count = 1 (one owner)
- When copied: Count increments (more owners)
- When destroyed: Count decrements
- When count reaches 0: Resource is automatically deleted
std::shared_ptr<int> ptr1 = std::make_shared<int>(42); // count = 1
std::shared_ptr<int> ptr2 = ptr1; // count = 2
std::shared_ptr<int> ptr3 = ptr1; // count = 3
// ptr1 goes out of scope // count = 2
// ptr3 goes out of scope // count = 1
// ptr2 goes out of scope // count = 0 -> Memory is deleted
Single shared_ptr
When you create: std::shared_ptr<int> ptr = std::make_shared<int>(42);
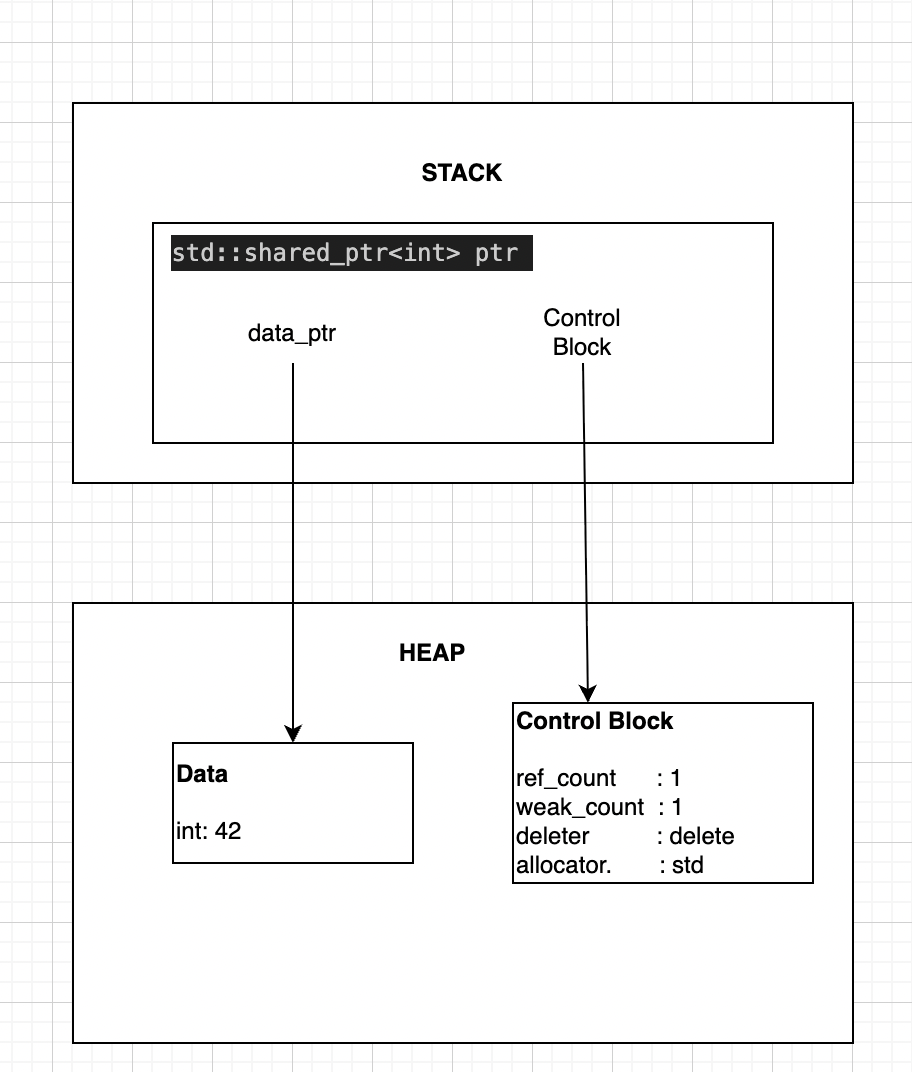
Three shared_ptr Sharing Same Resource
When you do:
std::shared_ptr<int> ptr1 = std::make_shared<int>(42);
std::shared_ptr<int> ptr2 = ptr1; // Copy
std::shared_ptr<int> ptr3 = ptr1; // Copy
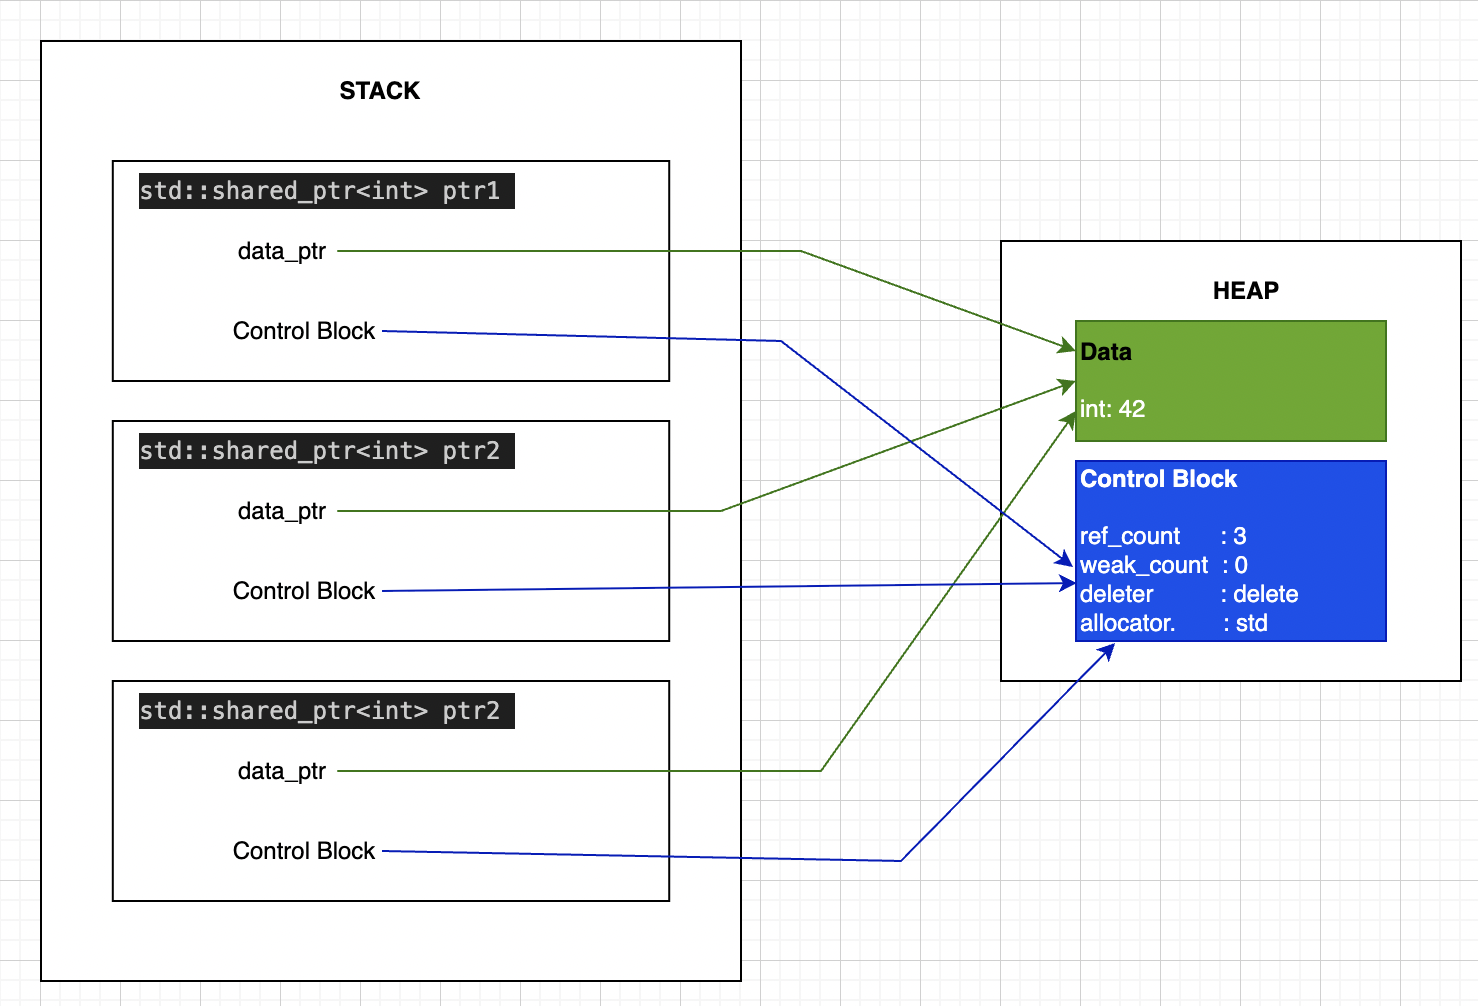
Key Point: All 3 shared_ptr point to the SAME Control Block!
- When ANY one is copied, ref_count increments
- When ANY one is destroyed, ref_count decrements
Creating a shared_ptr
Method 1: Using std::make_shared<T> (Recommended)
std::make_shared<T> is the preferred way to create a shared_ptr. It allocates the object and the reference count metadata in a single operation, making it more efficient. (See the detailed comparison with new in the “Advanced Topics” section at the end.)
#include <memory>
#include <iostream>
class Logger {
public:
Logger(const std::string& name) : name_(name) {
std::cout << "Logger '" << name_ << "' created\n";
}
~Logger() {
std::cout << "Logger '" << name_ << "' destroyed\n";
}
void log(const std::string& msg) const {
std::cout << "[" << name_ << "] " << msg << "\n";
}
private:
std::string name_;
};
int main() {
// Create using make_shared - THIS IS PREFERRED
std::shared_ptr<Logger> logger1 = std::make_shared<Logger>("Main");
std::cout << "Reference count: " << logger1.use_count() << "\n";
logger1->log("Application started");
return 0;
}
// Output:
// Logger 'Main' created
// Reference count: 1
// [Main] Application started
// Logger 'Main' destroyed
Method 2: Using new (When Custom Deleter Needed)
You can create a shared_ptr by passing a raw pointer, but this should only be used when you need a custom deleter or when make_shared cannot be used. See the “Advanced Topics: new vs make_shared” section at the end for a detailed comparison.
#include <memory>
#include <iostream>
class Resource {
public:
Resource() { std::cout << "Resource created\n"; }
~Resource() { std::cout << "Resource destroyed\n"; }
};
int main() {
// Create using new - works but less efficient than make_shared
std::shared_ptr<Resource> res(new Resource());
return 0;
}
// Output:
// Resource created
// Resource destroyed
Method 3: Converting from unique_ptr
You can move a unique_ptr into a shared_ptr, which transfers ownership:
#include <memory>
#include <iostream>
class Data {
public:
Data() { std::cout << "Data created\n"; }
~Data() { std::cout << "Data destroyed\n"; }
};
int main() {
std::unique_ptr<Data> uptr = std::make_unique<Data>();
// Move unique_ptr to shared_ptr
std::shared_ptr<Data> sptr = std::move(uptr);
// uptr is now empty, sptr owns the resource
return 0;
}
// Output:
// Data created
// Data destroyed
Custom Deleters with shared_ptr
Sometimes you need to manage resources that aren’t simple heap-allocated objects. For example, file handles, database connections, or C-style resources that need special cleanup. This is where custom deleters come in.
Why Custom Deleters?
Custom deleters are useful when:
- Managing non-memory resources (files, sockets, handles)
- Working with C APIs that have their own cleanup functions
- Implementing special cleanup logic
- Managing arrays allocated with
new[] - Releasing resources that don’t use
delete
Creating shared_ptr with Custom Deleter
Note: You cannot use make_shared with custom deleters. You must use the shared_ptr constructor with new.
std::shared_ptr<T> ptr(new T(), custom_deleter);
Consider this Example of Managing FILE with Custom Deleter
#include <memory>
#include <iostream>
#include <cstdio>
int main() {
// Custom deleter for FILE*
auto fileDeleter = [](FILE* file) {
if (file) {
std::cout << "Closing file\n";
std::fclose(file);
}
};
// Create shared_ptr with custom deleter
std::shared_ptr<FILE> file(
std::fopen("data.txt", "w"),
fileDeleter
);
if (file) {
std::fprintf(file.get(), "Hello, World!\n");
std::cout << "Data written to file\n";
}
return 0;
}
// Output:
// Data written to file
// Closing file
Managing Arrays with delete[]
When you allocate an array with new[], you need to delete it with delete[], not delete. A custom deleter ensures proper cleanup:
#include <memory>
#include <iostream>
int main() {
// Custom deleter for array
auto arrayDeleter = [](int* arr) {
std::cout << "Deleting array with delete[]\n";
delete[] arr;
};
// Create array with custom deleter
std::shared_ptr<int> arr(
new int[5]{10, 20, 30, 40, 50},
arrayDeleter
);
// Access array elements
for (int i = 0; i < 5; ++i) {
std::cout << "arr[" << i << "] = " << arr.get()[i] << "\n";
}
return 0;
}
// Output:
// arr[0] = 10
// arr[1] = 20
// arr[2] = 30
// arr[3] = 40
// arr[4] = 50
// Deleting array with delete[]
Better Alternative: Use shared_ptr<T[]> (C++17+) which automatically uses delete[]:
#include <memory>
#include <iostream>
int main() {
// C++17: shared_ptr for arrays - no custom deleter needed!
std::shared_ptr<int[]> arr(new int[5]{10, 20, 30, 40, 50});
// Can use array subscript operator
for (int i = 0; i < 5; ++i) {
std::cout << "arr[" << i << "] = " << arr[i] << "\n";
}
return 0;
}
No-Op Deleter (Stack Objects)
Sometimes you want to use shared_ptr with objects you don’t own (like stack-allocated objects). You need a no-op deleter:
#include <memory>
#include <iostream>
class Service {
public:
Service(int id) : id_(id) {
std::cout << "Service " << id_ << " created\n";
}
~Service() {
std::cout << "Service " << id_ << " destroyed\n";
}
void process() {
std::cout << "Processing with service " << id_ << "\n";
}
private:
int id_;
};
void useService(std::shared_ptr<Service> service) {
service->process();
}
int main() {
Service stackService(1);
// No-op deleter - don't delete stack object
auto noopDeleter = [](Service*) {
std::cout << "(No-op deleter called)\n";
};
std::shared_ptr<Service> servicePtr(&stackService, noopDeleter);
useService(servicePtr);
return 0;
}
// Output:
// Service 1 created
// Processing with service 1
// (No-op deleter called)
// Service 1 destroyed
Custom Deleter Syntax Summary
// Lambda deleter
std::shared_ptr<T> ptr(new T(), [](T* p) { delete p; });
// Function pointer deleter
void customDelete(T* p) { delete p; }
std::shared_ptr<T> ptr(new T(), customDelete);
// Functor deleter
struct Deleter {
void operator()(T* p) const { delete p; }
};
std::shared_ptr<T> ptr(new T(), Deleter{});
// std::function deleter
std::function<void(T*)> deleter = [](T* p) { delete p; };
std::shared_ptr<T> ptr(new T(), deleter);
Some situation where usage of Custom Deleters is needed
| Situation | Use Custom Deleter |
|---|---|
| Standard heap allocation | Use make_shared |
| Arrays | Use shared_ptr<T[]> (C++17+) or custom deleter |
| C API resources | Custom deleter with C cleanup function |
| File handles | Custom deleter with fclose |
| Special cleanup logic | Custom deleter |
| Stack objects | No-op deleter |
| Logging/debugging | Custom deleter with logging |
Important Notes About Custom Deleters
- Cannot use make_shared: Custom deleters require constructor syntax
- Two allocations: Unlike
make_shared, this creates two separate allocations - Type erasure: The deleter type is stored in the control block
- Shared among copies: All copies of the shared_ptr share the same deleter
- Called once: The deleter is only called when ref_count reaches 0
Copying and Sharing Ownership
The key feature of shared_ptr is that you can freely copy it, and each copy increases the reference count.
#include <memory>
#include <iostream>
class Service {
public:
Service(const std::string& name) : name_(name) {
std::cout << "Service '" << name_ << "' started\n";
}
~Service() {
std::cout << "Service '" << name_ << "' stopped\n";
}
void process() const {
std::cout << "Processing...\n";
}
private:
std::string name_;
};
int main() {
std::shared_ptr<Service> service = std::make_shared<Service>("DataProcessor");
std::cout << "Count after creation: " << service.use_count() << "\n";
// Copy the pointer - count increments
std::shared_ptr<Service> service_copy1 = service;
std::cout << "Count after 1st copy: " << service.use_count() << "\n";
std::shared_ptr<Service> service_copy2 = service;
std::cout << "Count after 2nd copy: " << service.use_count() << "\n";
service_copy1->process();
{
std::shared_ptr<Service> service_copy3 = service;
std::cout << "Count inside scope: " << service.use_count() << "\n";
}
// service_copy3 goes out of scope - count decrements to 3
std::cout << "Count after scope: " << service.use_count() << "\n";
return 0;
}
// Output:
// Service 'DataProcessor' started
// Count after creation: 1
// Count after 1st copy: 2
// Count after 2nd copy: 3
// Processing...
// Count inside scope: 4
// Count after scope: 3
// Service 'DataProcessor' stopped
Checking Ownership Information
use_count() - How Many Owners?
#include <memory>
#include <iostream>
int main() {
std::shared_ptr<int> ptr1 = std::make_shared<int>(100);
std::cout << "Owners: " << ptr1.use_count() << "\n"; // Prints: 1
std::shared_ptr<int> ptr2 = ptr1;
std::cout << "Owners: " << ptr1.use_count() << "\n"; // Prints: 2
std::shared_ptr<int> ptr3 = ptr1;
std::cout << "Owners: " << ptr1.use_count() << "\n"; // Prints: 3
return 0;
}
unique() - Am I the Only Owner?
#include <memory>
#include <iostream>
int main() {
std::shared_ptr<int> ptr1 = std::make_shared<int>(50);
if (ptr1.unique()) {
std::cout << "I'm the only owner\n"; // This prints
}
std::shared_ptr<int> ptr2 = ptr1;
if (!ptr1.unique()) {
std::cout << "Multiple owners exist\n"; // This prints
}
return 0;
}
bool Conversion - Is It Valid?
#include <memory>
#include <iostream>
int main() {
std::shared_ptr<int> ptr;
if (!ptr) {
std::cout << "ptr is empty\n"; // Prints
}
ptr = std::make_shared<int>(42);
if (ptr) {
std::cout << "ptr is valid\n"; // Prints
}
return 0;
}
The get() Method
What Does get() Do?
The get() method returns a raw pointer to the managed resource without transferring ownership. The shared_ptr retains ownership and will delete the resource when all owners are destroyed.
T* get() const noexcept;
Returns: Raw pointer to the managed object, or nullptr if empty
Use Case 1: Passing to Legacy C APIs
#include <memory>
#include <cstdio>
#include <cstring>
void legacyPrintString(const char* str) {
std::printf("String: %s\n", str);
}
int main() {
std::shared_ptr<char[]> buffer = std::make_shared<char[]>(100);
std::strcpy(buffer.get(), "Hello, World!");
legacyPrintString(buffer.get());
return 0;
}
// Output:
// String: Hello, World!
Use Case 2: Null Check Before Use
#include <memory>
#include <iostream>
class Service {
public:
void process() { std::cout << "Processing...\n"; }
};
int main() {
std::shared_ptr<Service> service;
if (service.get() != nullptr) {
service->process();
} else {
std::cout << "Service not initialized\n";
}
return 0;
}
// Output:
// Service not initialized
Dangers of get()
DANGER: Don’t store the pointer beyond the scope where shared_ptr is valid
#include <memory>
#include <iostream>
class Resource {
public:
~Resource() { std::cout << "Resource destroyed\n"; }
};
int main() {
Resource* dangling = nullptr;
{
std::shared_ptr<Resource> res = std::make_shared<Resource>();
dangling = res.get(); // OK here
} // res destroyed here
// DANGER: dangling points to freed memory!
// dangling->doWork(); // UNDEFINED BEHAVIOR
return 0;
}
The reset() Method
What Does reset() Do?
The reset() method releases the shared_ptr’s ownership of its current resource and optionally takes ownership of a new one. The reference count is decremented, and if it reaches zero, the resource is deleted.
void reset() noexcept;
void reset(T* ptr) noexcept;
Use Case 1: Explicitly Release a Resource
#include <memory>
#include <iostream>
class Connection {
public:
Connection(const std::string& host) : host_(host) {
std::cout << "Connecting to " << host_ << "\n";
}
~Connection() {
std::cout << "Disconnecting from " << host_ << "\n";
}
private:
std::string host_;
};
int main() {
std::shared_ptr<Connection> conn = std::make_shared<Connection>("localhost");
std::cout << "Connection active. Count: " << conn.use_count() << "\n";
conn.reset();
std::cout << "After reset. Count: " << conn.use_count() << "\n";
return 0;
}
// Output:
// Connecting to localhost
// Connection active. Count: 1
// Disconnecting from localhost
// After reset. Count: 0
Use Case 2: Replace One Resource with Another
#include <memory>
#include <iostream>
class File {
public:
File(const std::string& name) : name_(name) {
std::cout << "Opening: " << name_ << "\n";
}
~File() {
std::cout << "Closing: " << name_ << "\n";
}
private:
std::string name_;
};
int main() {
std::shared_ptr<File> file = std::make_shared<File>("data.txt");
std::cout << "Switching files...\n";
file.reset(new File("log.txt"));
return 0;
}
// Output:
// Opening: data.txt
// Switching files...
// Closing: data.txt
// Opening: log.txt
// Closing: log.txt
Use Case 3: Shared Ownership - reset() Only Affects One Owner
#include <memory>
#include <iostream>
class Data {
public:
Data(int val) : val_(val) {
std::cout << "Data(" << val_ << ") created\n";
}
~Data() {
std::cout << "Data(" << val_ << ") destroyed\n";
}
private:
int val_;
};
int main() {
std::shared_ptr<Data> ptr1 = std::make_shared<Data>(42);
std::shared_ptr<Data> ptr2 = ptr1; // Share ownership
std::cout << "Count before reset: " << ptr1.use_count() << "\n";
ptr2.reset(); // ptr2 releases its ownership
std::cout << "Count after reset: " << ptr1.use_count() << "\n";
std::cout << "ptr1 still valid: " << (ptr1.get() != nullptr) << "\n";
return 0;
}
// Output:
// Data(42) created
// Count before reset: 2
// Count after reset: 1
// ptr1 still valid: 1
// Data(42) destroyed
Comparison: get() vs reset()
| Aspect | get() | reset() |
|---|---|---|
| Purpose | Borrow raw pointer | Release ownership |
| Ownership Change | No | Yes - decrements ref count |
| Pointer Valid After | If shared_ptr alive | After reset call |
| Side Effects | None | May delete resource |
| Use Case | Legacy APIs, temporary access | Cleanup, replacement |
std::weak_ptr: Non-Owning Observer
Introduction: The Circular Reference Problem
Before diving into weak_ptr, let’s understand the problem it solves. Consider this scenario:
class Node {
public:
std::shared_ptr<Node> next;
std::shared_ptr<Node> prev;
};
int main() {
auto node1 = std::make_shared<Node>();
auto node2 = std::make_shared<Node>();
node1->next = node2; // node1 → node2
node2->prev = node1; // node2 → node1
// MEMORY LEAK!
// node1 keeps node2 alive
// node2 keeps node1 alive
// Neither can be deleted!
return 0;
}
The Problem:
node1has ashared_ptrtonode2→ ref_count(node2) = 1node2has ashared_ptrtonode1→ ref_count(node1) = 1- When
node1goes out of scope, it can’t be deleted (ref_count = 1) - When
node2goes out of scope, it can’t be deleted (ref_count = 1) - Result: Both nodes leak memory!
This is called a circular reference or reference cycle.
What is std::weak_ptr?
std::weak_ptr<T> is a smart pointer that holds a non-owning reference to an object managed by shared_ptr. It does not affect the reference count and cannot directly access the object.
Key Characteristics
- Non-owning: Does not contribute to reference counting
- No Direct Access: Cannot use
*or->operators directly - Must be converted: Use
lock()to get ashared_ptrfor access - Can detect expiration: Use
expired()to check if object still exists - Breaks circular references: Solves the circular dependency problem
- Lightweight: Only stores a pointer to the control block
How weak_ptr Works
#include <memory>
#include <iostream>
int main() {
std::weak_ptr<int> weak;
{
std::shared_ptr<int> shared = std::make_shared<int>(42);
std::cout << "shared ref_count: " << shared.use_count() << "\n"; // 1
weak = shared; // weak_ptr created
std::cout << "shared ref_count: " << shared.use_count() << "\n"; // Still 1!
// weak_ptr does NOT increment ref_count
}
// shared destroyed, object deleted
std::cout << "Object expired: " << weak.expired() << "\n"; // true
return 0;
}
// Output:
// shared ref_count: 1
// shared ref_count: 1
// Object expired: 1
Key Insight: weak_ptr observes but doesn’t own!
The Control Block with weak_ptr
Remember the control block structure? It has TWO counters:
Control Block:
┌──────────────────┐
│ shared_count: 2 │ ◄── Number of shared_ptr owners
│ weak_count: 3 │ ◄── Number of weak_ptr observers
│ deleter │
│ allocator │
└──────────────────┘
Important Rules:
- Object is deleted when
shared_countreaches 0 - Control block is deleted when
weak_countreaches 0 weak_ptrincrementsweak_count, notshared_count
Creating a weak_ptr
You cannot create a weak_ptr directly. It must be created from a shared_ptr:
#include <memory>
int main() {
// Cannot create weak_ptr from nothing
// std::weak_ptr<int> weak; // This creates an empty weak_ptr
// Create from shared_ptr
std::shared_ptr<int> shared = std::make_shared<int>(100);
std::weak_ptr<int> weak = shared;
// Copy from another weak_ptr
std::weak_ptr<int> weak2 = weak;
return 0;
}
Using weak_ptr: The lock() Method
To access the object through a weak_ptr, you must convert it to a shared_ptr using lock():
std::shared_ptr<T> lock() const noexcept;
Returns:
- A
shared_ptrto the object if it still exists - An empty
shared_ptrif the object has been deleted
Why lock()?
- Thread-safe: Atomically checks existence and creates
shared_ptr - Safe access: Ensures object stays alive during use
- Prevents race conditions: Object can’t be deleted while you’re using it
#include <memory>
#include <iostream>
int main() {
std::weak_ptr<int> weak;
{
std::shared_ptr<int> shared = std::make_shared<int>(42);
weak = shared;
// Convert weak_ptr to shared_ptr
if (auto locked = weak.lock()) {
std::cout << "Value: " << *locked << "\n"; // Safe to use
std::cout << "Ref count: " << locked.use_count() << "\n"; // 2
}
std::cout << "shared ref count: " << shared.use_count() << "\n"; // Back to 1
}
// Object deleted here
// Try to access deleted object
if (auto locked = weak.lock()) {
std::cout << "Still exists\n";
} else {
std::cout << "Object has been deleted\n"; // This prints
}
return 0;
}
// Output:
// Value: 42
// Ref count: 2
// shared ref count: 1
// Object has been deleted
Checking if Object Exists: expired()
bool expired() const noexcept;
Returns:
trueif the object has been deleted (shared_count = 0)falseif the object still exists
#include <memory>
#include <iostream>
int main() {
std::weak_ptr<int> weak;
{
std::shared_ptr<int> shared = std::make_shared<int>(99);
weak = shared;
std::cout << "expired: " << weak.expired() << "\n"; // false
}
std::cout << "expired: " << weak.expired() << "\n"; // true
return 0;
}
// Output:
// expired: 0
// expired: 1
Important: expired() can have a race condition in multithreaded code. Prefer using lock() instead:
// Race condition possible
if (!weak.expired()) {
auto shared = weak.lock(); // Object might be deleted here!
}
// Thread-safe
if (auto shared = weak.lock()) {
// Object guaranteed to exist here
}
Getting the Reference Count: use_count()
long use_count() const noexcept;
Returns: The number of shared_ptr instances owning the object (0 if expired)
#include <memory>
#include <iostream>
int main() {
auto shared1 = std::make_shared<int>(42);
std::weak_ptr<int> weak = shared1;
std::cout << "Count: " << weak.use_count() << "\n"; // 1
auto shared2 = shared1;
std::cout << "Count: " << weak.use_count() << "\n"; // 2
shared1.reset();
std::cout << "Count: " << weak.use_count() << "\n"; // 1
shared2.reset();
std::cout << "Count: " << weak.use_count() << "\n"; // 0
return 0;
}
// Output:
// Count: 1
// Count: 2
// Count: 1
// Count: 0
Solving Circular References with weak_ptr
Let’s fix the circular reference problem from the introduction:
#include <memory>
#include <iostream>
#include <string>
class Node {
public:
std::string data;
std::shared_ptr<Node> next; // Owning reference
std::weak_ptr<Node> prev; // Non-owning reference
Node(const std::string& d) : data(d) {
std::cout << "Node '" << data << "' created\n";
}
~Node() {
std::cout << "Node '" << data << "' destroyed\n";
}
};
int main() {
auto node1 = std::make_shared<Node>("First");
auto node2 = std::make_shared<Node>("Second");
node1->next = node2; // node1 owns node2
node2->prev = node1; // node2 observes node1 (non-owning)
std::cout << "node1 ref_count: " << node1.use_count() << "\n"; // 1
std::cout << "node2 ref_count: " << node2.use_count() << "\n"; // 2
// Access prev through weak_ptr
if (auto prevNode = node2->prev.lock()) {
std::cout << "node2's prev: " << prevNode->data << "\n";
}
return 0;
}
// Output:
// Node 'First' created
// Node 'Second' created
// node1 ref_count: 1
// node2 ref_count: 2
// node2's prev: First
// Node 'Second' destroyed - No leak!
// Node 'First' destroyed - No leak!
Why it works:
node1 → node2(shared_ptr) → node2’s ref_count = 2node2 → node1(weak_ptr) → node1’s ref_count stays = 1- When
node1goes out of scope → ref_count = 0 → deleted - When
node2goes out of scope → ref_count = 1, then 0 → deleted - No circular reference, proper cleanup!
weak_ptr Member Functions Summary
| Function | Purpose | Returns |
|---|---|---|
lock() | Get shared_ptr if object exists | shared_ptr<T> (or empty) |
expired() | Check if object deleted | bool |
use_count() | Get number of shared_ptr owners | long |
reset() | Release the weak reference | void |
swap(other) | Swap with another weak_ptr | void |
Common Patterns and Best Practices
Pattern 1: Always Use lock() for Access
// Correct
std::weak_ptr<Data> weak = shared;
if (auto locked = weak.lock()) {
locked->process(); // Safe
}
// Wrong - race condition
if (!weak.expired()) {
auto locked = weak.lock(); // Object might be deleted here!
locked->process();
}
Pattern 2: Check Both Expiration and Validity
std::weak_ptr<Resource> weak = shared;
// When you need to distinguish between "expired" and "null"
if (auto locked = weak.lock()) {
if (locked) { // Additional null check
locked->use();
}
} else {
// Object has been deleted or weak_ptr was never initialized
}
Pattern 3: Cleanup Expired weak_ptr from Containers
std::vector<std::weak_ptr<Observer>> observers;
// Remove expired observers periodically
void cleanupExpired() {
observers.erase(
std::remove_if(observers.begin(), observers.end(),
[](const std::weak_ptr<Observer>& weak) {
return weak.expired();
}),
observers.end()
);
}
Pattern 4: Convert weak_ptr to shared_ptr Temporarily
class Service {
std::weak_ptr<Resource> resource_;
public:
void process() {
// Lock only for the duration of use
if (auto res = resource_.lock()) {
res->doWork();
} // shared_ptr destroyed, ref_count decremented
}
};
Performance Considerations
Memory Overhead
std::weak_ptr<int> weak; // 16 bytes (two pointers)
Components:
- Pointer to control block: 8 bytes
- Pointer to object (for lock()): 8 bytes
Control block impact:
- Increments
weak_count(notshared_count) - Control block stays alive until
weak_count = 0 - Object can be deleted while control block persists
lock() Performance
auto shared = weak.lock(); // Atomic operation
Cost:
- Atomic load/increment of
shared_count - Check if count > 0
- ~10-20 CPU cycles
Recommendation: Don’t call lock() repeatedly in tight loops:
// Inefficient
for (int i = 0; i < 1000; ++i) {
if (auto obj = weak.lock()) {
obj->process(i);
}
}
// Better
if (auto obj = weak.lock()) {
for (int i = 0; i < 1000; ++i) {
obj->process(i);
}
}
Common Pitfalls
Pitfall 1: Forgetting to lock()
// Won't compile
std::weak_ptr<int> weak = shared;
*weak = 42; // ERROR: weak_ptr has no operator*
// Correct
if (auto locked = weak.lock()) {
*locked = 42;
}
Pitfall 2: Dangling weak_ptr in Multithreaded Code
// Thread-unsafe
std::weak_ptr<Data> weak = shared;
// Thread 1
if (!weak.expired()) {
// Thread 2 might delete object here!
auto obj = weak.lock(); // Might fail
}
// Thread-safe
if (auto obj = weak.lock()) {
// Object guaranteed alive here
}
Pitfall 3: Creating weak_ptr from this
class Widget {
public:
void registerSelf() {
// Won't compile
// std::weak_ptr<Widget> weak(this);
// Use enable_shared_from_this
}
};
Use std::enable_shared_from_this instead (covered in parent documentation).
When to Use weak_ptr
| Situation | Use |
|---|---|
| Breaking circular references | weak_ptr |
| Observer pattern | weak_ptr |
| Cache implementations | weak_ptr |
| Parent-child relationships | weak_ptr (child → parent) |
| Back-references in graphs | weak_ptr |
| Callbacks without ownership | weak_ptr |
| Temporary non-owning access | Raw pointer or reference |
| Ownership required | shared_ptr |
Comparison: shared_ptr vs weak_ptr
| Aspect | shared_ptr | weak_ptr |
|---|---|---|
| Ownership | Owns the object | Observes the object |
| Reference Count | Increments shared_count | Increments weak_count |
| Direct Access | Yes (*, ->) | No (must lock()) |
| Keeps Object Alive | Yes | No |
| Can Create From | make_shared, new, unique_ptr | Only from shared_ptr |
| Use Case | Ownership | Observation, breaking cycles |
weak_ptr Summary
Core Concepts:
- Non-owning observer of
shared_ptr-managed objects - Does not affect object lifetime (doesn’t increment
shared_count) - Must use
lock()to access the object safely - Automatically detects when object is deleted
Key Methods:
lock(): Get temporaryshared_ptrfor safe accessexpired(): Check if object has been deleteduse_count(): Get number ofshared_ptrowners
Primary Use Cases:
- Breaking circular references
- Observer pattern implementations
- Cache with automatic cleanup
- Parent-child relationships (child observes parent)
- Graph structures with cycles
Best Practices:
- Always use
lock()for access, neverexpired()+lock() - Clean up expired
weak_ptrfrom containers periodically - Use for back-references to prevent cycles
- Avoid storing raw pointers from
lock()
weak_ptr is essential for managing complex object relationships while avoiding memory leaks from circular references!
The Problem: new vs make_shared
Memory Layout with new
Code: std::shared_ptr<int> ptr(new int(42));
Step 1: new int(42) allocates data
┌──────────────────────┐
│ HEAP MEMORY │
│ ┌────────────────┐ │
│ │ int: 42 │ │ ◄── Allocation 1 (for data)
│ │ │ │
│ └────────────────┘ │
│ │
│ (fragmented space) │
│ │
│ ┌────────────────┐ │
│ │ Control Block │ │ ◄── Allocation 2 (for control block)
│ │ ref_count: 1 │ │
│ │ weak_count: 0 │ │
│ │ deleter │ │
│ │ allocator │ │
│ └────────────────┘ │
└──────────────────────┘
Problems:
-
Non-contiguous Memory: Data and Control Block are in separate heap locations
- CPU cache misses increase
- Performance is degraded
-
Exception Safety Risk: If shared_ptr constructor fails after new succeeds
- Memory for data is allocated but not managed
- Result: MEMORY LEAK
Example of Memory Leak (C++14 and earlier):
Note: This issue was fixed in C++17 where function argument evaluation order was made deterministic. However, understanding this problem helps explain why make_shared is still preferred.
void processData(std::shared_ptr<Data> d1, std::shared_ptr<Data> d2);
processData(
std::shared_ptr<Data>(new Data()), // Allocation 1
std::shared_ptr<Data>(new Data()) // Allocation 2
);
In C++14 and earlier, the compiler could execute in this order:
new Data()◄── Successnew Data()◄── Exception thrown here!- Allocate control block ◄── Never reached
- Allocate control block ◄── Never reached
Result: First Data() allocated but not wrapped in shared_ptr → MEMORY LEAK
In C++17+: Arguments are evaluated in a more predictable order, preventing this specific leak. However, make_shared is still superior for performance and remains the recommended approach.
Memory Layout with make_shared
Code: std::shared_ptr<int> ptr = std::make_shared<int>(42);
Single Allocation: Both data and control block together
┌─────────────────────────────────────────┐
│ HEAP MEMORY │
│ ┌───────────────────────────────────┐ │
│ │ Single Contiguous Block │ │ ◄── Allocation 1 (both together)
│ │ │ │
│ │ ┌──────────────────┐ │ │
│ │ │ Control Block │ │ │
│ │ │ ref_count: 1 │ │ │
│ │ │ weak_count: 0 │ │ │
│ │ │ deleter │ │ │
│ │ │ allocator │ │ │
│ │ └──────────────────┘ │ │
│ │ │ │
│ │ ┌──────────────────┐ │ │
│ │ │ int: 42 │ │ │
│ │ │ │ │ │
│ │ └──────────────────┘ │ │
│ │ │ │
│ └───────────────────────────────────┘ │
│ │
│ CONTIGUOUS MEMORY │
│ ATOMIC OPERATION │
│ EXCEPTION SAFE │
└─────────────────────────────────────────┘
Why make_shared is Better:
ADVANTAGE 1: Single Allocation
- Data and control block allocated together
- Contiguous memory layout
- Better CPU cache locality
- Fewer system calls
ADVANTAGE 2: Exception Safety
- Either entire operation succeeds OR fails
- No intermediate states where memory can leak
- Atomic from shared_ptr perspective
ADVANTAGE 3: Performance
- Only ONE system allocation
- Better memory layout for CPU cache
- Less memory overhead
Example of Safe Exception Handling:
void processData(std::shared_ptr<Data> d1, std::shared_ptr<Data> d2);
processData(
std::make_shared<Data>(), // If fails, nothing allocated
std::make_shared<Data>() // If fails, first is cleaned up
);
Each make_shared is atomic:
- Success: Data AND control block allocated + wrapped
- Failure: Exception thrown, nothing allocated, no leak
Comparison Table: new vs make_shared
| Characteristic | new | make_shared |
|---|---|---|
| Memory Allocations | 2 allocations (fragmented) | 1 allocation (contiguous) |
| Cache Efficiency | Poor (separate memory) | Good (same cache line) |
| Exception Safety | Risky (memory leak) | Safe (atomic) |
| Memory Leak Risk | High (if ctor fails) | None (atomic operation) |
| Performance (delete) | Same | Same |
| Custom Deleter | Supported (via 2nd param) | Not supported (use new for custom) |
| Memory with weak_ptr | Object freed when shared count = 0 | Object memory held until weak count = 0 |
| Recommended? | When custom deleter or weak_ptr used heavily | YES, for most cases |
Real-World Impact
Scenario: Creating 1000 shared_ptr objects
Using new:
- 2000 memory allocations
- Fragmented heap
- Many cache misses
- If one fails → potential leaks
Using make_shared:
- 1000 memory allocations
- Contiguous for each object
- Fewer cache misses
- Atomic per object → no leaks
When to Use new Instead of make_shared
While make_shared is generally preferred, there are specific scenarios where using new is actually better:
Scenario 1: Custom Deleters Required
make_shared does not support custom deleters. If you need special cleanup logic, you must use new:
// Cannot use make_shared for custom deleter
std::shared_ptr<FILE> file(
fopen("data.txt", "r"),
[](FILE* f) { if (f) fclose(f); }
);
Scenario 2: Heavy Use of weak_ptr (Memory Concern)
This is a subtle but important consideration related to how make_shared allocates memory.
The Problem: Control Block Lifetime with make_shared
When you use make_shared, the object and control block are allocated together in a single memory block. While this is normally efficient, it creates an issue with weak_ptr:
make_shared Memory Layout:
┌─────────────────────────────────────┐
│ Single Contiguous Allocation │
│ │
│ ┌────────────────┐ │
│ │ Control Block │ │
│ │ shared_count │ │
│ │ weak_count │ ◄── weak_ptr keeps this alive
│ └────────────────┘ │
│ │
│ ┌────────────────┐ │
│ │ Large Object │ │
│ │ (e.g., 1 MB) │ ◄── Cannot free this separately!
│ └────────────────┘ │
└─────────────────────────────────────┘
Why This Matters:
-
weak_ptr keeps control block alive: A
weak_ptrmust check if the managed object is still valid by looking at the shared_ptr count in the control block -
Control block must stay alive: Even when all
shared_ptrinstances are destroyed (shared_count = 0), if anyweak_ptrexists (weak_count > 0), the control block must remain -
Object memory cannot be freed separately: Since
make_sharedallocates object and control block together, the entire memory block (including the large object) stays allocated until both counts reach zero
Example of the Problem:
#include <memory>
#include <iostream>
#include <vector>
class LargeObject {
std::vector<int> data_;
public:
LargeObject() : data_(1'000'000, 42) { // 4 MB of data
std::cout << "LargeObject created (4 MB)\n";
}
~LargeObject() {
std::cout << "LargeObject destroyed\n";
}
};
int main() {
std::weak_ptr<LargeObject> weak;
{
// Using make_shared
std::shared_ptr<LargeObject> shared = std::make_shared<LargeObject>();
weak = shared;
std::cout << "shared_count: " << weak.use_count() << "\n";
}
// shared is destroyed, but...
std::cout << "After shared destroyed\n";
std::cout << "shared_count: " << weak.use_count() << "\n";
std::cout << "weak_count: " << weak.expired() ? 0 : 1 << "\n";
// PROBLEM: The 4 MB LargeObject memory is STILL ALLOCATED
// because weak_ptr keeps the control block (and entire allocation) alive!
std::cout << "4 MB still allocated until weak goes out of scope!\n";
return 0;
}
// Output:
// LargeObject created (4 MB)
// shared_count: 1
// LargeObject destroyed ◄── Destructor runs
// After shared destroyed
// shared_count: 0
// weak_count: 1
// 4 MB still allocated until weak goes out of scope! ◄── Memory not freed!
The Solution: Use new for Separate Allocation
When using new, object and control block are allocated separately:
new + shared_ptr Memory Layout:
┌────────────────┐
│ Control Block │ ◄── weak_ptr keeps only this alive
│ shared_count │ (small, ~24-48 bytes)
│ weak_count │
└────────────────┘
(separate allocation)
┌────────────────┐
│ Large Object │ ◄── Can be freed when shared_count = 0
│ (e.g., 1 MB) │ even if weak_count > 0
└────────────────┘
Example with Separate Allocation:
#include <memory>
#include <iostream>
#include <vector>
class LargeObject {
std::vector<int> data_;
public:
LargeObject() : data_(1'000'000, 42) { // 4 MB of data
std::cout << "LargeObject created (4 MB)\n";
}
~LargeObject() {
std::cout << "LargeObject destroyed\n";
}
};
int main() {
std::weak_ptr<LargeObject> weak;
{
// Using new instead of make_shared
std::shared_ptr<LargeObject> shared(new LargeObject());
weak = shared;
std::cout << "shared_count: " << weak.use_count() << "\n";
}
// BETTER: The 4 MB LargeObject memory is freed immediately
// Only the small control block (~48 bytes) remains
std::cout << "After shared destroyed\n";
std::cout << "shared_count: " << weak.use_count() << "\n";
std::cout << "Only control block (~48 bytes) still allocated\n";
return 0;
}
// Output:
// LargeObject created (4 MB)
// shared_count: 1
// LargeObject destroyed ◄── Destructor runs
// After shared destroyed
// shared_count: 0
// Only control block (~48 bytes) still allocated ◄── Object memory freed!
When to Prefer new Over make_shared:
Use new when:
- The object is large (significant memory footprint)
- You expect
weak_ptrinstances to outlive allshared_ptrinstances - You want the object’s memory freed immediately when the last
shared_ptris destroyed
Memory Timeline Comparison:
// With make_shared:
auto shared = std::make_shared<LargeObject>(); // Allocate: control block + object (single block)
weak_ptr<LargeObject> weak = shared;
shared.reset(); // Object destroyed but memory NOT freed (weak_ptr keeps it)
weak.reset(); // NOW entire memory freed
// With new:
auto shared = std::shared_ptr<LargeObject>(new LargeObject()); // Allocate: control block, object (separate)
weak_ptr<LargeObject> weak = shared;
shared.reset(); // Object destroyed AND object memory freed immediately
weak.reset(); // Control block freed (only ~48 bytes)
Scenario: Large object (1 MB) with weak_ptr that outlives shared_ptr
make_shared approach:
All shared_ptr destroyed → Object destructor runs
└─> BUT: 1 MB + control block still allocated
All weak_ptr destroyed → NOW 1 MB freed
└─> Total time holding 1 MB: Entire weak_ptr lifetime
new approach:
All shared_ptr destroyed → Object destructor runs AND 1 MB freed
└─> Only ~48 byte control block remains
All weak_ptr destroyed → Control block freed
└─> Total time holding 1 MB: Only shared_ptr lifetime
Trade-off Summary:
| Aspect | make_shared | new |
|---|---|---|
| Allocations | 1 (faster) | 2 (slower) |
| Cache locality | Better | Worse |
| Exception safety | Better | Worse (pre-C++17) |
| Object memory freed | When weak_count = 0 | When shared_count = 0 |
| Best for | Normal usage, short-lived weak_ptr | Large objects, long-lived weak_ptr |
Recommendation:
- Default to
make_sharedfor most cases - Use
newwhen:- You need custom deleters
- Object is large (> 1 KB) AND
- weak_ptr instances may significantly outlive shared_ptr instances
Best Practices for shared_ptr
1. Always Use std::make_shared<T>
Preferred:
auto ptr = std::make_shared<Resource>();
Avoid (unless custom deleter needed):
std::shared_ptr<Resource> ptr(new Resource());
Why?
- Single allocation (better performance)
- Exception safe
- Better cache locality
2. Pass by const Reference When Not Taking Ownership
Efficient:
void process(const std::shared_ptr<Data>& data) {
// Use data without modifying shared_ptr
data->doWork();
}
Inefficient:
void process(std::shared_ptr<Data> data) {
// Unnecessary copy, increments/decrements ref count
data->doWork();
}
3. Pass by Value Only When Taking Shared Ownership
class Container {
public:
void store(std::shared_ptr<Data> data) {
// Function takes shared ownership
storage_.push_back(data);
}
private:
std::vector<std::shared_ptr<Data>> storage_;
};
4. Avoid Storing Raw Pointers from get()
Dangerous:
Data* rawPtr = sharedPtr.get();
// Later... sharedPtr might be destroyed
rawPtr->doWork(); // Potential use-after-free
Safe:
std::shared_ptr<Data> copy = sharedPtr;
// Now copy keeps the resource alive
copy->doWork(); // Safe
5. Don’t Mix Ownership Models
Consistent - Good:
std::shared_ptr<Database> db = std::make_shared<Database>();
std::shared_ptr<Session> session = std::make_shared<Session>(db);
Inconsistent - Confusing:
Database* db = new Database(); // Raw pointer
std::shared_ptr<Session> session = std::make_shared<Session>(db);
// Who owns db? Unclear!
6. Be Careful with this Pointer
Problem:
class Widget {
public:
void registerCallback() {
// Creates separate shared_ptr from raw this
callback_system.setCallback(std::shared_ptr<Widget>(this));
// This will double-delete!
}
};
Solution: Use enable_shared_from_this
class Widget : public std::enable_shared_from_this<Widget> {
public:
void registerCallback() {
// Safely creates shared_ptr from this
callback_system.setCallback(shared_from_this());
}
};
// Usage:
auto widget = std::make_shared<Widget>();
widget->registerCallback(); // Safe!
7. Use Custom Deleters for Non-Memory Resources
// For C resources
auto fileDeleter = [](FILE* f) {
if (f) fclose(f);
};
std::shared_ptr<FILE> file(fopen("data.txt", "r"), fileDeleter);
// For C++ arrays (or use shared_ptr<T[]> in C++17+)
auto arrayDeleter = [](int* arr) {
delete[] arr;
};
std::shared_ptr<int> arr(new int[100], arrayDeleter);
Common Pitfalls and Solutions
Pitfall 1: Creating Multiple Control Blocks
Problem:
Widget* raw = new Widget();
std::shared_ptr<Widget> ptr1(raw);
std::shared_ptr<Widget> ptr2(raw); // Second control block!
// Result: Double delete when both go out of scope
Solution:
std::shared_ptr<Widget> ptr1 = std::make_shared<Widget>();
std::shared_ptr<Widget> ptr2 = ptr1; // Shares control block
Pitfall 2: Circular References (Memory Leak)
Problem:
class Node {
std::shared_ptr<Node> next; // Circular reference possible
std::shared_ptr<Node> prev;
};
Solution: Use weak_ptr for back-references
class Node {
std::shared_ptr<Node> next; // Forward reference
std::weak_ptr<Node> prev; // Back reference
};
Pitfall 3: Slicing with Polymorphic Types
Problem:
class Base { virtual void f() {} };
class Derived : public Base { void f() override {} };
std::shared_ptr<Base> ptr = std::make_shared<Derived>();
Base copy = *ptr; // Slicing! Only Base part copied
Solution:
std::shared_ptr<Base> ptr = std::make_shared<Derived>();
std::shared_ptr<Base> copy = ptr; // Shared ownership, no slicing
Pitfall 4: Thread Safety Misunderstanding
shared_ptr is:
- Thread-safe for reference counting
- Thread-safe for copying the pointer itself
shared_ptr is NOT:
- Thread-safe for modifying the pointed-to object
- Thread-safe for resetting without synchronization
std::shared_ptr<Data> ptr = std::make_shared<Data>();
// Thread 1
ptr->modify(); // Not thread-safe without external synchronization
// Thread 2
ptr->modify(); // Not thread-safe without external synchronization
// Solution: Protect the Data, not the shared_ptr
std::mutex mtx;
{
std::lock_guard<std::mutex> lock(mtx);
ptr->modify(); // Now thread-safe
}
Performance Considerations
Memory Overhead
Each shared_ptr has:
- Pointer to object: 8 bytes (64-bit)
- Pointer to control block: 8 bytes (64-bit)
- Total per shared_ptr: 16 bytes
Each control block has:
- Reference count: 4-8 bytes
- Weak count: 4-8 bytes
- Deleter: Variable size
- Allocator: Variable size
- Total control block: ~24-48 bytes minimum
Example:
std::unique_ptr<int> u; // 8 bytes
std::shared_ptr<int> s; // 16 bytes
// Plus ~24-48 byte control block for shared_ptr
Runtime Overhead
Reference counting operations:
- Atomic increment on copy (~10-20 CPU cycles)
- Atomic decrement on destroy (~10-20 CPU cycles)
- Comparison to zero on destroy (~1 cycle)
Compared to unique_ptr:
unique_ptr: Zero overhead (same as raw pointer)shared_ptr: Small overhead due to atomic operations
When performance matters:
- Use
unique_ptrif single ownership suffices - Use
shared_ptronly when truly needed - Consider pass-by-reference to avoid copying
Summary: shared_ptr<T>
Core Concepts
- Shared ownership: Multiple
shared_ptrinstances can own the same resource - Reference counting: Resource is deleted when the last owner is destroyed
- Copyable and movable: Unlike
unique_ptr, copying is the normal operation - Control block: Stores reference count and deletion information
Best Practices
DO:
- Use
std::make_shared<T>for creation (when possible) - Pass by
const &when not taking ownership - Use custom deleters for non-memory resources
- Use
enable_shared_from_thisforthispointer sharing
DON’T:
- Create multiple control blocks from same raw pointer
- Store raw pointers from
get()long-term - Use when
unique_ptrwould suffice - Forget about circular reference issues
When to Use
- Multiple parts of code need to own the resource
- Ownership is unclear or dynamic
- Resource needs to outlive any single owner
- Implementing shared state patterns
- Working with legacy code requiring shared ownership
Trade-offs
- Advantages: Safe shared ownership, automatic cleanup, flexible
- Disadvantages: Higher memory overhead, atomic operations cost, potential circular references
When to Use shared_ptr vs unique_ptr vs weak_ptr
| Situation | Use |
|---|---|
| Single clear owner | unique_ptr |
| Multiple owners needed | shared_ptr |
| Transferring ownership | unique_ptr (move) |
| Shared state across objects | shared_ptr |
| Observer pattern (non-owning) | weak_ptr |
| Breaking circular references | weak_ptr |
| Return from factory | unique_ptr (can convert to shared_ptr) |
| Temporary non-owning access | Raw pointer from get() |
| Performance critical, single owner | unique_ptr |
std::shared_ptr is a powerful tool for managing shared ownership of resources. Use it when you genuinely need multiple owners, but prefer unique_ptr when single ownership is sufficient.
From Specific to General: A Guide to Predicates, Functors, and Lambda Functions in C++
Starting Point: A Specific Find Algorithm
Let’s begin with a simple find algorithm that searches for a specific value:
template <typename It, typename T>
It find(It first, It last, const T& value) {
for (auto it = first; it != last; ++it) {
if (*it == value) // This condition is too specific!
return it;
}
return last;
}
This works well for finding exact values. The line of code that does this is:
if (*it == value)
What if i want to find the 1st element that is a prime number or based on some different criteria ?
The condition *it == value is too restrictive.
Instead of hardcoding the comparison, what if we could pass the condition itself as a parameter?
Let’s replace the specific condition with a general predicate function:
template <typename It, typename Pred>
It find_if(It first, It last, Pred pred) {
for (auto it = first; it != last; ++it) {
if (pred(*it)) // Call the predicate on each element
return it;
}
return last;
}
What changed?
Pred: The type of our predicate (the compiler figures this out via template deduction)pred: Our predicate parameter - a function we can call on each elementpred(*it): We call the predicate to test each element
Lets rename it to find_if to distinguish it from the original find function.
Finding Prime Numbers predicate function.
bool isPrime(size_t n) {
if (n < 2) return false;
for (size_t i = 2; i <= std::sqrt(n); i++)
if (n % i == 0) return false;
return true;
}
std::vector<int> ints = {1, 0, 6};
auto it = find_if(ints.begin(), ints.end(), isPrime);
assert(it == ints.end()); // No primes found!
So the observation here is by passing functions as parameters allows us to generalize algorithms with user-defined behavior !
The Problem: What About Runtime Values?
Suppose we want to find a number less than N, where N is determined at runtime:
int n;
std::cin >> n;
find_if(begin, end, /* lessThan... what? */);
The Naive Approach, We might try creating multiple functions:
bool lessThan5(int x) { return x < 5; }
bool lessThan6(int x) { return x < 6; }
bool lessThan7(int x) { return x < 7; }
find_if(begin, end, lessThan5);
find_if(begin, end, lessThan6);
find_if(begin, end, lessThan7);
Problem: We can’t create a function for every possible value of N at compile time!
Can We Add Another Parameter?
bool isLessThan(int elem, int n) {
return elem < n;
}
Problem: This won’t work with find_if! Look at our algorithm:
template <typename It, typename Pred>
It find_if(It first, It last, Pred pred) {
for (auto it = first; it != last; ++it) {
if (pred(*it)) // We only pass ONE parameter to pred!
return it;
}
return last;
}
The predicate pred is called with only one parameter (*it), so we can’t pass the threshold value N here.
The Challenge:
We need to give our function extra state (the value N) without adding another parameter to the predicate call. So how can we add a state to the predicate. The answer is a feature called Functors (Function Objects)
A functor is an object that can be called like a function. We create this by overloading the operator() in a class.
What Makes Something Callable?
In find_if, we write pred(*it). For this to work, pred needs to be callable.
Three things in C++ are callable:
- Regular functions
- Functors (objects with
operator()overloaded) - Lambda functions (we’ll get to these!)
Creating a Functor
class LessThanN {
private:
int threshold;
public:
LessThanN(int n) : threshold(n) {}
bool operator()(int x) const {
return x < threshold;
}
};
How it works:
LessThanNis a class that stores the threshold value as member data- The constructor allows us to set the threshold at runtime
operator()makes objects of this class callable like a function- The
constmeans this doesn’t modify the object’s state
Using the Functor
int n;
std::cin >> n;
LessThanN lessThanN(n); // Create a functor object with threshold n
find_if(begin, end, lessThanN); // Pass the functor to the algorithm
Or more concisely:
int n;
std::cin >> n;
find_if(begin, end, LessThanN(n)); // Create and pass in one line
Why This Works
When find_if calls pred(*it), it’s actually calling lessThanN.operator()(*it):
// Inside find_if:
if (pred(*it)) // This becomes: lessThanN.operator()(*it)
The functor has state (the threshold member variable) that persists across multiple calls!
Advantages of Functors
- State preservation: Can store data between calls
- Type safety: Each functor is its own type
- Optimization: Compiler can inline the
operator()calls - Flexibility: Can have multiple member functions and complex state
Disadvantages of Functors
- Verbose: Requires writing an entire class
- Boilerplate: Lots of code for simple predicates
- Readability: The logic is separated from where it’s used
So in C++11 a wonderful feature has been introdcued named Lamda functions.
Lambda Functions - The Modern Way
Lambda functions give us the benefits of functors with much cleaner syntax:
int n;
std::cin >> n;
auto lessThanN = [n](int x) {
return x < n;
};
find_if(begin, end, lessThanN);
Lambda Syntax Breakdown
[capture](parameters) { body }
- Capture clause
[n]: What variables from the outer scope to “remember” (like member variables in a functor or state) - Parameters
(int x): What gets passed when the lambda is called (like the parameters tooperator()) - Body
{ return x < n; }: The code to execute (like the body ofoperator())
Lambdas are syntactic sugar for functors. They give us the power of function objects with the convenience of inline code!
Capture Modes
The parameters from the outerscope can be captured in varius modes. Below are the modes.
int x = 10, y = 20;
[x] // Capture x by value (Variables captured by value are const by default (read-only))
[&x] // Capture x by reference (Variables captured by reference can be modified)
[x, &y] // Capture x by value, y by reference
[=] // Capture all used variables by value
[&] // Capture all used variables by reference
[=, &y] // Capture all by value except y (by reference)
[&, x] // Capture all by reference except x (by value)
Example:
#include <iostream>
using namespace std;
int main() {
int x = 10, y = 20;
// [x] - Capture x by value (Read only)
auto lambda1 = [x]() {
cout << "x = " << x << endl;
// x = 15; // ERROR: cannot modify x (captured by value is const)
};
lambda1();
// [&x] - Capture x by reference (Can modify)
auto lambda2 = [&x]() {
cout << "Original x = " << x << endl;
x = 15; // OK: can modify x
cout << "Modified x = " << x << endl;
};
lambda2();
cout << "x after lambda2: " << x << endl << endl;
// [x, &y] - Capture x by value, y by reference
x = 10; // Reset x
auto lambda3 = [x, &y]() {
cout << "x = " << x << ", y = " << y << endl;
// x = 100; // ERROR: cannot modify x (captured by value)
y = 25; // OK: can modify y (captured by reference)
};
lambda3();
cout << "y after lambda3: " << y << endl << endl;
// [=] - Capture all used variables by value (Read only)
auto lambda4 = [=]() {
cout << "x = " << x << ", y = " << y << endl;
// x = 50; // ERROR: cannot modify x (captured by value)
// y = 50; // ERROR: cannot modify y (captured by value)
};
lambda4();
// [&] - Capture all used variables by reference (Can modify)
auto lambda5 = [&]() {
cout << "Before: x = " << x << ", y = " << y << endl;
x = 30; // OK: can modify x
y = 40; // OK: can modify y
cout << "After: x = " << x << ", y = " << y << endl;
};
lambda5();
cout << "After lambda5: x = " << x << ", y = " << y << endl << endl;
// [=, &y] - Capture all by value except y (by reference)
auto lambda6 = [=, &y]() {
cout << "x = " << x << ", y = " << y << endl;
// x = 100; // ERROR: cannot modify x (captured by value)
y = 50; // OK: can modify y (captured by reference)
};
lambda6();
cout << "y after lambda6: " << y << endl << endl;
// [&, x] - Capture all by reference except x (by value)
auto lambda7 = [&, x]() {
cout << "x = " << x << ", y = " << y << endl;
// x = 200; // ERROR: cannot modify x (captured by value)
y = 60; // OK: can modify y (captured by reference)
};
lambda7();
cout << "After lambda7: x = " << x << ", y = " << y << endl;
return 0;
}
Output:
x = 10
Original x = 10
Modified x = 15
x after lambda2: 15
x = 10, y = 20
y after lambda3: 25
x = 10, y = 25
Before: x = 10, y = 25
After: x = 30, y = 40
After lambda5: x = 30, y = 40
x = 30, y = 40
y after lambda6: 50
x = 30, y = 50
After lambda7: x = 30, y = 60
Lambda Capture with mutable
By default, variables captured by value in a lambda are read-only (const).
If you need to modify the captured variable inside the lambda, use the mutable keyword.
However, mutable only allows you to modify a local read-write copy of the variable
inside the lambda. Any changes made are local to the lambda and do not affect the
original variable outside.
If you want to modify the original variable, you must capture it by reference
using &.
Example:
int x = 10;
// Without mutable - Read only
auto lambda1 = [x]() {
// x = 20; // ERROR: cannot modify
};
// With mutable - Local read-write copy
auto lambda2 = [x]() mutable {
x = 20; // OK: modifies LOCAL copy only
};
lambda2();
cout << x; // Output: 10 (original unchanged)
// By reference - Modifies original
auto lambda3 = [&x]() {
x = 30; // Modifies original x
};
lambda3();
cout << x; // Output: 30 (original changed)
Note: mutable gives you a read-write copy, but changes stay inside the lambda.
Use & (reference) if you need to modify the actual variable.
What Lambdas Really Are ?
Here is the fun part. Behind the scenes, the compiler turns a lambda into a functor!
When you write:
auto lessThanN = [n](int x) { return x < n; };
auto output = lessThanN(20);
The compiler generates something like the below:
class __lambda_6_22 // Compiler-generated name
{
public:
inline /*constexpr */ bool operator()(int x) const
{
return x < n;
}
private:
int n;
public:
__lambda_6_22(int & _n)
: n{_n}
{}
};
__lambda_6_22 lessThanN = __lambda_6_22{n};
bool output = lessThanN.operator()(20);
Passing Lambdas to Functions
One of the key advatage of lamdas is you can pass them to functions as paramters.
This feature is very useful for usecase like callback systems, Eventing etc.
Below are various ways you can accept lamdas as function parameters:
Method 1: Using std::function (Most Flexible)
std::function is a general-purpose wrapper that can hold any callable object (lambda, function pointer, functor).
#include <iostream>
#include <functional>
using namespace std;
// Function accepting lambda via std::function
void executeOperation(int a, int b, function<int(int, int)> operation) {
int result = operation(a, b);
cout << "Result: " << result << endl;
}
int main() {
// Pass different lambdas
executeOperation(10, 5, [](int x, int y) { return x + y; }); // 15
executeOperation(10, 5, [](int x, int y) { return x - y; }); // 5
executeOperation(10, 5, [](int x, int y) { return x * y; }); // 50
return 0;
}
Pros: Flexible, can store lambdas with different captures
Cons: Slight performance overhead (type erasure, heap allocation)
Method 2: Using Template (Best Performance)
Templates allow the compiler to optimize the lambda call directly.
#include <iostream>
using namespace std;
// Template function - accepts any callable
template<typename Func>
void executeOperation(int a, int b, Func operation) {
int result = operation(a, b);
cout << "Result: " << result << endl;
}
int main() {
executeOperation(10, 5, [](int x, int y) { return x + y; });
executeOperation(10, 5, [](int x, int y) { return x * y; });
// Works with captures too
int multiplier = 2;
executeOperation(10, 5, [multiplier](int x, int y) {
return (x + y) * multiplier;
});
return 0;
}
Pros: Zero overhead, compiler optimizations, works with any callable
Cons: Template code in header files, longer compile times
Method 3: Using Function Pointer (C-Style, Limited)
Only works with lambdas that don’t capture anything (stateless).
#include <iostream>
using namespace std;
// Function pointer for int(int, int) signature
void executeOperation(int a, int b, int (*operation)(int, int)) {
int result = operation(a, b);
cout << "Result: " << result << endl;
}
int main() {
// Works - no capture
executeOperation(10, 5, [](int x, int y) { return x + y; });
// ERROR - cannot convert lambda with capture to function pointer
int multiplier = 2;
// executeOperation(10, 5, [multiplier](int x, int y) { return x * y; });
return 0;
}
Pros: Lightweight, C-compatible
Cons: Only works with non-capturing lambdas
Method 4: Using auto (C++14+, Generic)
Perfect for generic code where you don’t care about the exact type.
#include <iostream>
using namespace std;
// Generic function using auto
auto executeOperation(int a, int b, auto operation) {
return operation(a, b);
}
int main() {
auto result1 = executeOperation(10, 5, [](int x, int y) { return x + y; });
auto result2 = executeOperation(10, 5, [](int x, int y) { return x * y; });
cout << "Result1: " << result1 << endl; // 15
cout << "Result2: " << result2 << endl; // 50
return 0;
}
Note: auto parameters require C++20, but templates work in C++11+.
Lambda Evolution: C++11 to C++20
Lambdas have evolved significantly since their introduction in C++11. Let’s explore the incremental improvements across C++ standards.
C++11: Lambda Introduction
C++11 introduced lambdas with basic functionality:
// Basic lambda syntax
auto add = [](int a, int b) { return a + b; };
// Capture by value and reference
int x = 10;
auto byValue = [x]() { return x; }; // Captures copy of x
auto byRef = [&x]() { return x; }; // Captures reference to x
// Capture all
auto captureAll = [=]() { return x; }; // Capture all by value
auto captureAllRef = [&]() { return x; }; // Capture all by reference
// Mutable lambdas (can modify captured values)
auto counter = [count = 0]() mutable {
return ++count;
};
// Explicit return type
auto divide = [](int a, int b) -> double {
return static_cast<double>(a) / b;
};
C++11 Limitations:
- Cannot capture
*thisby value - No
constexprsupport - Cannot use
autoas types for parameters - Return type deduction limited to simple cases
C++14: Generalized Lambda Captures & Generic Lambdas
C++14 added two major features:
1. Generalized Lambda Captures (Init Captures)
You can now initialize captured variables with arbitrary expressions:
// Move-only types in captures
auto ptr = std::make_unique<int>(42);
auto lambda = [ptr = std::move(ptr)]() {
return *ptr;
};
// Initialize new variables in capture
auto lambda2 = [value = 5 * 2]() {
return value; // value is 10
};
// Complex initializations
std::string str = "Hello";
auto lambda3 = [s = std::move(str)]() {
return s; // str is moved into lambda
};
// Multiple initializations
auto lambda4 = [x = 1, y = 2, z = x + y]() {
return z; // z is 3
};
2. Generic Lambdas (Auto Parameters)
Lambdas can now use auto for parameters, making them templates:
// Generic lambda - works with any type
auto print = [](auto x) {
std::cout << x << std::endl;
};
print(42); // int
print(3.14); // double
print("Hello"); // const char*
// Multiple auto parameters
auto add = [](auto a, auto b) {
return a + b;
};
add(1, 2); // int + int
add(1.5, 2.5); // double + double
add(std::string("Hello"), std::string(" World")); // string + string
// Mixing auto and concrete types
auto mixed = [](int x, auto y) {
return x + y;
};
What the compiler generates:
// Generic lambda
auto lambda = [](auto x) { return x * 2; };
// Becomes approximately:
struct __Lambda {
template<typename T>
auto operator()(T x) const {
return x * 2;
}
};
C++17: Constexpr Lambdas & *this Capture
1. Constexpr Lambdas
Lambdas are implicitly constexpr if they meet the requirements:
// Implicitly constexpr
auto squared = [](int x) { return x * x; };
constexpr int result = squared(5); // Evaluated at compile time
// Explicitly constexpr
constexpr auto cube = [](int x) constexpr { return x * x * x; };
static_assert(cube(3) == 27);
// Using in constexpr contexts
template<int N>
struct Array {
static constexpr auto size = [](){ return N * 2; }();
};
2. Capture *this by Value
Before C++17, when you capture this in a lambda inside a class member function, you only capture the pointer to the object, not the object itself.
This creates a dangling pointer problem if the object is destroyed before the lambda is executed.
C++17 allows capturing the entire object instead of just the pointer:
class Widget {
int value = 42;
public:
auto getLambda_Cpp11() {
// Captures 'this' pointer - dangerous if object is destroyed
return [this]() { return value; };
}
auto getLambda_Cpp17() {
// Captures copy of entire object - safe!
return [*this]() { return value; };
}
auto getLambda_Mutable() {
// Captured copy can be modified
return [*this]() mutable { return ++value; };
}
};
Widget w;
auto lambda1 = w.getLambda_Cpp11(); // Captures pointer to w
auto lambda2 = w.getLambda_Cpp17(); // Captures copy of w
Why this matters:
auto getLambda() {
Widget w;
return [w]() { return w.getValue(); }; // OK: w is copied
// return [&w]() { return w.getValue(); }; // DANGER: w destroyed!
// return [this]() { return value; }; // DANGER: this pointer dangling!
return [*this]() { return value; }; // OK: object copied
}
C++20: Template Lambdas & More
C++20 brought several powerful additions:
1. Template Parameter Syntax for Lambdas
Lambdas can now explicitly specify template parameters:
// Explicit template parameters
auto lambda = []<typename T>(T x) {
std::cout << "Type: " << typeid(T).name() << std::endl;
return x;
};
// Multiple template parameters
auto pair = []<typename T, typename U>(T first, U second) {
return std::pair{first, second};
};
// Template parameter with constraints
auto process = []<typename T>(std::vector<T>& vec) {
// Can use T explicitly in the body
T sum = T{};
for (const auto& elem : vec) {
sum += elem;
}
return sum;
};
std::vector<int> nums = {1, 2, 3, 4, 5};
auto result = process(nums);
Why this is useful:
// Before C++20: Can't get the type explicitly
auto oldWay = [](auto vec) {
// How do we get the element type?
using T = ???; // No easy way!
};
// C++20: Direct access to template parameter
auto newWay = []<typename T>(std::vector<T> vec) {
using ElementType = T; // Clear and explicit!
T defaultValue{};
// ...
};
2. Lambdas in Unevaluated Contexts
C++20 allows lambdas in contexts where they’re not executed:
// Lambda in decltype
auto lambda = [](int x) { return x * 2; };
using ReturnType = decltype(lambda(0)); // ReturnType is int
// Lambda in template parameter
template<auto Lambda>
struct Processor {
static constexpr auto value = Lambda(10);
};
constexpr auto times2 = [](int x) { return x * 2; };
Processor<times2> p; // p.value is 20
// Lambda for SFINAE/type traits
template<typename T>
concept Addable = requires(T a, T b) {
{ [](T x, T y) { return x + y; }(a, b) };
};
3. Pack Expansion in Lambda Init-Capture
C++20 allows capturing parameter packs:
// Variadic template with pack capture
template<typename... Args>
auto captureAll(Args... args) {
return [...args = std::move(args)] {
// Each arg is captured individually
return (args + ...); // Fold expression
};
}
auto lambda = captureAll(1, 2, 3, 4);
std::cout << lambda() << std::endl; // Output: 10
// More complex example
template<typename... Funcs>
auto compose(Funcs... funcs) {
return [... f = std::move(funcs)](auto x) {
// Apply all functions in sequence
return (f(x), ...); // Fold expression with comma operator
};
}
4. Default Constructible and Assignable Lambdas
C++20 lambdas without captures are default constructible and assignable:
// Stateless lambda
auto lambda = [](int x) { return x * 2; };
// Can default construct
decltype(lambda) another; // OK in C++20!
another = lambda; // OK in C++20!
// Useful for containers
std::vector<decltype(lambda)> lambdas(10); // Vector of 10 lambdas
// Compare lambdas
auto l1 = [](int x) { return x; };
auto l2 = l1;
// l1 == l2; // Still not allowed - use std::function or comparison operators
5. Lambdas with Concepts (C++20)
Constrain lambda parameters using concepts:
#include <concepts>
// Lambda with concept constraint
auto process = []<std::integral T>(T value) {
return value * 2;
};
process(5); // OK: int is integral
// process(5.0); // Error: double is not integral
// Multiple constraints
auto compare = []<typename T>(T a, T b)
requires std::equality_comparable<T> {
return a == b;
};
// Constraint on return type
auto compute = []<typename T>(T x) -> std::integral auto {
return static_cast<int>(x * 2);
};
Let’s see how the same problem evolves across standards:
Problem: Create a customizable filter
C++11:
// Need to specify types explicitly
auto createFilter(int threshold) {
return [threshold](int value) {
return value > threshold;
};
}
std::vector<int> nums = {1, 5, 10, 15};
auto filter = createFilter(7);
// Can only use with int
C++14:
// Generic lambda - works with any comparable type
auto createFilter(auto threshold) {
return [threshold](auto value) {
return value > threshold;
};
}
std::vector<int> ints = {1, 5, 10, 15};
std::vector<double> doubles = {1.5, 5.5, 10.5};
auto filter = createFilter(7);
// Works with both int and double!
C++17:
class FilterFactory {
int defaultThreshold = 10;
public:
auto createFilter() {
// Safe capture of object by value
return [*this](auto value) {
return value > defaultThreshold;
};
}
};
FilterFactory factory;
auto filter = factory.createFilter();
// filter still works even if factory is destroyed
C++20:
// Full type control with concepts
auto createFilter = []<std::totally_ordered T>(T threshold) {
return [threshold]<std::totally_ordered U>(U value)
requires std::convertible_to<U, T> {
return static_cast<T>(value) > threshold;
};
};
auto intFilter = createFilter(10);
// intFilter(15); // OK
// intFilter("test"); // Compile error: not convertible to int
Complete Feature Comparison Table
| Feature | C++11 | C++14 | C++17 | C++20 |
|---|---|---|---|---|
| Basic lambdas | ✅ | ✅ | ✅ | ✅ |
| Capture by value/reference | ✅ | ✅ | ✅ | ✅ |
| Mutable lambdas | ✅ | ✅ | ✅ | ✅ |
| Init captures | ❌ | ✅ | ✅ | ✅ |
| Generic lambdas (auto) | ❌ | ✅ | ✅ | ✅ |
| constexpr lambdas | ❌ | ❌ | ✅ | ✅ |
| Capture *this by value | ❌ | ❌ | ✅ | ✅ |
| Template parameter syntax | ❌ | ❌ | ❌ | ✅ |
| Pack expansion in captures | ❌ | ❌ | ❌ | ✅ |
| Unevaluated contexts | ❌ | ❌ | ❌ | ✅ |
| Default constructible | ❌ | ❌ | ❌ | ✅ |
| Concepts constraints | ❌ | ❌ | ❌ | ✅ |
Conclusion
The progression from specific algorithms to general ones with predicates represents a fundamental principle in C++ programming: abstraction without performance loss.
- Predicates allow us to separate the “what to find” from the “how to search”
- Functors provide a way to package state with behavior
- Lambdas offer modern, concise syntax that the compiler transforms into functors
The evolution of lambdas from C++11 to C++20 shows the language’s commitment to:
- Expressiveness: More ways to capture and initialize state
- Safety: Better lifetime management with
*thiscaptures - Performance: Compile-time evaluation with
constexpr - Flexibility: Template parameters and concepts for better type control
Understanding std::optional<T> and Type Safety in C++
What is Type Safety?
Type Safety: The extent to which a language prevents typing errors and guarantees predictable program behavior.
Python vs C++
# Python - Runtime error
def div_3(x):
return x / 3
div_3("hello") # CRASH during runtime
// C++ - Compile-time error
int div_3(int x) {
return x / 3;
}
div_3("hello"); // Won't compile!
C++ catches type errors at compile time, preventing the program from running with invalid code.
Let’s rephrase with funtion context: Type Safety is the extent to which a function signature guarantees the behavior of a function.
Lets understand the problem with an example
The best way to learn a new feature is to first understand what existing problem that feature will solve. Imagine you’re building a parser that reads settings from a configuration file. Some settings are required, but many are optional. How do you represent values that might not be present?
Using “Magic Values” or “default” values
class AppConfig {
private:
int port;
int maxConnections;
std::string theme;
std::string logLevel;
public:
AppConfig() {
// Initialize with "magic values" to signal "not set"
port = -1;
maxConnections = -1;
theme = "";
logLevel = "UNSET";
}
void loadFromFile(const std::string& filename) {
// Read config file...
// Only some values might be in the file
// If port is in file: port = parsedPort;
// If maxConnections is in file: maxConnections = parsedValue;
// If theme is in file: theme = parsedTheme;
// etc.
}
int getPort() {
return port; // Returns -1 if not set
}
int getMaxConnections() {
return maxConnections; // Returns -1 if not set
}
std::string getTheme() {
return theme; // Returns "" if not set
}
std::string getLogLevel() {
return logLevel; // Returns "UNSET" if not set
}
};
Think of a function signature as a promise or contract:
int getPort(); // Promise: "I will return an integer port number"
But what if there’s no port configured? The function cannot keep its promise! This breaks type safety because the signature lies about what the function actually does.
int getPort() {
if (portNotConfigured) {
return -1; // Breaking the contract! -1 isn't a real port
}
return configuredPort;
}
The signature says “I return an int (a port number)” but sometimes it returns -1, which isn’t actually a valid port. The signature is lying about the function’s behavior.
Why This Is Problematic
AppConfig config;
config.loadFromFile("app.conf");
// Problem 1: Magic values are confusing
int port = config.getPort();
if (port == -1) { // Wait, is -1 the magic value? Or was it 0?
port = 8080; // Use default
}
server.listen(port);
// Problem 2: What if -1 becomes a valid value?
int maxConn = config.getMaxConnections();
// Is -1 really "not set" or is it "unlimited connections"?
// Problem 3: Empty string vs "not set" vs actual empty value
std::string theme = config.getTheme();
if (theme == "") { // Did user want no theme, or was it not set?
theme = "default";
}
// Problem 4: Different magic values for different types
std::string logLevel = config.getLogLevel();
if (logLevel == "UNSET") { // Why "UNSET" and not ""?
logLevel = "INFO";
}
// What if a valid log level is actually called "UNSET"?
Below are some of the problems with this approch:
- Magic values are arbitrary and inconsistent (
-1,"","UNSET") - Magic values might conflict with valid values
- No way to distinguish “not set” from an actual value that equals the magic value
- Code becomes filled with magic value checks
- New developers must memorize what each magic value means
- Easy to forget to check for magic values, leading to bugs
Is there any better way ?
Introducing std::optional (C++17)
std::optional<T> is a template class introduced in C++17 that either contains a value of type T or explicitly contains nothing (represented as std::nullopt).
Think of it like a vending machine slot: when you select a snack, the machine either dispenses your item, or it doesn’t (maybe it’s out of stock). Instead of the machine pretending to give you something by dispensing an empty wrapper, it honestly tells you “nothing available.” You know to check the outcome before reaching in to grab your snack - did I actually get something, or did the machine give me nothing? The type system ensures you always check which case you’re in.
Basic Syntax
#include <optional>
// Creating optionals
std::optional<int> opt1; // Empty (no value)
std::optional<int> opt2 = 42; // Contains 42
std::optional<int> opt3 = std::nullopt; // Explicitly empty
std::optional<int> opt4 = {}; // Also empty
// Checking if it has a value
if (opt2.has_value()) {
std::cout << "Has value!\n";
}
// Shorter way: treat it like a boolean
if (opt2) {
std::cout << "Has value!\n";
}
// Getting the value
int x = opt2.value(); // Returns 42, or throws if empty
int y = opt2.value_or(100); // Returns 42, or 100 if empty
int z = *opt2; // Returns 42 (undefined if empty!)
// Setting values
opt1 = 50; // Now contains 50
opt1 = std::nullopt; // Now empty again
opt1.reset(); // Also makes it empty
Key Distinction
nullptr: Used for pointers (memory addresses)nullopt: Used for optionals (absence of a value)
Lets improve the config parser with std::optional
class AppConfig {
private:
std::optional<int> port;
std::optional<int> maxConnections;
std::optional<std::string> theme;
std::optional<std::string> logLevel;
public:
AppConfig() {
// Everything starts as nullopt (empty)
// No need for magic values!
}
void loadFromFile(const std::string& filename) {
// Read config file...
// Only set values that are actually present
if (fileContainsPort) {
port = parsedPort; // Set only if present
}
if (fileContainsMaxConnections) {
maxConnections = parsedMaxConn;
}
if (fileContainsTheme) {
theme = parsedTheme;
}
if (fileContainsLogLevel) {
logLevel = parsedLogLevel;
}
}
// Return optional - let caller decide what to do
std::optional<int> getPort() const {
return port;
}
std::optional<int> getMaxConnections() const {
return maxConnections;
}
std::optional<std::string> getTheme() const {
return theme;
}
std::optional<std::string> getLogLevel() const {
return logLevel;
}
// Or provide methods with built-in defaults
int getPortOrDefault() const {
return port.value_or(8080);
}
int getMaxConnectionsOrDefault() const {
return maxConnections.value_or(100);
}
std::string getThemeOrDefault() const {
return theme.value_or("default");
}
std::string getLogLevelOrDefault() const {
return logLevel.value_or("INFO");
}
};
Using the Fixed Configuration
AppConfig config;
config.loadFromFile("app.conf");
// Approach 1: Use defaults with value_or()
int port = config.getPortOrDefault(); // Clear and safe!
server.listen(port);
int maxConn = config.getMaxConnectionsOrDefault();
connectionPool.setMaxSize(maxConn);
// Approach 2: Check explicitly if you need different behavior
auto theme = config.getTheme();
if (theme) {
applyTheme(*theme); // User specified a theme
} else {
askUserForTheme(); // No theme in config, ask user
}
// Approach 3: Direct value_or at call site
std::string logLevel = config.getLogLevel().value_or("INFO");
logger.setLevel(logLevel);
// The type system helps you!
// You CANNOT accidentally use an optional without checking:
// int port = config.getPort(); // ERROR! Can't assign optional<int> to int
// You must explicitly handle both cases
Why This Is Better
// Before: Confusing and error-prone
int port = config.getPort(); // Returns -1 if not set
if (port == -1) { // Easy to forget this check!
port = 8080;
}
// After: Clear and safe
int port = config.getPort().value_or(8080);
// Or if you need different logic:
auto portOpt = config.getPort();
if (portOpt) {
int port = *portOpt;
// Use configured port
} else {
// No port configured, handle specially
}
Here is the complete code of the example:
#include <optional>
#include <string>
#include <iostream>
#include <fstream>
#include <map>
class AppConfig {
private:
std::optional<int> port;
std::optional<int> maxConnections;
std::optional<std::string> databaseUrl;
std::optional<std::string> theme;
std::optional<bool> enableLogging;
public:
void loadFromFile(const std::string& filename) {
std::ifstream file(filename);
std::map<std::string, std::string> settings;
// Parse file into key-value pairs
std::string line;
while (std::getline(file, line)) {
// Assume format: key=value
auto pos = line.find('=');
if (pos != std::string::npos) {
std::string key = line.substr(0, pos);
std::string value = line.substr(pos + 1);
settings[key] = value;
}
}
// Set optional values only if present
if (settings.count("port")) {
port = std::stoi(settings["port"]);
}
if (settings.count("maxConnections")) {
maxConnections = std::stoi(settings["maxConnections"]);
}
if (settings.count("databaseUrl")) {
databaseUrl = settings["databaseUrl"];
}
if (settings.count("theme")) {
theme = settings["theme"];
}
if (settings.count("enableLogging")) {
enableLogging = (settings["enableLogging"] == "true");
}
}
// Getters with clear defaults
int getPort() const {
return port.value_or(8080);
}
int getMaxConnections() const {
return maxConnections.value_or(100);
}
std::string getDatabaseUrl() const {
return databaseUrl.value_or("localhost:5432");
}
std::string getTheme() const {
return theme.value_or("default");
}
bool isLoggingEnabled() const {
return enableLogging.value_or(false);
}
// Also provide direct access to optionals for custom handling
std::optional<int> getPortOptional() const {
return port;
}
void displayConfig() const {
std::cout << "Configuration:\n";
std::cout << " Port: ";
if (port) {
std::cout << *port << "\n";
} else {
std::cout << "not set (using default: 8080)\n";
}
std::cout << " Max Connections: ";
if (maxConnections) {
std::cout << *maxConnections << "\n";
} else {
std::cout << "not set (using default: 100)\n";
}
std::cout << " Database: " << getDatabaseUrl() << "\n";
std::cout << " Theme: " << getTheme() << "\n";
std::cout << " Logging: " << (isLoggingEnabled() ? "enabled" : "disabled") << "\n";
}
};
int main() {
AppConfig config;
config.loadFromFile("app.conf");
config.displayConfig();
// Use configuration safely
int port = config.getPort();
std::cout << "\nStarting server on port " << port << "...\n";
// Check if a specific setting was provided
auto portOpt = config.getPortOptional();
if (portOpt) {
std::cout << "Using user-configured port: " << *portOpt << "\n";
} else {
std::cout << "Using default port\n";
}
return 0;
}
Example config file (app.conf):
port=3000
databaseUrl=postgresql://localhost:5432/mydb
theme=dark
enableLogging=true
std::optional<T> Interface Summary
| Operation | Syntax | Description |
|---|---|---|
| Check if value exists | opt.has_value() | Returns true if optional contains a value, false otherwise |
if (opt) { } | Boolean context - evaluates to true if value exists | |
| Access the value | opt.value() | Returns the contained value; throws std::bad_optional_access if empty |
opt.value_or(100) | Returns the contained value, or the provided default (100) if empty | |
*opt | Dereferences to get value; undefined behavior if empty | |
opt->member | Accesses member of contained object (if value is an object type) | |
| Modify | opt = 50; | Assigns a new value to the optional |
opt = std::nullopt; | Clears the optional (makes it empty) | |
opt.reset(); | Clears the optional (makes it empty) | |
opt.emplace(args...); | Constructs a new value in-place using the provided arguments |
std::optional<int> opt = 42;
// Check if value exists
opt.has_value() // Returns true if has value
if (opt) { } // Can use in boolean context
// Access the value
opt.value() // Returns value or throws bad_optional_access
opt.value_or(100) // Returns value or 100 if empty
*opt // Returns value (undefined behavior if empty!)
opt->member // Access member if value is an object
// Modify
opt = 50; // Assign new value
opt = std::nullopt; // Clear value
opt.reset(); // Clear value
opt.emplace(args...); // Construct value in-place
Advanced: Monadic Operations (C++23)
Note: The following features require C++23 or later. If you’re using C++17 or C++20, you’ll need to stick with the basic .value(), .value_or(), and .has_value() methods.
One of the most powerful features added to std::optional in C++23 is the ability to chain operations that might fail. This is called “monadic” programming - a functional programming concept where you chain operations together, and if any step fails (returns nullopt), the entire chain short-circuits.
The Problem: Nested Checks
Without monadic operations, handling multiple optional values gets messy:
std::optional<User> findUser(int id);
std::optional<std::string> getUserEmail(const User& user);
std::optional<std::string> validateEmail(const std::string& email);
// Get and validate a user's email
std::optional<int> userId = parseUserId(input);
std::optional<std::string> validatedEmail;
if (userId) {
auto user = findUser(*userId);
if (user) {
auto email = getUserEmail(*user);
if (email) {
validatedEmail = validateEmail(*email);
}
}
}
// Deeply nested, hard to read!
.and_then(function)
Calls the function on the value if it exists, and the function itself must return an std::optional. If the original optional is empty, returns nullopt without calling the function.
Signature: std::optional<U> and_then(function<std::optional<U>(T)> f)
class UserDatabase {
public:
std::optional<User> findUser(int id) {
// Find user logic...
}
std::optional<std::string> getUserEmail(const User& user) {
if (!user.email.empty()) {
return user.email;
}
return std::nullopt;
}
std::optional<std::string> validateEmail(const std::string& email) {
if (email.find('@') != std::string::npos) {
return email; // Valid
}
return std::nullopt; // Invalid
}
};
// Clean chaining with .and_then()
std::optional<int> userId = parseUserId(input);
auto validatedEmail = userId
.and_then([&](int id) { return db.findUser(id); })
.and_then([&](const User& u) { return db.getUserEmail(u); })
.and_then([&](const std::string& e) { return db.validateEmail(e); });
if (validatedEmail) {
sendEmail(*validatedEmail);
} else {
std::cout << "Could not get valid email\n";
}
How it works:
- If
userIdis empty → entire chain returnsnullopt - If
findUserreturnsnullopt→ chain stops, returnsnullopt - If
getUserEmailreturnsnullopt→ chain stops, returnsnullopt - If
validateEmailreturnsnullopt→ final result isnullopt - Only if ALL steps succeed do you get the final value
.transform(function)
Similar to .and_then(), but the function returns a regular value (not an optional). The result is automatically wrapped in an optional.
Signature: std::optional<U> transform(function<U(T)> f)
std::optional<std::string> getConfigValue(const std::string& key);
// Convert config value to uppercase
auto upperValue = getConfigValue("theme")
.transform([](const std::string& s) {
std::string result = s;
std::transform(result.begin(), result.end(), result.begin(), ::toupper);
return result; // Regular string, not optional!
});
// If config value exists, upperValue contains uppercase version
// If config value is nullopt, upperValue is nullopt
.or_else(function)
Returns the value if it exists, otherwise calls the function to provide an alternative.
Signature: std::optional<T> or_else(function<std::optional<T>()> f)
std::optional<AppConfig> loadConfig(const std::string& filename) {
// Try to load config...
}
std::optional<AppConfig> createDefaultConfig() {
return AppConfig{}; // Return default settings
}
// Try to load config, or create default
auto config = loadConfig("app.conf")
.or_else([]() {
std::cout << "Using default config\n";
return createDefaultConfig();
});
Lets improve our Config file parser example with Validation
class ConfigValidator {
public:
std::optional<int> parsePort(const std::string& value) {
try {
int port = std::stoi(value);
if (port > 0 && port < 65536) {
return port;
}
} catch (...) {}
return std::nullopt;
}
std::optional<int> validatePort(int port) {
if (port >= 1024) { // Only non-privileged ports
return port;
}
std::cout << "Warning: Port " << port << " requires privileges\n";
return std::nullopt;
}
std::optional<std::string> formatPort(int port) {
return "Using port: " + std::to_string(port);
}
};
// Chain the operations
ConfigValidator validator;
std::string userInput = "8080";
auto result = validator.parsePort(userInput) // Parse string to int
.and_then([&](int p) {
return validator.validatePort(p); // Validate the port
})
.transform([](int p) {
return "Using port: " + std::to_string(p); // Format message
})
.or_else([]() {
return std::optional<std::string>("Using default port: 8080");
});
std::cout << result.value() << "\n";
Comparison: Without vs With Monadic Operations
Without (nested ifs):
std::optional<std::string> result;
auto port = validator.parsePort(userInput);
if (port) {
auto validated = validator.validatePort(*port);
if (validated) {
result = "Using port: " + std::to_string(*validated);
} else {
result = "Using default port: 8080";
}
} else {
result = "Using default port: 8080";
}
With (clean chain):
auto result = validator.parsePort(userInput)
.and_then([&](int p) { return validator.validatePort(p); })
.transform([](int p) { return "Using port: " + std::to_string(p); })
.or_else([]() { return std::optional<std::string>("Using default port: 8080"); });
When to Use Monadic Operations
Use when:
- You have multiple operations that might fail
- Each operation depends on the previous one
- You want to avoid nested if statements
- You’re comfortable with functional programming style
Avoid when:
- You need detailed error messages for each failure point
- The chain is very long and hard to read
- You’re working with teammates unfamiliar with functional programming
- Simple if-statements would be clearer
Why std::optional<T&> Is Not Supported
You might wonder: “Can I have an optional reference?” The answer is no - std::optional<T&> is not allowed in C++.
// This does NOT compile!
std::optional<int&> optRef; // ERROR!
The Fundamental Problem
A reference in C++ must always refer to a valid object. It cannot be “empty” or “null” - that’s a core guarantee of references:
int x = 10;
int& ref = x; // ref MUST point to a valid int
// There's no way to have ref point to "nothing"
But std::optional<T> is all about representing “something or nothing.” These two concepts are incompatible:
- Reference: Must always be valid
- Optional: Might be empty (nothing)
What Happens If We Try?
If std::optional<int&> existed, what would std::nullopt mean?
std::optional<int&> opt = std::nullopt; // What does this mean?
// A reference to nothing? That violates the definition of a reference!
When you access an empty optional, you get nothing. But a reference can’t be “nothing” - it must point to something valid. This creates a logical contradiction.
The Workaround: Use Pointers
If you need optional semantics with references, use a pointer instead:
int* optPtr = nullptr; // Can be null!
int x = 10;
optPtr = &x; // Now points to x
if (optPtr) {
std::cout << *optPtr << "\n"; // Dereference to use
}
Or wrap the pointer in an optional:
std::optional<int*> opt = nullptr; // Empty
int x = 10;
opt = &x; // Now contains pointer to x
if (opt && *opt) { // Check optional exists AND pointer is not null
std::cout << **opt << "\n";
}
Alternative: std::reference_wrapper
C++ provides std::reference_wrapper<T> which acts like a reference but can be reassigned and stored in containers:
#include <functional>
int x = 10;
int y = 20;
std::optional<std::reference_wrapper<int>> opt;
opt = std::ref(x); // Now refers to x
if (opt) {
opt->get() = 15; // Modify x through the reference
std::cout << x << "\n"; // Prints 15
}
opt = std::ref(y); // Can be reassigned to refer to y!
This is the closest you can get to std::optional<T&>, but it’s more verbose.
Summary: References vs Optionals
| Feature | Reference (T&) | Optional (std::optional<T>) |
|---|---|---|
| Can be empty? | No | Yes |
| Can be reassigned? | No | Yes |
| Must be initialized? | Yes | No |
| Can represent “nothing”? | No | Yes |
Why no std::optional<T&>? Because references and optionals have fundamentally incompatible semantics. References must always be valid; optionals can be empty.
When to Use std::optional
Good Use Cases
- Configuration settings that might not be present
- Function return values that might fail (search, parse, lookup)
- Class members that might not be initialized
- Optional function parameters (as members, not parameters directly)
- Eliminating magic values and sentinel values
When NOT to Use
- Values that will always exist (just use the type directly)
- When performance is absolutely critical (has small overhead)
- As function parameters (use pointers or references instead)
- When a simple boolean flag would be clearer
Benefits of std::optional
- Type safety: Compiler forces you to handle the “no value” case
- Self-documenting: Function signature clearly shows a value might not exist
- No magic values: No confusion about what
-1,"", or0means - Explicit intent: Code clearly shows when values are truly optional
- Prevents bugs: Can’t accidentally use a value that doesn’t exist (if you check properly)
Key Takeaway
“Well typed programs cannot go wrong.” — Robin Milner
std::optional makes your code honest. Instead of using confusing magic values or returning potentially invalid data, you explicitly declare when a value might not exist. This forces you (and anyone using your code) to handle both cases properly, preventing an entire class of bugs.
Quick Reference Card
#include <optional>
// Create
std::optional<int> opt; // Empty
std::optional<int> opt = 42; // Has value
std::optional<int> opt = std::nullopt; // Empty
// Check
if (opt) { } // True if has value
if (opt.has_value()) { } // Same thing
// Get value
int x = opt.value(); // Throws if empty
int y = opt.value_or(0); // Safe: returns 0 if empty
int z = *opt; // Unsafe: undefined if empty
// Set/Clear
opt = 100; // Set value
opt = std::nullopt; // Clear
opt.reset(); // Clear